Fig. 14.1
Incision sites for various surgical approaches to the sacroiliac joint (used with permission from Borgess Health)
Knowing which tissues were interrupted, and in some approaches reapproximated, is essential to avoid unnecessary complications. The instrumentation used to fixate the SIJ and adjacent structures involved will affect the rehabilitation protocol. The graft material placed within the joint and any intra-articular hardware used to fuse it might also require different precautions.
Most postsurgical SIJ fusion patients will fall into one of three categories. The first category involves patients that have minimal restrictions at their initial 1–6-week post-op physical therapy visit (Table 14.1). Often, these patients have undergone a posterior midline or posterior lateral approach with minimal tissue disruption. Weight bearing is full and restrictions are minimal. The second category involves patients that have the same restrictions as the first category plus weight-bearing limitations. These patients have often undergone a direct lateral approach. Weight bearing is limited to toe touch only. The toe is allowed to touch the ground in order to unload the SIJ and surrounding soft tissue, but minimal force is transferred through the limb. The third group involves patients who have undergone a concurrent lumbosacral fusion. In these instances, the postsurgical lumbosacral fusion protocol is defaulted to.
Table 14.1
Surgical approaches to the sacroiliac joint and associated precautionsa
Approach | Restrictions | Brace/assistive device | Initiate PT |
|---|---|---|---|
Posterior midline | No bending, lifting (>10 lbs), twisting for 12 weeks Full WB | Pelvic belt for 6–12 weeks Walker/no pelvic belt (obese pts) | 6 Weeks post-op |
Lateral (minimally invasive) | No bending, lifting (>10 lbs), twisting for 12 weeks Toe-touch WB for 3–6 weeks | Pelvic belt for 6–12 weeks Crutches/walker for 3–6 weeks | 6 Weeks post-op |
Posterior lateral (minimally invasive) | No bending, lifting (>10 lbs), twisting for 12 weeks Full WB | Pelvic belt for 6–12 weeks Walker/no pelvic belt (obese pts) | 1–2 Weeks post-op |
Posterior lateral (open) | Toe-touch WB for 6–8 weeks | Crutches for 6–8 weeks | 6–8 Weeks post-op |
Posterior inferior | WB as tolerated | Crutches/walker for 3–6 weeks | 6 Weeks post-op |
Concurrent lumbosacral fusion | No bending, lifting (>10 lbs), twisting for 12 weeks | TLSO (pantaloon attachment) | 6–10 Weeks post-op |
Many surgeons performing SIJ fusions have specific rehabilitation protocols, while others do not. Contacting the referring surgeon to assure proper adherence to all precautions is important throughout the rehabilitation process. Failure to do so may result in negative consequences and poor outcomes.
While the SIJ and lumbar spine are close in proximity, rehabilitation following surgical fusion is different for each. The lumbar spine has many direct muscle attachments and can be stabilized via interventions aimed at these muscles. The sacrum has less direct muscular attachments and joint support, which requires interventions directed at adjacent structures both cephalad and caudal to the SIJ. Structural and force symmetry are also more of an issue with unilateral SIJ fusions compared to fusions of the lumbar spine.
The following rehabilitation guidelines (Table 14.2) are meant to be used in conjunction with sound clinical judgment. Some patients may be progressed faster or slower at the discretion of the referring surgeon. Specific exercises, volumes, and intensities will not be presented in detail. All patients are unique. Patient-specific interventions and education based on patient goals, current evidence, and clinician experience are the essential components to successfully rehabilitate a postsurgical SIJ fusion.
Table 14.2
Rehabilitation guidelines for postsurgical sacroiliac joint fusions
Phase | Time frame post-op | PT goals | Sample interventions |
|---|---|---|---|
1 | Weeks 1–5 | Patient education Pain control Bracing/assistive device training Proper body mechanics with ADLs Gait training | Cryotherapy Pelvic belt instruction Walker/crutches instruction (WB restrictions) Transfers, sleeping/sitting position instruction Stair training Aquatic therapy |
2 | Weeks 6–11 | Patient education Pain control Promote tissue remodeling Correct tissue dysfunction Initiate stabilization exercises Gait training Improve mobility/activity level HEP | Cryotherapy, TENS Scar mobilization Soft tissue techniques Hip ERs, HS, hip flexor stretches Eliminate compensatory patterns of muscles Gentle hip, facet mobilizations Draw-in maneuver, table-top exercises Kegel exercises Postural training Light cardiovascular exercise (walking) Gait mechanics correction Aquatic therapy |
3 | Weeks 12–19 | Patient education Promote tissue remodeling Correct tissue dysfunction Progress stabilization exercises Initiate resistance exercises Increase activity level HEP Return to work | Stretches to maintain flexibility Gluteal, hip ERs, HS strengthening Dynamic stabilization (Swiss ball, unstable surfaces) Single-leg stance exercises (bird dip, balance reach) Compound exercises (multi-planar) Cardiovascular exercise (recumbent bike) Workstation ergonomic evaluation |
4 | Weeks 20+ | Prior level of function Sport-specific training HEP | Dynamic stabilization Return to gym Running Agility exercises |
Phase 1, Weeks 1–5
Following SIJ surgery, the patient may remain in the hospital for up to several days. If iliac bone was harvested, a drain may be placed but will usually be removed within 24 h. The goals of physical therapy are pain control, to monitor the surgical site looking for signs and symptoms of possible infection, and patient education on activities of daily living (ADL), mobility, and precautions. Modalities, such as cryotherapy, may be used to control pain at the surgical site and surrounding tissues. Redness, swelling, increased pain in the buttock, and fever may indicate an underlying infection. If these symptoms are observed, contact the surgeon immediately.
Education should consist of verbal descriptions, visual demonstrations, and written instructions. Each patient’s preferred learning style should be taken into consideration when educating the patient and his or her family. The patient should be instructed to avoid any bending, lifting (>10 lbs), or twisting at the waist for 12 weeks. Sleeping may be uncomfortable depending on the patient’s preferred sleeping position. If the patient prefers to sleep in side lying, a pillow can be used between the knees and thighs to minimize hip adduction and stress on the fusion site. Be sure the patient is able to recall all postsurgical precautions prior to discharge.
Some patients may be required to wear a brace or use an assistive device. Education on how to get in and out of the brace as well as when it needs to be worn is important. Improper adherence to bracing can be detrimental to the fusion process. A pelvic belt can help support the SIJ by compressing the pelvis and increasing force closure at the SIJs (Fig. 14.2).
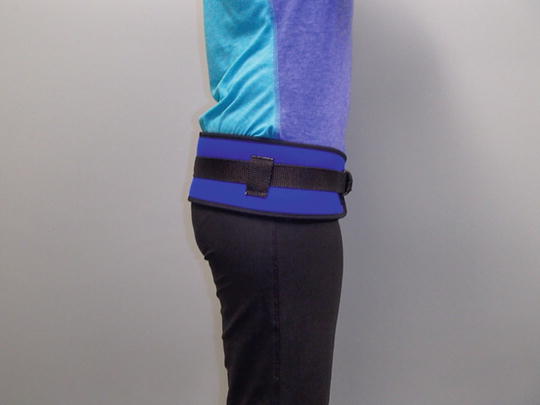
Fig. 14.2
A sacroiliac belt and proper placement just proximal to the greater trochanters
As the belt tightens, the alae of the ilium are approximated and the ventral part of the SIJ is compressed. The dorsal ligaments and fascia tighten as the posterior superior iliac spines (PSISs) try to separate and approximate the dorsal aspect of the joint (Fig. 14.3).
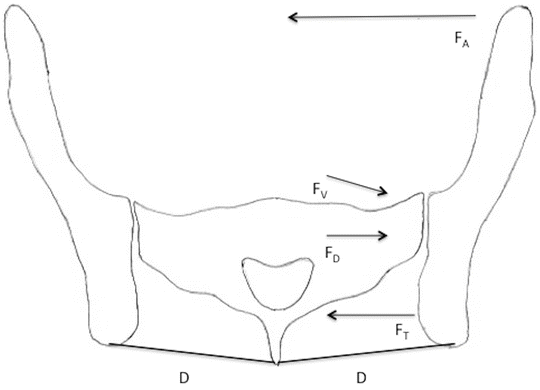
Fig. 14.3
Force closure of the sacroiliac joint. The deep abdominals contract and pull the ilia medially, which compresses the ventral aspect of the sacroiliac joint. This tensions the dorsal ligaments, which compresses the dorsal aspect of the sacroiliac joint. D = dorsal sacroiliac ligaments, FA = force of the contracting deep abdominals (or pelvic belt), FD = force compressing the dorsal joint, FT = force of the tensioned dorsal ligaments, FV = force compressing the ventral joint
It is recommended that the belt be worn just proximal to the greater trochanter with a tension force of 50 N or about 11.0 lbs [1, 2]. The pelvic belt should be worn when the patient is upright for 6–12 weeks until referral to physical therapy and the initiation of core stabilization can begin. A pelvic belt will be ineffective in obese patients secondary to excessive adipose tissue around the midsection, so these patients are encouraged to use a walker for all ambulation for up to 12 weeks.
Assistive devices may also be required secondary to weight-bearing restrictions or due to the acute side effects of medication used during and/or after surgery. After SIJ fusions using a direct lateral approach, toe-touch weight bearing is required and the patient will use crutches or a walker for 3–6 weeks. Using proper technique with all assistive devices is imperative for safety, surgical site protection, and energy conservation.
Related posts:


Stay updated, free articles. Join our Telegram channel

Full access? Get Clinical Tree


