Posterior Medial Release for Clubfoot
Todd A. Milbrandt
Vishwas R. Talwalkar
INTRODUCTION
It has been nearly 15 years since the Ponseti revolution overtook the treatment of clubfoot. His nonoperative technique of manipulation and casting followed by Achilles tenotomy is successful in greater than 90% of the cases leaving a functional and supple foot. While there is a significant relapse of the clubfoot with this treatment, an “a la carte” approach is now the norm to address recurrence that may include recasting, repeat Achilles tenotomy, tibialis anterior tendon transfer, cuboid osteotomy, or a combination of procedures. This tectonic shift in practice transformed the comprehensive posterior medial release from being one of the most frequently performed procedures in most pediatric orthopedic centers to one of the least.
Unfortunately, the children who are now candidates for this procedure frequently have undergone multiple attempts at correction that may distort anatomy or commonly have a diagnosis that makes the clubfoot recalcitrant (spina bifida, arthrogryposis, polio, spinal cord abnormalities, cerebral palsy, or muscular dystrophy). These issues combined with the relative rarity of these cases can increase the anxiety of the treating surgeon. This technique guide is our road map to make this complicated procedure manageable.
INDICATIONS
Failed Ponseti casting/manipulative techniques
Failed multiple rounds of casting and bracing
Diagnosis resistant to casting (myelomeningocele, arthrogryposis)
Skin breakdown
Family unable to obtain bracing
Foot resistant
Social situation not compatible with bracing
Foot position fixed in
Equinus
Varus
Adductus
Cavus
Child’s gait (Video 24-1, Pre-op):
Lateral weight bearing
Forefoot strike
No heel strike
CONTRAINDICATIONS
Unhealthy posterior and medial skin from either diagnosis or previous surgery
Tenuous vascular status
Previous posterior medial release (relative contraindication)
Consider correction through the bone and slow correction with external fixation
PREOPERATIVE PLANNING
Preoperative imaging
Radiography not helpful
Consider pre-op video versus pedobarography for documentation of gait and plantar pressures
MRI or CT not indicated
Discuss pain control with anesthesia
Single-shot caudal block
Epidural catheter with infusion
Regional block with ultrasound injection
Positioning of patient
Bilateral feet
Prone position can achieve excellent visualization posteriorly
Medial-sided visualization not as good but still acceptable
Unilateral foot:
Lateral decubitus position that is not fixed using beanbag
Gently roll the patient more supine for medial side visualization
Gently roll the patient more prone for posterior visualization
Also called “lazy lateral” position
Prone position may also be useful for unilateral procedure
Tourniquet
Using nonsterile tourniquet protects the surgical field from any intrusion or drift if patient is large enough.
Sterile tourniquet can allow for complete removal so that vascular status can be completely evaluated, also better for small patient.
Imaging
Utilizing fluoroscopy to access location can assist in intraoperative understanding of anatomy.
Prefer mini-C-arm for the excellent visualization but less radiation dose.
SURGICAL PROCEDURE
Anesthesia induction with endotracheal tube not LMA
Allows for some patient manipulation during case
Surgical pause
Patient identification
Procedure confirmation
Correct limb confirmation
Antibiotic infusion
Designation of fire hazard and wound type
Positioning as discussed above
Prone for unilateral or bilateral cases
“Lazy lateral” for unilateral cases
Surgical preparation and draping
Bilateral cases: bilateral extremity drape
Unilateral cases: single extremity drape
Strip of adhesive sterile barrier around edges of drape
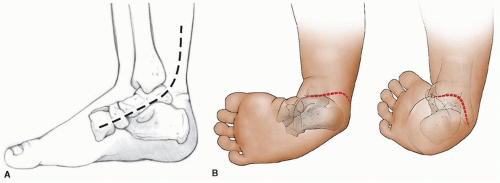
Mark incision with pen (Fig. 24-1)
Mark prior to inflation of tourniquet.
Cincinnati incision is a workhorse (allows extensive exposure medially and laterally).
Start laterally at a point 3 mm distal to lateral malleolus (can be extended if need for additional lateral procedure).
Curve posterior to a point over the Achilles tendon that is 2 cm superior to the top edge of the calcaneus.
This needs to be centered at where you think the tibiotalar joint is located.
The marking then sweeps medially toward a point 5 mm distal to medial malleolus.
This continues distally past the navicular in line with the first ray.
Mark three to four vertical lines to mark for closure.
This is especially critical at the apex of the incision at the Achilles tendon.
Use Esmarch to exsanguinate the leg and inflate tourniquet.
Incision is made from the lateral malleolus to the medial malleolus area, extending it medially and laterally as necessary to achieve visualization.
Take caution when making incision over the Achilles tendon not to cut too deeply and inadvertently cut the tendon as it sits superficial.
A modified Turco incision may be useful in situations where a return to the OR for manipulation may not be feasible, such as in the developing world during mission work or if the child has significant medical comorbidities.
This incision can almost always be closed with the foot in a corrected position but makes the posterolateral portion of the release slightly more difficult to visualize.
Achilles tendon lengthening
The Achilles tendon is identified.
The paratenon is then dissected and the tendon is released 360 degrees.
One key is to use a mosquito clamp or small right angle anterior to the tendon and spread, freeing it from the soft tissues.
If previous percutaneous or open Achilles tendon lengthening has occurred, then the surgeon must work to free the tendon from the adhesions from the skin and deeper soft tissues.
Once exposed proximally to the myotendinous junction and distally to the insertion (an area of roughly 5 cm in length), then the lengthening can occur in a Z pattern.
The distal cut exits the tendon medially and the proximal cut exits laterally.
The Achilles tendon can then be sewn to the posterior skin at the calcaneus to add as a retractor of the skin and Achilles tendon itself for the remainder of the procedure.
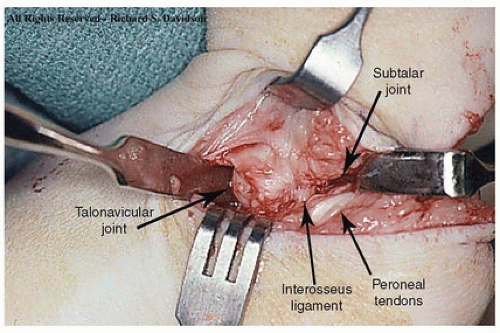
Lateral dissection (Fig. 24-2):
Soft-tissue dissection is made laterally using tenotomy scissors to identify and isolate the sural nerve with a vessel loop.
The nerve usually travels with the lesser saphenous vein.
The peroneal sheath is then identified and opened from proximal to distal exposing the tendons.
This sheath is further opened distally to the tip of the fibula.
Care must be taken not to extend this further anteriorly.
If the sheath is opened past the lateral malleolus, then peroneal tendon subluxation can occur.
The posterior talofibular ligament and calcaneofibular ligament must then be incised as the peroneal tendons are retracted laterally.
This is the “floor” of the peroneal sheath between the fibula and the posterior talus.
This is a key maneuver to allow for correction of varus and dorsiflexion of the foot.
A right angle passed just distal to the tip of the fibula directed medially will allow access to the subtalar joint.

Stay updated, free articles. Join our Telegram channel

Full access? Get Clinical Tree


