Lower-Extremity Surgery in Children with Cerebral Palsy
Robert M. Kay
Cerebral palsy (CP) is the most common motor disability in childhood and occurs in approximately 1 in 300 to 500 children. This rate has not changed significantly despite medical advances of the past several decades. Since children with CP frequently have soft-tissue contractures, bony deformity, and limited mobility, the initial diagnosis of CP is often made by the orthopedist.
Children with CP often have associated medical problems, including CNS maladies (seizures), pulmonary complications (including bronchopulmonary dysplasia, chronic pulmonary insufficiency, and frequent pneumonias), gastrointestinal problems (including gastroesophageal reflux, malabsorption, and ulcers), aspiration, and genitourinary problems (including incontinence and infection).
PATHOLOGY
CP is a static encephalopathy due to hypoxic or anoxic brain injury that may occur prior to, during, or following birth, and results in permanent damage to the brain, including the motor cortex. Though the brain injury is static, the peripheral manifestations (soft tissue and bone) often progress with time. Though many children with CP have spasticity and hyperreflexia in the affected extremities, some have low tone or mixed tone. Many children with CP have dystonia, especially as they reach adolescence.
PRESENTATION
Common reasons for orthopedic referral in children with CP include limping, leg-length discrepancy, foot problems, toe walking, tight muscles, and/or poor use of the hands.
The diagnosis of CP is often easily made after an appropriate birth, and developmental history has been obtained, prior to examination of the child. Such a history should include problems during the pregnancy and/or delivery, possible hypoxic events, duration of hospitalization, timing of developmental milestones, and a description of when the parents noticed a problem and what they noticed.
On average, children sit at 6 months, stand at 8 months, and walk at 12 months. If a child does not reach these milestones by 1.5 times these ages (i.e., sit by 9 months, stand by 12 months, and walk by 18 months), an investigation into the developmental delay is warranted. In addition, unilateral hand dominance (“handedness”) before 1 year old is pathologic, and often indicative of hemiplegia.
Physical examination should include range of motion, muscle tone, selective motor control, and upper- and lower-extremity reflexes. Typically, tone and reflexes are increased in the affected extremities, whereas selective motor control is decreased.
THE DECISION FOR SURGERY
Many children with spastic CP ultimately benefit from surgical intervention. However, the results of surgery are less reproducible in children with movement disorders.
The most common goals for orthopedic surgery in children with CP are to improve function and prevent deformity and/or pain. Most children who undergo hip reconstruction are GMFCS IV and V children, and common goals are to prevent or treat dislocation and potential pain.
In children who require surgery to address gait abnormalities that are interfering with function, I typically like to have the following three criteria fulfilled before performing surgery:
Age 6 to 10 years.
Nonsurgical interventions will no longer suffice to address the gait disturbances.
The child has failed to make significant functional progress over the preceding 6 months (i.e., the child has plateaued).
It is imperative to understand that the different levels of the lower extremities are interconnected and that a deviation at one level (and one plane) impacts the alignment and function at other levels (and other planes). A classic example is the child in marked equinus with unrecognized hamstring tightness who undergoes isolated heel-cord lengthening and ends up in significant crouch.
PREOPERATIVE PLANNING
Gait deviations are often complex in children with CP and a thorough preoperative evaluation of both gait and static measurements is requisite to maximize treatment outcomes. Three-dimensional computerized motion analysis, when available, provides objective information regarding dynamic joint deviations in multiple joints simultaneously and often impacts surgical decision making and outcomes (1, 2, 3, 4). Previous authors have demonstrated poor correlation of static and dynamic gait measures in children with CP (5). Recent authors have reported that preoperative gait analysis decreased the 5-year rate of reoperation in children with CP from 40% to 20% (4).
Single-event multilevel surgery (SEMLS) allows simultaneous correction of multiple deformities. This results in optimal alignment of the lower extremities, while limiting the child to a single recuperative period. Optimal biomechanical alignment is critical in these children with limited balance, strength, and coordination. A comprehensive surgical plan typically includes a combination of bone and soft-tissue procedures.
SOFT-TISSUE SURGERY
Hip
Hip Adductor Lengthening Hip adductor tightness is common in both ambulatory and nonambulatory children with CP. During gait, children with adductor tightness often strike their knees against one another, or their legs may actually cross (scissor) during gait.
INDICATIONS/CONTRAINDICATIONS When available, computerized motion analysis aids in the preoperative assessment of ambulatory children. Studies have demonstrated poor correlation between static and dynamic measures in children with CP (5). Visually, excessive femoral
anteversion, especially when combined with excessive knee flexion, may be confused with hip adduction deformity. Gait analysis can help determine whether there is true hip adduction during gait.
anteversion, especially when combined with excessive knee flexion, may be confused with hip adduction deformity. Gait analysis can help determine whether there is true hip adduction during gait.
The indication for hip adductor lengthening is the presence of dynamic hip adduction in combination with static tightness of the hip adductors. In general, adductor lengthenings are indicated when children have 20 degrees or less of hip abduction with the hip extended.
SURGICAL PROCEDURE Hip adductor lengthening may be performed either open or percutaneously. Over the last several years, I have migrated toward doing the vast majority of these lengthenings percutaneously. The percutaneous technique is probably most safely performed after one has gained significant experience with open techniques and is comfortable with the local anatomy.
PERCUTANEOUS LENGTHENING The hip is flexed to 90 degrees and maximally abducted. The adductor longus becomes very prominent and separated from the underlying adductors. At the level of the proximal groin crease, a no. 15 blade is oriented parallel to the floor, aimed directly cephalad, and is placed on the skin immediately anterior to the adductor longus tendon. The skin is not cut at this time, but the blade is used to “drag” the skin from in front of the longus tendon until the blade is immediately posterior to the tendon. The blade is inserted in this direction (parallel to the floor and directly cephalad) until the cutting portion of the blade is completely under the skin. With the assistant maintaining the hip in 90 degrees of flexion and maximal abduction, the blade is turned 90 degrees (until the cutting edge is anterior), the blade is gently swept anteriorly while the surgeon uses a finger or the thumb from the nondominant hand to push the tendon against the blade to facilitate the tenotomy (Fig. 14-1A).
The gracilis, when tight, is lengthened percutaneously through the same incision (Fig. 14-1B). With the hip in extension and maximal adduction, the gracilis tightens and is quite prominent if lengthening is required. To lengthen the gracilis, with the assistant holding the hip extended and abducted, the no. 15 blade is inserted through the percutaneous incision but is now directed perpendicular to the floor immediately deep (lateral) to the now-prominent gracilis. The blade is turned
90 degrees (until it is directed medially), and the blade is pushed medially while the surgeon’s finger or nondominant thumb pushes the gracilis against the blade to complete the lengthening.
90 degrees (until it is directed medially), and the blade is pushed medially while the surgeon’s finger or nondominant thumb pushes the gracilis against the blade to complete the lengthening.
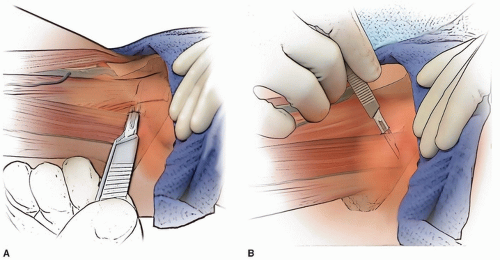 FIGURE 14-1 Percutaneous hip adductor lengthening. A. With the hip in 90 degrees of flexion and maximal abduction, the adductor longus is lengthened. The blade is inserted parallel to the floor and just posterior to the adductor longus and turned 90 degrees anteriorly, and the tendon is cut. The surgeon uses a finger, or the thumb from the nondominant hand is used to facilitate the cut. B. The gracilis is lengthened through the same percutaneous incision if it is also tight. To put the gracilis under tension, the hip is maximally abducted while the ipsilateral knee is maximally extended. The blade is inserted just lateral (deep) to the gracilis (and superficial to the adductor brevis) and turned 90 degrees medially in order to cut the gracilis while the surgeon’s nondominant hand is used, as above, to facilitate this. |
A single, simple stitch using an absorbable 3-0 suture is used for closure.
OPEN LENGTHENING A 3- to 4-cm transverse incision is made in the proximal groin crease. Tenotomy scissors are used to incise the fascia in line with the skin incision. The adductor longus (the tightest tendon, which is palpable anteriorly) is identified and isolated from surrounding tissue with a clamp and/or finger. A right-angle clamp is placed around the adductor longus and slid as far proximally as possible. Electrocautery is used to transect the musculotendinous unit (Fig. 14-2A).
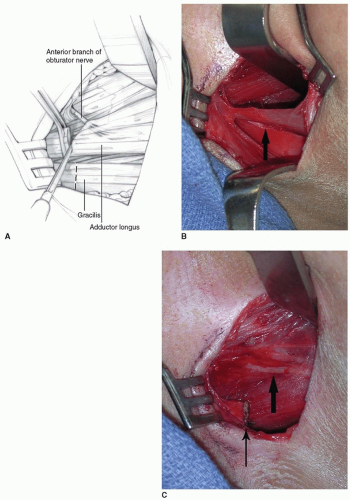 FIGURE 14-2 Open hip adductor lengthening. A. The adductor longus is first isolated and transected. Next, the gracilis is isolated and transected. The anterior branch of the obturator must be preserved. B. Isolation of the gracilis during hip adductor lengthening. The arrow points to the gracilis. The gracilis is brought under tension by a combination of hip abduction and knee extension. C. Branches of the anterior obturator nerve as they run across the adductor brevis. These branches should be preserved in order to preserve adductor strength and prevent excessive hip abduction postoperatively. The small arrow points to the transected gracilis muscle and the large arrow to anterior branches of the obturator nerve. |
The gracilis is then identified and isolated (as above) by abducting the hip and extending the knee (Fig. 14-2B). Electrocautery is used to transect the muscle as proximal as possible.
Further adductor lengthening is rarely needed after the adductor longus and gracilis are addressed. If further lengthening is needed (usually if hip abduction is less than 45 degrees in extension after the aforementioned lengthenings), then a portion of the adductor brevis is transected until 45 degrees of abduction in extension is possible. The anterior branches of the obturator nerve are protected during the lengthening (Fig. 14-2C). Although these wounds rarely become infected, closure with surgical glue may provide some protection from soiling.
POSTOPERATIVE MANAGEMENT After hip adductor lengthening surgery, the child is typically placed in an abduction pillow. The pillow is used 16 to 18 hours per day for 2 to 3 weeks (followed by a nighttime regimen for at least 6 to 12 months post-op to minimize recurrence). Weight bearing is allowed immediately if only soft-tissue surgeries are performed concomitantly.
Physical therapy, focusing on range of motion, gait, and strengthening, is begun 2 to 3 weeks after isolated soft-tissue procedures, though the child and family are to work on standing and walking at home within the first few days of such surgery.
COMPLICATIONS TO AVOID Acute complications (including neurovascular damage) following adductor lengthening are unusual. However, obturator neurectomy and/or excessive lengthening of the adductors can result in excessive weakness of the adductors, with resultant hip abduction and pelvic instability during standing and gait. Recurrent deformity is seen with some regularity, though the frequency and severity can be minimized by use of a hip abduction pillow for at least 6 to 12 months post-op.
PEARLS AND PITFALLS
Percutaneous lengthening is a valuable technique, but probably best reserved for those with significant experience with open adductor lengthening.
Obturator neurectomies should not be performed because of the frequent occurrence of overcorrection and fixed abduction following such surgery.
Excessive hip adductor lengthening must be avoided due to the same risk, fixed hip abduction.
Make sure to differentiate between apparent excessive hip adduction (as may be seen with femoral anteversion and knee flexion) and true hip adduction.
Psoas Recession
INDICATIONS/CONTRAINDICATIONS Psoas tightness typically results in the inability to get the affected limb into a trailing position. A recent report, however, shows that approximately half of children with CP measured to have hip flexion contractures ≥10 degrees do not walk with excessive hip flexion as measured on computerized gait analysis (CGA) (6). Further, many people who walk with excessive hip flexion do so due to “downstream” issues at the level of the knee and or ankle, such as excessive ankle dorsiflexion and/or excessive knee flexion, even in the absence of a true hip flexion contracture. Finally, since there is a tendency to overestimate the presence of excessive hip flexion with visual observation of gait, preoperative CGA is very helpful in this patient population (7).
The main indication for psoas recession is excessive hip flexion in terminal stance in patients with at least a 10-degree flexion contracture on static examination.
SURGICAL PROCEDURE Hip flexor power is best preserved when the psoas is lengthened fractionally rather than via a simple tenotomy. Such a recession is performed well proximal to the musculotendinous junction by cutting the tendon and leaving the adjacent muscle intact.
Before cutting the psoas tendon, it is important to be certain that this is the psoas and not the adjacent neurovascular structures. Skaggs et al. (8) described three tests that should be performed before cutting the tendon: (a) identifying muscle fibers leading into the tendon, (b) noting that the musculotendinous unit tightens with internal rotation of the hip, and (c) checking that the leg does not “jump” with a brief stimulation of the “tendon” via electrocautery.
This surgery is usually described as being performed through a separate 5-cm anterior bikini incision, using a standard anterior approach to the hip. The tensor-sartorius interval is identified as the soft spot just distal to the anterior superior iliac spine (ASIS). Tenotomy scissors or a small hemo-stat is used to pierce the deep fascia and open the interval. A strip of fat should be seen between the tensor fascia lata and sartorius. The lateral femoral cutaneous nerve is identified in this interval and protected. The rectus femoris is deep in this interval (just anterior to the hip capsule). Dissection is carried out medial to this, and the pelvic brim can be palpated. The hip is flexed to relax the psoas, and a right-angle retractor, such as a Sofield retractor, is used to retract the psoas while exposing the
tendon on its undersurface (Fig. 14-3A). The three tests described by Skaggs et al. (8) are checked prior to transecting the tendinous portion of the psoas. A fractional lengthening is performed by cutting the tendon well proximal to the musculotendinous junction, thereby preserving hip flexor strength (Fig. 14-3B).
tendon on its undersurface (Fig. 14-3A). The three tests described by Skaggs et al. (8) are checked prior to transecting the tendinous portion of the psoas. A fractional lengthening is performed by cutting the tendon well proximal to the musculotendinous junction, thereby preserving hip flexor strength (Fig. 14-3B).
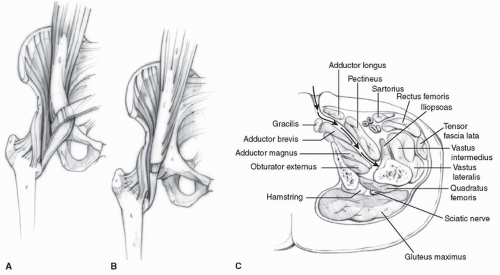 FIGURE 14-3 A. A right-angle retractor is placed around the psoas to rotate the muscle and expose the tendon on its undersurface. B. After recession, the cut ends of the tendon separate, revealing underlying muscle. There is continuity of the musculotendinous unit. C. If the psoas recession is to be performed through the adductor lengthening incision, the plane of dissection is posterior to the pectineus. Once the iliopsoas tendon is identified, it is traced as far proximal as possible (adjacent to the pelvic brim), and a recession is performed, as illustrated in (A) and (B). |
In children undergoing simultaneous open hip adductor tendon lengthening, the incision used for the adductor lengthening can also be used for psoas lengthening. By dissecting posterior to the pectineus, the psoas tendon can be easily palpated (Fig. 14-3C). Dissecting scissors are used to incise the sheath around the psoas, and the musculotendinous unit is identified. The psoas is traced as proximal as possible (typically close to where it exits the pelvis). A right-angle retractor (preferably a Sofield retractor) is placed around the psoas in order to expose the tendon. (As noted above, the tendon lies on the underside of the muscle.) The three confirmatory tests noted above for confirming are performed, and the fractional lengthening is completed as above.
POSTOPERATIVE MANAGEMENT Psoas recessions are almost always combined with other lower-extremity surgeries. Regardless of the other procedures performed, following psoas recession, the child is placed into a prone position for a total of 6 hours daily (three 2-hour sessions), beginning on postoperative day 1. The child is allowed to weight bear and ambulate as tolerated immediately postoperatively if these activities are not contraindicated by the other procedures.
COMPLICATIONS TO AVOID Damage to the femoral neurovascular structures is a rare, though potentially devastating, complication of hip flexor lengthening. The risk is minimized by the aforementioned surgical technique.
A more common complication is hip flexor weakness. Excessive weakness is minimized by performing a fractional lengthening of the psoas rather than a psoas tenotomy.
PEARLS AND PITFALLS
The psoas musculotendinous unit will tighten with internal hip rotation. This is a useful test for differentiating the tendon from the femoral nerve intraoperatively.
Because of better preservation of hip flexor power, fractional lengthening of the psoas is preferred to psoas tenotomy.
Knee
Hamstring Lengthenings
INDICATIONS/CONTRAINDICATIONS Hamstring lengthening is typically indicated for children with excessive knee flexion in terminal swing and stance and with popliteal angles greater than 40 degrees. Some centers, in which hamstring length is calculated at the time of CGA, only perform hamstring lengthening in children with short hamstrings as determined in this way. In general, various nonoperative options will have been tried prior to surgery, such as knee immobilizers at night, a home stretching program, and/or botulinum toxin A injections into the hamstrings.
For recurrent hamstring contractures, the result of hamstring lengthening is less reliable and bone procedures should be considered (as discussed below).
SURGICAL PROCEDURE Hamstring lengthening may be done open or percutaneously, though I now most typically perform them percutaneously (unless a concomitant distal rectus femoris transfer [DRFT] is being done). Hamstring lengthenings are probably best done open until one has gained experience with the anatomy and the feel of fractional tendon lengthenings.
PERCUTANEOUS LENGTHENING The hip is flexed to 90 degrees, and the knee is extended to place tension on the hamstrings. The medial hamstrings are almost universally tighter than are the lateral hamstrings (in the absence of previous surgical medial hamstring lengthening).
In a technique analogous to the percutaneous hip adductor lengthening, a no. 15 blade is used for this lengthening. The semitendinosus is identified; it is the most superficial posteromedial structure and is tendinous in nature (Fig. 14-4A). At or just proximal to the musculotendinous junction, the no. 15 blade is inserted directly lateral and anterior to the semitendinosus with the blade directed medially and parallel to the posterior thigh. Once the blade is inserted fully, the surgeon applies gentle pressure to direct the blade posteriorly while using the fingers or thumb of the opposite hand to push the tendon against the tendon. The tendinous portion of the semitendinosus is felt to release. If the semimembranosus is also tight, then the no. 15 blade is used to perform this lengthening through the same incision. This is most easily and safely accomplished by directing the blade medially as it is advanced anteriorly, cutting the aponeurosis of the semimembranosus, while leaving the underlying muscle intact. The feel of this fractional lengthening is best learned and internalized by the surgeon by performing several open lengthenings of semimembranosus muscles (Fig. 14-4B).
For all percutaneous hamstring lengthenings, it is of paramount importance to stay superficial in the posterior thigh and not stray deep toward the neurovascular structures.
If the biceps femoris is very tight, then this will require lengthening through a separate incision. A second percutaneous incision is also made with a no. 15 blade. This incision is just on the medial border of the aponeurotic band of the biceps femoris (which should be easily palpable with the hip in flexion and the knee somewhat extended). A single-level recession is performed with the blade first directed posterolaterally and then laterally while the blade is advanced (Fig. 14-4C).
I do not recheck a popliteal angle at the time of hamstring lengthening since this appears to put undue tension on the nerve (with the potential increase in the risk of peroneal nerve palsy) (Fig. 14-5). Instead, the knee is brought into full extension with the ipsilateral hip extended. If the knee easily falls into extension following the medial hamstring lengthening, the lateral hamstrings are not lengthened.
Steri-Strips are sufficient to close these incisions without the need for suture.
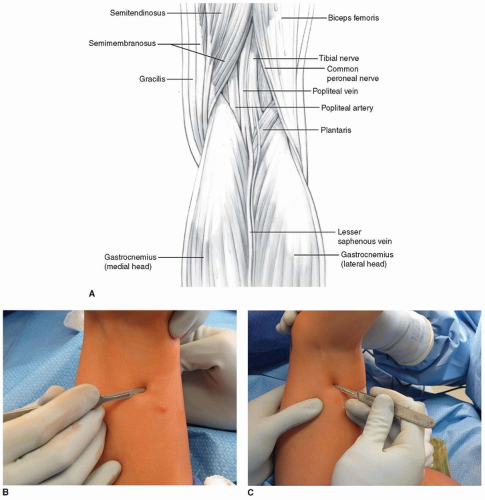 FIGURE 14-4 Percutaneous hamstring lengthening. A. Anatomy of the posterior thigh and knee. The semitendinosus is the most superficial tendon posteromedially. Since the neurovascular structures are deeper, percutaneous hamstring lengthenings are accomplished with the knife kept very superficial posteriorly. B. Percutaneous lengthening of the semitendinosus (ST). The blade is inserted parallel to the posterior thigh, just anterior to the ST tendon at, or just proximal to, the musculotendinous junction. The blade is turned posteriorly and the tendon cut. A finger or the thumb of the surgeon’s nondominant hand pushes the tendon against the tendon to facilitate lengthening. The semimembranosus is lengthened if needed. C. Percutaneous lengthening of the biceps femoris is through a separate lateral incision. The aponeurotic band of the biceps is easily palpated. The blade is inserted medial to lateral and is directed posterolaterally to cut the aponeurosis while leaving the muscle intact. (B and C courtesy of the Children’s Orthopaedic Center, Los Angeles, CA.) |
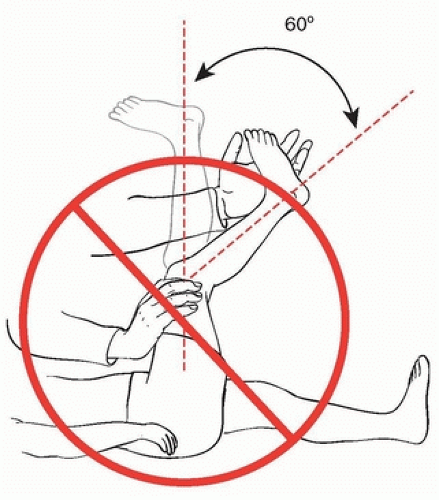 FIGURE 14-5 The popliteal angle test should not be performed intraoperatively, as this can cause undue tension on the sciatic nerve, with potential deleterious effects on the nerve (particularly the peroneal branch) postoperatively. |
OPEN LENGTHENING A single midline incision (usually 4 to 5 cm) is made at the junction of the middle and distal thirds of the posterior thigh. As above, since the medial hamstrings are generally the main culprit, they are approached first.
The dissection is carried medially, and the semitendinosus is isolated. Isolation of the semitendinosus is most easily accomplished by dissecting directly toward the tendon with tenotomy scissors or electrocautery. The deep fascia is incised with dissecting (tenotomy) scissors. Once the tendon is isolated, a right-angle clamp is placed around the semitendinosus tendon from lateral to medial to minimize the risk of neurovascular damage (Fig. 14-6A). In most cases, the semitendinosus is
transected with electrocautery at approximately the level of the musculotendinous junction. If a concomitant DRFT is to be performed, the semitendinosus is transected proximal to the musculotendinous junction to allow for sufficient length for the DRFT.
transected with electrocautery at approximately the level of the musculotendinous junction. If a concomitant DRFT is to be performed, the semitendinosus is transected proximal to the musculotendinous junction to allow for sufficient length for the DRFT.
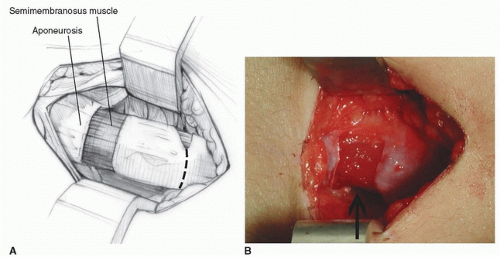 FIGURE 14-6 Open hamstring lengthening. A. Anatomy of the posterior distal thigh and knee. The semitendinosus is the most superficial medial hamstring. Because the neurovascular structures are relatively close during the surgery, the right-angle clamp should be placed from lateral to medial when isolating the semitendinosus to minimize the potential risk of neurovascular injury. These structures are at highest risk during posterior capsulotomy. B. Aponeurotic lengthening of the semimembranosus is typically performed at two levels. When the biceps femoris requires lengthening, a comparable aponeurotic lengthening is performed, also typically at two levels. |
The fascia over the semimembranosus is incised with tenotomy scissors, and the muscle is isolated. The discrete aponeurosis is then cut with a knife. A no. 15 blade provides finer control and feel than does electrocautery (Fig. 14-6B, C). The aponeurosis is cut transversely at one or two levels, with the underlying muscle left undisturbed. When two cuts are made, the proximal cut is made first so that the tissue is still on tension when the distal cut is made. It is not necessary to lengthen the gracilis; it does not appear to be a significant cause of medial hamstring tightness, and routine lengthening will cause excessive knee flexor and hip extensor weakness.
If lateral hamstring lengthening is needed, the biceps femoris can be accessed easily through the same midline incision. Dissection is aimed directly toward the tight biceps femoris with dissecting scissors or electrocautery. The fascia over the biceps is incised, and the discrete aponeurotic band, located laterally in the biceps, is identified and isolated. This band should be transected at one or two levels using a no. 15 blade (as with the semimembranosus), leaving the underlying muscle intact.
Posterior knee capsulotomy is almost never indicated in children with CP. In almost all children who are potential candidates for posterior capsulotomy, the capsule itself is not as tight as the neurovascular bundle following hamstring lengthening. For children with severe crouch and significant knee flexion contractures, bone surgery (discussed below) is typically a much better option than is capsulotomy.
POSTOPERATIVE MANAGEMENT Hamstring lengthening is often combined with other procedures. In general, a knee immobilizer can be used for at least 16 hours daily for 3 to 4 weeks following hamstring lengthening, followed by nighttime use for at least 6 to 12 months postoperatively. Unless contraindicated by other concomitant procedures, the child is allowed to stand and walk to tolerance postoperatively. Walking may be either with or without the immobilizers in place.
For children with marked crouch (usually ≥45 degrees) preoperatively, a knee-ankle-foot orthotic may be helpful to enhance gait for at least the first 3 to 6 months postoperatively.
COMPLICATIONS TO AVOID Though rarely discussed, genu recurvatum is relatively common following hamstring lengthening. The risk is significantly greater following combined medial and lateral hamstring lengthening than is that following isolated medial hamstring lengthening, and is exacerbated by ankle equinus, due to the plantarflexion-knee extension couple (9). Because of this risk of recurvatum, as well as risks of increased anterior pelvic tilt and weak hip extension, lateral hamstring lengthening should not routinely be performed.
Unfortunately, extreme recurvatum can occur after isolated medial hamstring surgeries if the medial hamstring surgery consists of a simple transection of each medial hamstring (semitendinosus, semimembranosus, and gracilis). Transection of all the medial hamstrings should never be performed in ambulatory children with CP.
Neurapraxia is well-described following hamstring lengthening surgery. The risk appears to be less if the popliteal angle is not checked intraoperatively and if an epidural catheter is not used postoperatively.
Recurrent hamstring contracture is possible as well, particularly in cases of revision hamstring lengthening (10). Postoperative casting followed by the use of knee immobilizers for at least 6 months postoperatively seems to decrease this risk.
PEARLS AND PITFALLS
Lateral hamstring lengthening is not needed in many cases. Medial hamstring lengthening suffices in most cases to allow sufficient knee extension.
Combined medial and lateral hamstring lengthening increases the risk of genu recurvatum and stiff-knee gait postoperatively.
Avoid extending the knee (to assess the hamstrings) with the hip flexed 90 degrees intraoperatively, as this stretches the peroneal nerve.
Posterior knee capsulotomy is rarely indicated in children with CP.
Bone surgery may be necessary for children with significant crouch and knee flexion contractures.
Anterior Hemiepiphysiodesis of the Distal Femur
INDICATIONS/CONTRAINDICATIONS Anterior hemiepiphysiodesis of the anterior distal femur is typically performed for children with CP who have significant crouch, knee flexion contractures of 15 to 25 degrees, and significant (preferably ≥2 years) growth remaining. Many of these children have previously undergone hamstring lengthening.
SURGICAL PROCEDURE Traditionally, these procedures have been performed using two separate plate and screw constructs. However, I have moved to using two percutaneous 4.5-mm cannulated screws in an attempt to decrease the frequency and severity of anterior knee pain after this procedure and also to decrease implant costs. This is a variant of the Metaizeau technique for complete percutaneous epiphysiodesis.
Either the medial or lateral screw can be inserted first. With the child in a supine position, the first guidewire is inserted percutaneously onto the distal femoral metaphysis. The position of the tip of the guidewire is typically in the metaphyseal flare about 2.5 cm proximal to the physis. Once the correct incision point is determined, a stab incision is made at the level at which the wire enters the skin. The guidewire is advanced distally so that it will be located in its respective condyle (medial or lateral); this often requires making a conscious effort to force the handle of the drill against the skin of the thigh. Since the screw needs to cross the physis in its anterior portion, the drill handle also needs to be aimed anteriorly. A wet sponge can be used to help direct the guidewire as it is advanced. Images are taken before crossing the physis in order to confirm the direction of advancement. Once satisfied with the position on the AP view (and before crossing the physis), a lateral view should be obtained to confirm the position in both views.
The second wire is inserted in comparable fashion. The first wire may help serve as a guide to the surgeon in the sagittal plane positioning of the second wire.
A cross-table lateral fluoroscopic view should be performed at this time to make sure that a perfect lateral x-ray shows correct positioning of the guidewires on the lateral view. Once this is confirmed, the cannulated screws are inserted in standard fashion (Fig. 14-7). It is helpful to spread down to the bone with a hemostat prior to inserting the screw to minimize the risk of soft-tissue impingement during screw insertion. Since the medial femoral condyle is typically distal to the lateral femoral condyle, the tip of the medial screw will often be located more distally than the lateral screw.
POSTOPERATIVE MANAGEMENT Postoperatively, a knee immobilizer is placed for comfort and worn for the majority of the day during the first week. The child may weight bear fully and walk as tolerated. After 1 week, the knee immobilizer is worn at night only.
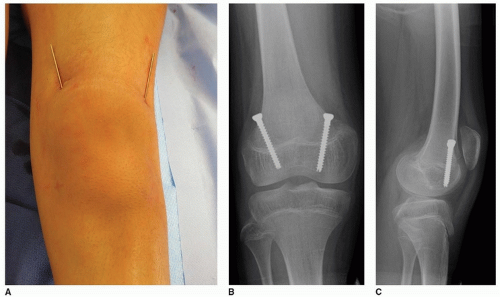 FIGURE 14-7 Technique for distal femoral anterior hemiepiphysiodesis. A. Typical appearance of guidewire positioning prior to fluoroscopic confirmation of positioning and screw placement. B, C. AP and lateral knee x-rays following correction of the knee flexion contracture deformity. The screws are located in the anterior third of the distal femur. (Images courtesy of the Children’s Orthopaedic Center, Los Angeles, CA.) |
COMPLICATIONS TO AVOID Anterior knee pain can occur but appears to be much less common and severe with two percutaneous screws than with plate and screw constructs. Prior to surgery, radiographs should be obtained to confirm that the physes appear sufficiently open to allow the procedure time to work. The highest risk for complication would appear to be the risk of not getting the screws anterior enough to allow for guided growth to occur; this necessitates obtaining a true lateral x-ray after the guidewires are placed and before the screws are inserted.
PEARLS AND PITFALLS
A wet gauze is often very helpful in directing the guidewire during insertion.
A true lateral x-ray must be obtained after the guidewires are inserted, prior to use of the cannulated drill or screws.
Distal Femoral Extension Osteotomy (with Patellar Tendon Advancement)
INDICATIONS/CONTRAINDICATIONS Distal femoral extension osteotomies (DFEOs) are typically performed in adolescents with severe crouch, knee flexion contractures ≥ 15 degrees and little or no distal femoral growth remaining (Fig. 14-8A). Many of these children have previously undergone hamstring lengthening. The vast majority of these children also have patella alta, which is concomitantly addressed at surgery.
SURGICAL PROCEDURE I prefer to make two separate incisions for this surgery, a straight lateral incision for the DFEO and a straight midline incision for the patella tendon advancement. The lateral incision is long enough to accommodate the plate to be used (either a distal femoral blade plate or a distal femoral locking plate). I do not use a tourniquet for this surgery due to its proximity to the incision.
A subvastus approach is used for the DFEO. If a distal femoral locking plate is used (my preference), the angle of the plate in the sagittal plane should be parallel to the tibia with the knee in maximal extension (Fig. 14-8B). While maintaining this plate position and angle, the screws for the distal fragment are predrilled and inserted partially. This will ensure the appropriate amount of correction and facilitate plate fixation following osteotomy.
If a unilateral DFEO is performed, then a standard triangular anterior-based closing wedge osteotomy of the distal femur is performed proximal to the cluster of screw holes in the distal fragment. The angle of the wedge is the same as the degree of preoperative knee flexion contracture so that there is optimal bone contact once the osteotomy is fixed internally. If bilateral DFEOs are performed, then a trapezoidal piece of bone (wider anteriorly than posteriorly) is removed in order to minimize tension on the posterior neurovascular structures (Fig. 14-8C). The trapezoidal cuts
are not made for unilateral osteotomies in order to minimize the risk of limb length discrepancy postoperatively. When a trapezoidal cut is made, the angle between the proximal and distal cuts should also be the same as the knee flexion contracture. After the plate is applied, the knee now should extend to neutral (Fig. 14-8D).
are not made for unilateral osteotomies in order to minimize the risk of limb length discrepancy postoperatively. When a trapezoidal cut is made, the angle between the proximal and distal cuts should also be the same as the knee flexion contracture. After the plate is applied, the knee now should extend to neutral (Fig. 14-8D).
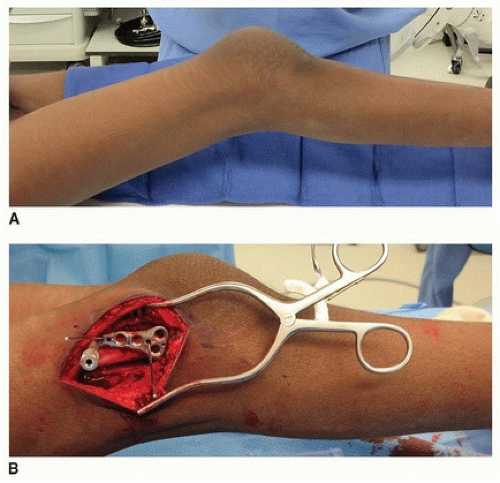 FIGURE 14-8 Distal femoral extension osteotomy (DFEO) technique. A. Preoperative knee flexion contracture in a 15-year-old male. B. Prior to predrilling the screw holes, the distal femoral plate is oriented parallel to the tibia in the sagittal plane. Once the orientation is as desired, the use of a second K-wire can maintain the alignment to facilitate screw insertion. |
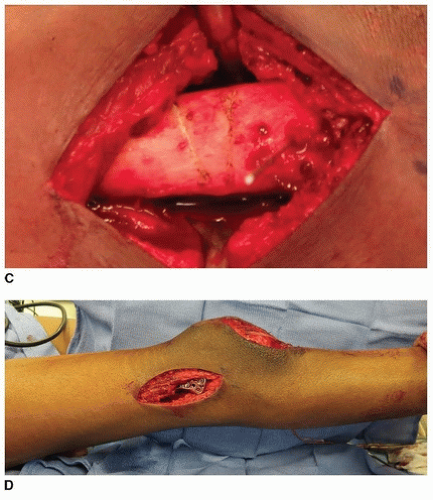 FIGURE 14-8 (Continued) C. The femur has been marked for a trapezoidal-shaped osteotomy since both knees were undergoing DFEO. D. Knee extension following DFEO fixation. (The anterior wound is for the concomitant patellar tendon advancement, PTA.) (Images courtesy of the Children’s Orthopaedic Center, Los Angeles, CA.) |
As mentioned, a separate midline incision is made to advance the patella distally. This advancement can be accomplished by moving the patellar tendon insertion (with or without a bone block) distally, though I prefer to imbricate the patella tendon. This obviates the risk of catastrophic failure of distalization of the insertion and also appears to be technically straightforward with a favorable risk/benefit profile.
The incision for patella advancement can be done prior to, or following, incision for the femoral osteotomy. However, the patella advancement should not be completed until after the femoral osteotomy is fixed, in order to allow optimal tensioning of the extensor mechanism.
The extensor mechanism is exposed from the patella to just distal to the tibial tubercle. After the femoral osteotomy is fixed, the patella is advanced and the patella tendon imbricated. To advance the patella, a transverse drill hole is placed in the midpoint of the patella and a second at the level of the tibial tubercle. A suture passer is used to pass a FiberTape (Arthrex, Inc., Naples, FL) through the drill holes and then to mobilize the patella distally. Typically, the distal pole lies just proximal to the knee joint, and the FiberTape is tied to maintain the patella at this level. The patella tendon is then folded over on itself (usually approximately 2.5 cm of overlap), and size 2-0 nonabsorbable sutures are used to imbricate the tendon in this position (Fig. 14-9A-C). The patella often sits more distal following PTA than in typically developing children (Fig. 14-10A, B).
Both wounds are closed in layers. For the anterior incision, a longer-lasting absorbable suture is used to minimize the risks of scar widening or dehiscence.
POSTOPERATIVE MANAGEMENT A knee immobilizer is used postoperatively for the first 3 to 4 weeks. Other physicians use a continuous passive motion machine, but I do not think this is requisite. Though the knees start off stiff in extension, regaining excellent flexion has not been problematic in those treated with an immobilizer postoperatively, and such immobilization would seem to decrease the risks of wound complications and fixation failure.
Weight bearing is usually started 4 weeks postoperatively and advanced to full weight bearing by 8 weeks. Range-of-motion exercises are begun by 2 weeks postoperatively.
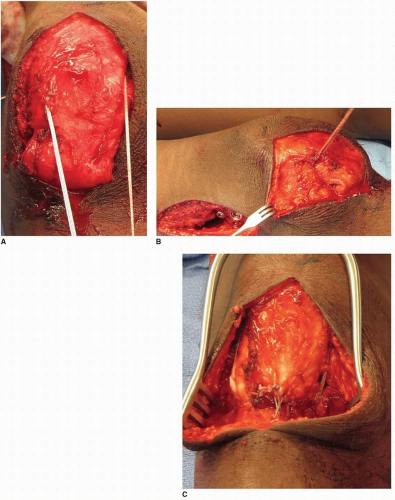 FIGURE 14-9 Patella tendon advancement (PTA). A. The significant laxity of the patellar tendon is evident in this adolescent after FiberTape is passed through the patella and pulled distally. B. After the tendon has been tensioned and the FiberTape tied, there is significant redundancy of patella tendon. C. Following completion of repair. (Images courtesy of the Children’s Orthopaedic Center, Los Angeles, CA.) |
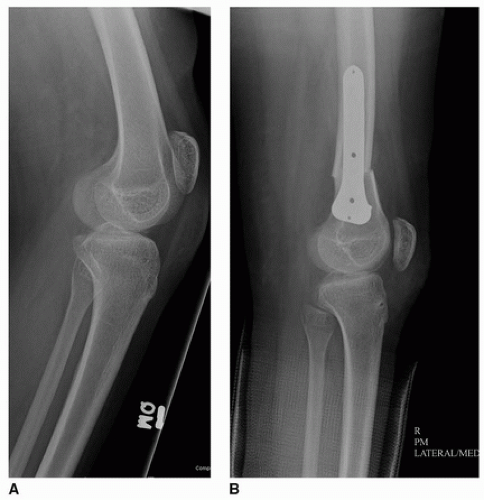 FIGURE 14-10 A. Preoperative lateral knee x-ray in a 14-year-old female (GMFCS III) with knee flexion contracture, patella alta, and crouch gait. B. Postoperative lateral x-ray shows DFEO, along with distalization of the patella following PTA. (Images courtesy of the Children’s Orthopaedic Center, Los Angeles, CA.) |
COMPLICATIONS TO AVOID Persistent crouch is minimized by combining DFEO with patella tendon advancement. Neurovascular complications are minimized by removing a trapezoidal bone graft when possible and by avoiding casting. Patella baja is often seen radiographically, but does not appear to be a clinical issue.
PEARLS AND PITFALLS
Patella tendon advancement should be performed with the DFEO to optimize outcome.
A trapezoidal bone excision is performed when bilateral DFEOs are performed and a simple anterior closing wedge osteotomy for unilateral DFEO.
Distal Rectus Femoris Transfer
INDICATIONS/CONTRAINDICATIONS The indications for DRFT are the combination of a stiff knee in swing phase and overactivity of the rectus femoris in swing phase. The stiff knee may cause difficulty with foot clearance due to decreased magnitude and/or delayed timing of peak knee flexion in swing phase. The results of DRFT surgery are best in GMFCS I and II children. Moderate to severe crouch is a contraindication to DRFT, as is quadriceps strength less than 4/5.
SURGICAL PROCEDURE A 4- to 5-cm longitudinal incision is made over the distal anterior thigh. The distal tip of the incision extends to the proximal pole of the patella. It is easiest to separate the rectus from the remainder of the quadriceps mechanism proximally (usually starting 4 to 5 cm proximal to the patella). This is accomplished by incising longitudinally (for a length of 1 to 2 cm) from superficial to deep along the medial or lateral border of the quadriceps tendon 4 to 5 cm proximal to the patella. This makes it easier to find the plane between the rectus femoris and the vastus intermedius. The plane is smooth and should separate easily. The interval is first developed with a Freer elevator and then blunt finger dissection. If developing this plane is difficult, the surgeon is likely within the rectus tendon rather than in the plane between the two aforementioned tendons. The Freer elevator is passed under the rectus tendon and is then used to penetrate the extensor mechanism immediately lateral to the lateral border of the rectus femoris. Blunt dissection frees the lateral border of the rectus, which is separated from the vastus intermedius as distally as possible using blunt dissection. The rectus is transected about 1cm proximal to the patella (Fig. 14-11A). The tendon is freed from all underlying attachments after placement of a whip stitch using a size 1 or 2-0 nonabsorbable braided suture, depending on tendon size (Fig. 14-11B). The tendon is then pulled distally, and care is taken to free the
tendon from any soft-tissue attachments proximally as far as the finger can reach. This allows for a direct line of pull toward its future distal attachment. When such soft-tissue attachments are released, the rectus should have an excursion of at least 1.5 to 2 cm when manual traction is applied (Fig. 14-11C).
tendon from any soft-tissue attachments proximally as far as the finger can reach. This allows for a direct line of pull toward its future distal attachment. When such soft-tissue attachments are released, the rectus should have an excursion of at least 1.5 to 2 cm when manual traction is applied (Fig. 14-11C).
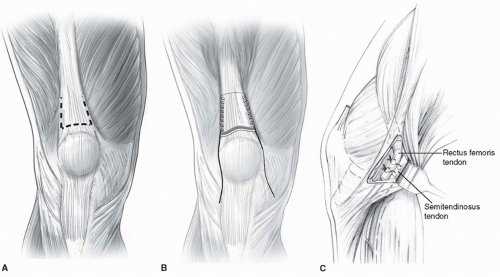 FIGURE 14-11 Technique for distal rectus femoris transfer (DRFT). Care must be taken to separate the rectus from the remainder of the quadriceps. The DRFT is best found about 4 to 5 cm proximal to the patella after incising longitudinally adjacent to the quadriceps tendon. A.
Get Clinical Tree app for offline access
Related posts: Operative Treatment of Pediatric Forearm Fractures Using Flexible IM Rodding
Proximal Humerus Fracture Closed Reduction and Percutaneous Pinning
Hip Arthroscopy
ACL Reconstruction in Skeletally Immature Patients
Anterior Spinal Fusion for Thoracolumbar Idiopathic Scoliosis
Alternative Anchors: Hooks and Sublaminar Wires Operative Treatment of Pediatric Forearm Fractures Using Flexible IM Rodding
Proximal Humerus Fracture Closed Reduction and Percutaneous Pinning
Hip Arthroscopy
ACL Reconstruction in Skeletally Immature Patients
Anterior Spinal Fusion for Thoracolumbar Idiopathic Scoliosis
Alternative Anchors: Hooks and Sublaminar Wires
Stay updated, free articles. Join our Telegram channel
Full access? Get Clinical Tree


|