Operative Treatment of Femur Fractures Using Flexible IM Nails
Joseph L. Yellin
John M. Flynn
Until the early 1990s, most children who sustained a femoral diaphyseal fracture were treated with spica casting or traction followed by delayed casting. In recent years, however, there has been an increasing trend among pediatric orthopedic traumatologists to perform operative fixation to mobilize the child, minimize the psychosocial impact of prolonged casting, and accelerate return to function. In older children and adolescents, surgeons have also recognized that operative management has yielded less shortening and angular deformity than did traction and casting. Through the 1980s and early 1990s, treatment preferences evolved from traction and casting to external fixation, standard plating, and adult-style reamed intramedullary nailing. However, complications from external fixation (refracture and pin-site complications), open plating (morbidity of open surgery), and reamed nailing (avascular necrosis of femoral head and risk of physeal closure) limit the widespread use of these techniques to treat the skeletally immature child. Although the French have used titanium elastic nails (TENs) with great success for a number of decades, it was not until the mid-1990s that elastic nailing gained acceptance in the United States. Since then, several studies have shown flexible nailing to have a very favorable risk-benefit profile as a treatment for femoral shaft fractures in children. The rapid nationwide adoption of flexible nailing as a standard of care at many pediatric trauma centers attests to the relatively short learning curve for surgeons and the effectiveness and safety for patients.
INDICATIONS/CONTRAINDICATIONS
Currently, in most centers, TENs are the most popular choice for stabilizing a typical pediatric femur fracture in the school-aged child. For children aged 5 and younger who have an isolated femoral shaft fracture, early spica casting remains the most common treatment. In young children with multitrauma, TENs are being used with increasing frequency. In adolescents older than 11 years and/or heavier than 50 kg, TENs have been used successfully, although a higher rate of complications has been reported. Because TENs do not involve a “rigid” fixation like a plate or locked nail, they are more suited for length-stable fractures, such as transverse or short oblique patterns. Long spiral and comminuted femur fractures can be treated with TENs, though the risk of shortening is increased. TENs are best suited for midshaft femur fractures, as a higher rate of malunion has been reported in distal and proximal fracture locations.
PREOPERATIVE PLANNING
All children with femoral shaft fractures should undergo a full trauma evaluation in search of other injuries. Full-length anteroposterior (AP) and lateral radiographs of the femur should be obtained to evaluate the fracture; in addition, radiographs of the hips and pelvis are standard for high-energy trauma. The nail size can be estimated by measuring the narrowest diameter of the femoral canal. In general, the appropriate nail is 40% of the smallest medullary diameter. For example, if the narrowest diameter were 1 cm, two 4-mm nails would be used. The largest possible nail diameter should always be used. Most pediatric femoral canals are wide enough to accommodate either a 3.5-mm or 4.0-mm nail.
SURGICAL PROCEDURE
Patient Positioning
Titanium elastic nailing can be performed on either a fracture table or a radiolucent table. The fracture table is often preferred as it allows the surgeon to get the fracture out to length and optimally reduced before prepping and draping. Others report good results without the use of a fracture table. When the radiolucent table is used (as may be necessary for children with a femur fracture and other lower-extremity fractures or severe short-tissue injuries), an assistant pulls traction, which complicates the process of getting AP and lateral images in fractures where it is difficult to pass the nail across the fracture site. In addition to the need for assistance with this technique, considerable patience may be required as well.
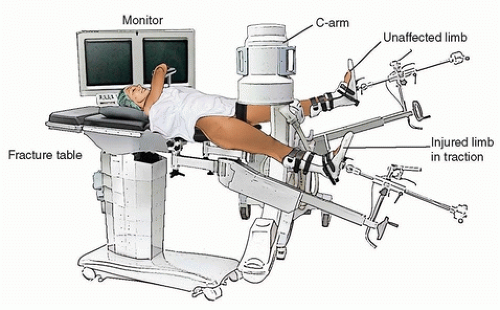
On the fracture table, both feet are padded with Webril and placed into the foot holders. The uninjured leg is abducted widely out of the way so that the image intensifier can be positioned between the legs, with sufficient room remaining for an assisting surgeon (Fig. 8-1). The C-arm monitor is positioned next to the patient’s contralateral shoulder, so that the monitor is in the direct line of sight for both the surgeon and the assistant. Alternatively, some surgeons prefer to have the uninjured leg scissored, rather than widely abducted, to allow the C-arm to come in perpendicularly from opposite the injured limb. Prior to preparing and draping the injured leg, the surgeon uses the C-arm image to visualize the fracture site. Traction is used to get the fracture out to length. This is a good time for the surgeon to rehearse the maneuver that aligns the fracture for nail passage and to note the position of the image intensifier that will yield good AP and lateral images of the fracture. Proper rotation can be ensured by noting the position of the patella and compensating for any external rotation of the hip, especially in the more proximal fracture. The entire injured extremity is then prepped from the upper thigh down to the foot holder. Circumferential drapes are used so that the entire leg is accessible from both the medial and the lateral sides.
Nail Entry
The first step in the surgical procedure is selecting the proper nail entry sites. The C-arm image intensifier is used to obtain an AP image of the knee. The distal femoral physis is visualized, and its position is marked on the skin to warn the surgeon to avoid deep dissection in this area. The proper nail entry point for the standard retrograde technique is 2 to 3 cm proximal to the distal femoral
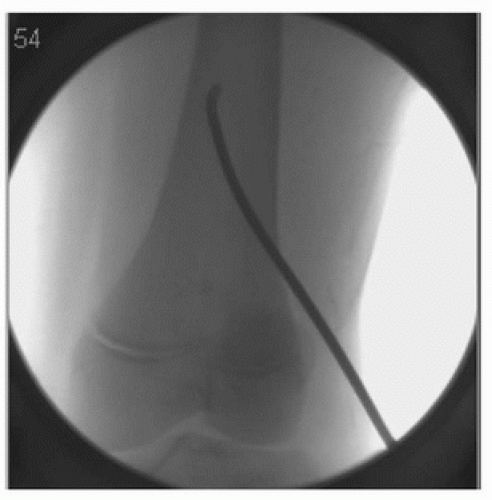
physis, just below the metaphyseal-diaphyseal junction. A longitudinal skin incision is made on both the medial and lateral leg extending from the site of bony insertion distally 1 to 2 cm to minimize soft-tissue damage during nail insertion (Fig. 8-2). The incisions are deepened with electrocautery, and a hemostat is used to spread down to the bone. The same hemostat may be used to palpate the femur to get a sense of the AP dimension. Ideally, the starting points should be in the center of the femur in the sagittal plane. A drill (with a soft-tissue protector) is used to open the femoral cortex at the medial and lateral insertion sites. Although an awl is available, a drill offers better control and can give the exact hole size needed. The size of the drill bit should be larger than the size of the nail; thus, a 4.5-mm drill would be used to place a 4.0-mm nail. The drill is first directed perpendicular to the cortex; once the cortex is breached, the drill (still running) is slowly angled sharply up the shaft of the femur (Fig. 8-3). This creates a track that greatly facilitates nail insertion. The cancellous bone of the distal femur can be very dense in young, active children. If the surgeon drills too transversely across the femur, the nail will follow that track, and it will be quite difficult to turn the nail up the femur. An oblique track, aiming up the shaft, will allow the surgeon to quickly pass the nail up to the fracture site.
physis, just below the metaphyseal-diaphyseal junction. A longitudinal skin incision is made on both the medial and lateral leg extending from the site of bony insertion distally 1 to 2 cm to minimize soft-tissue damage during nail insertion (Fig. 8-2). The incisions are deepened with electrocautery, and a hemostat is used to spread down to the bone. The same hemostat may be used to palpate the femur to get a sense of the AP dimension. Ideally, the starting points should be in the center of the femur in the sagittal plane. A drill (with a soft-tissue protector) is used to open the femoral cortex at the medial and lateral insertion sites. Although an awl is available, a drill offers better control and can give the exact hole size needed. The size of the drill bit should be larger than the size of the nail; thus, a 4.5-mm drill would be used to place a 4.0-mm nail. The drill is first directed perpendicular to the cortex; once the cortex is breached, the drill (still running) is slowly angled sharply up the shaft of the femur (Fig. 8-3). This creates a track that greatly facilitates nail insertion. The cancellous bone of the distal femur can be very dense in young, active children. If the surgeon drills too transversely across the femur, the nail will follow that track, and it will be quite difficult to turn the nail up the femur. An oblique track, aiming up the shaft, will allow the surgeon to quickly pass the nail up to the fracture site.
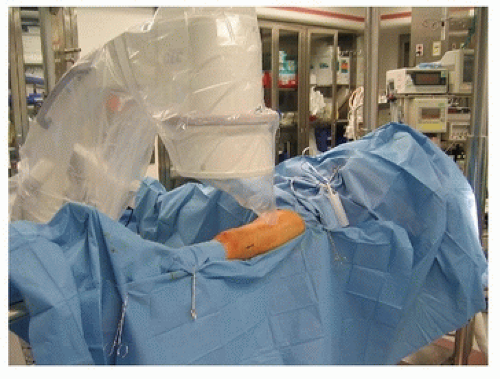 FIGURE 8-2 The extremity is circumferentially draped to allow access to both sides of the leg. A 2-cm skin incision is marked from the site of bony insertion extending distally. |
Prior to insertion, the elastic nails are bent by hand into a gentle C shape, such that the apex of the bend will be at the fracture site (Fig. 8-4). It is often easier to use the T-handle chuck rather than doing this by hand.
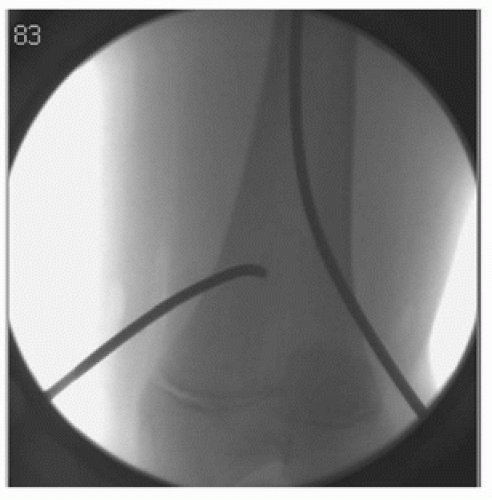
After prebending, the first nail is introduced through the lateral drill hole. Sometimes, it is easier to find the hole and enter the femur if the hooked tip is turned caudal. Under image-intensifier control, the tip is then turned cranial and tapped up the femur toward the fracture site (Fig. 8-5). The same technique is used to insert and advance the second nail through the medial femoral cortex (Fig. 8-6). Some surgeons prefer to pass one nail across the fracture site before introducing the
second nail. If there is any question as to the position of the nails, a lateral view should be consulted. The nail tips are sharp enough to penetrate the cortex (Fig. 8-7).
second nail. If there is any question as to the position of the nails, a lateral view should be consulted. The nail tips are sharp enough to penetrate the cortex (Fig. 8-7).
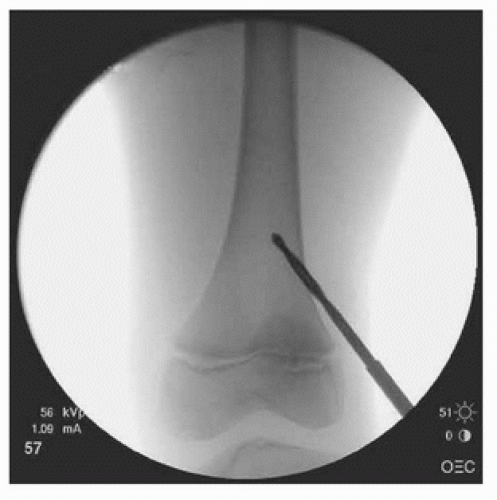 FIGURE 8-3 While running, the drill is angled sharply up the shaft of the femur to create a tract for nail passage. |
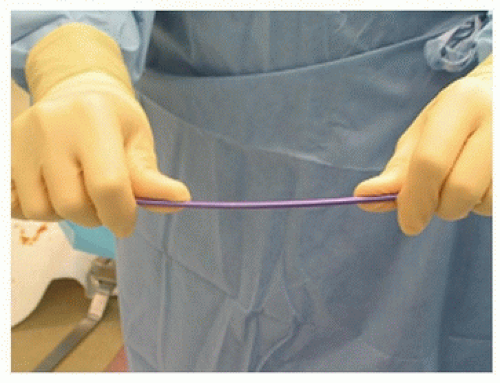 FIGURE 8-4 Elastic nails are prebent by hand so that the apex of the bend will be at the fracture site. |
 Get Clinical Tree app for offline access 
|
