Fig. 4.1
Anatomy of the human shoulder. The three joints responsible for shoulder movements are the glenohumeral, sternoclavicular and acromioclavicular joints
The movements of the two remaining joints, the sternoclavicular and the acromioclavicular joints, are much smaller compared to the glenohumeral joint. The sternoclavicular joint articulates the medial end of the clavicle onto the manubrium at the top of the sternum. The acromioclavicular joint is formed by the articulation between the acromion of the scapula and the distal end of the clavicle. These two joints cause translations of the glenohumeral head and also increase the rotational range of motion of the shoulder. Motions of the humerus involve the simultaneous motions of the glenohumeral, acromioclavicular and sternoclavicular joints [3]. An example of this simultaneous movement is in the shoulder abduction movement shown in Fig. 4.2.
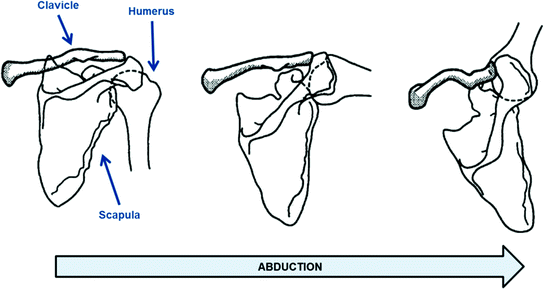
Fig. 4.2
Shoulder abduction requires simultaneous movement of the glenohumeral, sternoclavicular and acromioclavicular joints [3]. It can be seen that the clavicle, scapula and humerus all move during abduction
In the kinematic sense, the movements of all three joints (the glenohumeral, sternoclavicular and acromioclavicular joints) can be combined and simplified into 5-DOF [2]. This includes 3-DOF for the spherical and axial rotation of the upper arm about the shoulder ICOR and 2-DOF for the translations of the ICOR along the vertical axis and along the anterior–posterior axis. The 3-DOF of rotational motion is commonly referred to as shoulder abduction and adduction, flexion and extension, and medial and lateral rotation. The 2-DOF of translational motion is referred to as elevation and depression and retraction and protraction. This 5-DOF of the shoulder is illustrated in Fig. 4.3.

Fig. 4.3
Movements of the 5-DOF shoulder joint
Independently moving the 2-translational DOF with an exoskeleton is particularly challenging as the user’s torso, shoulder and upper arm must be rigidly attached to the exoskeleton. Furthermore, shifts in the user’s body posture can cause relatively large inaccuracies in translation movements of the shoulder. In this research, the 2-translational DOF of the shoulder is not considered in the exoskeleton design. Exclusion of this 2-DOF does not cause significant issues since the range of motion of this DOF is relatively small and full shoulder rotation can still be achieved. Shoulder translations are also less important compared to shoulder rotations in positioning the hand. These small translations can still be performed while using an exoskeleton due to the soft strap and human tissue.
4.1.2 Spherical Wrist Mechanism for Exoskeleton Shoulder
An exoskeleton has a kinematic structure that resembles the human limb, with robot joint axes that align with the limb joint axes. This robot is designed to operate side-by-side with the human upper limb and therefore must produce movements similar to the human counterpart. The human shoulder joint is one of the most complex joints in the human body and designing an exoskeleton for this joint is a challenging task. The shoulder joint has a very large range of motion, capable of rotating the upper arm in 3-DOF in a spherical motion over approximately half of the entire workspace (i.e. the upper arm has a semi-spherical workspace).
Hence, a shoulder exoskeleton is also required to have 3-DOF of spherical motion. However, it is not feasible to implement a true ball-and-socket spherical joint for an active exoskeleton as it cannot be aligned with the user’s shoulder joint and is difficult to actuate. Therefore, exoskeletons in the past use a 3R spherical wrist mechanism often with 90° links to replicate the spherical movement [4–8]. Most shoulder exoskeletons have a structure similar to that shown in Fig. 4.4, where a most distal joint (Joint 3) is incorporated into a revolving mechanism around the upper arm. However, the 3R mechanism behaves like a gimbal and consequently possesses problematic singular configurations [8, 9]. These singular configurations occur when the axes of rotation of two rotary joints align with each other, resulting in the loss of 1-DOF. The human shoulder joint behaves like a spherical joint which does not possess any singular configurations and therefore does not experience this problem. The 3R mechanism, however, has two distinct singular configurations which occur when the axis of rotation of the base joint (Joint 1) align with the axis of rotation of the distal joint (Joint 3). One singular configuration occurs when the axis of Joint 3 is in the same direction as the axis of Joint 1. The second singular configuration occurs when the axis of Joint 3 is 180° opposite to that of the first configuration as shown in Fig. 4.4.
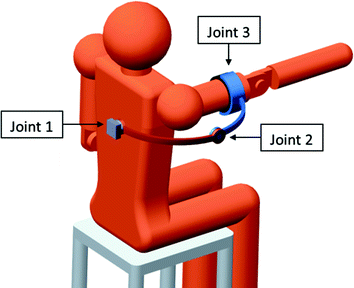
Fig. 4.4
A 3R exoskeleton in a singular configuration where the axis of rotation of Joint 3 aligns with the axis of rotation of Joint 1. In this configuration, the exoskeleton cannot produce horizontal flexion and extension movements of the shoulder
When the 3R mechanism approaches a singular configuration, the mechanism has difficulty performing rotations about the axis that is lost. A slow rotation of the shoulder about the affected axis requires high velocities from the 3R joints. The worst case is when two of the 3R joints completely align with one another, i.e. a singular configuration occurs. In this situation, the 3R mechanism needs to change its configuration instantaneously in order to produce smooth shoulder rotations about the lost axis (see Fig. 4.5). This is not possible in practice as there will always be a time delay to move the 3R mechanism into the necessary configuration. This causes the exoskeleton to produce jerky movements which can hinder the user’s shoulder movement and cause injuries or discomfort. The design shown in Fig. 4.4 is the simplest design of the 3R exoskeleton with the base joint of the 3R mechanism positioned directly behind the shoulder. However, this exoskeleton design has a very limited range of motion due to the limited space available for the movement of the mechanism’s links. It is not possible for this exoskeleton to raise the user’s upper arm above the horizontal plane as this will cause part of the 3R mechanism to collide with the user’s head. This problem is illustrated in Fig. 4.6.
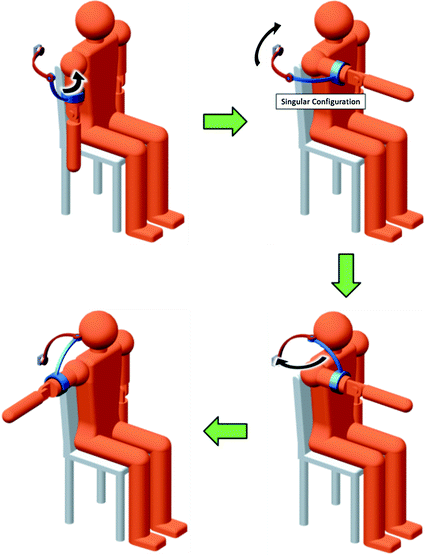
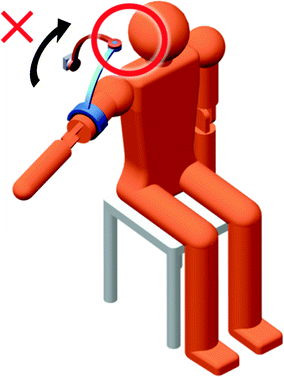
Fig. 4.5
A 3R exoskeleton moves into a singular configuration shown in the top right figure, where the axis of rotation of Joint 3 aligns with the axis of rotation of Joint 1. In this configuration, the exoskeleton cannot produce horizontal flexion and extension of the shoulder unless Joint 1 is adjusted into the position shown in the bottom right figure
Fig. 4.6
A 3R exoskeleton with the base joint behind the shoulder cannot raise the upper arm above the horizontal plane as this will cause the mechanism to collide with the user’s head
In an attempt to minimise the negative effects of singular configurations on shoulder movements, some exoskeletons were designed to have the singular configurations of the 3R mechanism occur at postures that are less likely to interfere with performing rehabilitation exercises [5, 7, 8]. This is done by moving the base joint (and consequently the singular configuration) of the 3R mechanism laterally so that it is in the position shown in Fig. 4.7. However, even if the exoskeleton does not operate exactly at the singular configuration, it will still experience a decrease in performance when it operates nearby. The 3R mechanism with a 45° lateral offset of the base joint can achieve a larger range of motion than the simpler design in Fig. 4.4, as it is possible to raise the user’s arm above the horizontal plane. However, the 3R mechanism will still move dangerously close to the user’s head when the upper arm is raised above the horizontal plane. In addition, raising the upper arm backwards will make the arm dangerously close to the base joint of the 3R mechanism as shown in Fig. 4.8.
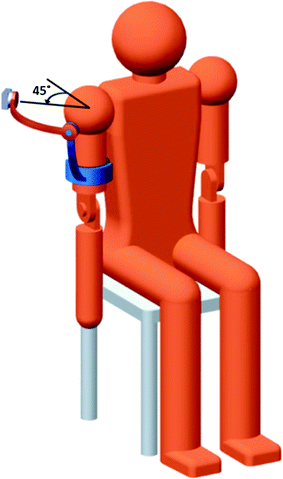
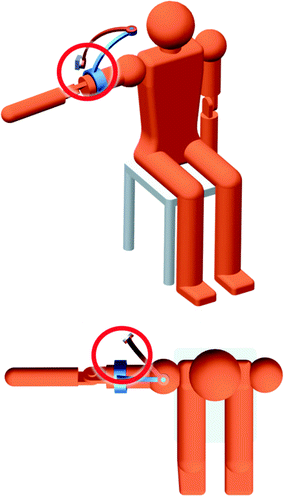
Fig. 4.7
The 3R exoskeleton design with the base joint offset laterally by 45° from behind the shoulder
Fig. 4.8
The upper arm can move dangerously close to the shifted base joint
It is possible to avoid the singular configurations and keep the mechanism away from potential collisions if a redundant joint is introduced into the 3R mechanism. The resulting 4R spherical wrist mechanism (Fig. 4.9) has one redundant joint which can be used to keep the system away from singular configurations. This 4R spherical wrist concept has been considered for generic robot manipulators in the past [10–13], but it has not been utilised in the design of an exoskeleton’s shoulder mechanism. This mechanism has been used in limited studies, possibly because there are better alternatives to using a replicated spherical joint for a generic robot manipulator. A shoulder exoskeleton, however, has very limited joint design possibilities due to the workspace constraints and the necessity to replicate the shoulder’s spherical movements. In this case, a 4R mechanism is very suitable. In this research, the 4R mechanism is considered for the design of an upper limb exoskeleton’s shoulder complex.
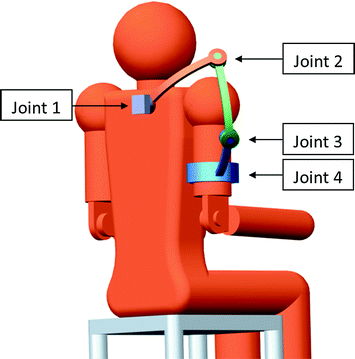
Fig. 4.9
The 4R shoulder mechanism concept
4.2 The 4R Mechanism for the Exoskeleton Shoulder
The 4R mechanism has four revolute joints and is therefore considered a 4-DOF robot. However, the 4R mechanism is only capable of moving the end-effector in 3-DOF of spherical motion about the ICOR. Hence, the 4R mechanism can be described as a 4-DOF redundant robot with 3-DOF of spherical motion. This kinematic redundancy is required to avoid singular configurations of the mechanism and prevent mechanical interference with the user while achieving the entire shoulder workspace.
The fundamental 4R mechanism consists of a stationary base, an end-effector and three links ( ,
,  ,
,  ) connected in series through four revolute joints (
 ,
,  ,
,  ,
,  ) as shown in Fig. 4.10. Each of the four revolute joints has an axis of rotation that intersects with the ICOR. The joints are positioned a suitable distance away from the ICOR so that they do not interfere with the user’s shoulder. This allows the 4R mechanism to operate alongside the human upper arm and mimic the spherical movements of the human shoulder joint. Due to the characteristics of the mechanism design, the position and orientation of the end-effector directly reflects the posture of the user’s upper arm.
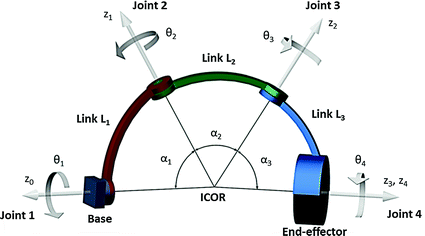
, , ) connected in series through four revolute joints (, , , ) as shown in Fig. 4.10. Each of the four revolute joints has an axis of rotation that intersects with the ICOR. The joints are positioned a suitable distance away from the ICOR so that they do not interfere with the user’s shoulder. This allows the 4R mechanism to operate alongside the human upper arm and mimic the spherical movements of the human shoulder joint. Due to the characteristics of the mechanism design, the position and orientation of the end-effector directly reflects the posture of the user’s upper arm.Fig. 4.10
Parameters of the 4R mechanism
The following terms are used to describe the various aspects of this mechanism:
ICOR
The centre of spherical rotation. All joints of the 4R mechanism intersect at this point. The ICOR of the 4R coincides with the ICOR of the human shoulder joint.
Link angle 
The angle between the two joints in the arc-shaped link about the ICOR.
Joint angle/angular position 
The angle of rotational displacement of the revolute joint from the default position.
Joint/end–effector position
The location of the joint/end-effector with respect to the ICOR.
Joint configuration
A combination of joint positions that achieves a certain end-effector position.
4.2.1 Kinematic Modelling of the 4R Mechanism
The kinematics of the multilink 4R mechanism is modelled using the Denavit–Hartenberg (DH) notation [14]. The main advantage of the DH notation is that only four parameters are required for each joint whereas six parameters are normally required for 6-DOF of a rigid body in 3D space. This is made possible by kinematic constraints present in the two types of 1-DOF robotic joints that can be used in a serial manipulator, the revolute joint and the prismatic joint. Kinematic analysis is therefore simpler and computational cost is reduced.
In the DH notation, a Cartesian coordinate system is assigned to each robot joint while following a set of rules. The coordinate systems are numbered from 0 to  starting from the base joint and ending at the end-effector. The z-axis (
 ) is assigned so that it is aligned with the axis of motion of the joint
  . In the case of revolute joints, the z-axis is aligned with the axis of rotation. The x-axis (
 ) is assigned so that it is parallel to the common normal of the z-axes in the current and precious coordinate systems (
 and
and  ). If
). If  and
and  are parallel, then there is no unique common normal. In this case,
  is in the direction from
  to
to  . Finally, the y-axis (
 ) is assigned by using the right-handed coordinate system.
starting from the base joint and ending at the end-effector. The z-axis () is assigned so that it is aligned with the axis of motion of the joint . In the case of revolute joints, the z-axis is aligned with the axis of rotation. The x-axis () is assigned so that it is parallel to the common normal of the z-axes in the current and precious coordinate systems ( and ). If and are parallel, then there is no unique common normal. In this case, is in the direction from to . Finally, the y-axis () is assigned by using the right-handed coordinate system.A transformation between the coordinate systems of two consecutive joints in a serial robot is described by one transformation associated with the joint ![$$ [J] $$](/wp-content/uploads/2016/09/A313541_1_En_4_Chapter_IEq22.gif) and a second transformation associated with the link
and a second transformation associated with the link ![$$ [L] $$](/wp-content/uploads/2016/09/A313541_1_En_4_Chapter_IEq23.gif) . The coordinate transformation along a serial robot is then a sequence of these transformations. For a robot with
. The coordinate transformation along a serial robot is then a sequence of these transformations. For a robot with  links, the complete kinematics equation of the robot is given by (4.1) where
 ![$$ [T] $$](/wp-content/uploads/2016/09/A313541_1_En_4_Chapter_IEq25.gif) is the transformation from the base joint to the end-effector.
is the transformation from the base joint to the end-effector.
![$$ \left[ T \right] = \left[ {J_{1} } \right]\left[ {L_{1} } \right]\left[ {J_{2} } \right]\left[ {L_{2} } \right] \ldots [J_{n} ][L_{n} ] $$](/wp-content/uploads/2016/09/A313541_1_En_4_Chapter_Equ1.gif)
and a second transformation associated with the link . The coordinate transformation along a serial robot is then a sequence of these transformations. For a robot with links, the complete kinematics equation of the robot is given by (4.1) where is the transformation from the base joint to the end-effector.(4.1)
By defining the coordinate systems using the DH notation outlined above, the transformations can be defined by (4.2) and (4.3), where  is the angle about
  from
from  to
to  and is the joint variable if joint
  is rotary;
  is the distance along
  from the origin of the
  th coordinate system to the common normal of
  and
and  and is the joint variable if joint
  is prismatic;
  is the length of the common normal of
  and
and  from the
  axis to the
  axis; and
  is the angle about the common normal of
  and
and  from the
  axis to the
  axis.
axis.
![$$ [J_{i} ] = \left[ {\begin{array}{*{20}c} {\cos \theta_{i} } & { - \sin \theta_{i} } & 0 & 0 \\ {\sin \theta_{i} } & {\cos \theta_{i} } & 0 & 0 \\ 0 & 0 & 1 & {d_{i} } \\ 0 & 0 & 0 & 1 \\ \end{array} } \right] $$](/wp-content/uploads/2016/09/A313541_1_En_4_Chapter_Equ2.gif)
![$$ [L_{i} ] = \left[ {\begin{array}{*{20}c} 1 & 0 & 0 & {a_{i} } \\ 0 & {\cos \alpha_{i} } & { - \sin \alpha_{i} } & 0 \\ 0 & {\sin \alpha_{i} } & {\cos \alpha_{i} } & 0 \\ 0 & 0 & 0 & 1 \\ \end{array} } \right] $$](/wp-content/uploads/2016/09/A313541_1_En_4_Chapter_Equ3.gif)
is the angle about from to and is the joint variable if joint is rotary; is the distance along from the origin of the th coordinate system to the common normal of and and is the joint variable if joint is prismatic; is the length of the common normal of and from the axis to the axis; and is the angle about the common normal of and from the axis to the axis.(4.2)
(4.3)
These transformations are a sequence of translations and rotations where
![$$ \left[ {J_{i} } \right] = {\text{Trans}}_{{J_{i} }} \left( {d_{i} } \right) {\text{Rot}}_{{J_{i} }} \left( {\theta_{i} } \right) $$](/wp-content/uploads/2016/09/A313541_1_En_4_Chapter_Equ4.gif)
![$$ \left[ {L_{i} } \right] = {\text{Trans}}_{{L_{i} }} \left( {a_{i} } \right) {\text{Rot}}_{{L_{i} }} \left( {\alpha_{i} } \right) $$](/wp-content/uploads/2016/09/A313541_1_En_4_Chapter_Equ5.gif)
![$$ {\text{Rot}}_{{J_{i} }} \left( {\theta_{i} } \right) = \left[ {\begin{array}{*{20}c} {\cos \theta_{i} } & { - \sin \theta_{i} } & 0 & 0 \\ {\sin \theta_{i} } & {\cos \theta_{i} } & 0 & 0 \\ 0 & 0 & 1 & 0 \\ 0 & 0 & 0 & 1 \\ \end{array} } \right] $$](/wp-content/uploads/2016/09/A313541_1_En_4_Chapter_Equ6.gif)
![$$ {\text{Rot}}_{{L_{i} }} \left( {\alpha_{i} } \right) = \left[ {\begin{array}{*{20}c} 1 & 0 & 0 & 0 \\ 0 & {\cos \alpha_{i} } & { - \sin \alpha_{i} } & 0 \\ 0 & {\sin \alpha_{i} } & {\cos \alpha_{i} } & 0 \\ 0 & 0 & 0 & 1 \\ \end{array} } \right] $$](/wp-content/uploads/2016/09/A313541_1_En_4_Chapter_Equ7.gif)
(4.4)
(4.5)
(4.6)
(4.7)
The coordinate systems of two consecutive joints are related as
![$$ T_{i}^{i - 1} = \left[ {J_{i} } \right]\left[ {L_{i} } \right] $$](/wp-content/uploads/2016/09/A313541_1_En_4_Chapter_Equ8.gif)
(4.8)
This gives the DH transformation matrix as
![$$ T_{i}^{i - 1} = \left[ {\begin{array}{*{20}c} {\cos \theta_{i} } & { - \cos \alpha_{i} \sin \theta_{i} } & {\sin \alpha_{i} \sin \theta_{i} } & {a_{i} \cos \theta_{i} } \\ {\sin \theta_{i} } & {\cos \alpha_{i} \cos \theta_{i} } & { - \sin \alpha_{i} \cos \theta_{i} } & {a_{i} \sin \theta_{i} } \\ 0 & {\sin \alpha_{i} } & {\cos \alpha_{i} } & {d_{i} } \\ 0 & 0 & 0 & 1 \\ \end{array} } \right] $$](/wp-content/uploads/2016/09/A313541_1_En_4_Chapter_Equ9.gif)
(4.9)
To interpret the transformation, the matrix can be represented as (4.10), where  is the
  rotation matrix (4.11) which represents the relative orientation between the two coordinate systems (i.e. relates the
  axes with the
  axes) and
  is the
  translation vector (4.12) which represents the relative position between the two coordinate systems.
![$$ T = \left[ {\begin{array}{*{20}c} R & r \\ {0^{\text{T}} } & 1 \\ \end{array} } \right] $$](/wp-content/uploads/2016/09/A313541_1_En_4_Chapter_Equ10.gif)
![$$ R = \left[ {\begin{array}{*{20}c} {\cos \theta_{i} } & { - \cos \alpha_{i} \sin \theta_{i} } & {\sin \alpha_{i} \sin \theta_{i} } \\ {\sin \theta_{i} } & {\cos \alpha_{i} \cos \theta_{i} } & { - \sin \alpha_{i} \cos \theta_{i} } \\ 0 & {\sin \alpha_{i} } & {\cos \alpha_{i} } \\ \end{array} } \right] $$](/wp-content/uploads/2016/09/A313541_1_En_4_Chapter_Equ11.gif)
![$$ r = \left[ {\begin{array}{*{20}c} {r_{x} } \\ {r_{y} } \\ {r_{z} } \\ \end{array} } \right] = \left[ {\begin{array}{*{20}c} {a_{i} \cos \theta_{i} } \\ {a_{i} \sin \theta_{i} } \\ {d_{i} } \\ \end{array} } \right] $$](/wp-content/uploads/2016/09/A313541_1_En_4_Chapter_Equ12.gif)
is the rotation matrix (4.11) which represents the relative orientation between the two coordinate systems (i.e. relates the axes with the axes) and is the translation vector (4.12) which represents the relative position between the two coordinate systems.(4.10)
(4.11)
(4.12)
Transformation into subsequent coordinate systems is achieved by combining the transformation matrices between each successive coordinate system using (4.13). This allows the determination of the relative position and orientation of any subsequent coordinate system with respect to a previous reference coordinate system and vice versa.
(4.13)
The global coordinate system is located at the ICOR of the right shoulder with the x-axis pointing to the right, y-axis pointing forward and z-axis pointing upward with respect to the user. A coordinate system is defined for each subsequent joint using the DH notation. For simplicity, the coordinate system of each joint is defined with an origin at the ICOR of the 4R mechanism, i.e. the length parameters  and
and  for all
  are zero. This is acceptable because the axis of rotation of all the joints in the 4R mechanism always intersect at the ICOR. As a result, the occurrence of singular configurations is dependent on only the orientation of the joints and independent of the distance between the joints and the ICOR. The DH parameters for the 4R mechanism are shown in Table 4.1. Note that the first line of parameters is used to define the orientation of the base joint with respect to the global coordinate system. Therefore, the numbering of the parameters in Table 4.1 is delayed by one.
and for all are zero. This is acceptable because the axis of rotation of all the joints in the 4R mechanism always intersect at the ICOR. As a result, the occurrence of singular configurations is dependent on only the orientation of the joints and independent of the distance between the joints and the ICOR. The DH parameters for the 4R mechanism are shown in Table 4.1. Note that the first line of parameters is used to define the orientation of the base joint with respect to the global coordinate system. Therefore, the numbering of the parameters in Table 4.1 is delayed by one.Table 4.1
DH parameters of the 4R robot
Link  |  |  |  |  |
|---|---|---|---|---|
1 | 0 |  | 0 |  |
2 | 0 |  | 0 |  |
3 | 0 |  | 0 |  |
4 | 0 |  | 0 |  |
5 | 0 | 0 | 0 |  |
The DH parameters of the 4R mechanism are used to obtain the transformation matrices that represent the geometric relationship between each pair of adjacent coordinate systems
![$$ T_{1}^{0} = \left[ {\begin{array}{*{20}c} {\cos \varphi_{z} } & { - \cos \varphi_{x} \sin \varphi_{z} } & {\sin \varphi_{x} \sin \varphi_{z} } & 0 \\ {\sin \varphi_{z} } & {\cos \varphi_{x} \cos \varphi_{z} } & { - \sin \varphi_{x} \cos \varphi_{z} } & 0 \\ 0 & {\sin \varphi_{x} } & {\cos \varphi_{x} } & 0 \\ 0 & 0 & 0 & 1 \\ \end{array} } \right] $$](/wp-content/uploads/2016/09/A313541_1_En_4_Chapter_Equ14.gif)
![$$ T_{2}^{1} = \left[ {\begin{array}{*{20}c} {\cos \theta_{1} } & { - \cos \alpha_{1} \sin \theta_{1} } & { - \sin \alpha_{1} \sin \theta_{1} } & 0 \\ {\sin \theta_{1} } & {\cos \alpha_{1} \cos \theta_{1} } & {\sin \alpha_{1} \cos \theta_{1} } & 0 \\ 0 & { - \sin \alpha_{1} } & {\cos \alpha_{1} } & 0 \\ 0 & 0 & 0 & 1 \\ \end{array} } \right] $$](/wp-content/uploads/2016/09/A313541_1_En_4_Chapter_Equ15.gif)
![$$ T_{3}^{2} = \left[ {\begin{array}{*{20}c} {\cos \theta_{2} } & { - \cos \alpha_{2} \sin \theta_{2} } & {\sin \alpha_{2} \sin \theta_{2} } & 0 \\ {\sin \theta_{2} } & {\cos \alpha_{2} \cos \theta_{2} } & { - \sin \alpha_{2} \cos \theta_{2} } & 0 \\ 0 & {\sin \alpha_{2} } & {\cos \alpha_{2} } & 0 \\ 0 & 0 & 0 & 1 \\ \end{array} } \right] $$](/wp-content/uploads/2016/09/A313541_1_En_4_Chapter_Equ16.gif)
![$$ T_{4}^{3} = \left[ {\begin{array}{*{20}c} {\cos \theta_{3} } & { - \cos \alpha_{3} \sin \theta_{3} } & {\sin \alpha_{3} \sin \theta_{3} } & 0 \\ {\sin \theta_{3} } & {\cos \alpha_{3} \cos \theta_{3} } & { - \sin \alpha_{3} \cos \theta_{3} } & 0 \\ 0 & {\sin \alpha_{3} } & {\cos \alpha_{3} } & 0 \\ 0 & 0 & 0 & 1 \\ \end{array} } \right] $$](/wp-content/uploads/2016/09/A313541_1_En_4_Chapter_Equ17.gif)
![$$ T_{5}^{4} = \left[ {\begin{array}{*{20}c} {\cos \theta_{4} } & { - \sin \theta_{4} } & 0 & 0 \\ {\sin \theta_{4} } & {\cos \theta_{4} } & 0 & 0 \\ 0 & 0 & 1 & 0 \\ 0 & 0 & 0 & 1 \\ \end{array} } \right] $$](/wp-content/uploads/2016/09/A313541_1_En_4_Chapter_Equ18.gif)
(4.14)
(4.15)
(4.16)
(4.17)
(4.18)
These transformation matrices are used to transform coordinates between the various coordinate systems in the 4R mechanism.
4.2.2 Forward Kinematics
Forward kinematics involves the use of known kinematic parameters of a robot’s joints and structure to compute the position and orientation of its end-effector. In the case of a shoulder exoskeleton based on a spherical wrist mechanism, forward kinematics utilises the angles of each exoskeleton joint to determine the position and orientation of the end-effector which is effectively the user’s upper arm. However, only the orientation is considered during analysis since position does not affect singularity of the mechanism. Also, the position of the upper arm with respect to the shoulder is directly related to its orientation. Therefore, positional information can be omitted to simplify the problem during the analysis of the spherical wrist.
Forward kinematics of the 4R mechanism is achieved by the multiplication of the DH transformation matrices
(4.19)
The resulting matrix represents the orientation of the coordinate system coupled to the upper arm with respect to the global coordinate system.
4.2.3 Inverse Kinematics
Inverse kinematics is the process of determining a set of required robot joint angles to reach a specified end-effector position. Solving the inverse kinematics problem is more challenging than the forward kinematics problem, particularly for a kinematically redundant system like the 4R mechanism.
There are infinite solutions to the inverse kinematics problem for any given end-effector position due to the kinematic redundancy of the 4R mechanism. However, if the desired end-effector position and the joint angle of one of the three proximal joints are known, the angles of the remaining joints can be derived using inverse kinematics. In this work, the angle of Joint 1 ( ) is generated by an algorithm. Therefore, the inverse kinematics problem now involves finding the configuration of a non-redundant 3R mechanism (i.e. the angular positions
  ,
,  and
and  ) which has a finite number of solutions. However,
  only affects the axial rotation of the end-effector and not the position since the end-effector is located in the same position as Joint 4. This means that the end-effector position (i.e. shoulder flexion and extension and abduction and adduction) is dependent on
  ,
,  and
and  while the end-effector axial orientation (i.e. shoulder medial and lateral rotation) is dependent on
  . The resulting inverse kinematics problem is then to find
  and
and  to achieve a desired end-effector position with a given value of
  .
.
) is generated by an algorithm. Therefore, the inverse kinematics problem now involves finding the configuration of a non-redundant 3R mechanism (i.e. the angular positions , and ) which has a finite number of solutions. However, only affects the axial rotation of the end-effector and not the position since the end-effector is located in the same position as Joint 4. This means that the end-effector position (i.e. shoulder flexion and extension and abduction and adduction) is dependent on , and while the end-effector axial orientation (i.e. shoulder medial and lateral rotation) is dependent on . The resulting inverse kinematics problem is then to find and to achieve a desired end-effector position with a given value of .The inverse kinematics problem for the 4R robot is solved using a heuristic iterative method based on the Forward and Backward Reaching Inverse Kinematics (FABRIK) algorithm [15]. The FABRIK algorithm has the advantage of converging to a solution with few iterations and has low computational cost.
An iteration of the FABRIK method is a two stage process that begins at the last joint in the chain and works inwards, adjusting the position of each joint along the way. This process is then repeated outwards in the second stage to complete a full iteration. Each iteration moves the end-effector closer to the target position. Hence, the iterations are repeated until the end-effector is sufficiently close to the specified target position. A graphical representation of a full iteration of the FABRIK algorithm applied to a planar manipulator is presented in Fig. 4.11.
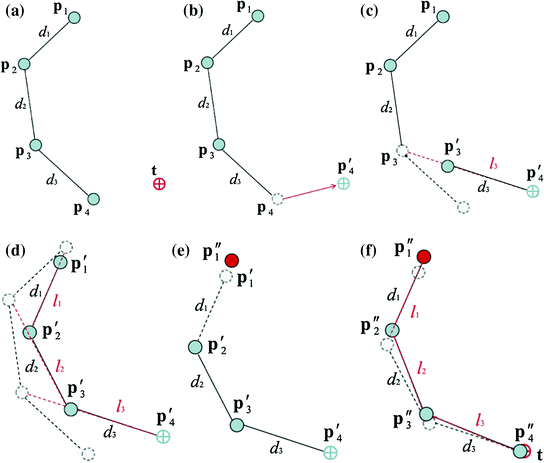
Fig. 4.11


An example of a full iteration of the FABRIK algorithm for a three-jointed planar manipulator [15]. a The initial position of the manipulator and the target, b move the end-effector  to the target
  , c find the joint
  which lies on the line
  that passes through the points
  and
and  , and has distance
  from the joint
  , d continue the algorithm for the rest of the joints, e the second stage of the algorithm begins by moving the base joint
  to its initial position, f repeat the same procedure, but this time start from the base and move outwards to the end-effector. The algorithm is repeated until the position of the end-effector gets sufficiently close to the target at the end of the second stage
to the target , c find the joint which lies on the line that passes through the points and , and has distance from the joint , d continue the algorithm for the rest of the joints, e the second stage of the algorithm begins by moving the base joint to its initial position, f repeat the same procedure, but this time start from the base and move outwards to the end-effector. The algorithm is repeated until the position of the end-effector gets sufficiently close to the target at the end of the second stageRelated posts:


Stay updated, free articles. Join our Telegram channel
Full access? Get Clinical Tree
