Chapter 9. Methods of managing trauma
Fractures
The principles of fracture management are:
1. Reduction of the fracture.
2. Immobilization of the fracture fragments long enough to allow union.
3. Rehabilitation of the soft tissues and joints.
Methods of reduction are:
1. Traction.
2. External splints/braces.
3. External fixation.
4. Internal fixation.
Some fractures, when seen, are not displaced and therefore do not require reduction. Others, however, will require reduction in order to keep the bones in the correct position.
Traction
Pulling on a broken limb draws the bones into line, just as a string of beads straightens when it is pulled at each end. Muscular contraction will shorten any limb unless there is a bone to hold its ends apart and the traction must therefore be strong enough to overcome the muscle power, but not so strong that it holds the ends apart (Fig. 9.1).
 |
| Fig. 9.1 Traction. Traction should be sufficient to pull the bones out to length and overcome local muscle contraction. |
Traction can be applied to the limb in a variety of ways.
Skeletal traction
Traction is applied to pins passed through the bone. Although metal pins passing straight through a limb may look unkind, they are more comfortable than skin traction, and allow substantial loads to be applied accurately to the bone itself. The commonest sites for the insertion of skeletal pins are the upper end of the tibia, the calcaneum, the distal femur or the olecranon, but traction can also be applied to the skull, pelvis and many other sites.
Two types of pin are in common use (Fig. 9.2). A Steinmann pin has a trocar point and smooth sides. Although easy to insert, it can slip sideways after being in position for a week or more, which is both uncomfortable and unhygienic. Threaded pins, such as a Denham pin, have threads which grip the bone and prevent lateral slippage. Although slightly harder to insert, they are better in the long term.
 |
| Fig. 9.2 Types of pin for traction: (a) Steinmann pin; (b) Denham pin with threads standing proud of the pin shaft. |
Skeletal traction is easy to set up and manage, provided attention is paid to the following points:
1. The pins should be drilled through the bone with a hand drill or T handle.
2. If the pin is inserted using local anaesthesia, the skin and periosteum must be carefully infiltrated at the points of entry and exit.
3. Never try to hammer the pin through the bone – this does not work and breaks the bone.
4. Keep the point of entry clean to avoid infection of the pin track but do not wind a bandage round the pin like a cleat: this causes skin necrosis.
5. Check whether the pin is threaded or smooth before removing it; smooth pins can be removed with a straight pull but a threaded pin must be unscrewed.
6. If the pin area is painful and the bone is tender to percussion, suspect a pin track infection.
Skin traction
Skin traction is applied by means of adhesive strapping stuck directly onto the skin and has many practical problems. The skin beneath the strapping becomes sweaty and rashes are common. The weight is applied to the bone indirectly via the soft tissues and these can be disrupted if too much weight is applied. The usual upper limit is 5 kg (12 lb). For these reasons, skin traction is really only suitable for children and as a temporary measure in adults until definitive treatment is instituted.
The mechanics of traction
The mechanics of traction are straightforward. Every force has an equal and opposite force; traction is no exception. The ‘opposite’ force to traction can be applied in three ways, described below.
Fixed traction with a splint. In the simplest form of fixed traction, the limb is rested on a splint such as the Thomas splint, originally devised by Hugh Owen Thomas (p. 125) for applying fixed traction to the lower limb, and still widely used (Fig. 9.3). The lower end of the splint has a ‘V’ shape to hold traction cord applied to the patient’s limb either by skin traction or, as a first aid measure, by tying the patient’s boot to the splint. The limb is then stretched with a Spanish windlass (nowadays usually made of two wooden tongue depressors) and the counter pressure taken by a padded leather ring at the upper end of the splint under the ischial tuberosity. The Thomas splint is ideal for transporting patients because it is self-contained and does not need pulleys or weights.
 |
| Fig. 9.3 Fixed traction with Thomas splint using a Spanish windlass. |
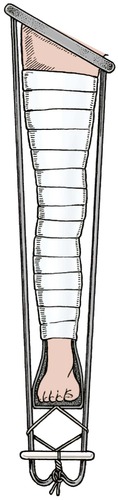
Fixed traction using gravity. The fundamental principle of this type of traction is to string the patient up by the injured limb and leave them hanging until the bone has joined. Gallows traction for a child under the age of 3 with fractured femur is a good example of this. Children tolerate the position surprisingly well for the 2–3 weeks necessary for the fracture to unite at this age (Fig. 9.4).
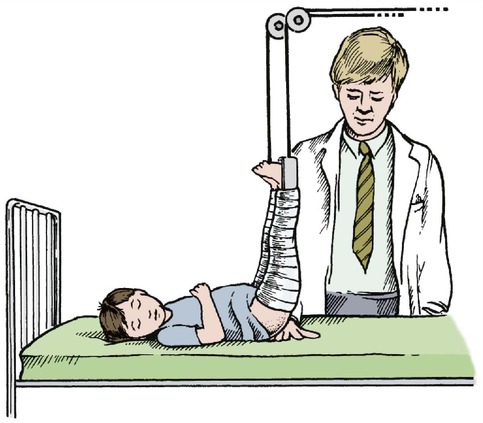 |
| Fig. 9.4 Gallows traction. The weight of the child should be enough to hold the limb out to length. A hand can be slipped between the buttocks and sheet. |
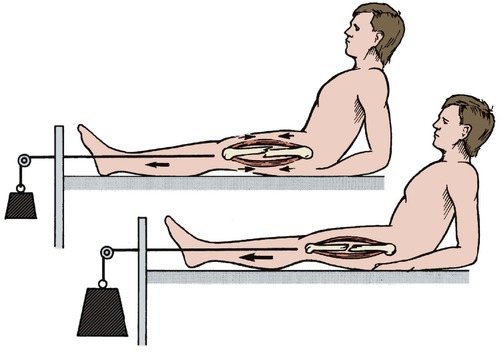
Gravity can also be applied to the limb by fixing the patient’s leg to the foot of the bed, which is then raised so that the patient slides down towards the pillow (Fig. 9.5).
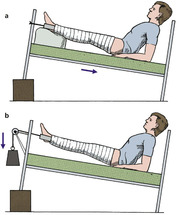 |
| Fig. 9.5 (a) Fixed traction – the weight of the patient provides traction; (b) sliding traction – the weight of the patient still applies traction but his own weight is counterbalanced by a weight attached to a cord running over a pulley. |
A similar principle is used in a hanging cast for fractures of the humerus in which a cast is applied to the forearm and suspended by a collar and cuff so that the combined weight of the arm and cast pull the humerus into line (Fig. 9.6). The arm must hang; a sling supporting the elbow prevents the traction reaching the fracture site.
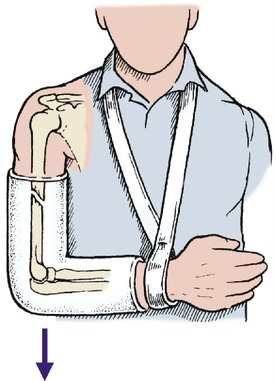 |
| Fig. 9.6 Hanging cast. The weight of the arm and cast pulls the humeral fragments into line. |
Sliding traction. Suspending the patient and tying the feet to the end of the bed restricts the patient’s mobility and makes nursing difficult. This can be overcome by weights and pulleys but the system is complicated and needs regular adjustment.
At its simplest, sliding traction is little different from fixed traction, except that the patient can move freely in the bed, but more complex arrangements are possible. Hamilton–Russell traction uses a single cord to apply a horizontal force that is twice the vertical force because the cord, on its horizontal run, runs through a three-pulley system which gives it a velocity ratio of 2. This means that a 1 kg weight will exert a 1 kg upwards pull, but a 2 kg longitudinal pull (Fig. 9.7).
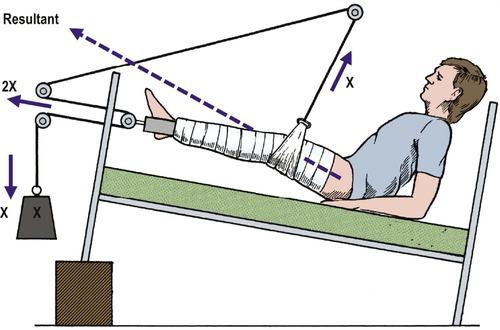 |
| Fig. 9.7 Hamilton–Russell traction. The longitudinal traction has a velocity ratio of 2 and the vertical traction a velocity ratio of 1. The resultant force is 2.24 times the mass of the weight applied at an angle of 27° to the horizontal. |
Balanced traction. It is uncomfortable to leave a broken limb lying on a bed so that the fragments rub against each other whenever the patient turns over (Fig. 9.8). Greater comfort can be achieved by resting the limb on a splint which is then suspended so that the limb is, in effect, in a gravity-free field.
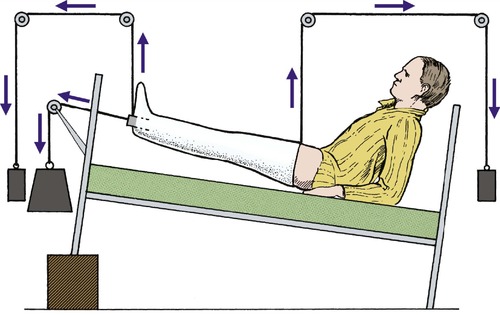 |
| Fig. 9.8 Balanced sliding traction. One weight applies longitudinal traction and others are applied to the upper and lower ends of the limb so that it ‘floats’ in a gravity-free field. |
In the most complicated arrangements this is done by resting the leg on a Thomas splint with a weight and pulley attached to each corner. If the weights are correctly adjusted the patient can be lifted almost with a fingertip, which makes nursing easier and avoids pressure sores. None of these weights act on the fracture, which must be controlled by a longitudinal force.
Although there are many advantages in complex systems of balanced traction, they are difficult to maintain and a simple system is often better.
Types of traction
• Skin or skeletal.
• Fixed or sliding.
• Fixed traction – may use splint or gravity.
• Sliding traction – may be balanced or not balanced.
External splints/slings/braces
Any device that holds a fracture steady is a splint and those that set hard around the limb are casts. A cast will hold a limb straight and still but cannot hold it out to length; casts are therefore unsuitable for fractures in which the limb is shortened.
To maintain the alignment of a bone, the plaster is not just wrapped around the leg and allowed to set; pressure must be applied to the cast while it sets so that the bones are held accurately by three-point pressure (Fig. 9.9).
 |
| Fig. 9.9 Three-point pressure. The fracture line is closed by pressure at three points. |
Use
Splints do not provide rigid fixation. If applied immediately after the fracture they will become loose as the swelling of trauma subsides and muscles waste. The position of the fracture must be checked regularly and the position reviewed.
If the fracture slips there are several options:
1. The position may be accepted (Fig. 9.10).
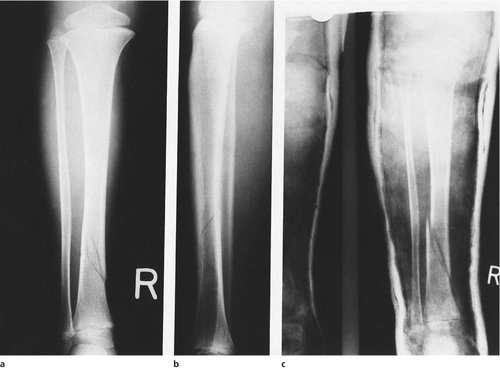 |
| Fig. 9.10 Loss of fracture position: (a), (b) a spiral fracture of the tibia with minimal displacement on the day of injury; (c) the position 10 days later. The fragments have moved but the position is still acceptable. |
2. The fracture may be manipulated again.
3. It may be necessary to abandon conservative treatment.
Materials
All casting bandages consist of a solid element covering a fibrous material. The solid part gives rigidity and the flexible part prevents it cracking. Reinforced concrete contains steel rods for similar reasons.
The original casting material was developed by the ancient Egyptians, who are said to have treated fractures by resting the injured limb in boxes containing Nile mud and straw which set hard and was broken away when the fracture had united. An Arab surgeon was the first to describe the use of plaster to treat fractures in ad 970, but it was not until the early part of the 20th century that plaster was widely used in Europe.
Plaster of Paris
The best known casting material is plaster of Paris, a high quality gypsum that originally came from Montmartre. Plaster of Paris bandages consist of a tough open-weave fabric coated with hemihydrated calcium sulphate powder. Book muslin or crinoline were originally used as the fabric. When dipped in water the plaster becomes hard with crystalline hydrated calcium sulphate. The chemical reaction involved is exothermic and the plaster therefore becomes warm as it sets:

Plaster of Paris is light, comparatively soft, porous so that the limb can ‘breathe’, easy to remove and has stood the test of time. Its greatest disadvantages are that it disintegrates when wet and that 24–48 h are needed for it to harden enough to take the patient’s weight.
Modern materials, including resins and fibreglass, are now used frequently. They are lightweight and easy to apply. Unfortunately, they are not as easy to mould as plaster of Paris and removal can be more difficult. Patients do, however, prefer them.
Applying a plaster correctly takes much practice, but the following points are particularly important (Fig. 9.11):
1. Padding. Apply light padding of soft wool or cotton over bony areas to avoid pressure sores, preferably over a thin layer of stockinette so that the padding will not roll up inside the cast and cause uncomfortable ridges.
2. Water temperature. The hotter the water, the faster the plaster sets. Cold water gives more time to apply the cast and so is recommended for beginners.
3. Dipping. When dipping a plaster bandage, hold it lightly so that water can penetrate to its centre. Hold it under the water until the bubbles stop and then drain it until the drips stop (Fig. 9.12). Do not wring it out like a dishcloth.
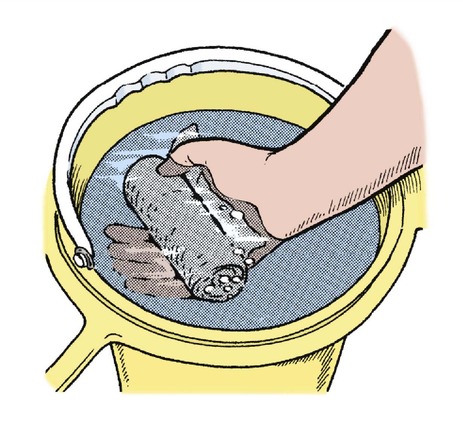 |
| Fig. 9.12 Dipping plaster bandage. The plaster is held loosely under the water and not gripped. The end of the bandage is separated from the rest of the roll. |
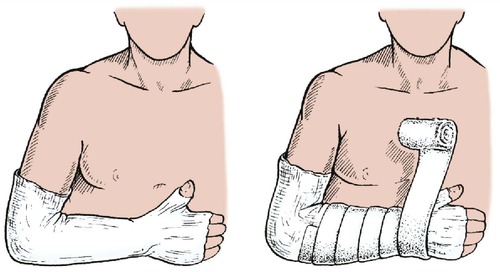 |
| Fig. 9.11 Applying a padded plaster. Stockinette is first placed over the arm and plaster wool is rolled gently over the stockinette. |
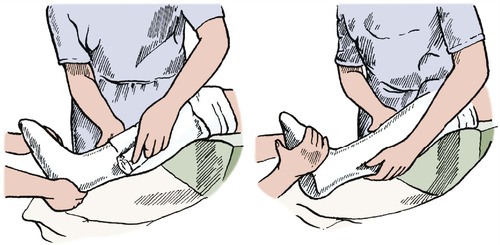 |
| Fig. 9.13 Applying the plaster. The plaster bandage is rolled gently and carefully around the limb. |
5. The ‘100–90 trick’. If a joint has to be held flexed to 90°, flex it 10° more, apply the plaster and then put the limb in the correct position (Fig. 9.14). This avoids hard wrinkles in the plaster, which can cause pressure sores at the flexure crease.
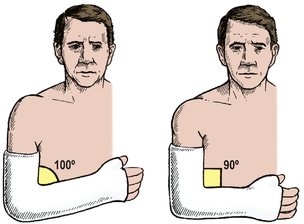 |
| Fig. 9.14 The ‘100–90’ trick. The plaster is applied at 100° and then straightened to 90° to avoid pressure at a joint. |
6. Splitting the cast. If the plaster is applied soon after injury, or at operation, split the cast and padding down to skin so that it can be spread or removed quickly in case of limb swelling.
Once the plaster is applied and set, check the following:
1. Edges. Check that the edges are not too sharp and do not press on the skin. If they do, bend the edges but do not cut the edge off because this loosens the plaster and makes the problem worse (Fig. 9.15).
 |
| Fig. 9.15 Tight plasters. The edge should not be trimmed – this leaves a sharp ragged edge. Plaster benders should be used to ease the cast. |
2. Circulation. Check that the peripheral circulation is good, that toes and fingers will extend fully and have normal sensibility, colour and circulation. If they do not, the plaster may need splitting or removing.
3. Advice. Tell the patient that if the limb is painful, numb, cold or discoloured, help should be sought at once.
Removing a plaster also needs care:
1. Saws. If an oscillating saw is used to cut the plaster it must only be pressed ‘up and down’, not dragged along the length of the cast (Fig. 9.16). The saw blade can cause a nasty scratch if dragged along the skin and a blunt blade can burn. Before using the saw, test the blade on the skin of your own forearm; this will reassure the patient and remind you that the instrument is potentially dangerous.
 |
| Fig. 9.16 Removing a cast with a power saw. The round blade oscillates. The plaster is cut by up and down movements at right-angles to the plaster. |
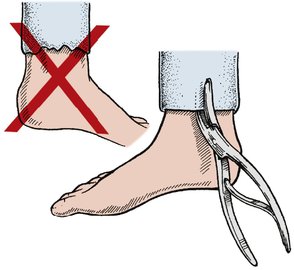
2. Shears. If plaster shears are used, particularly on an unconscious patient, be certain that the shears cut plaster only and do not bruise skin (Fig. 9.17). It is distressingly easy to break the skin, especially in older patients.
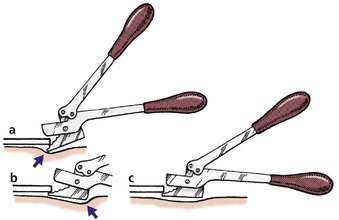 |
| Fig. 9.17 Removing the cast with shears: (a) the tip of the shears is digging into the patient’s skin; (b) the heel of the shears is digging into the patient’s skin; (c) the blade of the shears is parallel with the skin and the plaster can be removed safely. |
3. Advice


Related posts:


Stay updated, free articles. Join our Telegram channel
Full access? Get Clinical Tree
