Lateral Approaches to Interbody Fusion
Keith W. Michael
S. Tim Yoon
DEFINITION
Lateral approach to interbody fusion
Many different names including extreme lateral interbody fusion (XLIF), direct lateral interbody fusion (DLIF), or oblique lumbar interbody fusion (OLIF). It is often called the transpsoas approach because in the lumbar spine, it requires traversing the psoas muscle. The lateral approach can also be used to access thoracic spine as well.
Typically, this technique relies on a combination of neuromonitoring and direct visualization to safely navigate through the lateral lumbosacral neurologic plexus.
ANATOMY
After the superficial dissection, the lateral abdominal wall muscles are split to approach the lumbar spine. This leads directly into the retroperitoneal space.
The psoas muscle flanks the lateral lumbar spine and is covered by a thin, slippery fascia.
Within the psoas muscles traverse the lumbosacral plexus, genitofemoral nerve, and lateral cutaneous nerve (FIG 1).1,7
Moro et al5 identified and counted the location of the lumbar plexus and genitofemoral nerve relative to each disc space in 12 cadavers. Although there are general trends for each disc level in an anterior to posterior distribution, each individual has significant variability that can be different from the “typical” situation.5
As one progresses distally in the lumbar spine, the lumbosacral plexus covers more of the ventrolateral aspect of the lumbar spine.
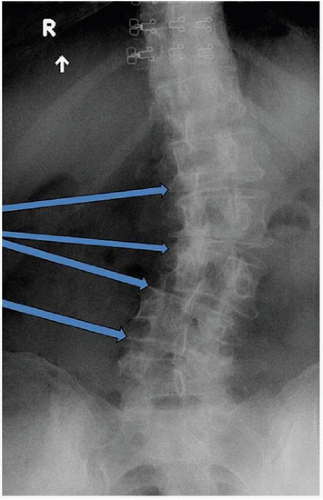
The lateral iliac crests are typically slightly below or at the level of the L4-L5 disc space. However, there is variability between patients, and at times, high iliac crest (or deep seated L4-L5 disc space) may prevent parallel access to the L4-L5 disc space from a direct lateral approach (FIG 2).
When approaching the upper lumbar levels, the ribs may interfere with direct lateral approach to the spine. This may require choosing an incision that is not perfectly lateral to the disc space or excising a rib to improve access (see FIG 2).
Anteroposterior (AP) and lateral lumbar radiographs are useful to assess the rib and iliac crest position relative to the level that needs to be approached.
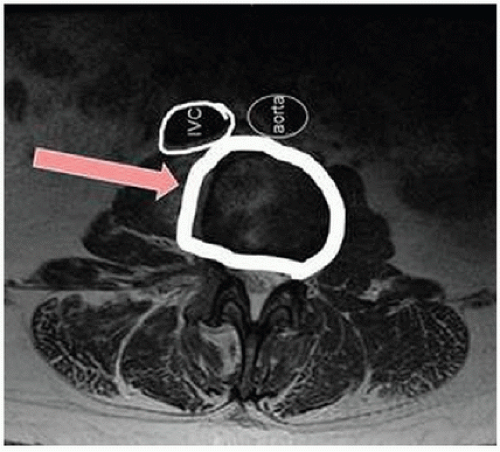
Aorta, inferior vena cava, and common iliac vessels run on the ventral surface of the anterior longitudinal ligament (ALL). Axial imaging allows preoperative localization of these structures to understand the safe zone for each patient (FIG 3).
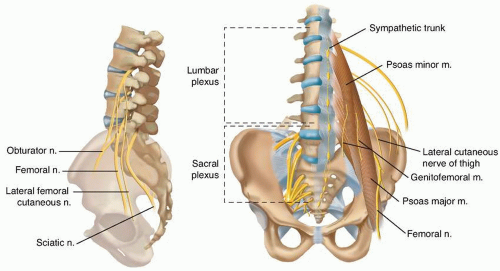 FIG 1 • The lumbar plexus exits the foramen traveling through the psoas muscle while moving more ventral as it progresses caudally. n, nerve; m, muscle. |
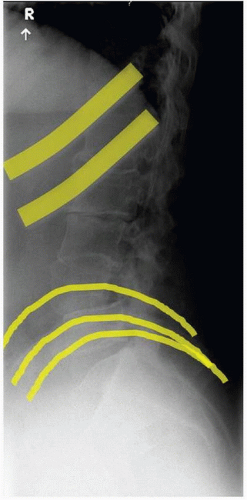 FIG 2 • Lateral lumbar radiographs superimpose the ribs and iliac crest over the disc spaces to determine which levels are accessible with a lateral approach. |
SURGICAL MANAGEMENT
Indications
Spondylolisthesis low grade
Isthmic
Degenerative
Deformity
Scoliosis
Kyphosis
In combination with pedicle subtraction osteotomy (PSO)
Foraminal stenosis with vacuum disc and instability
Adjacent segment disease with instability
Discitis after failure of medical management
Other situations when interbody fusion is necessary
Preoperative Planning
AP and lateral radiographs allow assessment of accessibility of each disc level relative to the iliac crest and ribs.
Determine side of approach. Typically, the disc is approached from the convex side (ie, the more open side of the disc) to facilitate intradiscal work. However, in scoliosis cases, when the approach to the L4-L5 level (the convex side) dictates the side of the approach, this may place the other levels on the concave side. Surgeons often perform the surgery on the same side (convex at L4-L5 and concave at the other lumbar levels) and work around the inconvenience of working in the concavity (FIG 4). In flexible curves, bending the patient can alleviate this problem significantly. Rarely, some surgeons may choose to flip the patient to work on the convex side for the rest of the curve.
Establish a neuromonitoring plan. Typically, electromyography (EMG) monitoring is performed. This can consist of both free-running EMG as well as stimulated proximity sensing. EMGs help to monitor the motor branches of the lumbosacral plexus; however, sensory nerves cannot be monitored. The genitofemoral and lateral cutaneous nerves cannot be monitored.
Ensure the anesthetic plan is compatible with the neuromonitoring plan. The patient must have muscle twitches during the surgery to allow for EMG monitoring.
Positioning
Positioning on the operative table is extremely important in lateral interbody fusion.
Typically, the procedure is performed on a regular operative bed with the capacity to break or flex in the middle. Usually, the table’s orientation is reversed such that the base is attached to the feet, allowing the C-arm to pass freely underneath the thoracolumbar spine.
The patient is positioned in a true lateral position as close to vertical as possible. This can be fine-tuned under fluoroscopy by tilting the bed.
The iliac crest should be positioned approximately 4 inches cephalad to the center of the break in the table. This allows the flexion of the table to open the disc space while still giving enough room for the C-arm to pass underneath the table to provide a perfect lateral of the L4-L5 disc space (FIG 5A).
Hips are flexed approximately 30 degrees to take tension off the iliopsoas. Knees are flexed approximately 30 degrees to
compensate for the hip flexion and to keep the feet in a good position on the bed.
Once positioned and prior to flexing the table, the patient is taped to the table. First, tape the patient horizontally at the hip (just inferior to the iliac crests) and at the chest (just below the axilla). Next, a crossing pattern of tape holds the legs in position because the table will be tilted throughout the case (FIG 5B).
After taping, flex the table. Flexing typically requires reverse Trendelenburg at the base while flexing the long end of the table. The goal is to have the involved disc space perpendicular to the floor. Feel the tension of the abdominal oblique muscles on the convex side to determine when sufficient flexion has been achieved, then use reverse Trendelenburg to make the lumbar spine parallel with the floor. Another round of taping of the hip area may be necessary.
Approach
The approach technique in the lumbar spine can be divided into the one-incision or two-incision technique.
With the one-incision technique, a single incision is created directly lateral to the disc space in a position that is as parallel as possible to the two endplates of the disc (FIG 6A).
With the two-incision technique, an initial incision is made posterior to the direct lateral position. Then a second incision is made directly lateral to the spine in a manner similar to the one-incision technique.
The addition of the posterior incision allows finger localization of the retroperitoneal space prior to incising the lateral abdominal musculature and facilitates finger-guided (through the posterior incision) placement of the instruments to the lateral disc space (FIG 6B,C).
The single-incision technique can also be used safely, but extra care must be taken to identify the retroperitoneal space, and a larger incision may be necessary to allow a finger to be placed through the direct lateral incision as opposed to through the posterior incision.
If multiple levels are involved, a single longitudinal incision or multiple small transverse incisions paralleling each of the involved disc spaces can be used. Multiple well-localized transverse incisions at each disc space have the advantage of ensuring one is able to work directly aligned over each disc space without undue soft tissue tension.6
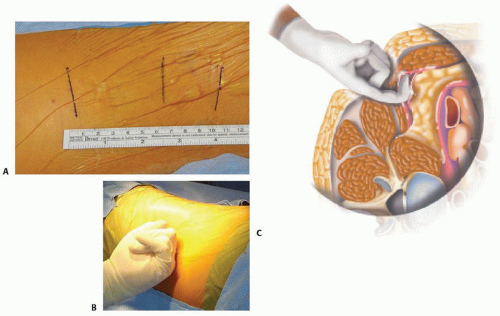 FIG 6 • A. Three incisions are planned, each parallel to the respective disc space. This is the one-incision technique as the posterior incision is omitted. B,C. The posterior incision allows finger localization of the disc space and direct finger-guided delivery of instruments to the lateral disc space.
Stay updated, free articles. Join our Telegram channel
Full access? Get Clinical Tree
 Get Clinical Tree app for offline access

|
