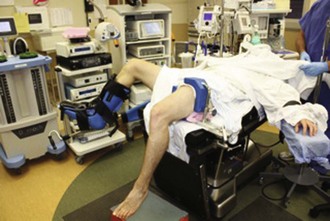
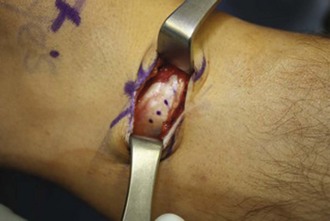
Chapter 74 ACL injury most commonly occurs during a noncontact deceleration change of direction maneuver. Patients typically feel and possibly hear a “pop” at the time of injury. Patients experience acute pain and are unable to continue their sport or activity. Comprehensive provocative examination testing and physical examination findings in the acute and chronic settings are outlined in Box 74-1 and Table 74-1. Anteroposterior (AP), lateral, and oblique radiographs are obtained to assess for fractures in the acute setting. A fracture along the lateral rim of the tibial plateau is a Segond fracture or lateral capsular sign and is pathognomonic for ACL tear. In most cases, no fracture is seen. Magnetic resonance imaging (MRI) may be useful in the acute setting to confirm a suspected ACL tear and to detect any additional ligamentous, meniscal or chondral injuries at the time of injury. In the chronic setting, MRI is seldom needed to identify ACL injury because provocative Lachman and pivot-shift testing results are positive. TABLE 74-1 Patients who experience an ACL tear and subsequent instability will benefit from surgical reconstruction. Young patients, particularly skeletally immature patients, should undergo early ACL reconstruction to restore rotational knee stability and minimize the risk of meniscal tears.1,2 Potential growth disturbances in skeletally immature patients is a concern; however, the incidence of growth disturbance with a hamstring graft is very low, and the deformity can be better salvaged than with the meniscal-deficient knee. A table of indications and relative contraindications for surgery is presented in Box 74-2. Position the patient supine on the operating table and place a tourniquet around the proximal thigh of the operative leg. Position the operative leg in a standard knee arthroscopy leg holder with the foot of the operating table flexed completely. The leg holder can be adjusted and rotated proximally to allow for greater knee flexion. Position the contralateral leg in an Allen stirrup with the hip flexed and abducted with mild external rotation. Ensure that there is no pressure on the peroneal nerve and calf (Fig. 74-1). Alternatively, the surgeon can position the operative leg flexed over the side of the table using a lateral post and maintain the contralateral leg extended on the operating table. Prepare, drape, and exsanguinate the leg and inflate the tourniquet. Box 74-3 provides the steps of this procedure. Make a 2- to 3-cm vertical incision along the posteromedial crest of the tibia, centered three fingerbreadths below the medial joint line. A vertical incision allows the surgeon a more extensile incision should it be necessary to lengthen the incision for ease of hamstring harvest. Making the incision obliquely or transversely might decrease the risk of sensory nerve injury, but these incisions are not extensile and need to be optimally placed. Incise the skin and subcutaneous fat down to the sartorius fascia. Palpate the hamstring tendons and incise the sartorius fascia horizontal and parallel inferior to the gracilis tendon and proximal to the semitendinosus tendon (Fig. 74-2). Flex the knee to 90 degrees and develop a plane by sweeping a finger in the proximal and posterior direction deep to the sartorius fascia along the gracilis tendon. Flex the finger to capture the gracilis tendon. Loop a Penrose drain around the tendon. Release any fascial slips from the inferior border of the gracilis. Strip the gracilis tendon from its musculotendinous junction with a blunt tendon stripper. Pull back on the gracilis tendon insertion site and identify the semitendinosus tendon along the inferior border of the gracilis. Loop a Penrose drain around the semitendinosus tendon (Fig. 74-3). Identify and cut any fascial slips to the medial gastrocnemius originating from the inferior border of the semitendinosus tendon. Strip the tendon with a blunt tendon stripper (see Fig. 74-3). Prepare the tendons by stripping the muscle from the tendon with scissors or a broad periosteal elevator (Fig. 74-4). Place an absorbable No. 1 stitch in the end of each tendon for tensioning. Double-loop and size the tendons with sizing sleeves. Select the diameter of the tendons by choosing the smallest-diameter sleeve that freely slides over the looped tendons. Subperiosteally remove the tendons from the anterior tibial crest at their common tendinous insertion, including 5 to 10 mm of periosteum (Fig. 74-5). Suture the common tendinous insertion with a single suture. Store the tendons in the sizing sleeve and a damp sponge in a kidney basin on the back table. Cover the kidney basin with an occlusive Ioban sheet to ensure the safety of the graft on the back table.
Hamstring Tendon Autograft for Anterior Cruciate Ligament Reconstruction
Preoperative Considerations
Examination
Significance
Lachman and pivot-shift test
ACL injury
Straight-leg raise
Extensor mechanism injury
Patella apprehension
Patella instability
MPFL tenderness
Patella instability
Varus or valgus laxity at 30 degrees
Collateral ligament injury
Varus or valgus laxity at 0 degrees
Capsular injury
Tibial external rotation at 30 degrees
PLC injury
Tibial external rotation at 90 degrees
PCL injury
Posterior drawer at 90 degrees
PCL injury
Quadriceps active test
PCL injury
Joint line tenderness
Meniscal tear, chondral injury, capsular avulsion
Lateral tibial plateau tenderness
Bone bruise, fracture
Extension recurvatum test
PCL and PLC combined injury
Reverse pivot shift test
PCL combined injury
Surgical Technique
Preferred Surgical Technique
Tendon Harvest
Related posts:
 Knot-Tying and Suture-Passing Techniques
Arthroscopic Remplissage for Management of Engaging and Deep Hill-Sachs Lesions
Open Repair of Multidirectional Instability
Arthroscopic Meniscus Repair: Inside-Out Technique
Tendon Augmentation Devices in Rotator Cuff Repair
Arthroscopic Lateral Retinacular Release and Lateral Retinacular Lengthening
Knot-Tying and Suture-Passing Techniques
Arthroscopic Remplissage for Management of Engaging and Deep Hill-Sachs Lesions
Open Repair of Multidirectional Instability
Arthroscopic Meniscus Repair: Inside-Out Technique
Tendon Augmentation Devices in Rotator Cuff Repair
Arthroscopic Lateral Retinacular Release and Lateral Retinacular Lengthening
![]()
Stay updated, free articles. Join our Telegram channel

Full access? Get Clinical Tree


Hamstring Tendon Autograft for Anterior Cruciate Ligament Reconstruction