External Fixation Methods for Salvage of Failed Total Ankle Arthroplasty
Paul S. Cooper
INTRODUCTION
Key to the surgeon’s approach to total arthroplasty is a clear strategy for salvage in both noninfected and infected cases. Options include either revision arthroplasty or conversion to arthrodesis with internal or external fixation.1,2,3,4,5,6,7 and 8 Challenges in the salvage scenario include compromise of soft tissue envelope and loss of bone stock on both sides of the ankle joint, resulting in a profound leg length discrepancy (LLD). Bulk allografts are commonly advocated to fill the defect, but face fixation challenges, resulting in high rates of both nonunion and late structural collapse.9,10,11 and 12 Also, bulk allografts cannot be used in septic cases. Finewire external fixation has evolved to be an excellent solution for long bone deficiencies, trauma, and osteomyelitis.13,14 and 15 This makes external fixation an excellent option for salvage in failed total ankle scenarios. External fixation may be viewed as a standalone solution, an adjunct to internal fixation methods, as well as a temporizing method when considering revision arthroplasty.
SALVAGE OF INFECTED TOTAL ANKLE ARTHROPLASTY WITH EXTERNAL FIXATOR
In septic conditions where delayed reimplantation or the use of internal fixation is not a realistic option, arthrodesis with external fixation is a viable alternative.3,8,14,16 The resultant bone defect or the remaining tibia and talus following removal of the implant may range from 2 to 4 cm or more following debridements. Primary compressive arthrodesis, which is exceptionally challenging, requires limb shortening, resulting in an unacceptable leg length deficiency for shoe modifications to compensate.
METHOD
The patient is placed in a supine position on the operating room table, with the leg in neutral rotation using bumps on the ipsilateral buttock. A well-padded thigh tourniquet is applied. The limb is prepped and draped in a standard fashion to above the knee. The infected implant is removed by utilizing the previous anterior approach. A generous synovectomy with debridement of the capsule is performed. Bone is resected back to bleeding surfaces free of osteomyelitis. If the defect is more than 2 cm, direct bone-to-bone apposition between the talus and tibia will be difficult due to malleolar impingement (Fig. 19.1). To allow for docking, medial and lateral malleolar slides using an oblique osteotomy will reset position based on the docking of the tibial and talar surfaces (Fig. 19.2). The ankle is then stabilized temporarily with a threaded Steinmann pin, one from the medial distal tibia into the lateral talus and the other directed through the sinus tarsi laterally into the medial tibia (Fig. 19.3).
 Figure 19.1. Sawbone demonstration of residual bone defect following total ankle extirpation. |
 Figure 19.2. Malleolar slide osteotomies of both the fibula and the medial malleolus allow for tibiotalar contact. |
 Figure 19.3. Temporary stabilization with a threaded Steinmann pin. |
A premade external fixator may then be slid over the stabilized limb (Fig. 19.4). Several decision points need to be incorporated in the premade frame applied. If the plan is for sole isolated ankle compression arthrodesis, then a two-block tibial ring connected by compression struts to an enclosed foot ring is sufficient. Additional rings and struts may be applied at a later date above the tibial ring block should lengthening then be desired.
 Figure 19.4. Prebuilt external fixator allowing for separate levels of compression and distraction: (A) anteroposterior (AP) view and (B) lateral view. |
Alternatively, the premade frame can incorporate this additional feature from the start, adding additional struts and ring block proximal to those for the arthrodesis. The frame decision is either for direct compression at the ankle joint in isolation or with an additional level for future corticotomy and transport of a central tibial segment if bone loss is anticipated and resultant LLD at the ankle joint amounts to more than 2 cm. With the frame lined up distally to have the foot ring in line with the glabrous skin junction, a reference wire is placed through the calcaneus oriented from medial to lateral transversely (Fig. 19.5).
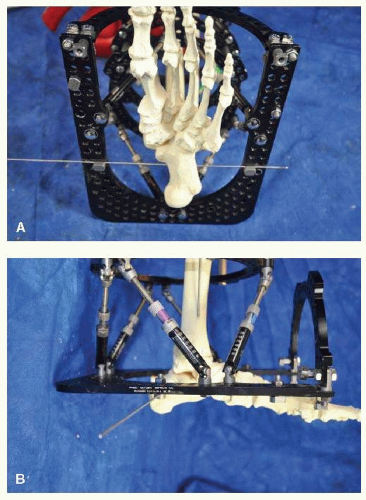 Figure 19.5. Distal reference wire placed transversely through the os calcis: (A) plantar view and (B) lateral view. |
This is tensioned to 130 kg, followed by a second reference wire placed on the proximal ring relationship through the tibia oriented from medial to lateral and similarly tensioned to 130 kg (Fig. 19.6). There should be adequate clearance of one to two fingerbreadths from the anterior ring to the anterior tibia. Similarly, there should be two-fingerbreadth clearance from the back of the foot ring to the os calcis (Fig. 19.7).
 Figure 19.6. Second reference wire placed proximally in the tibia. |
 Figure 19.7. (A, B) Views of position of the limb in the external fixation frame. |
Once these wires are tensioned, overall alignment is assessed. Then, additional wires placed in an oblique fashion in talus, calcaneus, and forefoot are similarly tensioned (Figs. 19.8 and 19.9). Additionally on the tibia, either cross wires on the tibial ring block or a combination of fine wire and 6-mm half pins from pin clamps or rancho cubes may be used (Fig. 19.10). Once the leg is secured on the frame, the threaded Steinmann pins are removed and additional compression is applied between the foot ring and tibial ring block through either adjustable struts or threaded rods depending on whether single-plate axial compressions or multiple-plane deformities are required for correction,
respectively. A vacuum-assisted closure dressing is applied on the anterior wound with the plan for future debridements until the ankle joint is adequately clean for primary wound closure.
respectively. A vacuum-assisted closure dressing is applied on the anterior wound with the plan for future debridements until the ankle joint is adequately clean for primary wound closure.
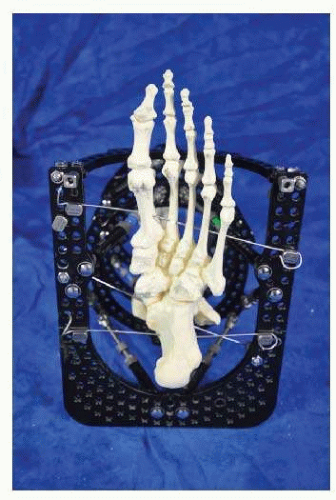 Figure 19.8. Additional oblique wires placed in the hindfoot. |
 Figure 19.9. Wires placed to stabilize the forefoot and midfoot. |
Following delayed primary wound closure, continuous compression through the struts is applied for the first 6 to 8 weeks postoperatively. Initial intravenous antibiotics are then followed with orals for a minimum of 6 weeks. Questions of residual infection may be addressed with needle biopsy at the arthrodesis site. Delayed unions or nonunions may require subsequent bone grafting at the arthrodesis site.
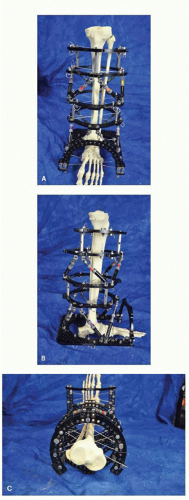 Figure 19.10. Final construct demonstrating a minimum of two crossed fine wires per segment: (A) AP view, (B) lateral view, and (C) axial view. |
In cases where the predicted LLD is more than 2 cm, limb lengthening may be either performed simultaneously with compression arthrodesis or delayed while the patient remains in the external fixator.14,16 Traditional site for corticotomy is in the proximal one-third of the tibia, with an additional tibial ring block consisting of a full and five-eighth ring proximal to the corticotomy site connected by struts. The corticotomy may be safely approached with a 2- to 3-cm longitudinal incision on the tibial crest followed with a subperiosteal dissection. It is critical not to disrupt the periosteum continuity since this is supplying the bone regenerate following lengthening. Serial drill holes are circumferentially followed by a narrow sharp osteotome to complete the corticotomy (Figs. 19.11 and 19.12). The posterior cortex is fractured with a 90° twist action from a wider osteotome; typically, a plier will generate an adequate lever arm to generate the necessary torque (Figs. 19.13 and 19.14). The fibula is approached through a separate 2-cm incision at the level of the tibia and is best osteotomized obliquely with a sagittal saw (Fig. 19.15). The two fragments are positioned in situ for 10 days, followed by a gradual lengthening process of 1 mm per day divided into quarter turns. Once desired length is achieved, the frame is placed in static mode for approximately double the time to lengthening (Fig. 19.16). External fixator is removed once radiographic evidence of consolidation of the regenerate appears. Incomplete regenerate may require subsequent bone grafting to complete the process. Conversion into compression, releasing the distraction somewhat, may also allow the regenerate to complete. In cases of incomplete regenerate that is unable to independently support removal of the fixator, insertion of a locked intramedullary (IM) nail may be used upon removal of the frame.15
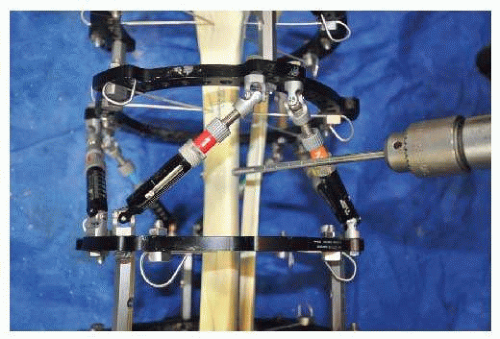 Figure 19.11. Corticotomy in proximal tibial diaphysis using 4-mm drill bit. |
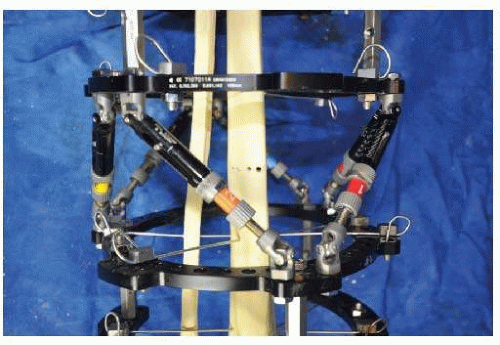 Figure 19.12. Circumferential linear drill holes at corticotomy site. |


