Expsures of the Upper Extremity: Humerus, Elbow, Forearm
Bernard F. Morrey
Matthew C. Morrey
INTRODUCTION
As complexity in the management of elbow problems has increased over time, it stands to reason that there has been an increase in the need to expose the anatomy both proximal and distal to the elbow joint. Facility with exposures to the elbow as well as the humerus and forearm, characterized by flexibility and extensibility, is an essential prerequisite to the execution of the full spectrum of elbow surgery, which is discussed in this volume. In this chapter, we provide detailed but useful exposures of all three regions: first, the humerus; then, the elbow proper; and finally, the forearm.
We have included only those exposures that we have found useful or “relevant” to our practice over the years: Chapter 1A: Exposure of the Humerus; Chapter 1B: Exposure of the Elbow; and Chapter IC: Exposure of the Forearm (1). Throughout, emphasis is placed how limited exposures can be expanded to address broadened pathology and perform more complex procedures. Details of exposures as applied to specific pathology and technique are the subject matter for the remainder of the volume.
CHAPTER 1A: SURGICAL EXPOSURES OF THE HUMERUS
ANTEROLATERAL EXPOSURE OF THE HUMERUS
Introduction
The most common and useful approach to the anterior aspect of the humerus is through the anterolateral interval. The value of this exposure is that it can be extended proximally through the delto-pectoral interval to expose the proximal humerus and distally allows adequate access even to the anterior aspect of the elbow joint.
Indications
Fractures of the proximal and midhumeral shaft, malignancies, revision humeral component total shoulder, and total elbow arthroplasty. For the elbow, salvage revision of very proximal pathology requires use of this exposure as an adjunct to that of the elbow.
Position
The patient is placed supine with the arm across the chest or in the barber chair semireclined position.
Note: Care is taken to assure the primary elbow exposure is not compromised by the initial patient positioning.
Landmarks
The deltopectoral groove proximally, the lateral margin of the biceps and the mobile wad, the extensor muscle mass, distally.
Skin Incision
The limited midportion of the skin incision is from the anterior-inferior aspect of the deltoid’s attachment on the humerus to the lateral epicondyle (Fig. 1A-1).
This may be expanded proximally to include the distal portion of the deltopectoral groove (Fig. 1A-2).
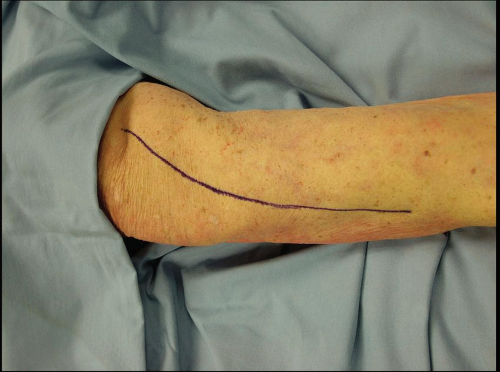 FIGURE 1A-1 |
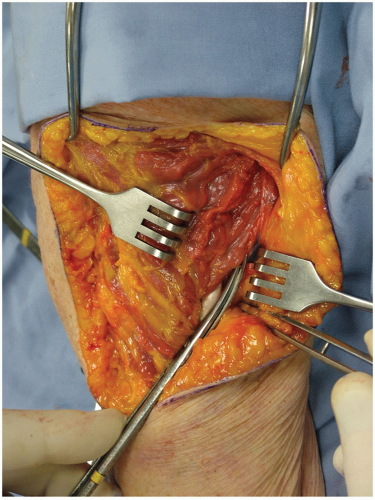 FIGURE 1A-2 |
Technique
Proximal
The skin and subcutaneous tissue are incised exposing the brachial fascia, which is likewise incised. Beginning proximally, the medial margin of the deltoid is defined along with the cephalic vein.
The deltopectoral groove is developed by blunt and sharp dissection.
The deltoid is retracted laterally and the pectoralis major medially. This exposes the long head of the biceps tendon, and deep in the interval, the pectoralis major attachment to the proximal humerus is visualized.
Note: The inferior humeral attachment of the pectoralis major is the proximal limit of the exposure.
The proximal margin of the pectoralis is retracted, exposing the circumflex vessels. Release of the attachment allows access to the proximal major attachment portion of the humeral shaft (Fig. 1A-3A and B).
Retracting the deltoid laterally and the pectoralis major medially allows ready access to the proximal humeral shaft distal to the subscapularis muscle and lateral to the long head of the biceps tendon.
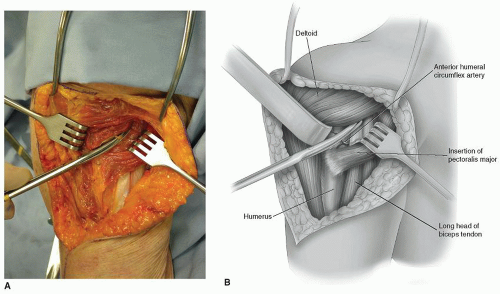 FIGURE 1A-3 |
Distal Extension Note: For a distal expansion, the skin incision is carried distally over the lateral margin of the biceps muscle to the extent needed.
The brachial fascia is split distally, exposing the lateral margin of the biceps. The cutaneous portion of the musculocutaneous branch of the nerve is identified and protected as it emerges from the lateral margin of the biceps distally.
The brachialis muscle is identified along with the interval between the brachialis and the brachio-radialis muscles. The interval is developed by sharp dissection (Fig. 1A-4A and B).
Note: Alternately, the brachialis muscle may be split longitudinally in line with the lateral margin of the biceps muscle.
The radial nerve is palpated or observed on the undersurface of the brachioradialis (Fig. 1A-5) and is exposed by sharp dissection.
The brachialis muscle is carried medially, protecting the cutaneous branch of the musculocutaneous nerve and exposing the humeral shaft.
The humeral shaft is identified and brachialis muscle is elevated with a periosteal elevator. The radial nerve is protected and retracted laterally.
The humeral shaft may be exposed by sharp dissection proximally to the lateral origin of the brachialis muscle on the humerus, which is confluent with the deltoid attachment distally (Fig. 1A-6A and B).
Both attachments may be released allowing complete access to the entire proximal two-thirds of the humeral shaft (Fig. 1A-6C).
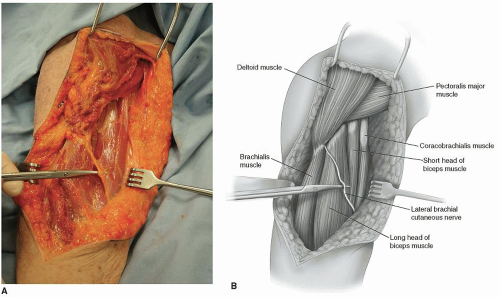 FIGURE 1A-4 |
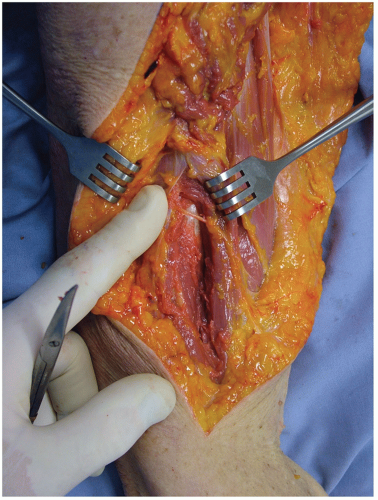 FIGURE 1A-5 |
 FIGURE 1A-6 |
THE EXTENSILE POSTERIOR MEDIAL EXPOSURE OF THE HUMERUS (MAYO EXPOSURE)
Comment
We have found this approach extremely valuable for exposing the posterior aspect of the humerus since it allows extension distally by employing the triceps reflexion exposure from the olecranon. This is a unique (Mayo) feature to the manner of exposing and protecting the radial nerve.
Indications
Fractures of the posterior aspect of the humerus, extensile exposure for revision of total elbow, humeral, and ulnar components.
Position
The patient is supine, and the arm is brought across the chest. The surgical table is tilted at 10 degrees opposite to the side of the surgeon.
Skin Incision
Proximally from the posterior medial aspect of the triceps in line with the long head and distally between the medial epicondyle and tip of the olecranon (Fig. 1A-7).
Note: This excision can be extended distally over the subcutaneous border of the ulna if required.
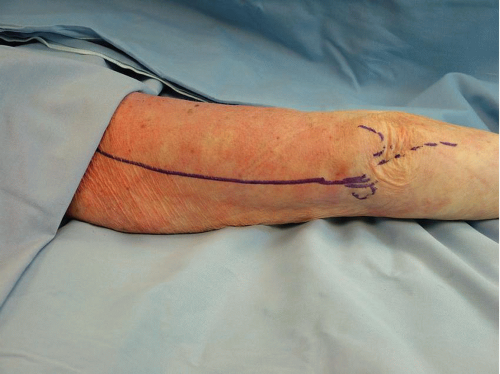 FIGURE 1A-7 |
Technique
The skin and subcutaneous tissue are entered, and the ulnar nerve is identified, and flaps are raised medially and laterally (Fig. 1A-8A and B).
The ulnar nerve is identified lying on the posterior surface of the intermuscular septum. The fascia protecting the nerve is split proximally, including the ligament of Struthers. The nerve is identified distally to the level of the cubital tunnel, but the cubital tunnel retinaculum is not released.
With sharp dissection, the triceps is freed from the distal aspect of the humerus (Fig. 1A-9B). The medial head of the triceps as well as the medial aspect of the long head of the triceps are retracted laterally.
The muscle is then elevated from the entire posterior medial aspect of the humerus with a periosteal elevator (Fig. 1A-10).
Note: The critical departure of this exposure is that it is extended, releasing the intramuscular septum, elevating the radial nerve subperiosteally, and retracting it laterally.
At this point, the triceps position is restored. The radial nerve is palpated as it penetrates the intermuscular septum laterally (Fig. 1A-11).
Once the location has been identified, the triceps muscle is reflected from medial to lateral, and the radial nerve is identified at the site of its penetration of the intermuscular septum laterally (Fig. 1A-12). The intermuscular septum is then elevated from the lateral aspect of the humerus. In so doing, this affords greater access to the proximal aspect of the humerus (Fig. 1A-13A and B).
The radial nerve is protected by gentle lateral retraction (Fig. 1A-14).
This maneuver allows complete exposure of the posterior aspect of the humerus. The radial nerve is protected in the brachioradialis musculature laterally since it has been freed from the intermuscular septum. The ulnar nerve is safely protected and is retracted medially.
 FIGURE 1A-8 |
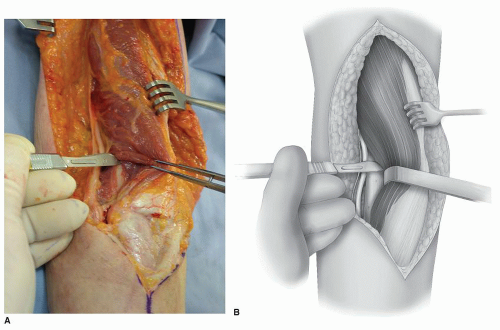 FIGURE 1A-9 |
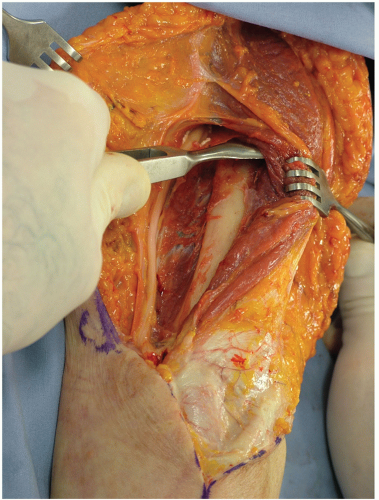 FIGURE 1A-10 |
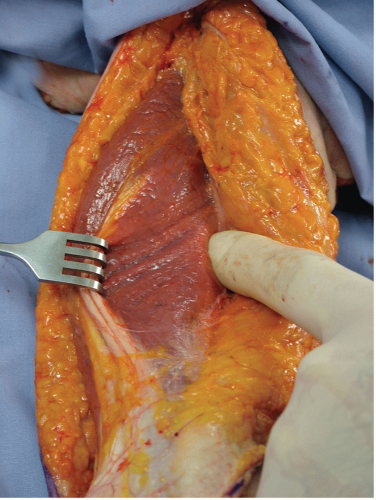 FIGURE 1A-11 |
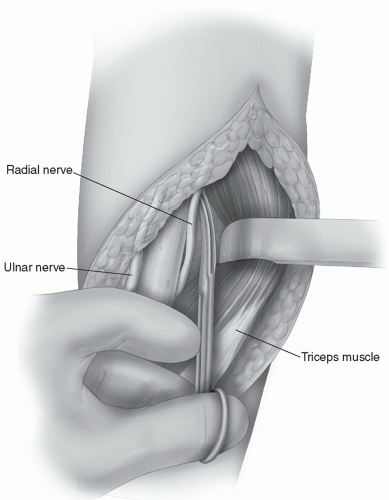 FIGURE 1A-12 |
 FIGURE 1A-13 |
Note: For extensile exposures at this juncture, the triceps may be reflected from the tip of the olecranon. The subcutaneous border of the ulna is identified, and the entire posterior aspect of the arm from the proximal humerus to the distal ulna may be readily and safely exposed.
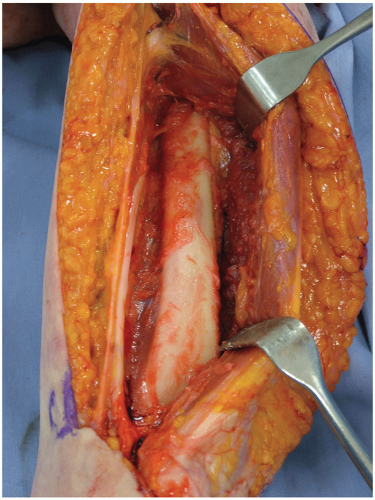 FIGURE 1A-14 |
TRICEPS-SPLITTING APPROACH
Comment
This along with exposure of the ulna is the easiest and safest exposure of the upper extremity. Recently, various modifications have centered on the manner of releasing the triceps attachment from the ulna.
Position
The patient is supine and the arm brought across the chest.
Indications
When extended distally, this can be used for exposure for total elbow arthroplasty and fracture of the midshaft of the humerus.
Skin Incision
A straight posterior skin incision as long as needed to address the pathology.
Technique
The flaps are elevated medially and laterally exposing the fascia of the triceps (Fig. 1A-15).
The fascia comprising the distal two-thirds of the triceps mechanism is split in line with its fibers in the midline from proximal to distal. The triceps is elevated medially and laterally to expose the humeral shaft (Fig. 1A-16).
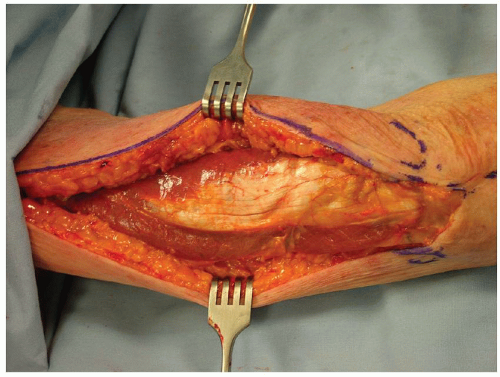 FIGURE 1A-15 |
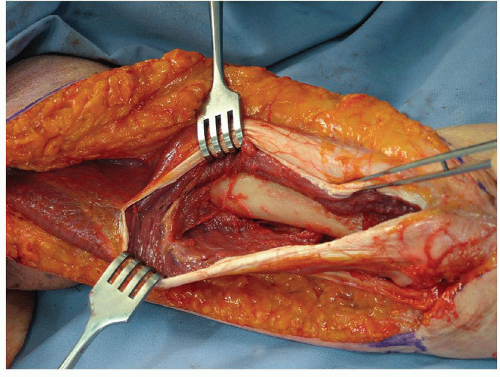 FIGURE 1A-16 |
Comment
The limiting factor of this procedure is the presence of the radial nerve as it enters the intermuscular septum proximally and laterally just distal to the deltoid attachment.
CHAPTER 1B: THE ELBOW
There are two conceptual incision types for the elbow: an extensile posterior or for purpose incisions. For extensile exposures, a straight posterior or posterior lateral incision is used (Fig. 1B-1). For fear of injuring the ulnar nerve, a posterior incision of variable length (12 to 18 cm) is placed just medial or lateral to the tip of the olecranon and not directly over the cubital tunnel (Fig. 1B-2). We term the posterior exposure the “universal” incision (Fig. 1B-3) since both medial and lateral elbow pathology can be addressed through a posterior skin incision by elevating skin flaps (Fig. 1B-4). However, care must be taken to keep the flap as thick as possible and elevate only to the extent needed.
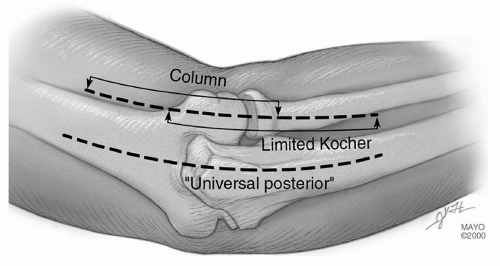 FIGURE 1B-1 |
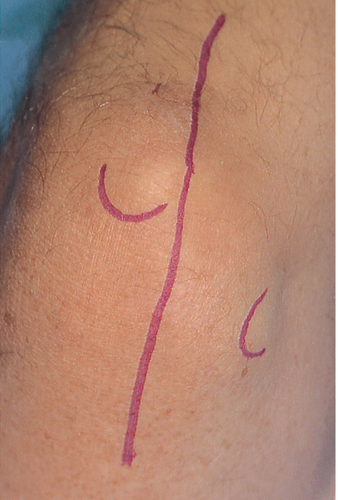 FIGURE 1B-2 |
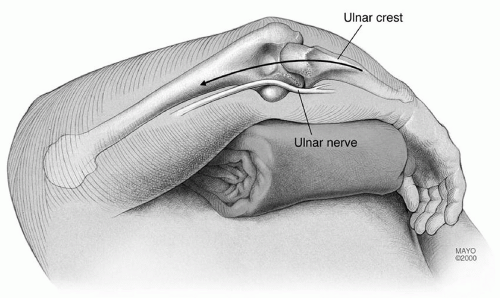 FIGURE 1B-3 |
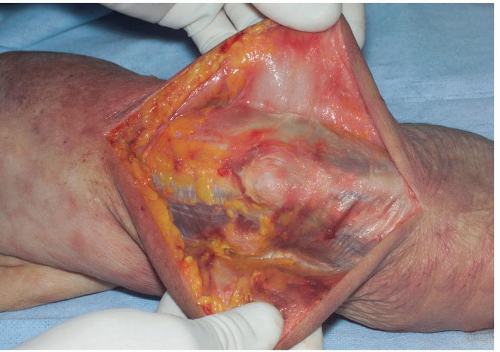 FIGURE 1B-4 |
OLECRANON OSTEOTOMY
Indications
Reduction and fixation, distal humeral, comminuted fractures (C3).
Landmarks
Tip of olecranon, medial epicondyle, ulnar nerve in cubital tunnel, nonarticular portion of olecranon.
Position
Supine, arm across the chest.
Skin Incision
Direct posterior from 6 to 8 cm proximal the tip of the olecranon, over subcutaneous border of the ulna; distal as required.
Technique
Elevate skin flaps medially and laterally to the epicondyles.
Identify ulnar nerve and incise medial ulnohumeral capsule (Fig. 1B-5).
The anconeus is released from the triceps, the ulnohumeral capsule is incised and the nonarticular portion of the greater sigmoid notch is identified.
A Chevron osteotomy is performed, apex distal with a depth of 5 to 10 mm (Fig. 1B-6). Protect the ulnar nerve medially. Use osteotome to crack last few millimeters to assure accurate subsequent reduction.
The olecranon fragment is reflected proximally exposing the distal humerus (Fig. 1B-7).
Repair uses the AO-K-wire, tension band technique with the wires in the anterior cortex, not down the canal (Fig. 1B-8).
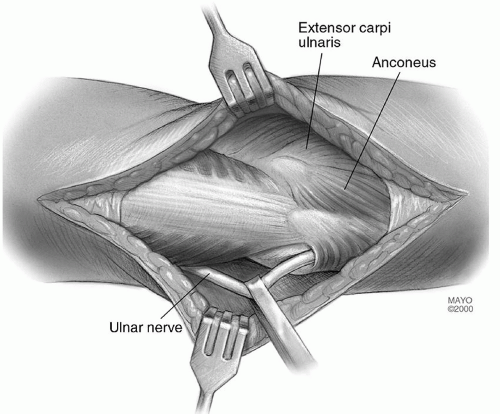 FIGURE 1B-5 |
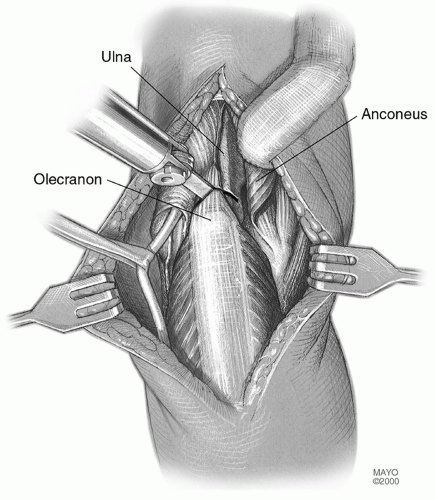 FIGURE 1B-6 |
 FIGURE 1B-7 |
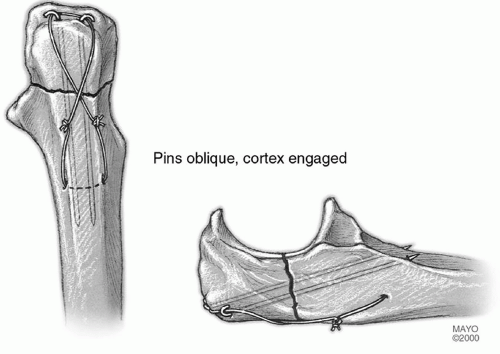 FIGURE 1B-8 |
MAYO OLECRANON OSTEOTOMY OF THE ELBOW: ANCONEUS PRESERVING
Concern with regard to transecting the anconeus attachment to the triceps has prompted the development of an olecranon osteotomy that preserves the anconeus origin and viability. The attractiveness of this exposure is that the anconeus dissection can be done very safely and quickly. This does preserve the anconeus triceps continuity in the event that a later reconstructive procedure may be necessary that uses the anconeus.
Position
The patient is supine with the arm across the chest.
Technique
Deep exposure is at the Kocher interval between the extensor carpi ulnaris and anconeus. The interval is entered, and the anconeus is identified and isolated (Fig. 1B-9).
The anconeus is elevated from its bed by sharp dissection leaving the attachment of its origin at the fascial expansion of the triceps, and the midportion of the sigmoid notch is identified laterally (Fig. 1B-10A and B).
Medially, the ulnar nerve is identified (Fig. 1B-11A and B), and the midportion of the medial ulnohumeral articulation is exposed (Fig. 1B-12A and B).
A V-shaped osteotomy is carried out as above with an oscillating saw (Fig. 1B-13). The osteotomy is completed with an osteotome (Fig. 1B-14)
The osteotomized olecranon along with the attached anconeus is elevated proximally (Fig. 1B-15).
Closure consists of the standard AO reattachment of the olecranon. The anconeus is brought back to its insertion on the ulna. The fascia over the anconeus is closed with a running 2-0 absorbable suture (Fig. 1B-16).
TIP: The ulnar nerve does not need to be mobilized unless dictated by the pathology.
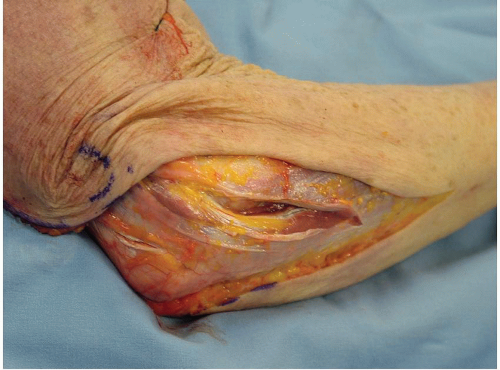 FIGURE 1B-9 |
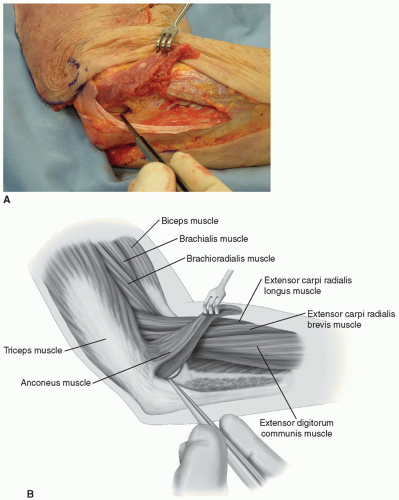 FIGURE 1B-10 |
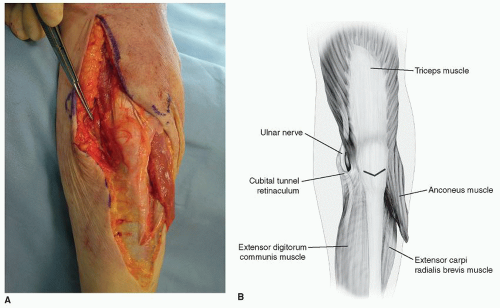 FIGURE 1B-11 |
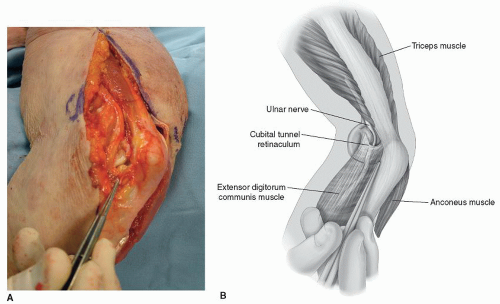 FIGURE 1B-12 |
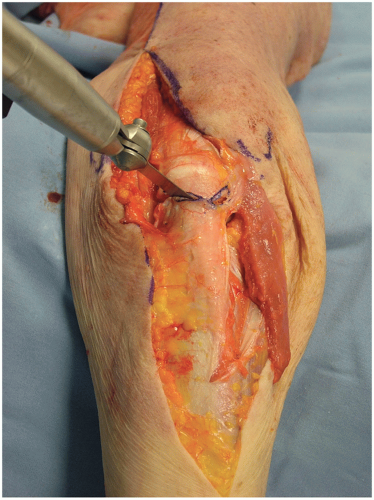 FIGURE 1B-13 |
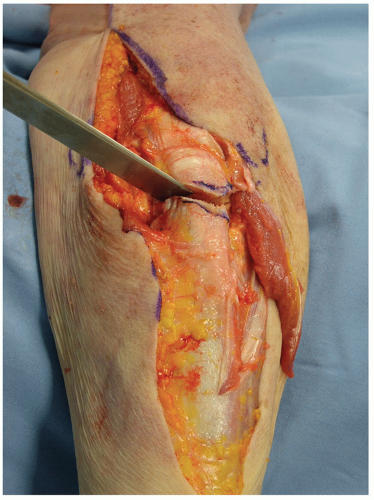 FIGURE 1B-14 |
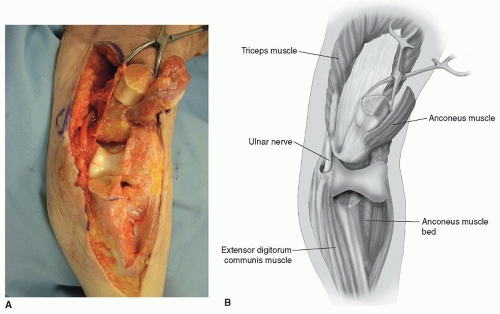 FIGURE 1B-15 |
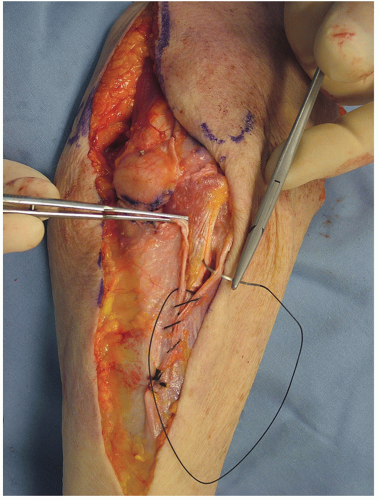 FIGURE 1B-16 |
Pitfalls
Avoid osteotomy in rheumatoid arthritis as the thin olecranon compromises healing if an osteotomy is carried out (2). The transverse osteotomy of McAusland is associated with an approximately 5% nonunion rate (2). Although for fractures the Chevron osteotomy may improve these results and decrease the nonunion rate, I personally have not had the clinical need to osteotomize the olecranon in the last 14 years. Osteotomy should always be avoided if the olecranon is resorbed.
FLEXIBLE EXPOSURES OF THE ELBOW
The central concept is a focused, for purpose, approach that may be extended based on real-time exposure requirements. The technique is predicated on raising subcutaneous flaps both medial and laterally.
Lateral Exposures
A limited proximal lateral approach exposes the supracondylar column. A limited distal approach enters Kocher interval and exposes the radial head and the lateral collateral ligament. Connecting the two defines the extensile Kocher exposure (Fig. 1B-17).
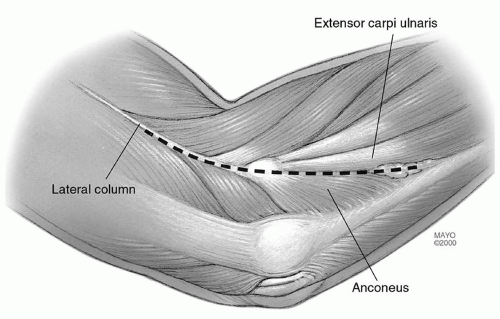 FIGURE 1B-17 |
The Column Exposure (3)
INDICATIONS Anterior-posterior capsular release for stiff elbow.
LANDMARKS Lateral epicondyle, the common extensor tendon, the extensor carpi radialis longus, and the anterior capsule.
POSITION Supine, arm across the chest.
SKIN INCISION The skin incision starts over the lateral column 5 cm proximal to the lateral epicondyle and extends distally 2 cm past the epicondyle (Fig. 1B-18).
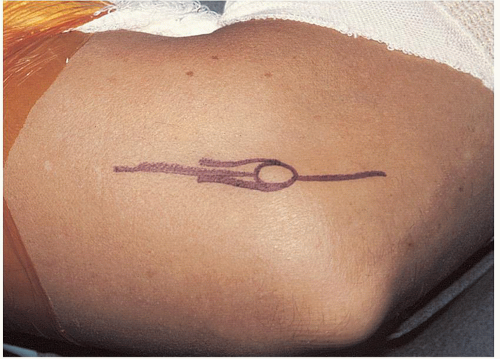 FIGURE 1B-18 |
TECHNIQUE
The extensor carpi radialis longus is identified and elevated from the lateral column and epicondyle, and the anterior capsule is visualized (Fig. 1B-19).
An incision is made in the capsule just superior to the collateral ligament (Fig. 1B-20).
If the posterior joint needs to be exposed, the triceps is easily elevated (Fig. 1B-21).
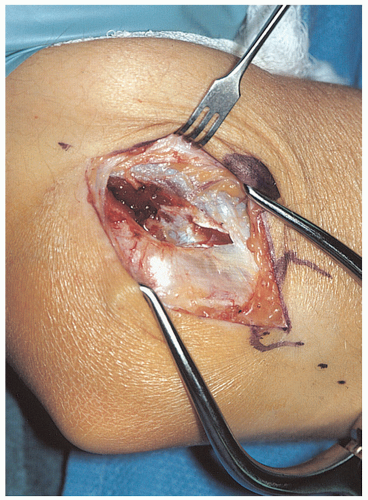 FIGURE 1B-19 With the elbow at 90 degrees of flexion, the fibers of the extensor carpi radialis longus are followed down to the capsule. The brachialis is elevated from the anterior capsule. |
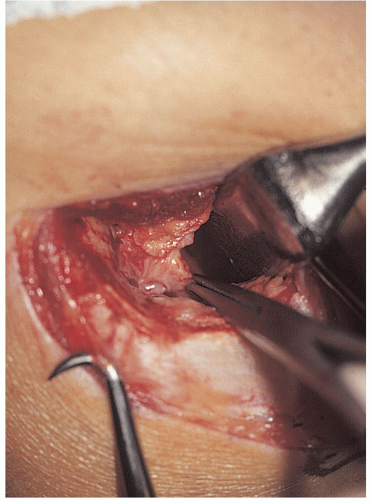 FIGURE 1B-20 Elevation of the extensor carpi radialis longus (ECRL) and the distal fibers of the brachioradialis. The anterior aspect of the capsule is isolated from the brachialis and is identified with an arthrotomy at the anterior aspect of the radiohumeral joint. |
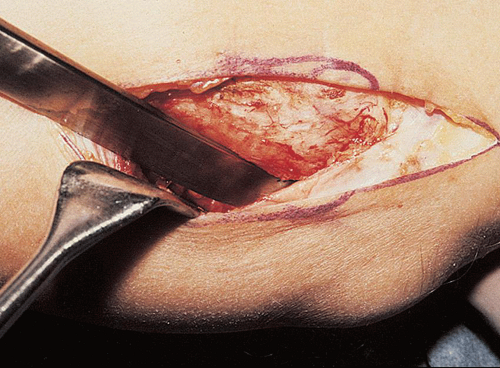 FIGURE 1B-21
Get Clinical Tree app for offline access
Related posts:Stay updated, free articles. Join our Telegram channel
Full access? Get Clinical Tree


|
