Complete Rotator Cuff Tears
You can cut your throat with a sharp tongue!
Rotator cuff tears are one of the most common disorders in shoulder practice. Despite a long history of surgical treatment, the optimal rotator cuff repair continues to evolve. Our approach to rotator cuff repair was fully described in Chapter 2, “Philosophy of Rotator Cuff Repair.” This chapter describes our preferred repair techniques for complete rotator cuff tears.
CRESCENT TEARS
Single-row Rotator Cuff Repair (SpeedFix Repair)
Although we prefer double-row repair over single-row repair, in some cases a single-row repair when performed correctly will still yield excellent clinical results with anatomic healing. In general, we reserve single-row repair for cases where there is insufficient mobility to perform a double-row repair (i.e., massive contracted rotator cuff tears). In addition, in patients with partial-thickness bursal surface rotator cuff tears where only a small bursal leaf must be repaired to the bone bed, a single-row repair may also be performed (see Chapter 5, “Partial-thickness Rotator Cuff Tears”).
Similar to double-row repair, many different suture configurations are possible for a single-row repair. We prefer in many cases to perform a SpeedFix repair, which utilizes inverted mattress FiberTape stitches (Arthrex, Inc., Naples, FL) coupled to a 4.75-mm BioComposite SwiveLock C anchor (Arthrex, Inc., Naples, FL) (Figs. 4.1 and 4.2). An inverted mattress configuration is utilized since it provides superior fixation in the cuff when compared to a simple stitch and provides compression of the rotator cuff tendon against the footprint.
Following diagnostic arthroscopy, the subacromial space is evaluated and a subacromial decompression is performed as indicated. The rotator cuff margins are evaluated and the mobility is assessed. Tears amenable to this type of repair demonstrate good mobility from a medial-to-lateral direction indicating a crescent-shaped tear and are small, with a footprint that measures only 10 to 12 mm from medial to lateral. For full-thickness tears, our primary indication for a single-row SpeedFix repair is when medial bone quality is insufficient to place a medial anchor. In this setting, fixation can always be achieved in the lateral cortex using a SwiveLock anchor (Fig. 4.3).
While viewing through a posterior portal, a shaver or burr is introduced through the lateral portal, and the footprint of the rotator cuff is debrided to a bleeding bone surface. Since an anchor will only be placed along the lateral aspect of the footprint, a number of bone vents can be created with a punch or PowerPick (Arthrex, Inc., Naples, FL) along the medial aspect of the footprint to encourage infiltration of marrow elements containing cells beneficial for rotator cuff healing.
An inverted mattress stitch is placed in the rotator cuff using either a FastPass or MultiFire Scorpion device (Arthrex, Inc., Naples, FL). The #2 FiberWire leader (Arthrex, Inc., Naples, FL) of a FiberTape suture is loaded onto the Scorpion. While viewing through the posterior portal, the Scorpion is introduced through the lateral portal. A #2 FiberWire leader is passed antegrade through the anterior aspect of the tear (Fig. 4.4A), and then the opposite FiberWire leader is passed antegrade through the posterior aspect. The FiberWire leaders are then retrieved and the FiberTape is pulled through the tendon creating an inverted mattress stitch (Fig. 4.4B).
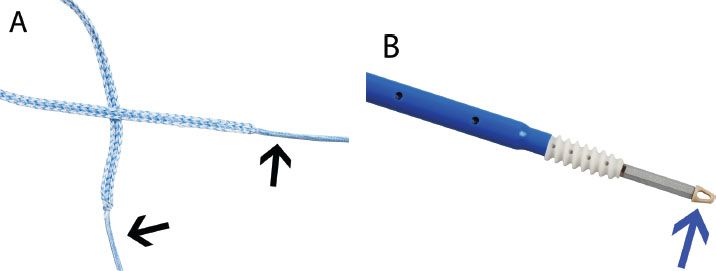
Figure 4.1 The SpeedFix (Arthrex, Inc., Naples, FL) utilizes (A) a FiberTape suture coupled to a (B) SwiveLock anchor. The FiberTape suture has #2 FiberWire leaders (black arrows) that facilitate passing through the rotator cuff. The FiberTape is threaded through the eyelet (blue arrow) of a SwiveLock anchor to secure the suture to bone.
The suture limbs are tensioned and the cannula is used as a guide to determine the position for the lateral anchor. The punch for a 4.75-mm BioComposite SwiveLock C is then used to create a bone socket in the lateral aspect of the greater tuberosity approximately perpendicular to the bone (Fig. 4.5). Extracorporeally, the FiberTape sutures are fed through the distal eyelet of the BioComposite SwiveLock C anchor. The anchor is then inserted and the sutures are appropriately tensioned to remove slack from the construct and reduce the tendon to the bone socket. It is helpful to maintain the location and orientation of the bone socket by keeping the punch in place until just prior to insertion of the loaded anchor. The eyelet of the anchor is seated into the bone socket and advanced until the leading threads of the anchor just contact the bone socket. While holding the thumb pad on the SwiveLock driver, the anchor is inserted into the bone. With self-punching versions, the anchor itself (4.75-mm BioComposite SwiveLock SP; Arthrex, Inc., Naples, FL) may be used in a similar fashion without preparing a bone socket (Fig. 4.6). The final repair demonstrates secure tendon fixation to bone and adequate coverage of the medial aspect of the footprint (Fig. 4.7).
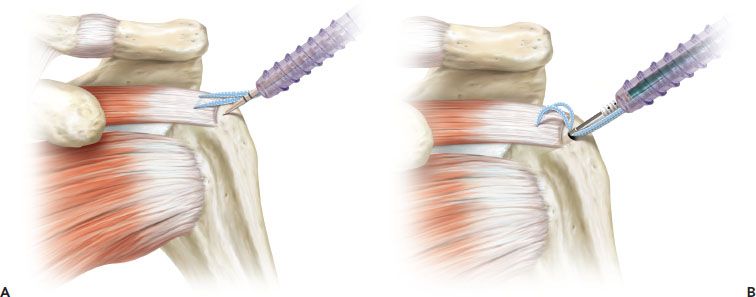
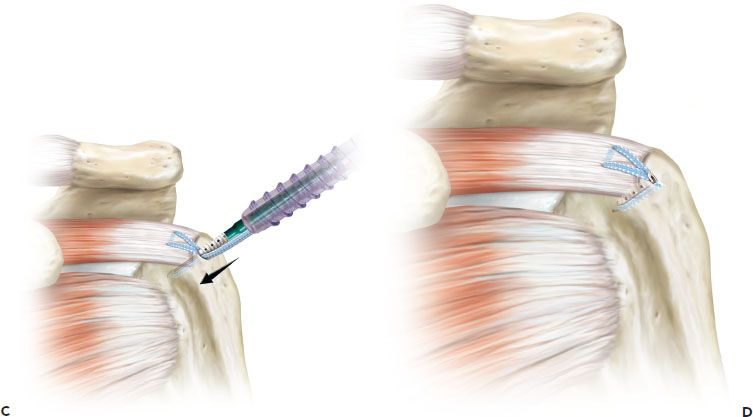
Figure 4.2 Schematic of the SpeedFix (Arthrex, Inc., Naples, FL) rotator cuff repair. A: A FiberTape suture is placed as an inverted mattress stitch in the rotator cuff and the suture limbs are retrieved out a lateral portal. Then, a punch is used to create a bone socket in the lateral cortex. B: Extracorporeally, the suture limbs are threaded through the eyelet of a BioComposite SwiveLock C anchor. Then, the eyelet of the anchor is seated into the prepared bone socket. C: The suture limbs are tensioned and the eyelet is seated until the anchor is just in contact with the bone. Manual tension on the suture limbs is released and the anchor is advanced until it is fully seated. D: Final repair. The suture limbs have been cut flush with the anchor.
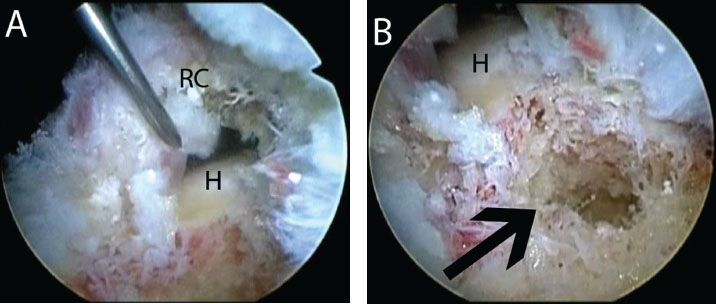
Figure 4.3 A: Right shoulder, lateral subacromial viewing portal, demonstrates a crescent-shaped rotator cuff tear. B: View of the proximal humerus bone bed in the same shoulder demonstrates a large cyst. In this case, the bone quality was very poor. Despite multiple techniques including bone graft, a buddy anchor, and use of a tenodesis screw, medial fixation could not be achieved. A SpeedFix repair (Arthrex, Inc., Naples, FL) is indicated that achieves lateral cortical fixation. H, humerus; RC, rotator cuff.
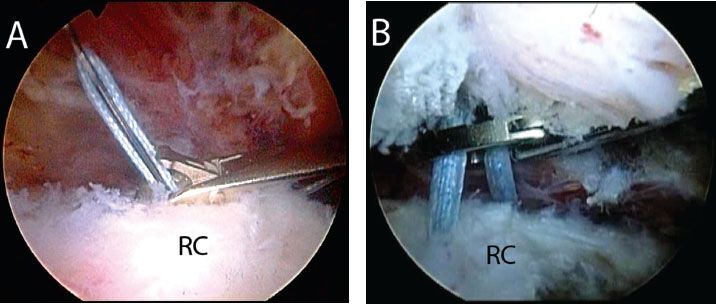
Figure 4.4 A: Right shoulder, posterior subacromial viewing portal demonstrates use of a Scorpion FastPass suture passer (Arthrex, Inc., Naples, FL) to pass a #2 FiberWire leader of a FiberTape (Arthrex, Inc., Naples, FL) through the rotator cuff. To place an inverted mattress stitch, the opposite limb of the FiberTape will similarly be passed through the rotator cuff B: A FiberTape suture has been placed as an inverted mattress stitch. The two limbs are seen exiting the rotator cuff and are retrieved out a lateral working cannula for lateral cortical fixation. RC, rotator cuff.
SutureBridge Double-row Repair
Double-row rotator cuff repair may be performed in many different configurations with the advantages of each configuration described previously (see Chapter 2, “Philosophy of Arthroscopic Rotator Cuff Repair”). When originally described, arthroscopic double-row rotator cuff repair was performed using two rows of unlinked anchors, with sutures passed in a mattress configuration for the medial row and simple stitches for the lateral row (Fig. 4.8). Linking the medial and lateral rows when performing a double-row rotator cuff repair has improved our biomechanical constructs and has demonstrated lower retear rates following rotator cuff repair. In this methodology, two rows of anchors are utilized. However, in this technique after the #2 FiberWire sutures from the medial-row anchors have been passed through the medial rotator cuff and tied, the tails from the knotted medial anchors are individually crisscrossed, then placed through the distal eyelet of the lateral-row anchors, and secured into the lateral tuberosity (Fig. 4.9).
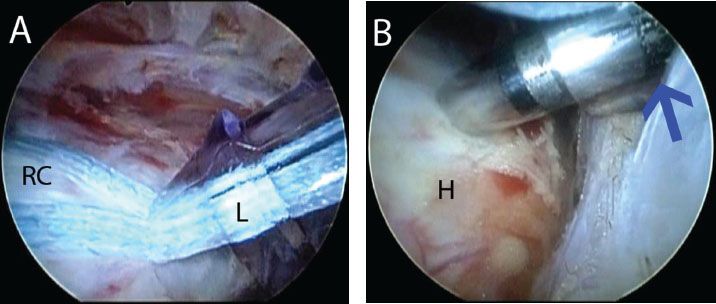
Figure 4.5 Right shoulder, posterior subacromial viewing portal, demonstrates creation of a lateral bone socket for a SwiveLock C anchor (Arthrex, Inc., Naples, FL). A: After sutures are retrieved, the cannula is used as a guide to determine the position for a lateral anchor bone socket. By tensioning the sutures and placing the cannula adjacent to the humerus, the proper position for the bone socket is determined. B: A punch has been introduced and will be impacted to the second line (blue arrow) to create a bone socket for the SwiveLock C anchor. H, humerus; L, lateral portal cannula; RC, rotator cuff.
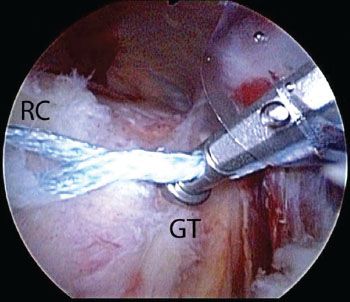
Figure 4.6 Right shoulder, posterior subacromial viewing portal. As an alternative to using a cannula to determine the location for lateral anchor placement, in one step a self-punching anchor (SwiveLock SP; Arthrex, Inc., Naples, FL) can be used to tension the sutures and determine the location. GT, greater tuberosity; RC, rotator cuff.
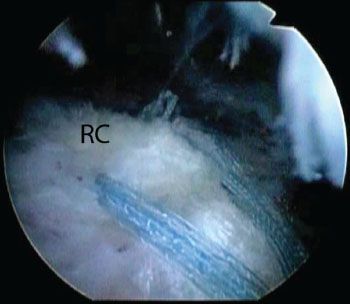
Figure 4.7 Right shoulder, posterior subacromial viewing portal, demonstrates a SpeedFix repair (Arthrex, Inc., Naples, FL) of a full-thickness crescent-shaped rotator cuff tear in which medial fixation could not be achieved. (Compare to Fig. 4.3. RC, rotator cuff.)
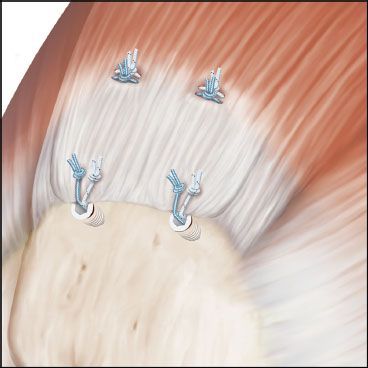
Figure 4.8 With the original double-row rotator cuff repair, two medial anchors were placed, sutures were individually passed and tied as mattress stitches, and then the suture limbs were cut. Two lateral anchors were also placed, sutures were passed and tied as simple stitches, and the suture limbs were cut.
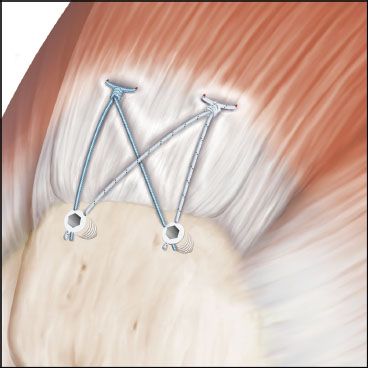
Figure 4.9 The SutureBridge (Arthrex, Inc., Naples, FL) rotator cuff repair represents an advancement over the traditional double-row repair, whereby the medial and lateral rows are linked. Two medial suture anchors are placed and sutures from these anchors are individually passed and tied as mattress stitches. Rather than cutting the suture limbs, however, the sutures are crisscrossed and secured laterally to two knotless anchors. This repair mechanically links the two rows and provides enhanced footprint compression to encourage rotator cuff healing.
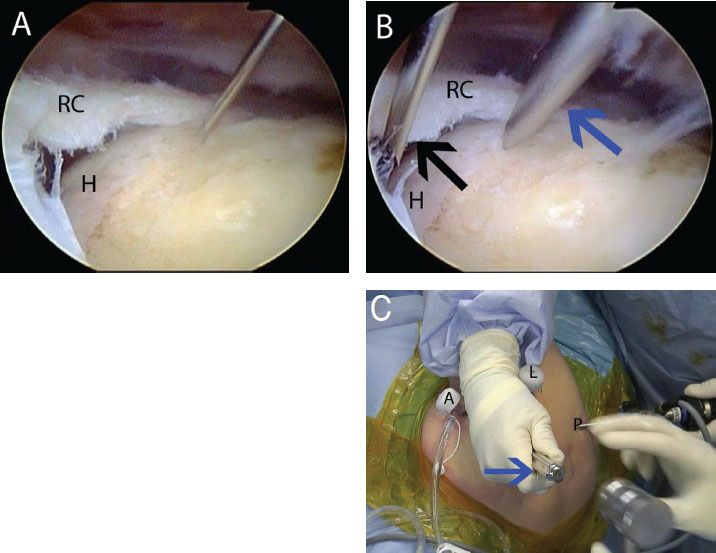
Figure 4.10 A: Right shoulder, posterior subacromial viewing portal, demonstrates use of a spinal needle as a guide to determine an adequate angle of approach for placement of (B) a punch that is placed through the same incision. The punch is used to create a bone socket for an anteromedial anchor. C: Outside view of a right shoulder demonstrates the percutaneous position of the punch (blue arrow) that is placed just lateral to the acromion. A, anterior portal; H, humerus; L, lateral portal; P, posterior portal; RC, rotator cuff.
Threaded, double-loaded anchors (5.5-mm BioComposite Corkscrew FT, Arthrex, Inc., Naples, FL) are placed medially. Using a spinal needle as a guide, a punch is inserted into the anteromedial aspect of the footprint just lateral to the articular margin through a separate percutaneous incision (Fig. 4.10). The anchor is similarly inserted through the same incision, reproducing the same angle of insertion. A second medial anchor is then placed in the posteromedial aspect of the footprint. To improve visualization of the posteromedial aspect of the footprint, a 70° arthroscope may be utilized while viewing from a posterior subacromial portal. Alternatively, a posterolateral or lateral viewing portal may improve visualization (Fig 4.11). Finally, it is also sometimes necessary to place the posteromedial anchor while viewing intra-articularly (Fig. 4.12). For suture management, sutures are temporarily retrieved through the corresponding percutaneous puncture that the anchors were inserted through (Fig. 4.13).
Following placement of both anchors, mattress sutures are passed through the rotator cuff. It is important again to place sutures 2 to 3 mm lateral to the musculotendinous junction and to pass wide mattress sutures to avoid suture cut through. In addition, when performing any suture bridge technique, the location of the medial sutures and anchors will dictate the tendon reduction. Inaccurate anchor or suture placement will cause malreduction of the tendon and poor footprint reconstruction. For example, sutures passed more medially than described above will result in excessive tension and risk for failure. Once again, we emphasize that the sutures should be passed 2 to 3 mm lateral to the musculotendinous junction. Sutures are passed individually using a SureFire Scorpion needle in a FastPass Scorpion suture passer (that has a spring-loaded trapdoor in the upper jaw that captures the suture) (Arthrex, Inc., Naples, FL) (Figs. 4.14 and 4.15). As the suture passage moves more posteriorly, retrograde suture passage through the posterior portal using a Penetrator suture passer (Arthrex, Inc., Naples, FL) can provide the correct angle of approach (Fig. 4.16). Final medial suture passage should demonstrate equal spacing and complete coverage of the medial tendon (Fig. 4.17). Although the classic SutureBridge technique utilizes only one suture pair from each medial anchor, the second suture in each anchor may be preserved and utilized for additional security, particularly if the tendon is of poor quality.
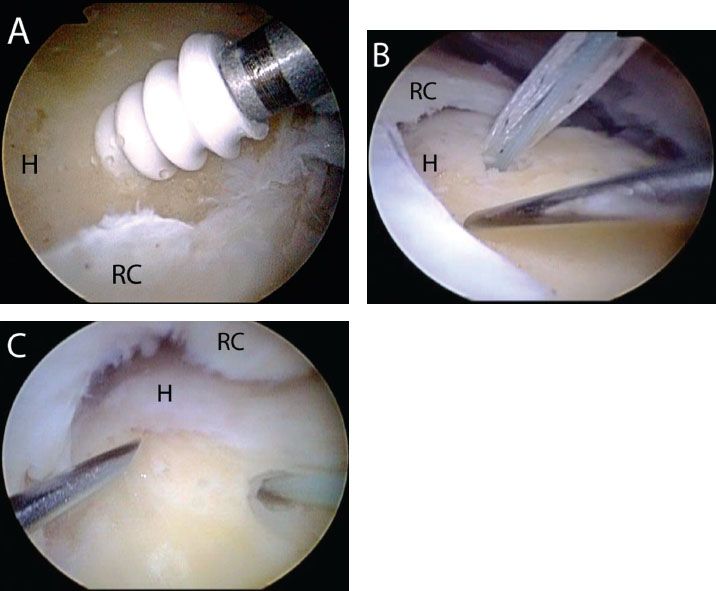
Figure 4.11 Right shoulders viewed with a 70° arthroscope demonstrate visualization for posteromedial anchor placement. A: A posteromedial anchor can be placed while viewing from a posterior subacromial portal with a 70° arthroscope. B: For many crescent-shaped tears, however, it difficult to visualize the posteromedial articular margin while viewing from a posterior subacromial portal. In this case, an anteromedial anchor has been placed and a spinal needle is used as a guide for a posteromedial anchor. But visualization is obstructed by the posterior margin of the crescent tear. C: Same shoulder as in previous image demonstrates how moving the arthroscope to the lateral subacromial portal may provide improved visualization of the posteromedial articular margin for placement of a posteromedial anchor. H, humerus; RC, rotator cuff.
The medial mattress sutures are then tied compressing the medial cuff against the footprint (Fig. 4.18). Sutures are tied with a static six-throw Surgeon’s knot using a Surgeon’s Sixth Finger Knot Pusher (Arthrex, Inc., Naples, FL). Suture tails are not cut but are left long for subsequent incorporation into the lateral-row anchors. Although skipping tying the medial sutures is an option, tying the medial mattress sutures has shown improved biomechanical characteristics when using #2 FiberWire suture.
Once the medial sutures have been tied, the potential for any dog-ear during lateral fixation can be judged. We commonly prevent dog-ears by placing a cinch-loop stitch at both the anterior and posterior margins of the tear using a FiberLink suture (Arthrex, Inc., Naples, FL) (see Chapter 2, “Philosophy of Rotator Cuff Repair”). FiberLink is a #2 FiberWire suture that has a closed loop on one end. To place a cinch loop, the free end of the suture is loaded onto a Scorpion and passed through the rotator cuff. Then, the free end is retrieved and threaded through the looped end of the suture. Tensioning the free end delivers the loop down to the rotator cuff, creating a cinch-loop stitch (Fig. 4.18C).
To secure the tendon laterally, the medial suture limbs are retrieved and secured with two 4.75-mm BioComposite SwiveLock C anchors. In most cases, one suture limb is retrieved from each anchor in a crisscross fashion through the lateral cannula. However, the number of sutures incorporated into each anchor and the number of lateral anchors should be dictated by the tear configuration and provide complete lateral fixation and footprint compression. If cinch loops have been placed, the posterior cinch loop is typically secured with the posterolateral anchor and the anterior cinch loop is secured with the anterolateral anchor. Prior to anchor insertion, tensioning the sutures through the cannula is useful to evaluate the proposed anchor location (Fig. 4.19). The lateral anchors are placed just lateral to the “corner” of the greater tuberosity, in the metaphyseal cortex: one anterior and one posterior.

Figure 4.12 Right shoulder, posterior glenohumeral intra-articular viewing portal with a 70° arthroscope, demonstrates placement of a posteromedial anchor for a SutureBridge (Arthrex, Inc., Naples, FL) rotator cuff repair. This posterior glenohumeral view is useful if the posteromedial articular margin cannot adequately be seen with either posterior or lateral subacromial viewing portals. A: A spinal needle is used as a guide to determine an adequate angle of approach to the posteromedial bone bed. B: After an incision is made adjacent to the spinal needle, a punch is walked down the spinal needle to create a bone socket. C: A BioComposite Corkscrew FT anchor is inserted into the bone socket. H, humerus; RC rotator cuff.
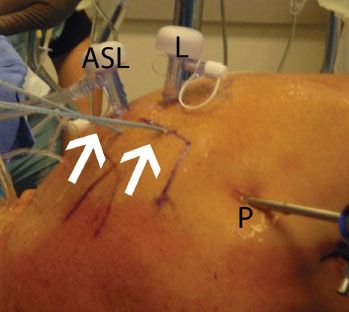
Figure 4.13 External view of a right shoulder in the lateral decubitus position. After placement of anchors via stab incisions, suture management is facilitated by keeping the sutures (white arrows) in the percutaneous incisions until suture passing is performed. ASL, anterosuperolateral portal; L, lateral subacromial portal; P, posterior portal.
A bone socket is then punched into the humerus (Fig. 4.20A). The suture limbs are threaded through the eyelet of a BioComposite SwiveLock C anchor (Fig. 4.20B) and the eyelet of the anchor is placed into the bone socket (Fig. 4.20C). Prior to completely seating than eyelet, the sutures are tensioned to remove slack from the construct (Fig. 4.20D). If the eyelet does not fully seat manually by pushing on the inserter, the inserter handle is gently impacted until the anchor just reaches the top of the bone socket (Fig. 4.20E). While holding the thumb pad, the inserter handle is then turned to advance the SwiveLock anchor (Fig. 4.20F). Sutures are then cut flush with the anchor using an open-ended knot cutter or a closed FiberTape cutter (Arthrex, Inc., Naples, FL). The steps are then repeated for the second lateral anchor. Any unused sutures are then cut.
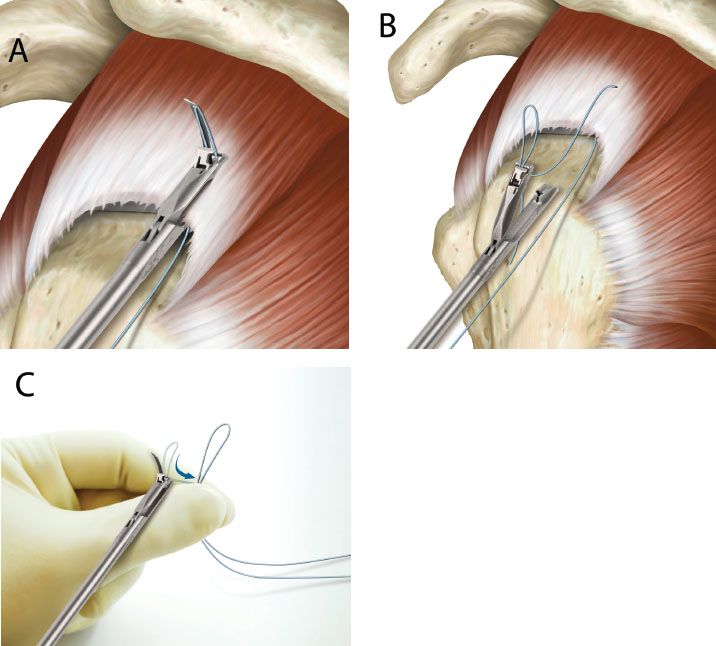
Figure 4.14 Schematic illustration of the Scorpion FastPass (Arthrex, Inc., Naples, FL). A: A suture is passed through the rotator cuff. B: A trapdoor on the instrument captures the suture, allowing suture passage and retrieval in one step. C: Extracorporeally, the suture is unloaded by firing the needle again, which raises the trap door so that the suture may be removed.
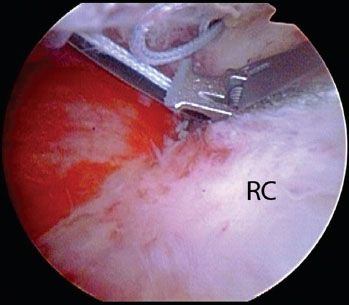
Figure 4.15 Arthroscopic photo of a right shoulder viewing from a posterior subacromial portal demonstrates suture passage with a Scorpion FastPass (Arthrex, Inc., Naples, FL).

Figure 4.16 Right shoulder, lateral subacromial viewing portal, demonstrates use of a Penetrator (Arthrex, Inc., Naples, FL) to pass sutures from a posteromedial anchor. H, humerus; RC, rotator cuff.
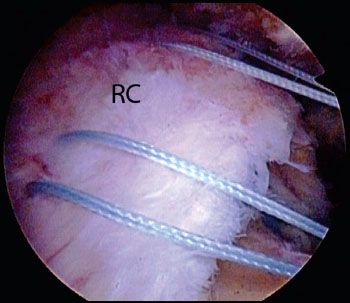
Figure 4.17 Right shoulder, posterior viewing portal, demonstrates placement of equally spaced mattress stitches that were placed from medial anchors for a SutureBridge (Arthrex, Inc., Naples, FL) rotator cuff repair.
Related posts:


Stay updated, free articles. Join our Telegram channel

Full access? Get Clinical Tree


