22
Common Shoulder Diagnoses
Introduction
Positioning the hand in space to allow for interaction with the environment is the primary function of the shoulder. Accordingly, dysfunction of the shoulder complex often results in profound impairment of the entire upper extremity (UE).1 The shoulder will compensate for decreased mobility of the wrist and elbow, which can lead to shoulder dysfunction as the individual tries to perform normal activities of daily living (ADLs). Consequently, when treating a client with elbow or wrist dysfunction, the therapist needs to monitor the health of the shoulder. Therefore a thorough understanding of the shoulder is imperative for therapists treating clients with UE dysfunction.
 Clinical Pearl
Anatomy
The shoulder complex consists of:
• Three bones: The humerus, the clavicle, and the scapula
• Three joints: The glenohumeral (GH), acromioclavicular (AC), and sternoclavicular (SC)
Glenohumeral Joint
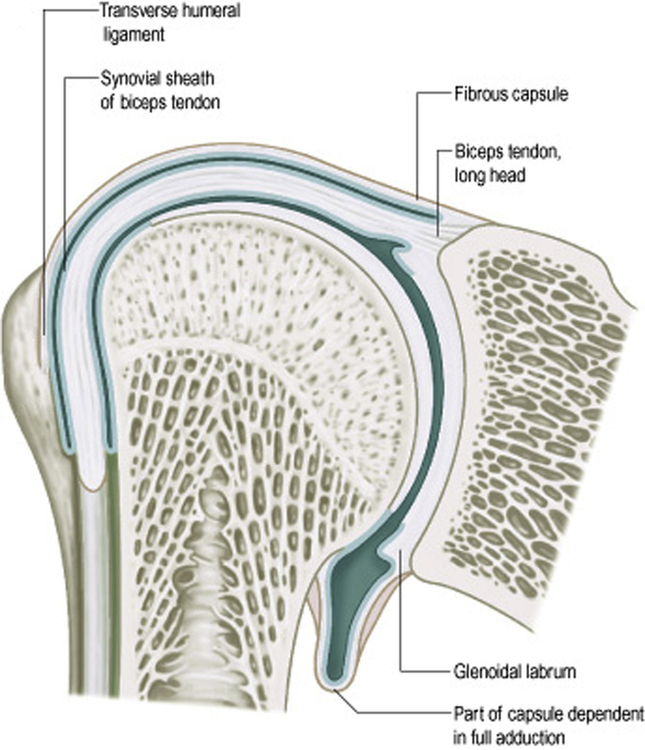
The GH joint is a multi-axial, synovial, ball-and-socket joint that moves around three axes of motion: internal/external rotation around a vertical axis, abduction/adduction around a sagittal axis, and flexion/extension around a frontal axis (Fig. 22-1). The humeral head forms roughly half a sphere with the glenoid fossa forming the socket component of the joint. The glenoid fossa covers only one third to one fourth of the humeral head (Fig. 22-2). The glenoid labrum, a ring of fibrocartilage, surrounds and deepens the glenoid socket by about 50% and increases joint stability by increasing humeral head contact 75% vertically and 56 % transversely.2
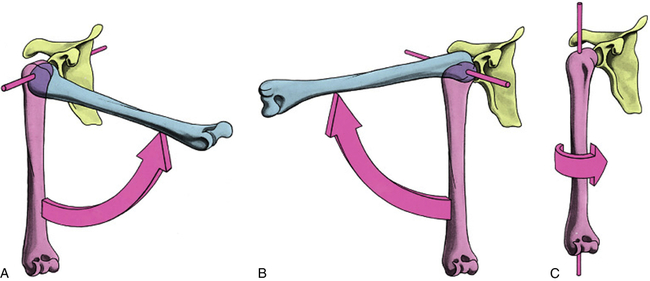
A, Flexion/extension; B, abduction/adduction; C, internal/external rotation. (From Standring S: Gray’s anatomy e-book, ed 40, St Louis, 2012, Churchill Livingstone.)
The open-packed position (joint position in which the capsule and ligaments are most lax and separation of joint surfaces are greatest) of the GH joint is 55° of abduction and 30° of horizontal adduction. The close-packed position (joint position in which the capsule and ligaments are under the most tension with maximal contact between joint surfaces) of the joint is full abduction and lateral rotation. At rest, the humerus sits centered in the glenoid cavity; with contraction of the rotator cuff (RC) muscles, the humeral head translates anteriorly, posteriorly, superiorly, inferiorly, or any combination of these movements. These translations are very small, but full motion of the GH joint is impossible without them because the combined actions of the RC muscles contribute to the overall stability of the GH joint during ROM.3 It is the motion of the GH joint that contributes the most to shoulder movement.
Acromioclavicular Joint
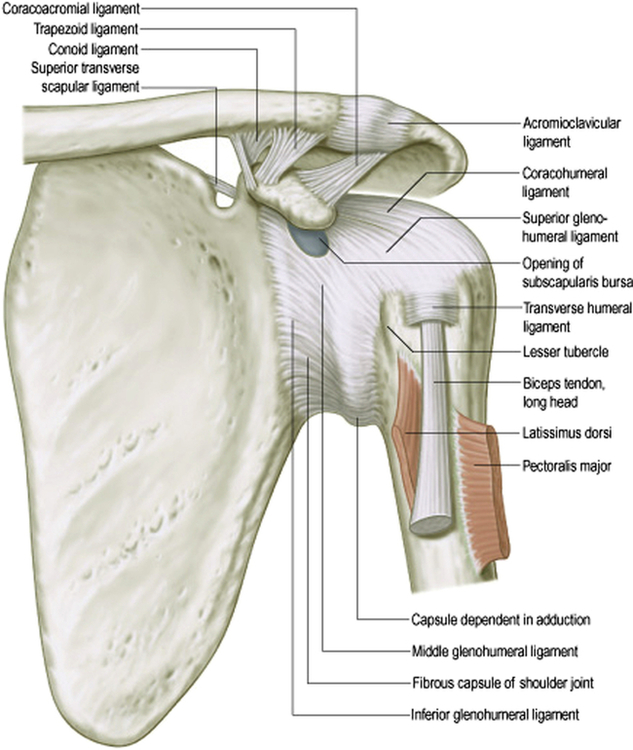
The AC and coracoclavicular (CC) ligaments support the AC joint (Fig. 22-3). The AC ligaments contribute the least to joint stability; they function mainly to support the joint capsule and check anterior/posterior translation of the clavicle on the acromion. The AC ligaments are damaged in grade I shoulder separations. The CC ligaments have no attachment to the acromion and consist of the conoid and trapezoid ligaments. They transmit scapular motion to the clavicle and check superior clavicular displacement.4 As all fibers of the upper trapezius insert on the clavicle,5 the CC ligaments play an integral role in the transmission of force from the upper trapezius to the scapula.6 Complete rupture of these ligaments represents a grade III separation resulting in a step deformity at the AC joint (Fig. 22-4).
Sternoclavicular Joint
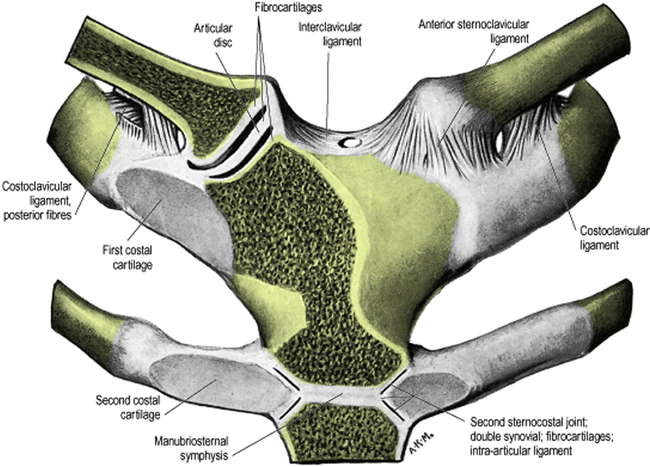
The sellar (saddle) shaped SC joint is the only direct articulation between the shoulder complex and the axial skeleton (skeletal components consisting of the skull, ribcage, spine, and pelvis). The articulations of the SC joint are between the medial end of the clavicle, the clavicular notch of the sternum, and the cartilage of the first rib. Interposed between the clavicle and the sternum is an articular disc that enhances stability of the joint (Fig. 22-5). Movement between the disc and clavicle is greater than movement between the disc and sternum. The joint is further stabilized by the joint capsule and ligaments that primarily check superior and anterior translation.7 The SC joint is stabilized so well by the disc and ligaments that trauma to the clavicle usually results in fracture instead of dislocation.8 The motion of the SC joint mirrors that of the AC joint: elevation/depression, protraction/retraction, and rotation (spin). The open-packed position for the SC joint is with the arm by the side. The close-packed position is full UE elevation.
Scapulothoracic Articulation
As the scapula has no direct bony or ligamentous connections to the thorax, the ST articulation cannot be considered an anatomic joint. Scapular movement results in movement of the shoulder girdle. These movements are described as: upward/downward rotation around an axis perpendicular to the scapular body, internal/external rotation around a vertical axis along the medial border, and anterior/posterior tilt around a horizontal axis along the scapular spine.9 Scapular motion allows for elevation above the 120° provided by the GH joint.2 The scapula’s bony articulation is with the AC joint, but the stability of the ST joint comes from muscular attachments to the scapula.
Much like a street performer balancing a ball on the end of a stick, the scapula must change position during shoulder elevation to keep the humeral head balanced in the glenoid fossa, thus allowing for the most efficient length-tension relationship of the RC. With shoulder elevation, the majority of motion occurs at the GH joint during the initial (0° to 60°) and final (140° to 180°) phases of motion. It is during these phases that the ST articulation plays a subtler balancing or stabilizing role. Throughout the middle or critical (60° to 140°) phase of shoulder elevation, the ratio of GH to ST motion shifts, with more emphasis on ST movement10 (see Video 22-1 on the Evolve website).
This movement of the scapula is the result of force couples between groups of muscles that run from the thorax to the scapula (Table 22-1). A force couple is defined as two resultant forces of equal magnitude in opposite directions that produce rotation of a structure. The upward rotation of the scapula that occurs during shoulder elevation is primarily the result of the concentric (muscle contraction resulting in approximation of the origin and insertion) actions of the upper and lower trapezius and the lower portion of the serratus anterior muscles with the levator scapulae, rhomboids, and pectoralis minor acting eccentrically (muscle contraction to stabilize movement resulting in increased distance between the origin and insertion) to produce smooth motion.
TABLE 22-1
| Movement | Concentric Force Couple | Eccentric Stabilizers |
| Upward rotation (GH elevation) | Upper trapezius Lower trapezius Serratus anterior | Levator scapulae Rhomboids Pectoralis minor |
| Retraction | Trapezius Rhomboids | Serratus anterior Pectoralis major Pectoralis minor |
| Protraction | Serratus anterior Pectoralis major Pectoralis minor | Trapezius Rhomboids |
| Elevation | Upper trapezius Levator scapulae | Serratus anterior Lower trapezius |
| Depression | Serratus anterior Lower trapezius | Upper trapezius Levator scapulae |
| Downward rotation | Levator scapulae Rhomboids Latissimus dorsi Pectoralis minor | Upper trapezius Lower trapezius Serratus anterior |
In the normal resting position, the scapula sits angled 20° to 30° forward relative to the frontal plane, 20° forward in the sagittal plane with the medial border angled at 3° top to bottom from the spinous processes. This position, combined with the orientation of the glenoid fossa, results in elevation of the arm in a plane that is 30° to 45° anterior to the frontal plane. This motion is termed scapular plane abduction or scaption.11 The scapula extends from the level of the T2 spinous process to the T7 or T9 spinous process based on size. Since the ST articulation is not an anatomic joint, there is no close- or open-packed position.
Proximal (Cervical) Screening
Anatomy
Cervical Nerve Roots
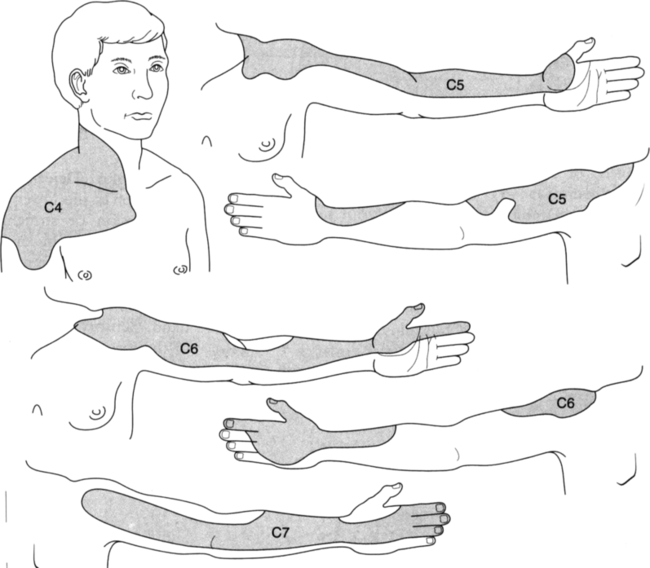
The C4 to C7 nerve roots supply structures that overlie or comprise the shoulder complex (Fig. 22-6). The C5 and C6 nerve roots innervate most of the GH joint structures with the C4 nerve root innervating the AC joint.
Cervical Discs
The cervical spine contains five discs with the most superior disc located between C2 and C3, and the most inferior disc located between C7 and T1. The disc consists of three parts: the annulus fibrosis (multi-layered ligamentous exterior of the disc), the vertebral end plate (cartilaginous interface between the vertebral disc and the vertebral body), and the nucleus pulposus (pulpy semi-liquid center of the disc). The cervical discs are morphologically quite different from lumbar discs, because they essentially lack a posterior annular wall.12 The posterior longitudinal ligament mainly supplies that role. Also, the cervical disc develops horizontal annular clefts or tears in the lateral portion by age 15 that progressively extend across the back of the disc.12 It is likely due to these differences that the cervical discs degenerate more quickly than the lumbar discs.13
Cervical Facets
The facet joints of the cervical spine are paired synovial joints with fibrous capsules. The capsules are heavily innervated by mechanoreceptors (specialized nerve endings that transmit information regarding position and motion) and nociceptors (specialized nerve endings that transmit pain signals), which likely modulate protective muscle reflexes that are important in preventing joint instability and degeneration.14
Studies on normal individuals and clients with neck pain demonstrated pain referral patterns from the cervical facets to the cervical and shoulder regions.15,16 These studies demonstrated a consistent pain referral pattern to the top and lateral parts of the shoulder, extending to the inferior border of the scapula from the C6 to C7 facet joints.
Cervical Intrinsic Soft Tissue
The intrinsic soft tissue structures of the cervical/thoracic region include the muscles that do not originate or insert on the clavicle or scapula. Of these muscles, the scalenes demonstrate trigger point (palpable taut muscle bands that refer pain when compressed) pain referral patterns to the shoulder (Fig. 22-7). There are substantial anatomical variations in the attachments of the scalene muscles. In general, the proximal portions attach to the transverse processes of the cervical vertebrae. The distal attachments of the anterior and medial scalene are the first rib; the distal attachment of the posterior scalene is the second rib. The trigger points refer pain to the anterior lateral aspect of the shoulder and medial scapular border.17

Cervical Extrinsic Muscle
The trapezius extends down the midline from the occiput to T12, anteriorly to the clavicle, laterally to the acromion and superior medial scapular angle, and superiorly to the scapular spine. Six trigger points with distinctive pain patterns are located in the upper, middle, and lower fibers. The trigger point located in the lower trapezius refers pain to the mastoid area and the posterior acromion (Fig. 22-8).17

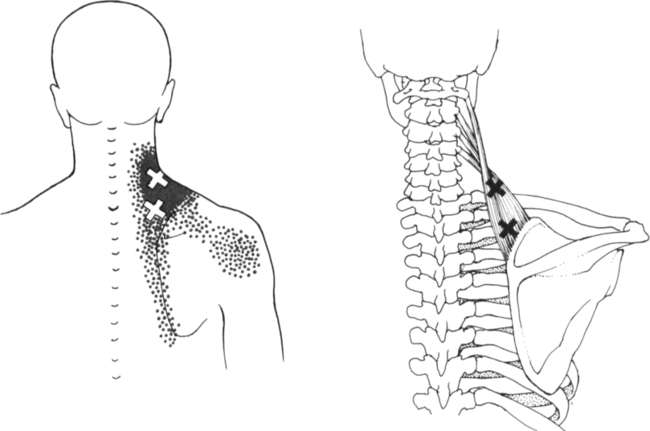
The levator scapulae attaches proximally to the transverse processes of the first four cervical vertebrae and distally to the superior medial scapular angle. The trigger point refers pain to the angle of the neck and often projects to the posterior aspect of the shoulder (Fig. 22-9).17
Cervical Screening Examination
Range of Motion Testing—Intrinsic versus Extrinsic Restrictions
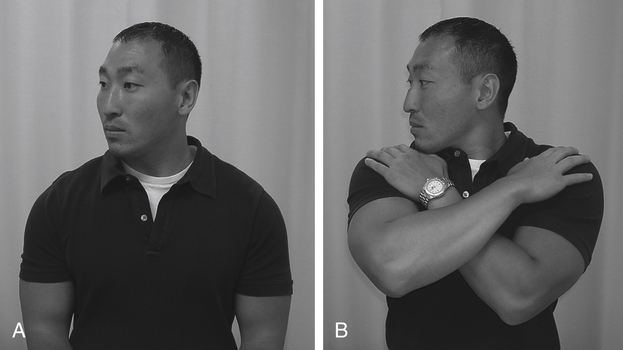
Your client performs the basic motions of the cervical spine (flexion/extension, rotation, lateral flexion) from a corrected neutral seated posture with the arms unsupported. Next, he/she performs the same motions in a crossed arm position (Fig 22-10; see Video 22-2 on the Evolve website). Your client grasps as close to their AC joints as possible and then relaxes their arms and shoulders, letting their arms rest against their chest wall.
 Clinical Pearl
Test Clusters to Detect Cervical Radiculopathy
Since the cervical nerve root is the most likely structure of the cervical spine responsible for cervicobrachial pain (shoulder and arm pain originating from the cervical region),19 screening for cervical nerve root pathology is critical in ruling out the cervical spine as a source of shoulder pain. An optimum group of four test items was identified by Wainner, et al.20 that if present, produced a post-test probability (the probability of the condition being present compared to pretesting) of 90%. These items were the Spurling’s test, cervical distraction test, cervical rotation ROM less than 60° toward the involved side, and the upper limb neurodynamic test (ULNT) (described in the following “Thoracic Outlet Syndrome/Brachial Plexopathy” section).
Spurling’s Test
Spurling’s test has been described as a screening test to detect cervical radiculopathy (CR) (disease of the cervical nerve roots) in numerous studies considered to be good.20–23 The Spurling’s test has been shown to have moderate to low sensitivity (few if any clients with the disease will have negative test results; a negative test rules out the condition) and moderate to high specificity (all persons who do not have the disease will have negative test results; a positive test rules in the condition).
Although variations of this test are common, Spurling24 originally described the test performed with your client seated and the examiner passively side-bending his/her client’s neck toward the symptomatic side to end range, next adding axial compression of approximately 7 kg directed toward the base of the cervical spine (Fig. 22-11; see Video 22-3 on the Evolve website). The examiner executes these steps sequentially, stopping with reproduction or worsening of his/her client’s symptoms. Variations of the test include the additional movements of extension and rotation toward the painful side prior to adding compression of cervical spine (Fig. 22-12; see Video 22-3 on the Evolve website).23 With the cervical spine in this position, the IVF diameter closes down by approximately 70%,25 decreasing the available space for an inflamed nerve root; the presence of a space-occupying lesion (such as, a disc herniation or osteophytic spur) will intensify the test result. Axial loading at the end range of extension, lateral flexion, and rotation also stresses the facet joints, provoking symptoms if pathology is present.
Consists of lateral cervical flexion to end range followed by axial compression of approximately 7 kg.
Cervical Distraction Test
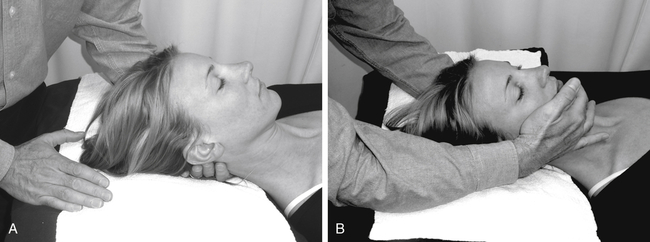
The examiner performs this test seated at the head of the plinth with his/her client supine. The examiner grasps his/her client’s chin and occiput, flexes their neck to a position of comfort, and applies an axial distraction force of approximately 14 kg (Fig. 22-13; see Video 22-4 on the Evolve website). A positive test results in reduction or elimination of his/her client’s symptoms. With distraction of the cervical spine in this manner, the IVF diameter increases by approximately 120% effectively relieving pressure on the inflamed nerve root, resulting in symptom reduction.25
Cervical Rotation Range of Motion
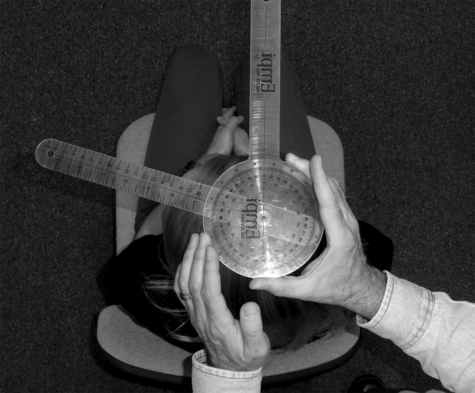
The examiner performs this test utilizing a standard goniometer standing behind his/her client seated in a chair with back support to stabilize the thoracic spine. The examiner positions the axis of the goniometer over the vertex of the client’s head, the stationary arm of the goniometer perpendicular to his/her shoulders, and the movable arm in line with the client’s nose (Fig. 22-14). Rotation ROM of 60° or less toward the involved side results in a positive test.
Thoracic Outlet Syndrome/Brachial Plexopathy
The term thoracic outlet syndrome (TOS) encompasses an assortment of clinical entities involving the shoulder region. The thoracic outlet provides the pathway for the neural and vascular structures to and from the upper limb, therefore pathology of this area has profound and often disabling results. As vascular presentations of TOS are relatively uncommon (3% to 5%), the great majority of TOS clients, in fact, have brachial plexopathies.26
Anatomy
The Thoracic Outlet
The thoracic outlet (TO) can be divided into four regions: the sternocostovertebral space, the scalene triangle, the costoclavicular space, and the pectoralis minor (coracopectoral) space. Each region has distinct boundaries, contents, and potential pathologies that result in neurovascular compression and/or entrapment (Fig. 22-15).
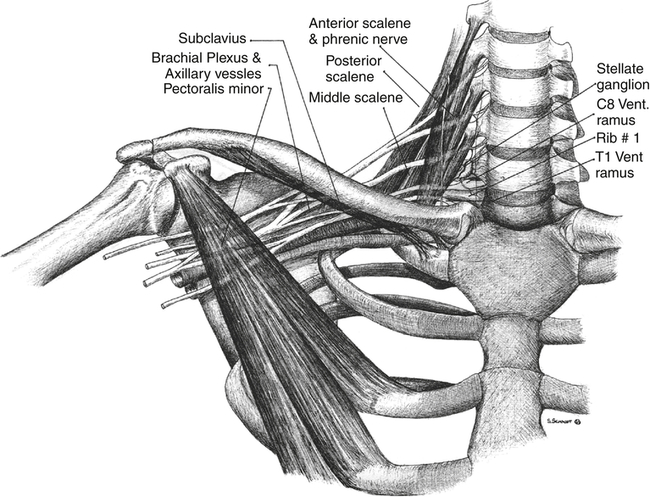
Scalene Triangle
The scalene triangle is bordered anteriorly by the anterior scalene, posteriorly by the middle scalene, and inferiorly by the first rib. The contents are the roots and trunks of the plexus and subclavian artery. Compression and entrapment of these structures are caused by variations in scalene anatomy and the presence of congenital fibrous bands that may interdigitate with the plexus.27
Diagnosis and Pathology
There are nearly a dozen surgical and medical specialties that see TOS clients. Unfortunately these various specialties have disparate views regarding diagnosis and treatment of the condition. The most up-to-date thoughts on TOS are that it is comprised of five discrete subgroups. These groups consist of: 1) arterial vascular, 2) venous vascular, 3) true neurologic, 4) traumatic neurovascular, and 5) disputed.26 Groups 1 to 4 are rare and beyond the scope of this chapter. The disputed subgroup is considered to be fairly common and primarily involving the brachial plexus. As a result, wide ranges of clinical presentations are common and confusing to clinicians.26,28
Vascular Component
Unfortunately the clinical tests for vascular compromise that are advocated in the literature (such as the Adson’s and Wright’s tests, which rely on obliteration of the radial pulse while in the test position) have a high incidence (as high as 87%) of positive results in normals.28–33 Therefore drawing conclusions based on the results of these tests in the clinic should be questioned.
Neural Component—Brachial Plexopathy
Onset can be insidious in nature with genetic and morphologic predisposition combined with poor postural and movement habits leading to the development of the condition. During the growth phase into adolescence, the scapulae gradually descend down the posterior thorax with the descent being greater in women. A strain with resulting weakness of the scapular suspensory muscles that lengthen during this process is associated with the development of brachial plexopathy. This helps to explain the rarity of insidious onset brachial plexopathy before puberty and the increased incidence of the disease in women.34
Clients with brachial plexopathy will often complain of unilateral headaches in the occipital region with facial pain from the angle of the jaw to the zygomatic region to the ear. They may complain of shoulder and chest wall pain from the trapezius ridge down the medial border of the scapula, in the supra/infraclavicular fossa, and from the sternum to the axilla to the epigastric region. These clients are often seen in the emergency room for a suspected cardiac event but misdiagnosed with costal chondritis or gastritis.35
 Clinical Pearl
Timelines and Healing
Full recovery from a brachial plexus injury is rare. However, clients can often achieve enough of a reduction in symptoms to allow for a return to restricted activity. The level of restriction is related to the severity of the original injury, neural sensitization (activation of the small diameter pain fibers within the nerve itself)36 and the amount of intraneural (contained within the nerve) and/or perineural (between the nerve and the nerve bed) scarring. This is a lifelong injury, and your client must be instructed in management of the condition. Unfortunately, the condition is characterized by periods of high and low neural irritability based on your client’s activity level and the degree of pathology. As these clients have experienced an injury to the nervous system, most progress to a condition known as central sensitization (loss of brain-orchestrated pain inhibitory mechanisms and hyperactivation of ascending pain pathways).37 Specifically, the problem is not just due to a peripheral nerve injury, but symptoms are driven from changes within the brain—not a bottom-up, but a top-down issue. This fairly recent way of looking at clients with chronic nerve pain has led to treatments that take advantage of the brain’s neuroplasticity (the ability of the brain to adapt and change neuronal connections based on a variety of stimuli) and are beyond the scope of this chapter.
Non-Operative Treatment
Your client performs gliding and stretching exercises in front of the mirror as well. He/she begins the glide exercise with the arms against the side and elbows flexed to 90° with the palms facing up. Next your client elevates the shoulders while slowly extending the elbows. To bias the medial and lateral cords of the plexus via the median nerve, he/she maintains supination while extending their wrists (Fig. 22-16; see Video 22-6 on the Evolve website). To bias the posterior cord of the plexus via the radial nerve, your client pronates their forearms and flexes their wrists (Fig. 22-17; see Video 22-6 on the Evolve website).
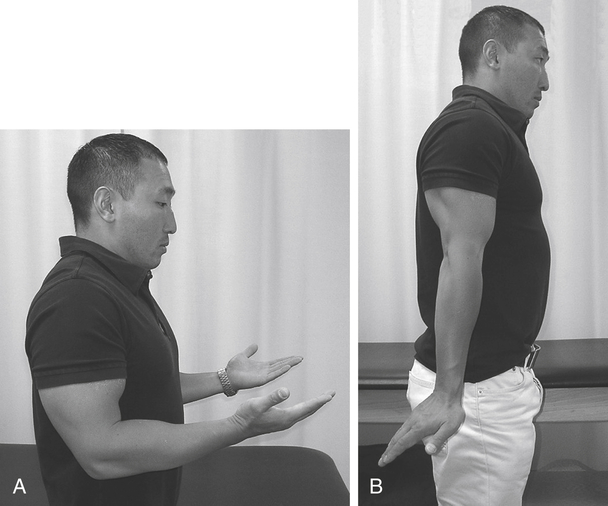
A, Starting and ending position. B, Midpoint of the glide.
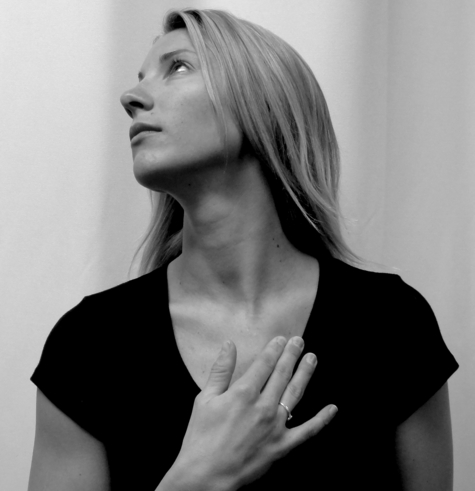
Your client begins the stretch exercise with the palm of the hand brought to eye level in front of the face and the elbow held close to the body. While maintaining the hand at eye level, your client moves their shoulder into abduction and external rotation (ER) with the forearm held in supination. Again keeping the hand at eye level, your client slowly extends their elbow just until a stretch is felt or a slight increase in symptoms occurs. At this point he/she backs off slightly on his/her elbow extension and alternately flexes and extends the wrist three times (Fig. 22-18; see Video 22-7 on the Evolve website). Your client attempts to straighten their elbow further with each cycle of the exercise. The nerve gliding variation of this exercise consists of cervical lateral flexion toward the ipsilateral arm with wrist extension (see Video 22-6 on the Evolve website). The glide and stretch exercises are performed in sets of three as well.
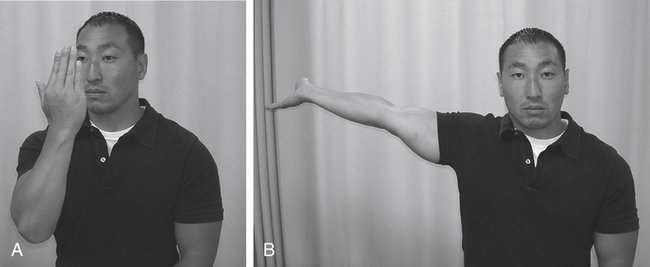
A, Starting position and ending position. B, Maximal stretch position.
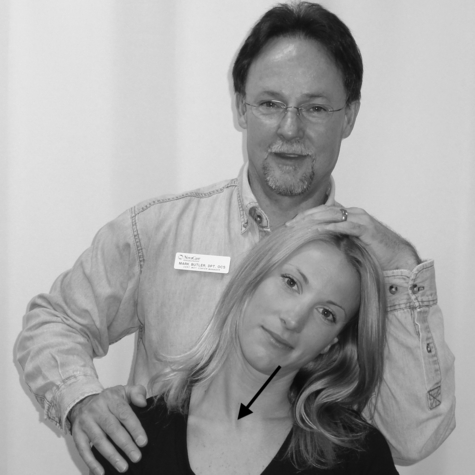
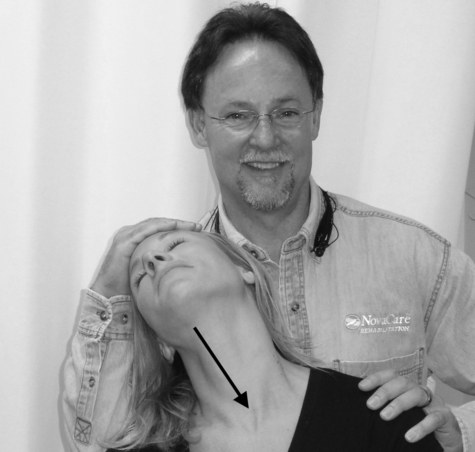
Many of the scalene stretches described in the literature and in exercise kits often bias stretch the brachial plexus and should therefore be avoided. They usually instruct the client to depress their shoulder while stretching, frequently causing further irritation to the injured plexus. The scalenes, which have no attachment to the shoulder and are intrinsic to the cervical and thoracic regions, should be stretched with the shoulder held elevated—thereby relieving tension from the brachial plexus during stretching. Anchoring the first rib at its sternal attachment further enhances the scalene stretch (Fig. 22-19; see Video 22-8 on the Evolve website).
The doorway stretch is ideal for stretching the pectoralis minor (Fig. 22-20). An important component of this stretch is the addition of the shoulder shrug before stepping into the doorway. This initiating maneuver serves two purposes: first, lifting the shoulders increases the origin-to-insertion length of the pectoralis minor, enhancing the stretch; second, lifting the shoulders increases the aperture of the costoclavicular space by elevating the clavicle away from the first rib, minimizing the potential for neurovascular compression once the stretch is commenced. Having your client perform nerve glides as previously described between each stretch helps to minimize neural irritation that may occur as a result of tissue stretching.
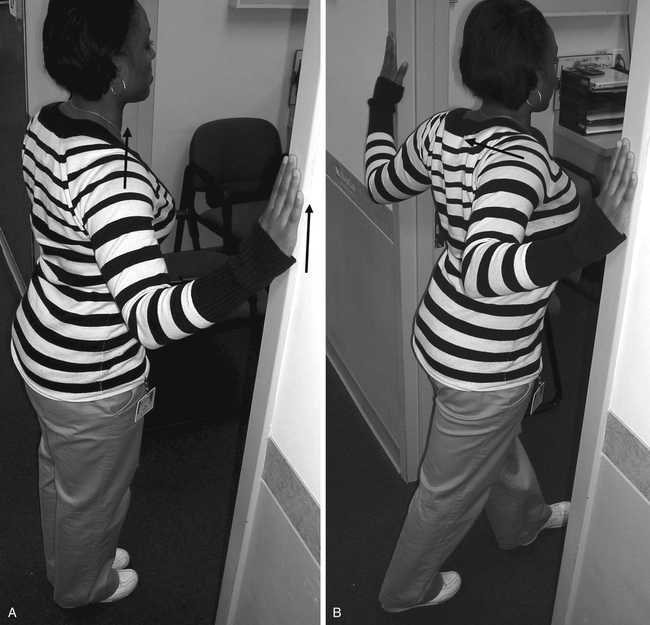
A, The client stands with their toes in line with the doorway opening. They shrug their shoulders and raise their hands along the doorframe to shoulder height, or just below the point of symptom provocation, whichever happens first. B, While holding this posture, the client takes a half step into the doorway.
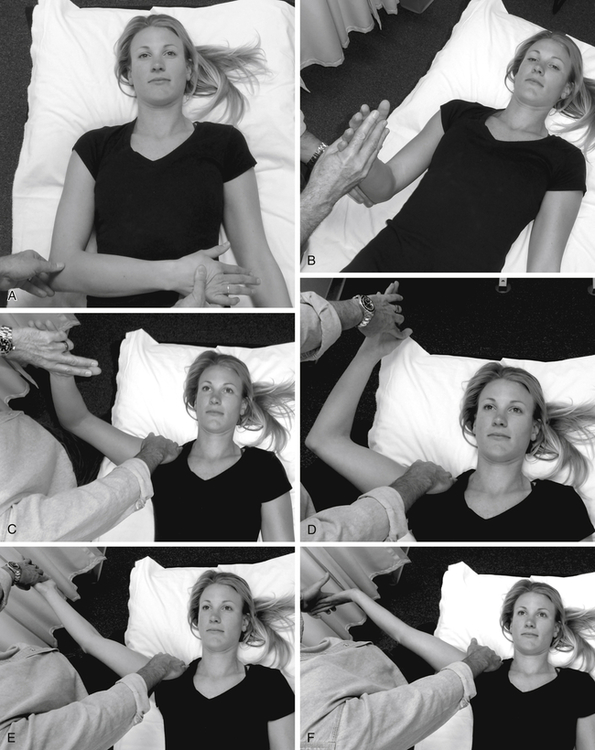
A, 0/5 position; B, 1/5 position; C, 2/5 position; D, 3/5 position; E, 4/5 position; F, 5/5 position.
Operative Treatment
The primary goal of TOS surgery is decompression of neurovascular contents or neurolysis (the removal of scar tissue from the nerve) of the entrapped brachial plexus. Clients who fared the best were those with confirmed vascular or neurological compromise in the TO via diagnostic testing.38 Unfortunately, surgical outcomes have been disappointing; therefore surgery is reserved as a last resort.28,39 The most common procedures are transaxillary first rib resection and supraclavicular scalenectomy (surgical removal of the anterior scalene) with neurolysis.
 Clinical Pearl
 Questions to Discuss with the Physician
 What to Say to Clients
About the Home Exercise Program
Evaluation Tips
• Assess your client’s ability to achieve the corrected posture position described earlier.
• Check for asymmetry of scapular/shoulder position.
• Look for swelling over the supraclavicular fossa.
• Monitor your client’s UE for evidence of autonomic instability (sympathetic nervous system irritation) during testing, such as reticular mottling, color changes, temperature changes, and so on.
• Palpate along the course of the brachial plexus and peripheral nerves for tenderness and evidence of a Tinel’s sign (production of tingling or paresthesia with percussion over the nerve).
• Neural mobility testing of the brachial plexus can be graded as follows (Fig. 22-21; see Video 22-9 on the Evolve website):
• 0/5: Shoulder in internal rotation (IR), elbow flexed to 90° with arm across stomach, wrist and fingers in neutral (see Fig. 22-21, A)
• 1/5: Shoulder in neutral, elbow flexed to 90°, wrist and fingers in neutral (see Fig. 22-21, B)
• 2/5: Shoulder in approximately 100° of abduction, neutral rotation, elbow flexed to 90°, wrist and fingers in neutral (see Fig. 22-21, C)
• 3/5: As earlier with the shoulder in approximately 90° of ER, forearm in supination, and fingers in neutral (see Fig. 22-21, D)
• 4/5: As earlier with the elbow extended to 0° (see Fig. 22-21, E)
• 5/5: As earlier with the wrist and fingers extended to end range (see Fig. 22-21, F)
• Use +/− for positions between each grade. If movement into the test position is less than halfway to the next grade position, the (+) is added the level achieved. If the position achieved is more than halfway but falls short of the next level, the (−) is added to the next level to aide in documentation.
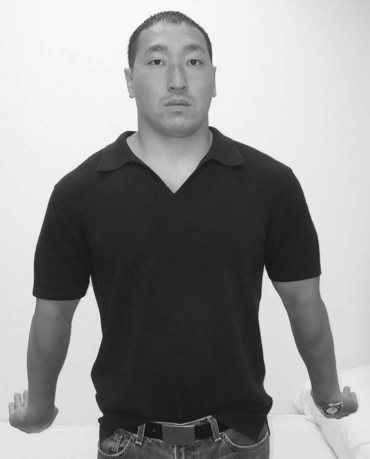
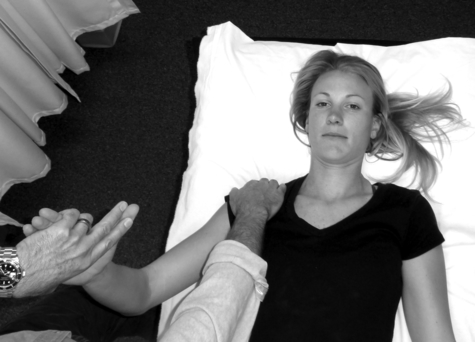
• Block shoulder elevation during testing at 45° of shoulder abduction moving from the 1/5 test position to the 2/5 test position; do not depress the shoulder (Fig. 22-22).
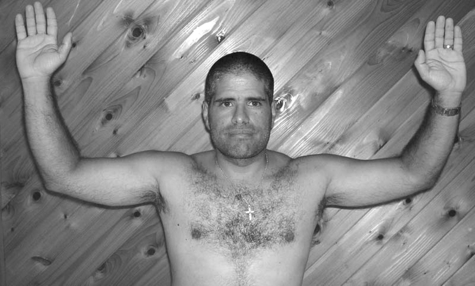
• Use elevated arm stress test (EAST) (Roos Test) and record the time to provocation of symptoms. Described as a 3-minute test;40 in my experience, clients with plexopathy will not tolerate more than 1 minute (Fig. 22-23). Having your client open/close their hands during the test is optional, because it tests for fatigue of the forearm and hand muscles.
• During myotomal screen, focus on scapular elevators for upper trunk lesions and hand intrinsics for lower trunk lesions.
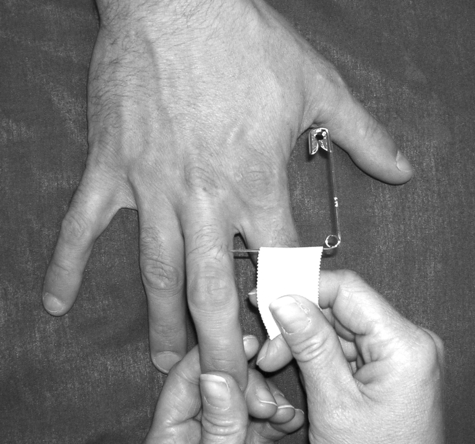
• Using a safety pin flagged with tape to check for acuity to sharp sensation keeps the level of pressure applied during testing constant (Fig. 22-24). Clients with brachial plexopathy will show differential sensation of the middle finger vs. ring finger for clients with carpal or cubital tunnel syndrome. Decreased acuity along the medial half of the ring finger indicates medial cord involvement; decreased acuity along the lateral half of the ring finger indicates lateral cord involvement.35 Differences found with testing of the ring finger concurrent to positive findings of the long finger could indicate the presence of a double or multiple crush syndrome (areas of more than one compressive lesion along the injured nerve).

Stay updated, free articles. Join our Telegram channel

Full access? Get Clinical Tree


