(1)
303 Kaseville Road, 17821 Danville, PA, USA
Keywords
Multiple ligament knee injuryMechanical graft tensionerAllograftTranstibial PCL reconstructionInside-to-outside PCL femoral tunnelsIntroduction
The multiple-ligament-injured knee is a severe injury that may also involve neurovascular injuries and fractures [1]. Surgical treatment offers good functional results documented in the literature by physical examination, arthrometer testing, stress radiography, and knee ligament rating scales. Mechanical tensioning devices are helpful with cruciate ligament tensioning. Some low-grade medial collateral ligament (MCL) complex injuries may be amenable to brace treatment, while high-grade medial-side injuries require repair–reconstruction. Lateral posterolateral injuries are most successfully treated with surgical repair–reconstruction. Surgical timing in acute multiple-ligament-injured knee cases depends upon the ligaments injured, injured extremity vascular status, skin condition of the extremity, degree of instability, and the patients’ overall health. Allograft tissue is preferred for these complex surgical procedures. Delayed reconstruction of 2–3 weeks may decrease the incidence of arthrofibrosis, and it is important to address all components of the instability. Currently, there is no conclusive evidence that double-bundle posterior cruciate ligament (PCL) reconstruction provides superior results to single-bundle PCL reconstruction in the multiple-ligament-injured knee.
The purpose of this chapter is to discuss my surgical technique for combined PCL and anterior cruciate ligament (ACL), medial- and lateral-side reconstructions in acute and chronic multiple-ligament-injured knees with global laxity [1–6]. This chapter focuses on recognizing and defining the instability pattern, the use of external fixation, surgical timing, graft selection and preparation, the author’s preferred surgical technique, mechanical graft tensioning, perioperative antibiotics, specialized operating teams, postoperative rehabilitation, and our results of treatment in these complex surgical cases.
Surgical Timing
Surgical timing in the acute bicruciate multiple-ligament-injured knee is dependent upon the vascular status of the involved extremity, the collateral ligament injury severity, the degree of instability, and the postreduction stability. Delayed or staged reconstruction of 2–3 weeks post injury has demonstrated a lower incidence of arthrofibrosis in our experience [7, 8].
Surgical timing in acute ACL–PCL -lateral-side injuries is dependent upon the lateral-side classification [9]. Arthroscopic combined ACL–PCL reconstruction with lateral-side repair and reconstruction with allograft tissue is performed within 2–3 weeks post injury in knees with types A and B lateral posterolateral instability. Type C lateral posterolateral instability combined with ACL–PCL tears is often treated with staged reconstruction. The lateral posterolateral repair and reconstruction with allograft tissue is performed within the 1st week after injury, followed by arthroscopic combined ACL–PCL reconstruction 3–6 weeks later.
Surgical timing in acute ACL–PCL -medial-side injuries is also dependent on the medial-side classification. Some medial-side injuries will heal with 4–6 weeks of brace treatment, provided that the tibiofemoral joint is reduced in all planes. Other medial-side injuries require surgical intervention. Types A and B medial-side injuries are repaired–reconstructed as a single-stage procedure with combined arthroscopic ACL–PCL reconstruction . Type C medial-side injuries combined with ACL–PCL tears are often treated with staged reconstruction. The medial posteromedial repair–reconstruction augmented with allograft tissue is performed within the first 2 weeks after injury, followed by arthroscopic combined ACL–PCL reconstruction 3–6 weeks later [7, 8, 10–13].
Surgical timing may be affected by modifiers beyond the surgeon’s control, and may cause the surgical treatment to be performed either earlier or later than desired. The surgical timing modifiers include the injured extremity vascular status, open wounds, reduction stability, skin conditions, multiple system injuries, other orthopedic injuries, and meniscus and articular surface injuries [10, 11]. When delayed or staged reconstruction techniques are used, it is very important to document maintained reduction of the tibiofemoral and patellofemoral articulations with radiographs.
Chronic bicruciate multiple ligament knee injuries often present to the orthopedic surgeon with functional instability, and possibly, some degree of post-traumatic arthrosis. Considerations for treatment require the determination of all structural injuries. These structural injuries may include various ligament injuries, meniscus injuries, bony malalignment, articular surface injuries, and gait abnormalities. Surgical procedures under consideration may include proximal tibial or distal femoral osteotomy, ligament reconstruction, meniscus transplant, and osteochondral grafting.
Graft Selection
My preferred graft for the PCL reconstruction is the Achilles tendon allograft for single-bundle PCL reconstruction s, and Achilles tendon and tibialis anterior allografts for double-bundle PCL reconstructions. We prefer Achilles tendon allograft or other allograft for the ACL reconstruction. The preferred graft material for the lateral posterolateral reconstruction is allograft tissue combined with a primary repair, and posterolateral capsular shift procedure. My preferred method for medial-side injuries is a primary repair of all injured structures combined with posteromedial capsular shift and allograft tissue supplementation–augmentation as needed.
Combined PCL– ACL Reconstruction Surgical Technique
The principles of reconstruction in the multiple-ligament-injured knee are to identify and treat all pathology, accurate tunnel placement, anatomic graft insertion sites, utilize strong graft material, mechanical graft tensioning, secure graft fixation, and a deliberate postoperative rehabilitation program [1, 2, 6, 14–20].
The patient is placed on the operating room table in the supine position, and after satisfactory induction of anesthesia, the operative and nonoperative lower extremities are carefully examined [6]. A tourniquet is applied to the upper thigh of the operative extremity, and that extremity is prepped and draped in a sterile fashion. The well leg is supported by the fully extended operating room table, which also supports the surgical leg during medial- and lateral-side surgery. A lateral post is used to control the surgical extremity. An arthroscopic leg holder is not used (Fig. 15.1). Preoperative and postoperative antibiotics are given, and antibiotics are routinely used to help prevent infection in these time-consuming, difficult, and complex cases. Allograft tissue is prepared prior to bringing the patient into the operating room. Autograft tissue is harvested prior to beginning the arthroscopic portion of the procedure.
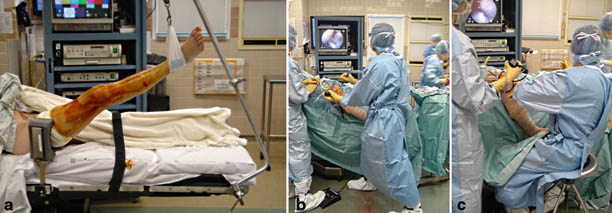

Fig. 15.1
Patient positioning. a The patient is positioned on the fully extended operating room table with a lateral post used for control of the surgical extremity. The surgeon stands during the basic arthroscopic portion of the procedure (b), and the surgeon is seated during the PCL, ACL, and lateral-side reconstruction (c). (From Fanelli 2013 [1]). PCL posterior cruciate ligament, ACL anterior cruciate ligament.
The arthroscopic instruments are inserted with the inflow through the superolateral patellar portal. Instrumentation and visualization are positioned through inferomedial and inferolateral patellar portals, and can be interchanged as necessary. Additional portals are established as necessary. Exploration of the joint consists of evaluation of the patellofemoral joint, the medial and lateral compartments, medial and lateral menisci, and the intercondylar notch. The residual stumps of both the anterior and PCL are debrided; however, the posterior and ACL anatomic insertion sites are preserved to serve as tunnel reference points. The notchplasty for the ACL portion of the procedure is performed at this time.
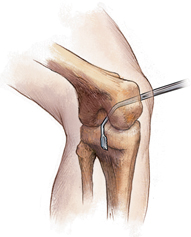
An extracapsular extra-articular posteromedial safety incision is made by creating an incision approximately 1.5–2 cm long starting at the posteromedial border of the tibia approximately 1 in. below the level of the joint line and extending distally (Fig. 15.2). Dissection is carried down to the crural fascia, which is incised longitudinally. An interval is developed between the medial head of the gastrocnemius muscle and the nerves and vessels posterior to the surgeon’s finger, and the capsule of the knee joint anterior to the surgeon’s finger (Fig. 15.3). The posteromedial safety incision enables the surgeon to protect the neurovascular structures, confirm the accuracy of the PCL tibial tunnel, and to facilitate the flow of the surgical procedure.
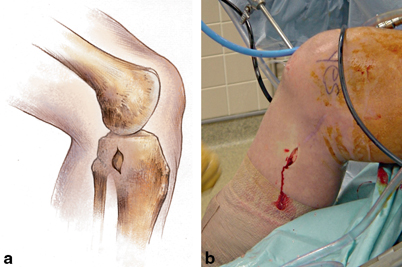
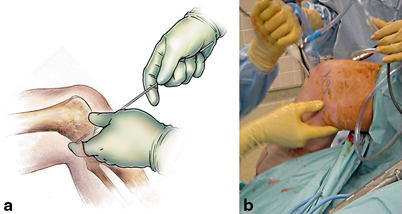


Fig. 15.3
a The surgeon is able to palpate the posterior aspect of the tibia through the extracapsular extra-articular posteromedial safety incision. This enables the surgeon to accurately position guide wires, create the tibial tunnel, and to protect the neurovascular structures. (From Fanelli 2012 [6]). b Intraoperative photograph of posterior instrumentation with the surgeon’s finger in the posteromedial safety incision. (From Fanelli 2013 [1])
The curved over-the-top PCL instruments (Biomet Sports Medicine, Warsaw, IN, USA) are used to sequentially lyse adhesions in the posterior aspect of the knee, and elevate the capsule from the posterior tibial ridge. This will allow accurate placement of the PCL/ACL drill guide and correct placement of the tibial tunnel (Fig. 15.4 15.4).
The arm of the PCL /ACL guide (Biomet Sports Medicine, Warsaw, IN, USA) is inserted through the inferior medial patellar portal. The tip of the guide is positioned at the inferior lateral aspect of the PCL anatomic insertion site. This is below the tibial ridge posterior and in the lateral aspect of the PCL anatomic insertion site. The bullet portion of the guide contacts the anteromedial surface of the proximal tibia at a point midway between the posteromedial border of the tibia, and the tibial crest anterior at or just below the level of the tibial tubercle (Fig. 15.5). This will provide an angle of graft orientation such that the graft will turn two very smooth 45° angles on the posterior aspect of the tibia (Fig. 15.6). The tip of the guide in the posterior aspect of the tibia is confirmed with the surgeon’s finger through the extracapsular extra-articular posteromedial safety incision. Intraoperative AP and lateral X-ray may also be used; however, I do not routinely use intraoperative X-ray. When the PCL/ACL guide is positioned in the desired area, a blunt spade-tipped guide wire is drilled from anterior to posterior. The surgeon’s finger confirms the position of the guide wire through the posterior medial safety incision.
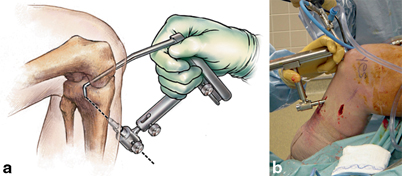
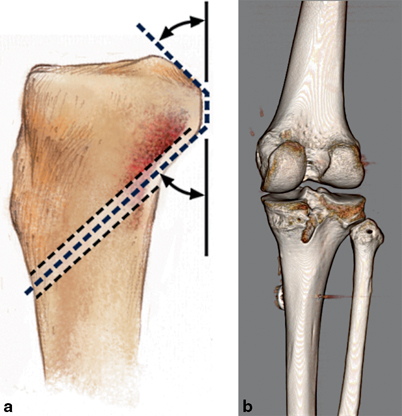

Fig. 15.5
a PCL–ACL drill guide positioned to place guide wire in preparation for creation of the transtibial PCL tibial tunnel. (From Fanelli 2012 [6]). b Intraoperative photograph of the drill guide positioned to create the PCL tibial tunnel. (From Fanelli 2013 [1]). PCL posterior cruciate ligament, ACL anterior cruciate ligament

Fig. 15.6
a Drawing demonstrating the desired turning angles the PCL graft will make after the creation of the tibial tunnel. (From Fanelli 2012 [6]). b Three-dimensional CT scan demonstrating the position of a well-placed PCL tibial tunnel. Note the smooth turning angles the PCL graft will take. (From Fanelli 2013 [1]). PCL posterior cruciate ligament, CT computed tomography
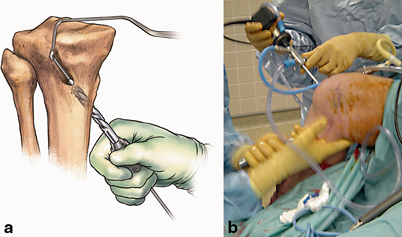
The appropriately sized standard cannulated reamer is used to create the tibial tunnel. The surgeon’s finger through the extracapsular extra-articular posteromedial incision monitors the position of the guide wire. When the drill is engaged in bone, the guide wire is reversed, blunt end pointing posterior, for additional patient safety. The drill is advanced until it comes to the posterior cortex of the tibia. The chuck is disengaged from the drill, and completion of the tibial tunnel is performed by hand (Fig. 15.7).
The PCL single-bundle or double-bundle femoral tunnels are made from inside out using the double-bundle aimers, or an endoscopic reamer can be used as an aiming device (Biomet Sports Medicine, Warsaw, IN, USA). The appropriately sized double-bundle aimer or endoscopic reamer is inserted through a low anterior lateral patellar arthroscopic portal to create the PCL anterior lateral bundle femoral tunnel. The double-bundle aimer or endoscopic reamer is positioned directly on the footprint of the femoral anterior lateral bundle PCL insertion site (Fig. 15.8). The appropriately sized guide wire is drilled through the aimer or endoscopic reamer, through the bone, and out a small skin incision. Care is taken to prevent any compromise of the articular surface. The double-bundle aimer is removed and the endoscopic reamer is used to drill the anterior lateral PCL femoral tunnel from inside to outside (Fig. 15.9). When the surgeon chooses to perform a double-bundle double-femoral tunnel PCL reconstruction , the same process is repeated for the posterior medial bundle of the PCL (Fig. 15.10). Care must be taken to ensure that there will be an adequate bone bridge (approximately 5 mm) between the two femoral tunnels prior to drilling. This is accomplished using the calibrated probe, and direct arthroscopic visualization of the PCL femoral anatomic insertion sites (Fig. 15.11).
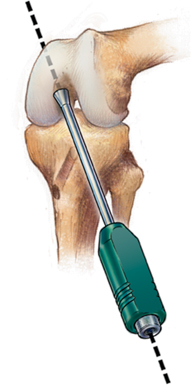
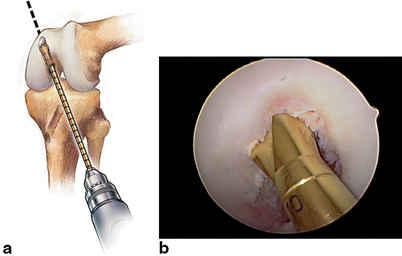
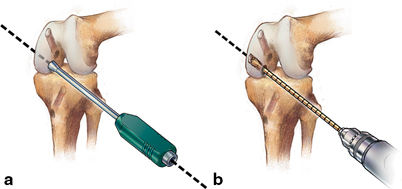
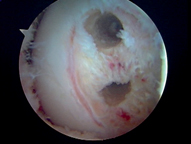

Fig. 15.8
Double-bundle aimer positioned to drill a guide wire for creation of the PCL anterolateral bundle tunnel. (From Fanelli 2012 [6]). PCL posterior cruciate ligament

Fig. 15.9
a Endoscopic acorn reamer is used to create the PCL anterolateral bundle femoral tunnel through the low anterolateral patellar portal. (From Fanelli 2012 [6]). b Intraoperative view of an endoscopic acorn reamer is positioned to create the PCL anterolateral bundle femoral tunnel. (From Fanelli 2013 [1]). PCL posterior cruciate ligament

Fig. 15.10
a Double-bundle aimer positioned to drill a guide wire for creation of the PCL posteromedial bundle femoral tunnel through the low anterolateral patellar portal. (From Fanelli 2013 [1]). b Endoscopic acorn reamer is used to create the PCL posteromedial bundle femoral tunnel. A 5-mm bone bridge is maintained between tunnels. (From Fanelli 2012 [6]). PCL posterior cruciate ligament

Fig. 15.11
Completed PCL anterolateral and posteromedial bundle tunnels fill the anatomic footprint of the posterior cruciate ligament. A 5-mm bone bridge is maintained between the tunnels. (From Fanelli 2013 [1]). PCL posterior cruciate ligament
My preferred surgical technique of PCL femoral tunnel creation from inside to outside is for two reasons. There is a greater distance and margin of safety between the PCL femoral tunnels and the medial femoral condyle articular surface using the inside-to-outside method (Fig. 15.12). In addition, a more accurate placement of the PCL femoral tunnels is possible, in my opinion, because I can place the double-bundle aimer or endoscopic reamer on the anatomic footprint of the anterior lateral or posterior medial PCL insertion site under direct visualization (Fig. 15.13).
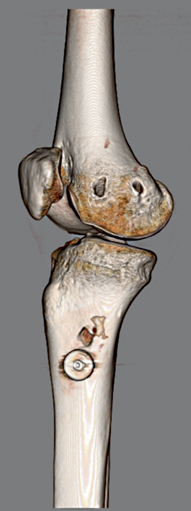
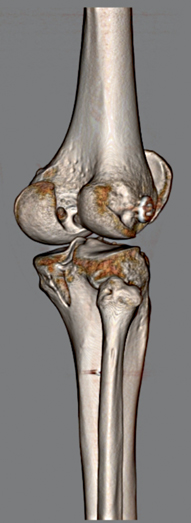

Fig. 15.12
Three-dimensional CT scan showing properly positioned PCL femoral tunnel exit points after inside-to-outside PCL femoral tunnel creation. Note the distance between the femoral tunnel exit points and the distal medial femoral condyle articular surface. (From Fanelli 2013 [1]). PCL posterior cruciate ligament, CT computed tomography

Fig. 15.13
Three-dimensional CT scan showing properly positioned intra-articular PCL femoral tunnel position after inside-to-outside PCL femoral tunnel creation. A more accurate placement of the posterior cruciate ligament femoral tunnels is possible because I can place the double-bundle aimer or endoscopic reamer on the anatomic footprint of the anterior lateral or posterior medial posterior cruciate ligament insertion site under direct visualization. (From Fanelli 2013 [1]). PCL posterior cruciate ligament, CT computed tomography
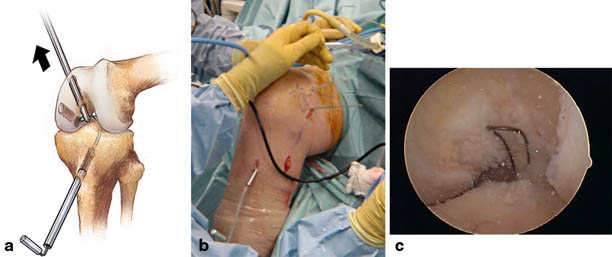
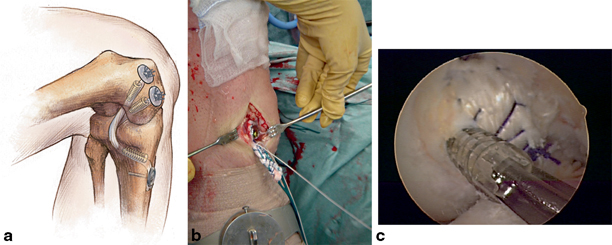
A Magellan suture retriever (Biomet Sports Medicine, Warsaw, IN, USA) is introduced through the tibial tunnel into the joint, and retrieved through the femoral tunnel (Fig. 15.14). The traction sutures of the graft material are attached to the loop of the Magellan suture retriever and the graft is pulled into position. The graft material is secured on the femoral side using a bioabsorbable interference screw for primary aperture opening fixation, and a polyethylene ligament fixation button for backup fixation.
The cyclic dynamic method of graft tensioning using the Biomet graft-tensioning boot is used to tension the posterior and ACL grafts [21]. This tensioning method is discussed in Chap. 21. Tension is placed on the PCL graft distally using the Biomet graft-tensioning boot (Biomet Sports Medicine, Warsaw, IN, USA; Fig. 15.15). Tension is gradually applied with the knee in 0° of flexion (full extension) reducing the tibia on the femur. This restores the anatomic tibial step-off. The knee is cycled through a full range of motion multiple times to allow pretensioning and settling of the graft. The process is repeated until there is no further change in the torque setting on the graft tensioner. The knee is placed in 70–90° of flexion, and fixation is achieved on the tibial side of the PCL graft with a bioabsorbable interference screw, and backup fixation with a bicortical screw and spiked ligament washer or polyethylene ligament fixation button (Fig. 15.16).
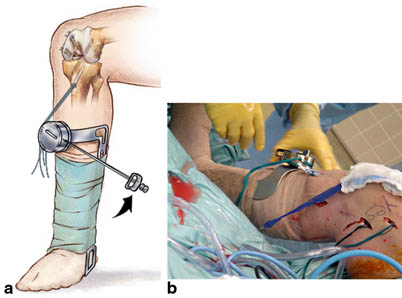

Fig. 15.15
a Knee ligament graft-tensioning boot is used to tension the PCL graft. This mechanical tensioning device uses a ratcheted torque wrench device to assist the surgeon during graft tensioning. (From Fanelli 2012 [6]). b Intraoperative photograph of Biomet tensioning boot applied to the tibia to tension the PCL reconstruction graft. (From Fanelli 2013 [1]). PCL posterior cruciate ligament

