Chondrocyte Transplantation
Lars Peterson
INDICATIONS/CONTRAINDICATIONS
Lesions of the articular cartilage in the knee joint present great diversity in size, location, depth, and containment. These factors have to be evaluated to decide the right treatment. Autologous chondrocyte transplantation (ACT) is a treatment option for symptomatic full-thickness chondral or osteochondral lesions (OCD). The patients (15 to 55 years old) often present with pain and catching or locking on activity and pain and swelling after activity.
Chondral lesions possible for treatment with ACT should be between 1 to 2 and 16 cm2 with grade III or IV Outerbridge classification (grade 3 or 4 ICRS classification). The opposing articular surface has to be undamaged or have only minor cartilage pathology (grade I or II Outerbridge classification, grade 1 or 2 ICRS classification).
Autologous chondrocyte transplantation is indicated for lesions on the femoral condyles, the femoral trochlea, and patella. Patients with tibial plateau defects treated with ACT are showing improved results over time; therefore, this locale can be considered for ACT. Long-term follow-up on kissing lesions (i.e., bipolar lesions in the femurotibial and patellotrochlear joints) show at 4 to 10 years postoperatively satisfactory results in 75% of the cases. Autologous chondrocyte transplantation can be tried in these cases in younger patients as a salvage procedure. Multiple lesions, two or more lesions in one joint excluding kissing lesions, have shown satisfactory results in 84% at 5 to 11 years postoperatively. Almost all of these patients needed concomitant procedures to create optimal environment for the transplanted chondrocytes. Stabilizing or unloading procedures will improve the short- and long-term survival of the repair tissue in the injured surfaces. Autologous chondrocyte transplantation is not a treatment for osteoarthritis (general joint disease), gout, and rheumatoid arthritis or other systemic joint diseases.
Autologous chondrocyte transplantation is indicated for osteochondritis dissecans (OCD) with unstable fragments, osteochondral flaps and empty defects, and a size between 1 to 2 and 16 cm2. If the bony defect is between 6 and 8 mm deep, ACT alone can be used. If the bony defect is deeper, concomitant autologous bone grafting (sandwich technique) has to be used.
PREOPERATIVE PLANNING
The preoperative planning includes a careful history to find out the cause of the cartilage lesion: traumatic or microtraumatic. Clinical assessment of symptoms and signs, radiologic imaging including standing radiographs, and arthroscopic assessment are essential.
Examination and Evaluation
The preoperative assessment is important when deciding if ACT is an option for the patient and should include all pathology of the knee; but an arthroscopic evaluation must precede the final decision. Try to find out the cause of the cartilage defect, since this affects the treatment. Crepitations during extension and flexion against resistance may indicate cartilage pathology. Check for any ligament instability or malalignment that might need surgical correction. It is important to have a stable joint since instability greatly decreases the chances of a successful surgery.
Regarding lesions to the patella, it is very important to examine for possible patellar instability, malalignment, or maltracking, since this often is the cause of the cartilage damage.
Radiography, Magnetic Resonance Imaging, Arthrography
Radiologic imaging is useful to rule out patients with osteoarthritis. Standing radiographs in 45 degrees of knee flexion and extension and hip-knee-ankle radiographs show joint space reduction and varus or valgus malalignment that may need surgical correction. Computerized tomography with and without quadriceps contraction may reveal patellofemoral dysplasia or instability. Magnetic resonance imaging (MRI) with or without contrast medium (gadolinium) may be helpful to assess the articular cartilage and pathology of the underlying bone.
Arthroscopic Evaluation
If ACT so far is the choice of treatment, the next step is an arthroscopic examination performed by the surgeon. The examination proceeds as follows:
Administer general or spinal anesthesia.
Test the joint stability.
Examine all the articular surfaces, the menisci, the synovial lining, and the cruciate ligaments using an arthroscopic probe.
Remove loose bodies or debris in the joint, if present.
Evaluate the location, size, containment, and depth of the cartilage lesion (Fig. 29-1).
Make sure the lesion is accessible through an optimal arthrotomy.
Harvest cartilage if the lesion is suitable for chondrocyte transplantation.
Slice cartilage specimens from the unloaded proximal, medial edge of the trochlea using a ring curette or a gouge and (Fig. 29-2).
When necessary use other locations for the cartilage biopsy, such as the proximal, lateral edge of the trochlea or the lateral intercondylar notch.
Cut down through the subchondral bone to cause a bleeding, so the donor site area may heal with fibrocartilage.
Let one end of the specimen still be attached, then use a grasper to take out the specimen.
Harvest cartilage from a surface of approximately 5 by 10 mm is, resulting in the required 200 to 300 mg of cartilage.
Place the specimens in a sterile tube containing a medium of DMEM with phenolred and gentamycin.
Treat meniscal injuries after the harvesting of cartilage.
The harvested cartilage is enzymatically digested and the chondrocytes are isolated and cultured for 2 weeks, which results in an increase in cell number by 20 to 30 times (Fig. 29-3). The implantation of the chondrocytes can thus at the earliest take place 2 weeks after the harvesting. If the implantation is scheduled at a later date, the chondrocytes can be frozen after 1 week of culturing, and then thawed and cultured for another week before the implantation.
SURGERY
Chondral Lesions
Preparation and Approach
Place the patient supine on the operating table.
Use general or spinal anesthesia and a tourniquet-controlled bloodless field.
Perform medial or lateral parapatellar miniarthrotomy to open the joint.
Adjust the arthrotomy for good access to the defect.
To expose multiple femoral or patellar lesions, the patella may have to be dislocated.
Consider the approach for concomitant procedures, for example, high tibial osteotomy.
Debridement of Defect
Excise all damaged and undermined cartilage.
Get vertical edges to healthy cartilage.
Cut down to the subchondral bone around the lesion using a knife with a No. 15 blade.
Keep the lesion contained by cartilage, if possible.
It is better to leave a 3 to 4 mm rim of cartilage of questionable quality than have a lesion bordering bone or synovium.
Remove the damaged cartilage using a ring curette or a periosteal elevator.
Be careful not to violate the subchondral bone and cause bleeding and possible fibrous ingrowth in the defect.
The debrided defect should be as circular or oval as possible (Fig. 29-4).
Measure the defect and use sterile aluminum foil or paper to make a template of the defect (Fig. 29-5).
Check for any bleeding of the subchondral bone; at this time the tourniquet can be let down for easier detection.
If there is a bleeding, place an epinephrine-wet sponge in the defect to stop it.
Keep the explored cartilage moist throughout the procedure.
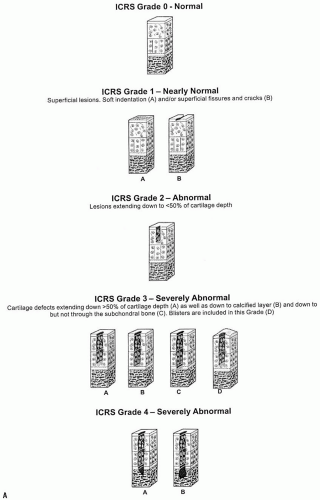 FIGURE 29-1 A-C: ICRS classification of the location and depth of a cartilage lesion. (With permission from International Cartilage Repair Society, ICRS Cartilage Injury Evaluation Page, 2000.) |
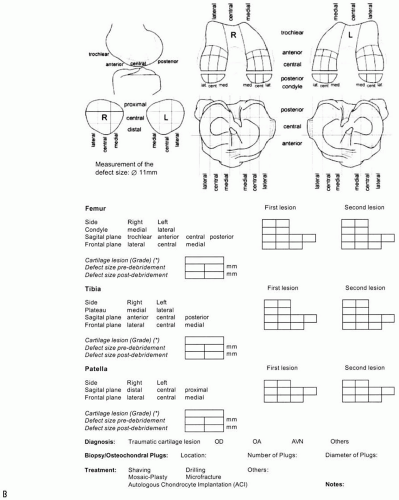 FIGURE 29-1 (Continued) |
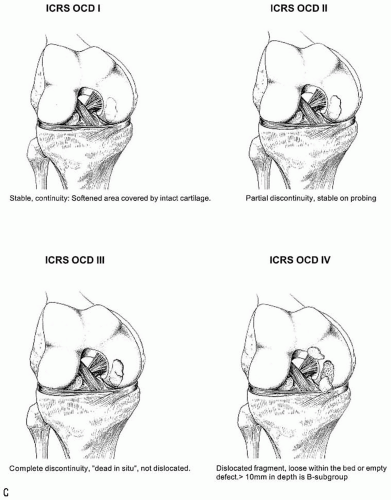 FIGURE 29-1 (Continued) |
 FIGURE 29-2 Schematic drawing of the cartilage harvest (A). Arthroscopic pictures of a full-thickness cartilage lesion (B) and cartilage harvesting with a ring curette (C). |
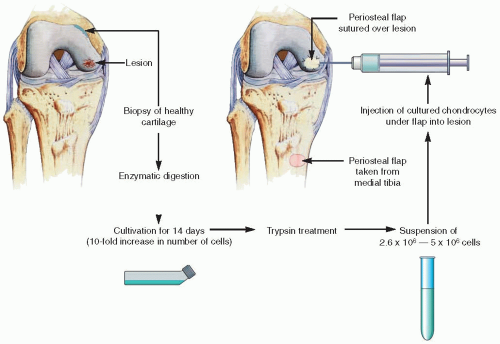 FIGURE 29-3 From the harvested cartilage slices the chondrocytes are isolated and cultured for 2 weeks, before the implantation can take place. |
Periosteal Flap Harvest
It is then time for the harvesting of a periosteal flap to cover the cartilage defect. The periosteum is easily accessed at the proximal medial tibia, distal to pes anserinus and the medial collateral ligament insertion. The medial or lateral femoral condyles proximal to the articular cartilage can also be used as harvest sites but the periosteum is thicker, less elastic, and covered by numerous vessels, which may cause postoperative bleeding and arthrofibrosis if not taken care of. More adequate periosteum is found on the distal shaft of the femur proximal to the condyles. The steps for periosteal flap harvest are as follows:
Incise to get good exposure.
Dissect gently and remove the overlying fibrous tissue, fat, and crossing vessels covering the periosteal flap.
Use the template to measure how a large flap you need (Fig. 29-6).
Oversize the periosteal flap with 1 to 2 mm at the periphery of the template.
Incise the periosteal flap using a knife with a No. 15 blade.
Carefully dissect it with a periosteal elevator with small movements and lift with a nontoothed forceps.
Go close down to the bone so the cambium layer of the periosteum is preserved and take care not to penetrate the flap. A healthy cambium layer interacts with the chondrocytes and is thus important.
Mark the outside of the periosteal flap with a sterile pen for orientation at fixation.
Be sure to keep the flap moist at all times.
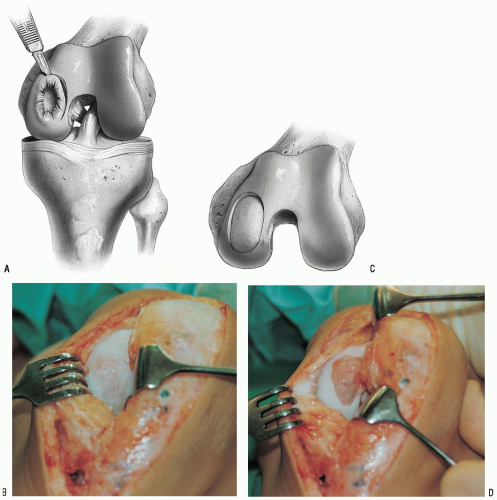 FIGURE 29-4 Drawings and photographs showing a femoral condyle defect before (A,B) and after (C,D) radical excision and debridement of all damaged and undermined cartilage. |
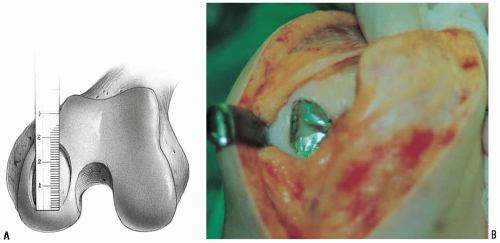 FIGURE 29-5 The debrided defect is measured (A) and a template of aluminum foil is made (B). |
Periosteal Flap Suturing
Return to the debrided defect and inspect once again for bleeding.
Cover the defect with the periosteal flap with the cambium layer facing the defect bed.Related posts:
 Medial Patellofemoral Ligament Reconstruction and Repair
Patellectomy
Meniscal Transplantation without Bone Plugs
Arthroscopically Assisted Posterior Cruciate Ligament Reconstruction
High Tibial Osteotomy in Knees with Associated Chronic Ligament Deficiencies
Synovectomy for Pigmented Villonodular Synovitis
Medial Patellofemoral Ligament Reconstruction and Repair
Patellectomy
Meniscal Transplantation without Bone Plugs
Arthroscopically Assisted Posterior Cruciate Ligament Reconstruction
High Tibial Osteotomy in Knees with Associated Chronic Ligament Deficiencies
Synovectomy for Pigmented Villonodular Synovitis

Stay updated, free articles. Join our Telegram channel

Full access? Get Clinical Tree


