Anterior Cruciate Reconstruction
Andrew Pickle MD
Aaron Campbell MD
Donald H. Johnson MD, FRCS
The most common mechanism of anterior cruciate injury is a twisting or deceleration that may be accompanied by hyperextension and/or internal rotation forces on the knee.
Unrecognized malalignment can be a reason for failure of ACL reconstructions.
X-rays should be ordered in all cases to rule out associated fractures and to identify degenerative changes in middle-age patients pre-operatively.
Reconstructive surgery is generally considered the standard treatment for athletes, who want to return to sports that involve pivoting.
In younger patients, reconstructive surgery is necessary to prevent further damage to the knee, and minimize degenerative changes.
An aggressive post-op rehabilitation program can diminish the problem of lack of full knee extension commonly associated with patellar tendon grafts. Therefore, if the surgeon is unable to control the post-op physiotherapy program to ensure full extension, the hamstrings may be a better graft choice.
The ideal candidate for reconstruction with a patellar tendon graft is the young athlete competing in pivotal activities at the elite level, because of the importance of the commitment to an intensive rehabilitation program.
Unlike hamstring grafts, which can be of variable diameter, the patellar tendon offers a graft of consistent size and shape.
Errors in tunnel placement, tensioning, and fixation are more likely to result in a poor outcome than the choice of which graft to use.
Patients are placed in a Continuous Passive Motion (CPM) machine prior to leaving the OR.
Physical therapy is begun within 4 or 5 days of surgery, and patients are seen 5 to 7 days post-op to review surgical findings and postoperative rehabilitation.
The goal for the first 2 weeks post-op is to minimize swelling, allow wound healing, and begin range of motion exercises.
After 3 months, light sports (cross-country skiing, curling, or golf) may be allowed, if there is full range of motion, no effusion, negative Lachman, and return to 90% strength.
Anterior cruciate ligament (ACL) injuries are very common in today’s active population. Over the years, ACL reconstruction has evolved dramatically, from primary repair to extra-articular procedures, and finally intra-articular, single incision techniques. There are estimated to be over 100,000 ACL reconstructions performed in the United States annually. Once considered a career ending injury, ACL reconstruction is now an outpatient procedure with better than 90% successful outcome.
History
The most common mechanism of injury is a noncontact twisting or deceleration injury. This may also have hyperextension and/or internal rotation forces on the knee. The patients often feel a “pop,” followed by pain and swelling, and they are unable to continue playing. In the chronic situation the patients have symptoms of knee instability with pivoting, jumping, or lateral motions. The patients complain that the knee gives way, and it feels like the bones are coming apart. ACL ruptures can also occur with combined ligament injuries such as knee dislocations.
Physical Exam
The examination begins with observation of the patient’s body habitus, gait, and alignment. Unrecognized malalignment can be a reason for failure of ACL reconstructions. An example of this would be a varus knee alignment, associated with posterolateral laxity, and a thrust when walking. A general examination of the knee is performed, including inspection, palpation, range of motion, neurovascular examination, and special tests for ligaments and menisci.
Lachman Test
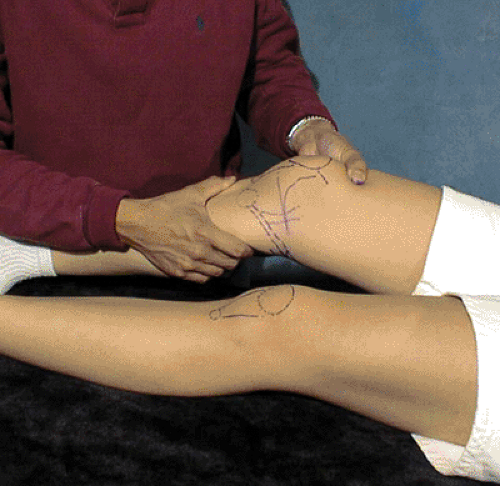
This is the hallmark test to assess ACL injury (Fig 34.1-1). The test is performed with the knee flexed at 30 degrees, and the hamstrings relaxed. The examiner assesses the amount of anterior translation and the presence or absence of an endpoint compared to the opposite knee.
The Lachman test can be graded as follows:
Grade 1+ has 0 to 5 mm displacement with a firm end point,
Grade 2+ has 5 to 10 mm displacement with no end point,
Grade 3+ has greater than 10 mm displacement.
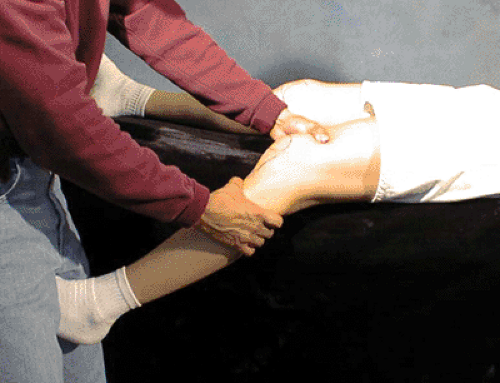
In the acute situation, the dropped leg Lachman test is performed by letting the thigh rest on the edge of the bed, and the leg is dropped over the side with 30 degrees of knee flexion (Fig 34.1-2). The hamstring muscles are relaxed in this position, and an assessment of the anterior translation can be made even in the acute situation.
Pivot Shift Test
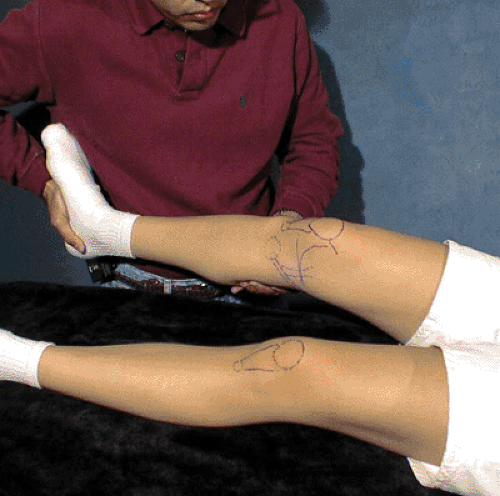
This test is performed by the examiner supporting the patient’s leg in extension. One hand then applies an axial load, and valgus force as the knee is slowly flexed (Fig 34.1-3).
If the ACL is deficient, the tibia will sublux anteriorly in extension, and will reduce with flexion. The anatomic shape of the lateral femoral condyle is thought to be responsible for the snap or clunk that is felt with reduction (1). It can be accentuated with applying external rotation to the tibia with the maneuver.
If the ACL is deficient, the tibia will sublux anteriorly in extension, and will reduce with flexion. The anatomic shape of the lateral femoral condyle is thought to be responsible for the snap or clunk that is felt with reduction (1). It can be accentuated with applying external rotation to the tibia with the maneuver.
The pivot shift test can be graded as follows:
1+ is a pivot glide
2+ is a pivot shift
3+ is a gross pivot shift with the feeling that the condyles will dislocate.
Anterior Drawer Test
Although the posterior drawer test is very useful for posterior cruciate ligament injuries, the anterior drawer test has limited use in ACL injuries. It is performed with the patient’s knee flexed 90 degrees and stabilized by the examiner sitting on the foot, while applying an anterior directed force to the proximal tibia. The amount of anterior translation of the tibia under the femur is compared to the opposite leg.
Special tests for other ligament injuries, such as the dial test for posterolateral laxity, will not be covered here, but are very important to avoid missing associated injuries.
Plain Radiographs
These should be ordered in all cases to rule out associated fractures. They can be used to assess the growth plates and avulsion fractures in adolescents. The Segond fracture is a lateral capsule avulsion from tibia, and is pathognomonic for ACL injury. As well, degenerative changes in middle age patients can be identified pre-operatively.
MRI
This is generally not required for routine ACL injuries. However, MRI is useful to assess associated meniscal pathology, and newer fast spin technology has improved cartilage imaging.
KT-1000 Arthrometer
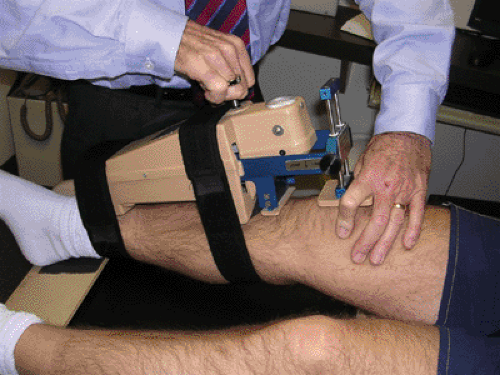
This is a very useful tool to give objective measurements of the amount of anterior translation of the tibia (Fig 34.1-4). The arthrometer can be used pre-operatively, intra-operatively, and post-operatively. It has been validated and generally a side-to-side difference of over 3 mm is considered pathologic, and over 5 mm difference indicates a complete tear (2,3).
The patient who has sustained an ACL injury has three treatment choices: avoid pivoting sports, resume modified activities with a brace, or undergo ACL reconstruction.
Reconstructive surgery for torn ACLs is generally considered the standard of care for patients who want to return to pivoting sports. There are two main reasons for this: First, the natural history of an ACL deficient knee is associated with a high incidence of complex meniscal tears, chondral
injuries, and late degenerative changes (4,5); second, ACL reconstruction has become a relatively routine outpatient procedure with a greater than 90% success rate (6).
injuries, and late degenerative changes (4,5); second, ACL reconstruction has become a relatively routine outpatient procedure with a greater than 90% success rate (6).
Nonoperative
The initial treatment of all ACL injuries includes splinting, crutches, and early range of motion exercises. Range of motion must be re-established for optimal outcome with either operative or nonoperative treatment.
The role of functional braces is controversial. They have been shown to decrease anterior translation at low loads, but not at physiologic loads. Braces may however contribute some proprioceptive feedback, but the significance is unknown (7). A difficult scenario exists when an athlete tears one’s ACL early in the season and wants to complete the season with a brace. Shelton et al. (8) followed 43 athletes, prospectively, who elected to complete the season in a brace, and found that 70% were able to complete the season, 61% experienced instability in the brace, and 62% of the athletes had associated meniscal/chondral injuries at the time of their ACL reconstruction. Generally, if patients elect for nonoperative treatment, they should be aware of the natural history, and avoid pivoting activities.
Operative
The operative management of ACL tears has evolved significantly over the years. Primary repair has been abandoned due to high failure rates (9). The extra-articular procedures such as the Macintosh and Ellison had poor long-term results, and thus have fallen out of favor. Amis and Scammell (10) have shown in the lab that the addition of an extra-articular procedure did not improve the biomechanics over an intra-articular procedure alone. For most surgeons, the standard of care would be the arthroscopically aided intra-articular reconstruction.
The indications for ACL reconstruction include active patients that experience symptoms of instability with pivoting sports. Patients who complain of instability with activities of daily living most likely have additional pathology such as a meniscal tear. In younger patients, reconstructive surgery is necessary to prevent further damage to the knee, and minimize degenerative changes (11). In older patients the treatment is more individualized to meet their physical demands.
There are several issues to consider in ACL reconstruction including the choice of graft, tunnel placement, choice of fixation, pain control, and post-op rehabilitation. The choices of graft include autogenous bone-patellar tendon-bone, hamstring, and quadriceps grafts. The same tissues are all available in all grafts.
Successful outcomes have been achieved with all graft types. The meta-analysis by Yunes et al. (12) showed better stability, but more anterior knee pain with the patellar tendon graft. There was more laxity with the hamstrings graft, but less harvest site morbidity. At International Society of Arthroscopy, Knee Surgery, and Orthopaedic Sports Medicine, (ISAKOS) in 2003, Cohen showed that at a 15 year follow-up, 75% of patients had evidence of patellofemoral osteoarthritis with patellar tendon reconstructions. Inability of the patients to regain full extension was implicated as the reason for this finding. Shelbourne and Nitz (13) have advocated an aggressive post-op rehabilitation program, which has diminished the problem of lack of full knee extension commonly associated with patellar tendon grafts. Therefore, if the surgeon is unable to control the post-op physiotherapy program to ensure full extension, then the hamstrings may be a better graft choice.
Quadrupled hamstring grafts have been found to be stronger (i.e., higher ultimate load to failure) than patellar tendon grafts, and twice as strong as native ACLs (14). The main issue with hamstring grafts remains the method of graft fixation (15,16). With improved fixation devices and graft tensioning this problem should be minimized.
The following are the steps in ACL reconstruction with the four bundle hamstring graft at our institution:
Examination under anesthesia (EUA) and Documentation
Graft Harvest and Preparation
Diagnostic Arthroscopy and Meniscal Repair
Menisectomy
Stump Debridement and Notchplasty
Tibial Tunnel Preparation
Femoral Tunnel Preparation
Graft Passage and Fixation
Final Inspection and Measurement
Examination Under Anesthesia and Documentation
After appropriate anesthesia, a femoral nerve block and pre-operative antibiotics are given. An examination under anesthesia is performed to confirm the diagnosis and check for other pathology. The collateral ligaments, the PCL, and posterior lateral corner are examined. Lachman, pivot shift, as well as, a KT-1000 arthrometer side to side difference are done to evaluate the ACL. The indication to proceed with a standard ACL reconstruction is a manual maximum difference of greater than 5 mm, and positive pivot shift. The leg is prepped and draped in the standard fashion, and the tourniquet is inflated.
Graft Harvest and Preparation
Harvesting of the hamstring grafts usually occurs first. There is some controversy in whether the diagnostic arthroscopy of the knee should be done before the graft
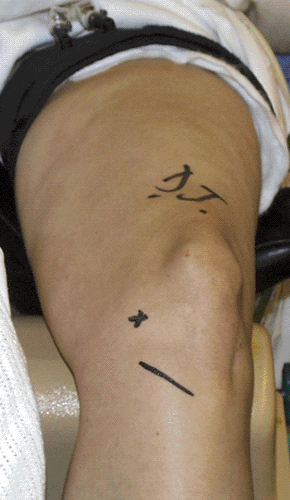
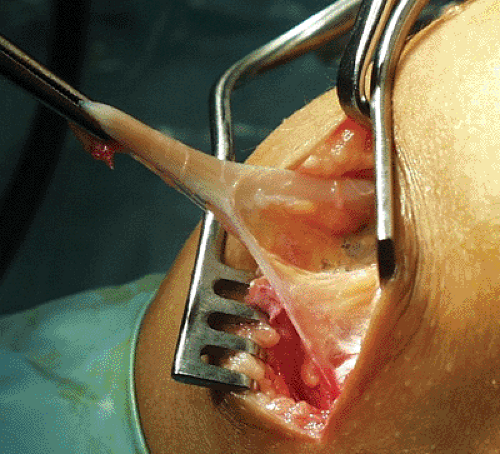
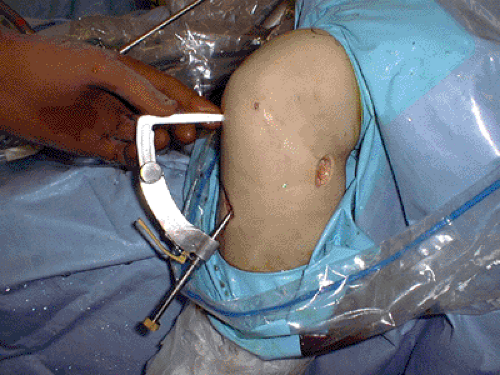
harvest. If the patient has a positive pivot shift test, and KT-1000 values greater than 5 mm side to side, then the ACL is not functional, and a reconstruction will have to be performed. The leg is placed in the figure of four position, and the hamstring tendons can often be palpable approximately 5 cm below the medial joint line. An oblique 3 cm incision is made about 1 cm medial to the tibial tubercle and approximately 5 cm below the joint line (Fig 34.1-5). Dissection is made through the skin and subcutaneous fat until the sartorius fascia is identified. The gracilis and semitendinosus tendons can now be seen and felt just below the fascia. The tendons are picked up with a Kocher, and using scissors, the fascia is opened above the tendons, and the pes anserine bursa identified. The tendons are detached from the tibia by sharp dissection using a knife. This corner is lifted up to visualize the underlying medial collateral ligament. Kochers are placed on both tendon ends, and the conjoined tendon divided. The tendon ends can now be pulled into the wound to expose the adhering bands, which attach inferiorly and medially to the gastrocnemius. Avoid twisting the tendons as it changes the orientation of the bands, making them harder to find and subsequently cut (Fig 34.1-6). Pulling on the free end and watching for any dimpling in the calf is a useful check to be sure the tendon is free. It is very important to identify and cut these all the fascial bands to the gastrocnemius to prevent premature amputation of the grafts with the tendon stripper. The closed loop tendon stripper is then used to harvest the grafts by keeping distal tension on the grafts, and passing the stripper in the direction of the tendons. The tendons will be cut off by the stripper at their musculotendinus junction. The tendons are then taken to the back table to be prepared.
harvest. If the patient has a positive pivot shift test, and KT-1000 values greater than 5 mm side to side, then the ACL is not functional, and a reconstruction will have to be performed. The leg is placed in the figure of four position, and the hamstring tendons can often be palpable approximately 5 cm below the medial joint line. An oblique 3 cm incision is made about 1 cm medial to the tibial tubercle and approximately 5 cm below the joint line (Fig 34.1-5). Dissection is made through the skin and subcutaneous fat until the sartorius fascia is identified. The gracilis and semitendinosus tendons can now be seen and felt just below the fascia. The tendons are picked up with a Kocher, and using scissors, the fascia is opened above the tendons, and the pes anserine bursa identified. The tendons are detached from the tibia by sharp dissection using a knife. This corner is lifted up to visualize the underlying medial collateral ligament. Kochers are placed on both tendon ends, and the conjoined tendon divided. The tendon ends can now be pulled into the wound to expose the adhering bands, which attach inferiorly and medially to the gastrocnemius. Avoid twisting the tendons as it changes the orientation of the bands, making them harder to find and subsequently cut (Fig 34.1-6). Pulling on the free end and watching for any dimpling in the calf is a useful check to be sure the tendon is free. It is very important to identify and cut these all the fascial bands to the gastrocnemius to prevent premature amputation of the grafts with the tendon stripper. The closed loop tendon stripper is then used to harvest the grafts by keeping distal tension on the grafts, and passing the stripper in the direction of the tendons. The tendons will be cut off by the stripper at their musculotendinus junction. The tendons are then taken to the back table to be prepared.
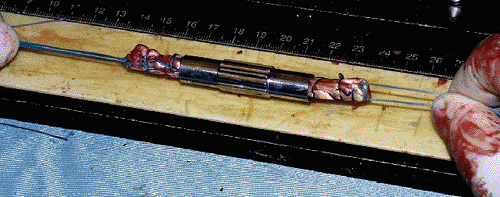
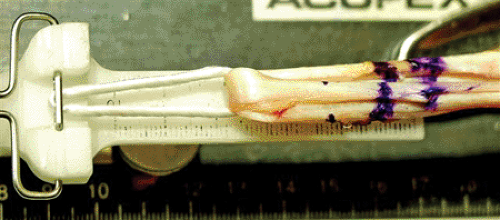
The tendons are prepared on the graft preparation workstation. Using a periosteal elevator, the muscle is removed, and the tendons are cut to 22 cm in length. Using No. 2 nonabsorbable braided suture, the four ends are individually stitched in a whip stitch fashion for about 4 cm. The two tendons are folded over a No. 5 braided suture, to form a quadruple graft. Their diameter is measured to the nearest 0.5 mm (Fig 34.1-7). The tendons can be kept in a moist sponge, or pretensioned at 15 N until the tunnels are prepared.
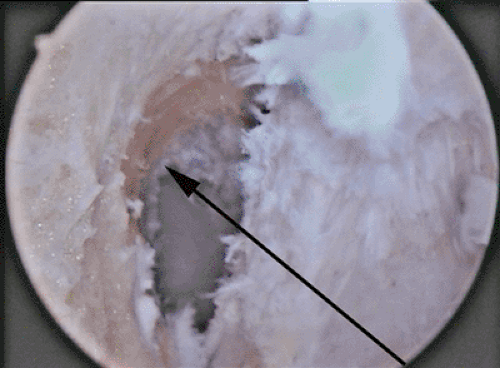
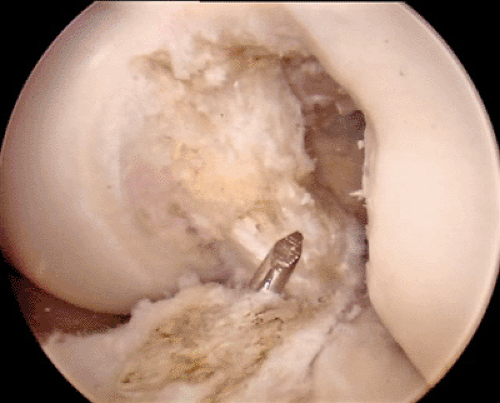
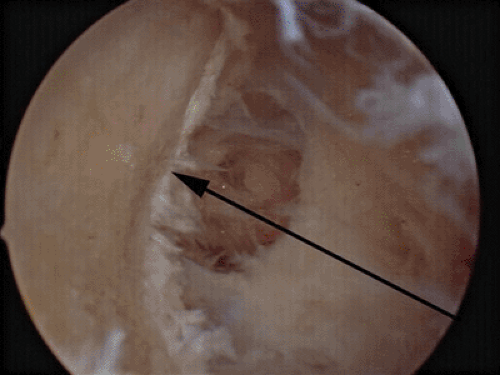
A complete diagnostic arthroscopy is performed next in a standard fashion. Any associated pathology is identified and treated. The remaining ACL stump is removed with a mechanical shaver until the footprint is seen well. A minimal notchplasty is performed to ensure there will be no graft impingement and the back wall of the femoral notch is well seen and felt with a hook. Care must be taken to ensure the true back wall is visualized and not just residents’ ridge (Fig 34.1-8).
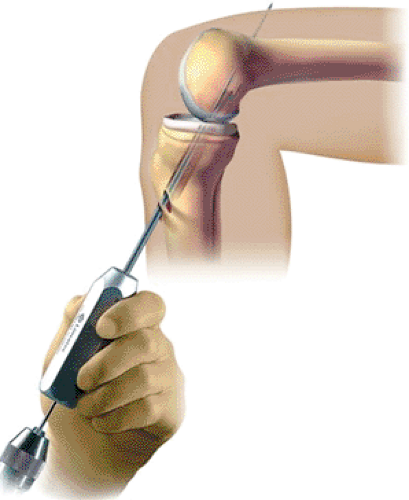
The tunnels are prepared next. The tibial tunnel is prepared using a tibial guide (Fig 34.1-9) that is inserted through the anteromedial portal and directs a K-wire 7 mm anterior to the PCL in the midline (Fig 34.1-10). The K-wire is started on the anteromedial tibia in the harvest site incision approximately halfway between the tubercle and the posterior tibia. This will allow the transtibial drilling of the femur at the 10 and 2 o’clock positions, and avoid placing the graft too vertical in the notch. After appropriate guide wire placement,
the tibial tunnel is first drilled with a 6 mm cannulated drill, and then dilated to the diameter of the harvested graft. The leg can be extended with the dilator in place to verify that there will be no anterior graft impingement.
the tibial tunnel is first drilled with a 6 mm cannulated drill, and then dilated to the diameter of the harvested graft. The leg can be extended with the dilator in place to verify that there will be no anterior graft impingement.
The closed loop EndoButton (Smith & Nephew, Andover, MA) is the choice of femoral fixation at our institution (Fig 34.1-11). A Bullseye femoral aiming guide is placed into the notch and hooked over the back wall (Fig 34.1-12). The guide can be passed through the tibial tunnel or through a low anteromedial portal. It is important to position the guide at the 10 o’clock position for right knees and 2 o’clock position for left knees. The endobutton 4.5 mm cannulated drill is used next, to drill through both cortices, and the length of the femoral tunnel is measured with a depth gauge. After calculating the desired length of tunnel to hold the graft and allow for flipping the endobutton (5 mm), the tunnel is drilledto the
diameter of the harvested graft. The closed loop endobutton is attached to the quadrupled graft and the length of the femoral tunnel is marked on the graft. One No. 2 suture is placed in one eye of the endobutton and two No. 5 sutures are placed in the other eye. These will be used to pull the graft through the tunnels and allow flipping of the endobutton on the anterior femoral cortex. The graft is passed into the femoral tunnel from distal to proximal. After the endobutton is secured on the femur by flipping the button, the graft is tensioned distally.
diameter of the harvested graft. The closed loop endobutton is attached to the quadrupled graft and the length of the femoral tunnel is marked on the graft. One No. 2 suture is placed in one eye of the endobutton and two No. 5 sutures are placed in the other eye. These will be used to pull the graft through the tunnels and allow flipping of the endobutton on the anterior femoral cortex. The graft is passed into the femoral tunnel from distal to proximal. After the endobutton is secured on the femur by flipping the button, the graft is tensioned distally.
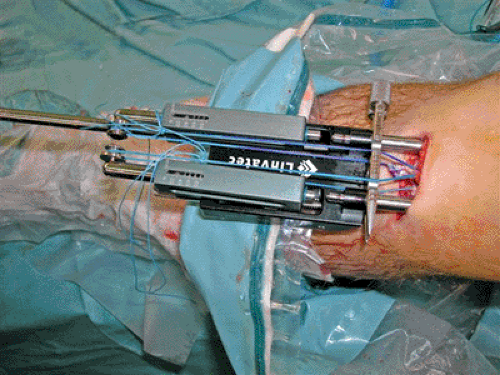
In order to achieve appropriate ACL graft tension intra-operatively, we have been using the Linvatec SE Graft Tensioner (Fig 34.1-13). Small guide pins are attached at the entrance of the tibial tunnel, and the semitendinosus graft ends are marked to distinguish them from the gracilis ends. The knee is taken through a range of motion and impingement is assessed. The tensioner is now attached to the guide pins on the tibia, and the semitendinosus graft is tensioned to 50 N, and the gracilis is tensioned to 30 N, to attain an overall 80 N of tension in the graft. Again the knee is cycled several times, and the tensioner adjusted. The tensioner is left in place, keeping the tendons separated and under appropriate tension while a BioScrew XtraLok (Linvatec, Largo, FL) corticocancellous screw is placed in the middle of the four bundles of graft. Finally, the tensioner is removed, the grafts ends are cut, and the wounds are closed and dressed. An immediate post-op KT-1000 manual maximum measurement is taken and recorded.
Post-operatively, the patients are discharged home with crutches, an extension knee splint, a continuous passive motion machine, and a Cyrocuff cold therapy unit.
Anterior Cruciate Ligament Reconstruction with the Patellar Tendon Graft
Initially described by Jones in 1960, and later popularized by Erickson in the 1970s, the patellar tendon graft remains a popular graft choice for surgeons and is considered by many to be the gold standard. The problems with postoperative stiffness have been greatly diminished as a result of more aggressive rehabilitation protocols, such those advocated by Shelbourne. Contra lateral graft harvest has also been described in order to facilitate rehabilitation and early return to sports. The popularity of this graft amongst members of the American Academy of Orthopedic Surgeons was demonstrated by a survey conducted in 2003, in which 80% of respondents preferred the use of a patellar tendon graft.
Advantages to Patellar Tendon Grafts
Several advantages of the patellar tendon graft, which serve to enhance its popularity. Unlike hamstring grafts, which can be of variable diameter, the patellar tendon offers a graft of consistent shape and size. Graft harvest is done with relative ease, and little preparation is required to make the graft ready to implant. Bone plugs at the ends of the graft allow for secure initial fixation and early bone to bone healing, which is more conducive to an aggressive rehabilitation program and early return to sport at an elite or professional level. Finally, as Shelbourne has demonstrated, contra lateral limb graft harvest can also be undertaken in an attempt to further enhance postoperative recovery.
Indications for the Patellar Tendon Graft
The ideal candidate for ACL reconstruction with a patellar tendon graft is the young athlete competing in aggressive pivotal activities at the elite or professional level. Commitment to an intensive rehabilitation program is essential for a good outcome. Thus, while there is no strict age limit for this graft, it is generally better suited to young athletes, who often have more time to commit to rehabilitation, and competitive individuals, who are highly motivated to commit to the postoperative physiotherapy required for good outcome. The patellar tendon graft is favored by 80% of the ACL study group members, and 99% of NFL team physicians.
Concerns with Patellar Tendon Autografts
Despite its popularity, the patellar tendon graft is not without its disadvantages. The graft harvest necessitates exposing and then disturbing the normal extensor mechanism. Thus the majority of problems involved the components of the extensor mechanism as well as the incision required for the exposure.
The topic of patellofemoral pain, after anterior cruciate reconstruction with the patellar tendon is graft, is controversial. The problem is confounded by the fact that older rehabilitation programs immobilized the knee and restricted early motion. The incidence of patellofemoral problems appears to have lessened with more aggressive postoperative physiotherapy and patellar mobilization exercises. However,
anterior knee pain and difficulty kneeling are common complaints after patellar tendon harvest. This may be, at least in part, due to injury to the infrapatellar branch of the saphenous nerve. Harvest through two transverse incisions rather than a single longitudinal incision has been proposed in order to help minimize the risk of nerve injury and resultant anterior knee pain.
anterior knee pain and difficulty kneeling are common complaints after patellar tendon harvest. This may be, at least in part, due to injury to the infrapatellar branch of the saphenous nerve. Harvest through two transverse incisions rather than a single longitudinal incision has been proposed in order to help minimize the risk of nerve injury and resultant anterior knee pain.
The defect left in the patellar tendon after removing its central third is also a concern for the orthopedic surgeon. If the defect is closed too tight, the patella may become entrapped producing patellar baja, and potential patellofemoral pain and crepitus. On the other hand, if the defect is not closed, it may persist, resulting in a weaker tendon susceptible to rupture.
Being able to perform the postop physiotherapy is crucial to a good outcome after anterior cruciate reconstruction. Both patellar tendonitis and quadriceps weakness are common after patellar tendon harvest, making compliance with rehabilitation a problem for some patients. For this reason, many surgeons consider an alternative graft in patients who are not highly motivated or will not be followed closely by a therapist postoperatively.
Patellar fracture may also occur as a result of harvesting the patellar bone plug. This may occur either intraoperatively or in the postoperative period. It generally mandates open reduction and internal fixation, if appropriate rehabilitation is to be carried out. Removing the patellar bone plug in a manner, which does not produce stress risers (see method of harvest), can greatly reduce the risk of fracture.
Contraindications to Patellar Tendon Graft Harvest
While there are no absolute contraindications to primary harvest of the patellar tendon in a mature patient, one should consider the previously discussed concerns prior to choosing it as the source of graft material for ACL reconstruction. As postoperative anterior knee pain remains a concern, it seems to make sense to avoid using patellar tendon grafts in patients with a history of patellofemoral pain, patellar tendonitis, or chondromalacia in order to prevent exacerbating a previous condition. Although, Shelbourne and Nitz (13) has reported that a bony ossicle within the tendon from Osgoode-Schlatters disease is not a contraindication to use of the patellar tendon, because the ossicle usually lies within a bone tunnel, such cases should be considered on an individual basis.
The patient with a narrow patellar tendon (less than 25 mm) also deserves careful consideration. Harvesting 10 mm from such tendon leaves it susceptible to rupture in the postoperative period. To reduce this risk, one should either reduce the graft width (i.e., 8 to 9 mm), or chose an alternative source of graft.
Summary
Successful ACL surgery requires a number of factors including careful patient selection, surgical technique, and postoperative rehabilitation. While there has been much debate about graft selection, comparative studies have shown the outcome is almost the same regardless of graft choice. Errors in tunnel placement, tensioning, and fixation are more likely to result in a poor outcome, than is the choice of graft. One must remember that with any graft, meticulous surgical technique is still required to obtain an optimal result.
Graft Harvest and Preparation
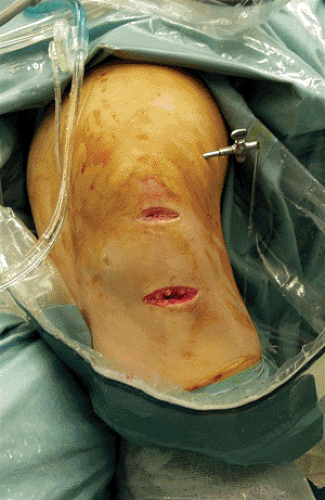
The first step in patellar tendon graft harvest is to carefully plan the skin incisions. Preferably the skin incision, or incisions for harvest incorporate the exposure needed for the tibial tunnel in order to avoid unnecessary incisions. A longitudinal incision 8 to 10 cm long and biased 1cm medially allows for easy exposure and harvest, while allowing the tibial tunnel to be drilled through the same incisions. As one becomes more proficient with the harvest, the incision can be shortened in order to improve cosmesis. Alternatively, two short transverse incisions may be used instead of the single longitudinal incision (Fig 34.1-14). This technique has been shown to lessen the risk of injury to the infrapatellar branch of the saphenous nerve, and improve the patients’ ability to kneel comfortably after the tendon harvest. Despite its merits, this method provides less exposure of the bone tendon complex, than the longitudinal incision, and thus is more technically demanding.
After exposing the tendon, a double bladed knife is used to mark the central 10 mm of the tendon (picture). The bone plugs on the patella (10 × 25 mm), and tibia (10 × 35 mm) should also be marked at this time. Using a boat shaped graft minimizes the risk of stress fracture. A 2 mm (1/16 inch) drill bit is then used to drill two holes in each bone plug. It is generally easier to perform this step prior to removing the bone plug.
With the bone plugs marked and predrilled, a micro-oscillating saw is used to make the necessary cuts. Careful attention should be paid to the patella to avoid creating stress risers that can cause fractures. The initial 4 to 5 mm cut should be perpendicular to the cortex. The saw should then be angled to at 60 degrees and the cut continued to 8 to 10 mm. A deep V cut as well as a transverse proximal cut should be avoided as both create stress risers. Upon completion of the cuts, the graft is carefully freed with a 1 cm osteotome. The base of the bone plug should be flat and its proximal end tapered to minimize the risk of fracture and allow easy passage (Fig 34.1-15).
Once free, the graft is transferred to a back table and prepared for implantation. Care must be taken to avoid dropping the graft. Nonabsorbable sutures are placed through the holes previously drilled in the bone plugs. Two number five Ticron sutures are used for the femoral (patellar) plug, and two number two sutures are used for the tibia. Excess fat should be removed and rough edges trimmed with scissors. Next, the bone plugs should be tailored with a small rongeur and checked with an appropriate sizing tube (9 mm femur, 10 mm tibia) so they pass easily through the tunnels. Finally, the bone tendon junction on the femoral plug should be marked so it can easily be distinguished arthroscopically as the graft is passed through the knee. The graft is now ready to implant.
Notch Preparation
The diagnostic arthroscopy and meniscal work should be completed prior to the notch and tunnel preparation. The technique is essentially the same as for hamstring grafts.
The soft tissue is removed from the medial aspect of the lateral femoral condyle using a curette and 5.5 mm resector. Emphasis should be placed on “opening” up the roof and anterolateral corner of the notch. This allows more light to reach the back of the knee and improves visualization as one works in the posterior aspect of the notch closer to the neurovascular structures. The degree of notchplasty required is quite variable depending on the amount of notch stenosis. In the very narrow A-shaped notch, an oval burr may be used to remove bone. Oval burrs are preferred as they do not jump around as much as round burrs and are easier to control.
By carefully working posterior, the back of the notch can be viewed. Remember, the most common technical error in ACL reconstruction is placing the femoral tunnel too anterior. Therefore, it is critical to clearly visualize the overlying fringe of capsule and probe the drop off of the femoral condyle (Fig 34.1-16). The fringe of capsule is not present on residents ridge and together with feeling the drop off allows for accurate determination of the over the top position. Once the over the top position has been identified a mark is made with a burr or awl, 7 mm in from the drop off (assuming a 10 mm tunnel) at the eleven or one o’clock position. A visual check can be used to see that the tunnel is aimed for the intended 10 oval target area on the anterior lateral aspect of the thigh.
Tibial Tunnel
After the notch is prepared, the tunnels are drilled. Generally the tibial side is drilled first, and the femoral tunnel referenced off the tibial tunnel. However, if a transtibial technique is being used, great care must be taken to correctly orient the tibial tunnel, in order to allow for proper placement of the femoral tunnel (Fig 34.1-17). The guide positions the tunnel approximately 5 cm distal to the joint line at the anterior margin of the medial collateral ligament. Using the guide, a K-wire is then positioned in the footprint of the ACL, just anterior to the leading edge of the PCL. The guide should then be removed and the position rechecked in extension to check for possible impingement.
After confirming correct positioning of the K wire, a cannulated drill is then used to drill the tibial tunnel. Then remove any debris from around the intra articular portion of the tunnel. A 3 mm posterior wall should exist between the posterior wall of the tunnel and the PCL. Also remove any soft tissue from the tunnel entrance to facilitate passage of the femoral guide and later the graft.
Stay updated, free articles. Join our Telegram channel

Full access? Get Clinical Tree


