Fig. 12.1
Incision of the fascia parallel to the orientation of the pes anserinus tendons
12.2.3 Tibial Tunnel
Under arthroscopic visualization, a guide pin is inserted on the medial aspect of the tibia through the graft harvesting incision, directed to the medial posterior part of the ACL tibial insertion. The guide pin is usually reamed with a diameter of 8–9 mm. Then, a looped wire passer is inserted from the tibial tunnel into the notch and is brought out from the anteromedial portal with a forceps.
12.2.4 Over-the-Top Position
The knee is then positioned at 90° flexion with the foot externally rotated, and a longitudinal incision 3–5 cm long is made directly above the lateral femoral epicondyle. The posterior third of the iliotibial band is divided and is retracted anteriorly. In order to reach the lateral intermuscular septum, which separates the vastus lateralis muscle (above) from the lateral head of the gastrocnemius muscle (below), we dissect the lateral aspect of the thigh. When the lateral intermuscular septum has been clearly identified, it is possible to reach the posterior aspect of the joint capsule by passing over this structure. If this is not possible, the septum can be divided. By palpating the posterior tubercle of the lateral femoral condyle with a finger, it is possible to determine the correct placement of the “over-the-top” position and to protect the posterior structures during the next step. A curved Kelly clamp is inserted into the anteromedial portal directed to the notch, and its tip is placed as far proximally possible against the posterior part of the capsule. After palpating the tip of the clamp from the lateral side of the femur just posterior to the intermuscular septum, it is pushed through the thin posterior layer of the knee capsule, reaching the posterior space previously prepared. A suture loop is then placed into the tip of the clamp, pulled anteriorly through the anteromedial portal, and placed into the wire loop previously inserted in the portal. Pulling the wire from the tibial side brings the suture loop at the bottom of the tibial tunnel and out from the tibial incision. At the end of this step, the suture crosses the tibial tunnel and the knee joint exiting from the lateral incision (Fig. 12.2).

Fig. 12.2
The suture loop is pulled from the femoral incision to pass the graft through the knee joint
12.2.5 Graft Placement and Fixation
The free end of the graft is then tied to the passing suture, which is pulled through the knee joint retrieving the graft from the lateral incision using a small osteotome (Fig. 12.3). A groove is made in the lateral aspect of the femur just proximally to the start of the lateral condyle, allowing the anteriorization of the grafts and the achievement of a more isometric position. Once the graft is placed in the correct position, it is tensioned and the knee cycled through a full range of motion to check its stability. Then, the graft can be secured to the lateral femoral cortex into the groove with two metal staples (Fig. 12.4), while maintaining the knee at about 90° of flexion and the foot externally rotated. It is possible to check if the graft is long enough to perform lateral plasty, by putting it under tension directed to the anterolateral aspect of the tibia. If the graft is of the required length, a 1–2 cm skin and fascia incision is performed just below the GT (Fig. 12.5). Then, a small Kelly clamp is passed under the fascia from this incision to the lateral femoral condyle, where the sutures at the end of the graft are placed in the tip of the clamp and pulled down, emerging from the GT incision. After graft tensioning and after checking the isometry of the lateral tenodesis, another metallic staple is then used to fix the graft below GT to the lateral aspect of the tibia. An intra-articular drain is inserted through the superomedial portal, and another drain is inserted in the medial and lateral wounds. The iliotibial tract defect is closed, taking care to prevent lateral tilt and patellar compression, while the medial fascia over the pes anserinus is not closed
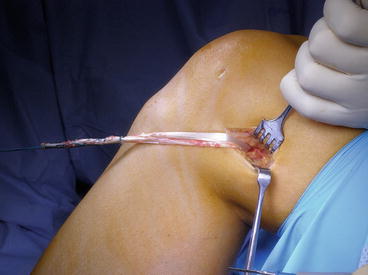
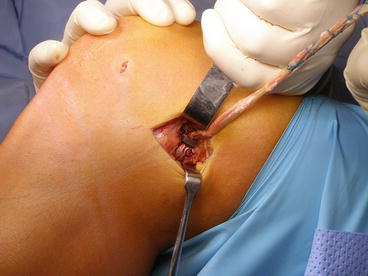
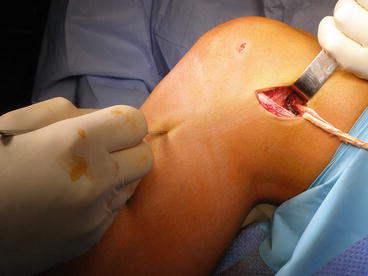
Fig. 12.3
After the graft exits from the lateral incision, its length is checked before proceeding with the lateral plasty
Fig. 12.4
The graft is fixed to the lateral femoral cortex with two staples, maintaining the knee at about 90° of flexion and the foot externally rotated
Fig. 12.5
After checking the correct length of the graft, a 1–2 cm incision is made just below the Gerdy tubercle to perform the lateral plasty
12.3 Pearls and Pitfalls
The main feature for the success of this technique is the adequate length of the graft; therefore, all events that could cause a short graft harvesting or graft rupture should be carefully avoided. A meticulous dissection of both gracilis and semitendinosus tendons from their fascial attachments is mandatory in order to prevent early cutting of the tendons when advancing the tendon stripper. If this event happens and one of the two tendons is shorter, the graft could be sutured in any case, and the reconstruction should be performed according to the described technique. In most of the cases, the intra-articular graft will be formed by two strands, while the lateral plasty will be inevitably formed by a biomechanically weaker single strand. In order to gain an additional 1 or 2 cm in length, the distal attachment of the semitendinosus to the adjacent gracilis tendon could be dissected. Another potential danger of the graft’s integrity could be the sharpness of the edges of the tibial tunnel hole, and as tension is applied to the graft when passing through the tibial tunnel, it could produce a cutting mechanism that could damage the graft. Therefore, before passing the graft through the tibial tunnel, the edges of the osseous tunnel should be accurately smoothened with a motorized shaver. Detachment of the distal insertion of the tendons from the anteromedial tibia could be caused by excessive graft tensioning as well; therefore, the graft should be correctly tensioned with a progressive increase of the force avoiding rough stretches. In case of detachment of the distal insertion of the tendons, both the strands of the distal end of the graft could be sutured together, and the graft should be retrieved downwards through the tibial tunnel and fixed with an interference screw or metallic staple. At this point, the possibility to perform the lateral tenodesis depends on the remaining length of the graft. Additionally, the fixation of the graft with metallic staples, especially at the lateral femoral cortex, could be a source of graft damage, as the barb of the staple coupled with high tension applied to the graft could produce a guillotine effect. In order to avoid this drawback, the staples should be firmly fixed to the bone cortex, without driving them too deeply. On the other hand, a not firm fixation will lead to loss of proper graft tension and almost certain failure of the reconstruction. In case of graft rupture that does not allow the lateral tenodesis, the ACL reconstruction could be performed by maintaining only the intra-articular part, with all the limitations derived from a single-bundle nonanatomic technique.
Correct graft placement, both for the intra- and the extra-articular part, is mandatory in order to obtain good outcomes and avoid dangerous complications. Positioning the tibial tunnel to the posteromedial part of ACL tibial insertion, coupled with the use of the over-the-top position, guarantees the correct location of the graft, which is posteriorly enough to avoid impingement. Nevertheless, in chronic cases, big osteophytes, especially on the medial edge of the lateral condyle, could obstruct the intercondylar notch; therefore, a true notchplasty should be performed to avoid graft impingement. Any soft tissue in the posterior part of the roof that can obstruct the “over-the-top” position must be carefully removed as well. The incorrect placement of the extra-articular tenodesis could produce excessive tension on the graft along the range of motion, causing pain and joint stiffness. This could be avoided by fixing the graft in the isometric position. Creating a small groove in the lateral aspect of the femur allows the graft to move anteriorly, while the repeated cycling allows the construct to find its optimal placement for the distal fixation and to check the graft tension along the complete range of motion.
A special mention goes to a more dangerous and harmful complication related to this technique, which is the injury of the popliteal artery when approaching to the over-the-top position. Although this is a rare event, it should be considered as a vascular emergency and its treatment is beyond the scope of this chapter. But this risk is almost inconsistent, if all the steps are scrupulously followed.
Related posts:


Stay updated, free articles. Join our Telegram channel

Full access? Get Clinical Tree


