5
YNSA Neck Diagnosis Points
“What is to be reduced is first expanded.
What is to be weakened is first strengthened.
What is to be abolished is first established.”1
“He who asks is a fool for five minutes but he who does not ask remains a fool forever.” – Chinese Proverb
YNSA. YNSA is a diagnosis and treatment micro-system utilizing the YNSA neck diagnosis procedure for anatomical and channel dysfunction or disease. The anatomical system uses Basic points, and a channel system uses Ypsilon points.
YNSA neck diagnosis. The unique palpatory examination of the neck soft tissue structures as developed by Dr. Yamamoto to identify axial skeletal and channel dysfunction, vacuity, or repletion.
This chapter discusses the methods and procedures of doing YNSA neck diagnosis. It is critical to master YNSA neck diagnosis to know which Basic and Ypsilon points to treat; see Figure 5–1 to review the steps in diagnosis and treatment. It is necessary to master which phase to treat, either YIN or YANG and either left and/or right. In all cases where YNSA is considered or used, YNSA neck and/or abdominal diagnosis procedures should be used. Figures 5–2 and 5–3 encapsulate the procedures for determining sidedness (first procedure), phase YIN or YANG (second procedure), quadrant (third procedure), and Basic points.
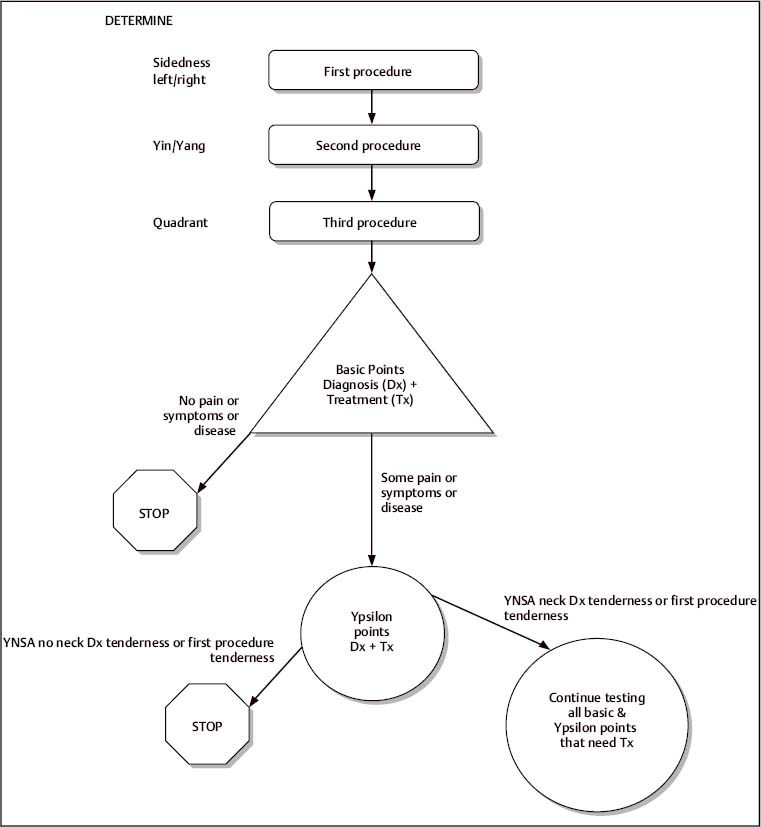
Figure 5–1 YNSA diagnosis and treatment.
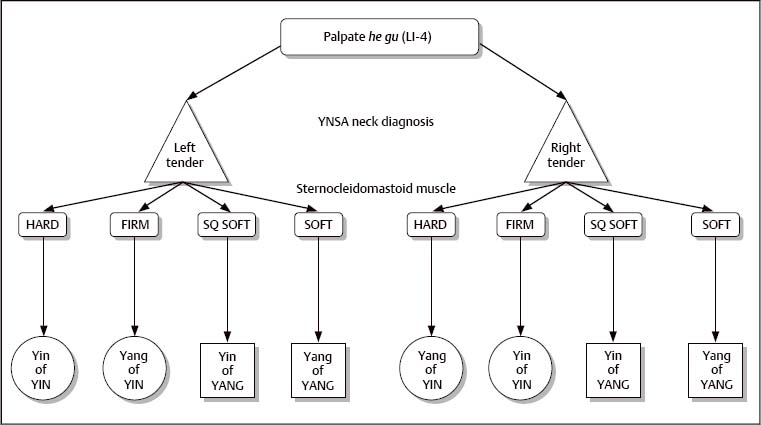
Figure 5–2 YNSA neck diagnosis.
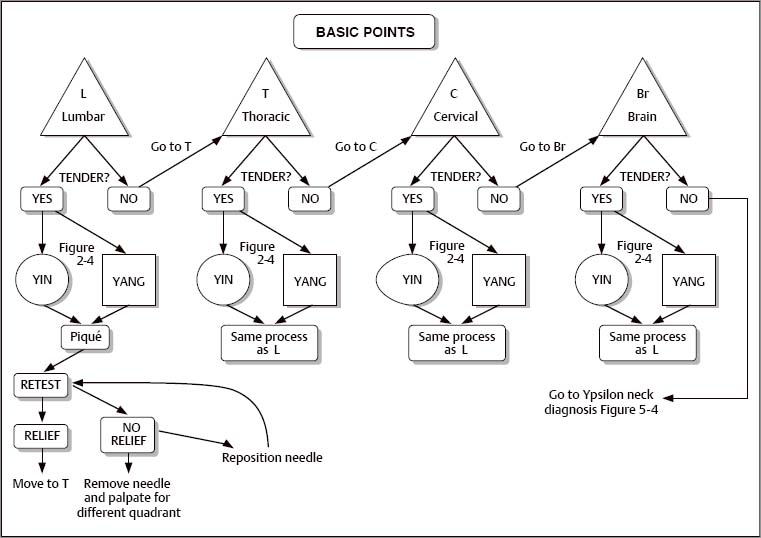
Figure 5–3 YNSA Basic point diagnosis.
YNSA Neck Diagnosis Principles
First Procedure. Sidedness: To Determine Sidedness, Left or Right
Purpose
Determine sidedness for neck diagnostic testing
Method
1. Have the patient sitting facing the physician standing.
2. Grasp the patient’s left hand with your right hand.
3. Compress the patient’s LI-4, he gu, points with your thumbs.
4. Ask the patient which is most tender.
5. The most tender side indicates the sidedness or the side that needs treatment first.
Second Procedure. Phase: To Determine YIN or YANG
Purpose
Determine whether you need to treat in YIN or YANG.
Method
1. Place thumb over liver (LR) neck diagnosis spot on the sternocleidomastoid muscle (SCM).
2. Compress LR point with thumb and rub back and forth on the SCM.
3. Result: YIN is soft to palpation, therefore treat in YANG.
4. Result: YANG is hard and firm to palpation, therefore treat in YIN.
Third Procedure. Quadrant: Ypsilon Neck Diagnosis Procedure To Verify Correct Quadrant
YNSA is based on the systematic correspondences associated with the four quadrants—Yin of YIN, Yang of YIN, Yin of YANG, and Yang of YANG— which are key in determining correct needle placement and achieving excellent results using YNSA. See Figure 5–4 for delineation of specific points.
Purpose
To determine correct quadrant for needle placement after the first and second procedures are done.
Method
1. Determine sidedness of neck diagnosis using first procedure.
2. Determine YIN or YANG using second procedure.
3. Palpate the SCM at the level of the Liver (LR), slide the thumb back and forth pressing posterior medially for several seconds (30–40 seconds). If the liver (LR) is tender (positive) move to step 4. If the liver (LR) is not tender (negative), move to PC, HT, GB, and KI, in that order, to identify a tender (positive) Ypsilon point.
4. Identify a positive YNSA neck diagnosis Ypsilon point on the correct side in the correct quadrant.
Bioenergetic procedure: With one thumb on the positive YNSA neck diagnosis Ypsilon tender point, place the other hand’s index finger over the scalp Ypsilon point, if the second procedure identified YIN, first try Yin of YIN to see if tenderness diminishes. If tenderness goes away, one has successfully found the correct quadrant to treat. If it is still tender, move index finger to Yang of YIN. The tenderness should go away when the finger is on the exact point in the correct quadrant. The same procedure may be applied in the YANG quadrants if the second procedure identified YANG.
5. Next, piqué the Ypsilon point on the correct side in the correct quadrant. Retest neck tender point; if normal (nontender), then one has found the right quadrant (phase) end point, continue with the rest of the treatment. If the tender point does not improve, recheck the needling technique. Remove the needle and replace it in the correct Ypsilon point in the corresponding quadrant.
6. Once the correct quadrant is identified, by tradition all positive Basic points are piquéd first and then any remaining Ypsilon points are taken.
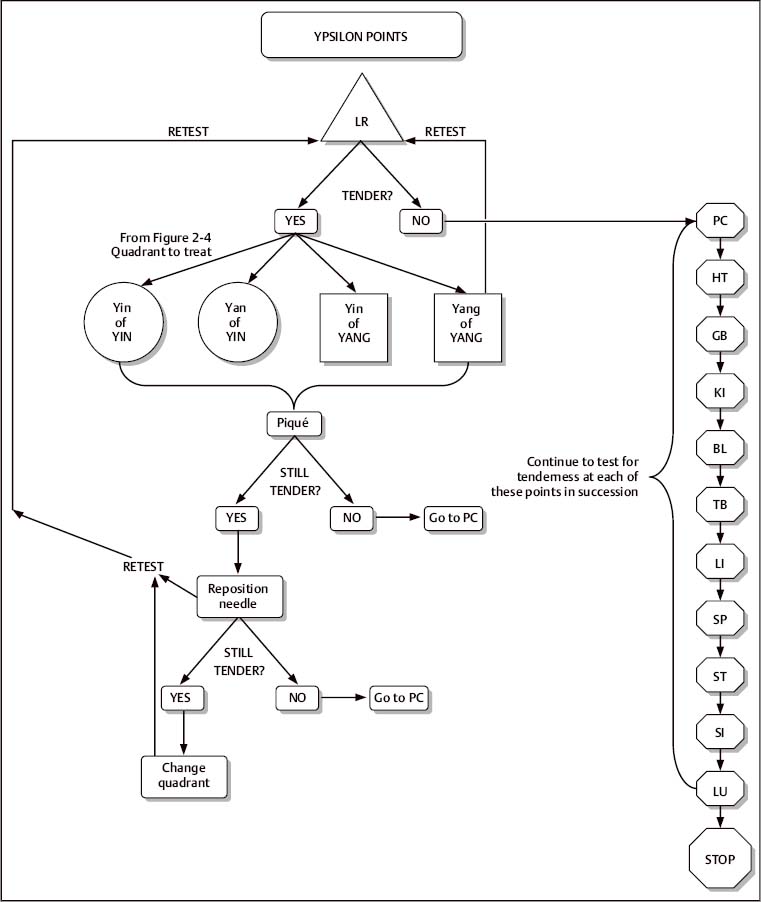
Figure 5–4 YNSA Ypsilon point diagnosis.
YNSA Basic Neck Diagnosis Systematic Procedure
Procedure
YNSA basic point neck diagnosis: to diagnose by palpation the anatomical structures related to the spine and the central nervous system. Basic points may be used for a myriad of conditions that relate medically and physiologically to these structures. The YNSA basic neck diagnosis tests for lumbar spine, thoracic spine, cervical spine, and brain Basic points.
Purpose
To determine if the spine and brain points are positive (tender) needing treatment.
Method
1. Place thumb on the most tender side as detected by the First Procedure, LI-4 testing, over the lumbar neck diagnosis point—located over the first rib between the anterior scalene and the SCM. Press medial to determine tenderness. LI-14 is an alarm point for upper body problems, but I find it is also tender for the lower body.
2. Then test the thoracic spine, one thumb breadth lateral to lumbar, then cervical, again one thumb breadth lateral, and finally the brain points, which are one thumb breadth lateral to the cervical point.
3. Rank these points in order of tenderness, with the most severe first.
4. Treat the most tender point first, then retest that point to determine if it has improved.
5. Retest other positive (tender) basic neck points and treat.
6. Then test basic diagnosis points on the other side of the neck.
7. Treat only the positive tender points first, then one may secondarily treat anatomically related points based on history.
8. After one has diagnosed and treated all of the positive Basic points related to the patient’s condition, if symptoms still persist move on to Ypsilon neck diagnosis. If the patient does not have any symptoms, stop.
YNSA Ypsilon Neck Diagnosis Systematic Procedure
Procedure
The Ypsilon neck diagnosis systematic procedure is a quick and systematic way of performing YNSA neck diagnosis. It was developed and refined to be used with the least amount of motion and the most reliability and reproducibility in palpating for tenderness over the correct anatomical locations. Figure 5–5 delineates all the YNSA neck diagnosis tender points and Figure 5–6 identifies the anatomical structures that one needs to be cognizant of during the YNSA neck diagnosis palpation, particularly the SCM, both heads of the SCM as it attaches to the manibrium sterni and the clavicle, the trapezius muscle, the posterior scalene and scalenus muscles, and the omohyoid muscle.
Method
1. After one has done the first procedure, the correct side to diagnose and treat has been identified. The physician is facing the seated patient and places his thumb over the patient’s SCM. For example, when the patient sidedness is left, the physician’s right thumb is used.
2. Placing the thumb over the belly of the SCM, at the level of the thyroid cartilage, press the thumb posterior medially maintaining contact over the SCM, sliding back and forth to elicit tenderness. If tenderness is elicited upon questioning, it is considered a positive liver (LR) Ypsilon point and will require YNSA Ypsilon treatment. If it is not tender, move to the next Ypsilon point.
3. From the liver (LR), curl the thumb anterior medial and posterior over the edge of the SCM and press posteriorly to elicit tenderness. If there is tenderness, then one has a positive pericardium (PC) YNSA neck diagnosis tender point.
4. From the pericardium (PC), slide the thumb superior one thumb breadth up the anterior belly of the SCM to palpate the heart (HT). Press posterior to elicit tenderness.
5. From the heart (HT), slide the thumb caudad along the anterior belly of the SCM past the pericardium (PC) to one finger breadth below the pericardium (PC) tender point. This is gall bladder (GB). Press posterior to elicit tenderness.
6. It is at this point that YNSA needle treatment usually begins. First piqué the scalp YNSA points in the correct quadrant from the most to the least tender, in that order, based on the neck diagnosis procedures above.
7. From the gall bladder (GB), move the thumb off the SCM and place it between the mandibular and clavicular heads of SCM just superior to the clavicle. In that triangular hole, press the thumb posteriorly. This is kidney (KI). If tender it is positive and needs to be treated on the scalp.
8. From kidney (KI), rotate the thumb so that the thumbnail is pointed caudally and inferior and just posterior to the clavicle. Pressing caudally, this is the bladder (BL). If tender, it is positive and needs to be treated.
9. From bladder (BL), move the thumb to the trapezius, 4 finger breadths (3 cun) lateral to the root of the neck over the trapezius muscle to search the next group of points. The first point is underneath the roll of the trapezius muscle and posteriorly one will find the triple burner (TB). If tender, it is positive and needs to be treated.
10. From the triple burner (TB), on top of the trapezius muscle at that same location and pressing caudally on top of the trapezius roll, is the large intestine (LI). If tender, it is positive and needs to be treated.
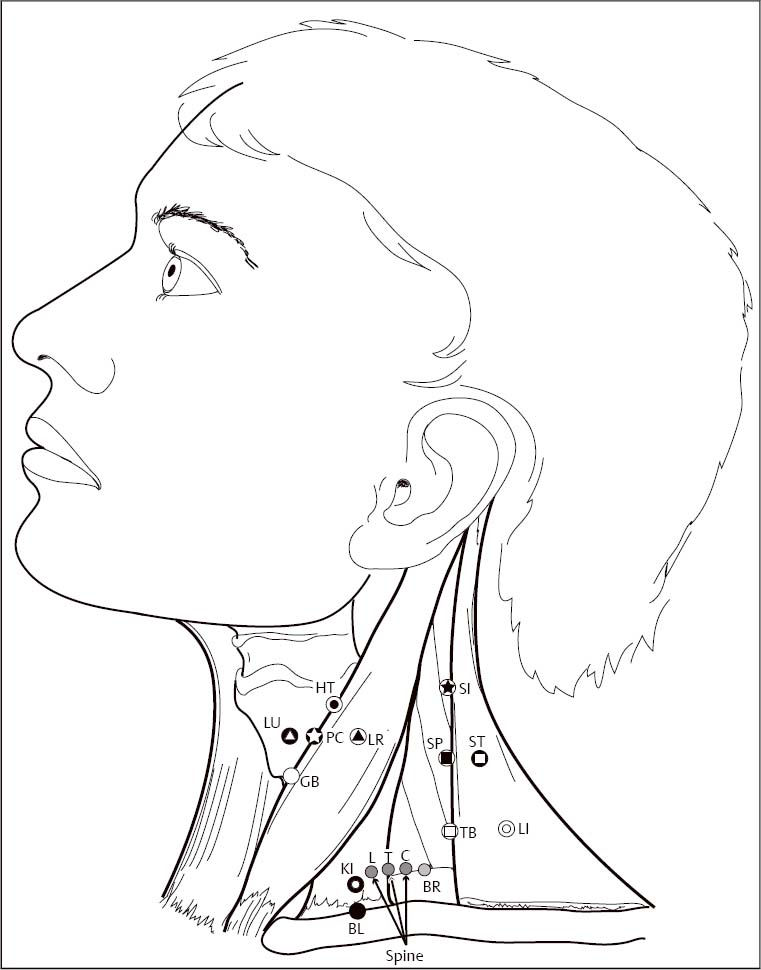
Figure 5–5 YNSA neck diagnosis tender points.
11. From the large intestine (LI), moving medially one thumb breadth underneath the roll of the trapezius muscle is the YNSA neck diagnosis tender point for spleen (SP). If tender, it is positive and needs to be treated.
12. From the spleen (SP), moving superior to SP on top of the trapezius muscle and pressing caudally is the stomach (ST). If tender, it is positive and needs to be treated.
13. From the stomach (ST), moving medially in the hole between the scalenus and trapezius muscles, is the small intestine (SI). Press posteriorly to elicit tenderness. If tender, it is positive and needs to be treated.
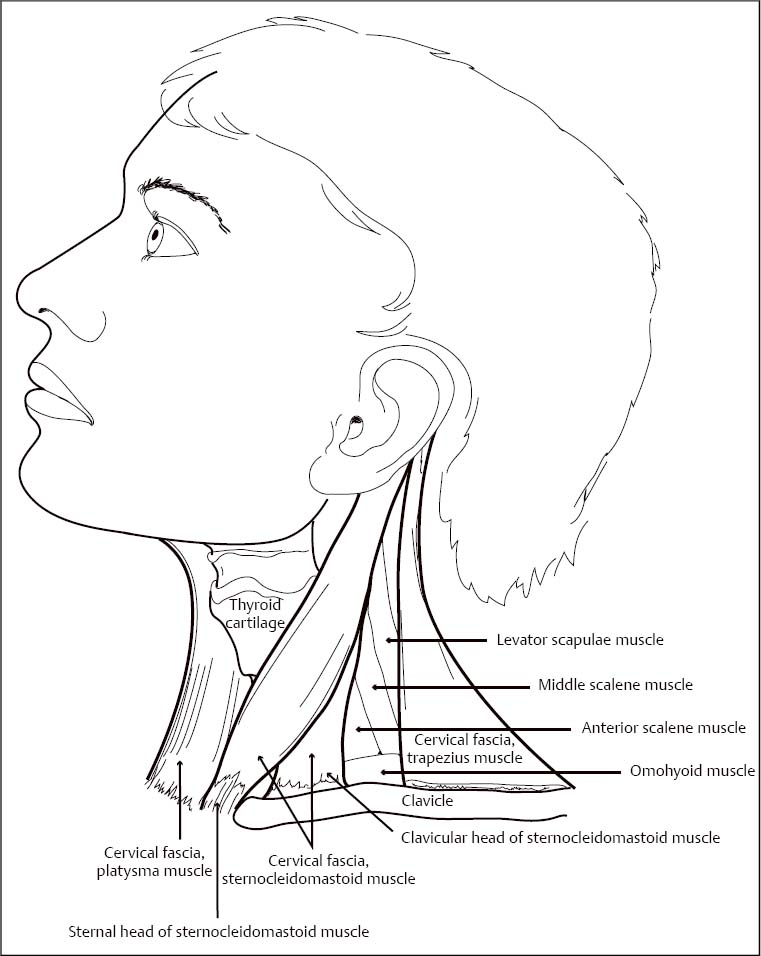
Figure 5–6 Neck anatomy.
14. From the small intestine (SI), removing one’s thrumb from the trapezius muscle and then placing it next to the thyroid cartilage with the thumbnail medial and pressing posteriorly along the cartilage is the lung (LU). If tender, it is positive and needs to be treated.

Stay updated, free articles. Join our Telegram channel

Full access? Get Clinical Tree


