Chapter 6 Upper body, stretching and overall joint mobilization exercises
The pectoral girdle is the most mobile set of articulating surfaces in the body allowing, with respect to the trunk, approximately 180 degrees of shoulder flexion, abduction and rotation, and 90 degrees of shoulder extension. However, this mobility is to some degree at the expense of shoulder stability, which is nevertheless essential for providing a firm base for upper limb movement and weight bearing.
As discussed in Chapter 1, poor pectoral girdle alignment and its consequences are both associated with postural faults, and they must always be con-sidered together when dealing with defective pectoral girdle function.
BASIC UPPER BODY EXERCISES
| UBE1 | Shoulders forwards and back |
| UBE2 | Shoulder shrugs |
| UBE3 | Bilateral arm arcs |
| UBE4 | Chest opener |
| UBE5 | Arm arcs with arms in opposition, arm arcs with half circles, arm circles |
| UBE8 | Spine twist |
| UBE9 | Side bending |
| UBE10 | Spine curls |
STRETCHING, JOINT MOBILIZATION AND EXERCISES TO IMPROVE FOOT ALIGNMENT, MOBILITY AND STRENGTH
| FM1 | Exercising the forefoot |
| FM2 | Ankle mobilization |
| FM3 | Exercising the lower limb and foot |
| ST1 | Calf muscle stretch |
| ST2 | Hamstring muscle stretch |
| ST3 | Tensor fasciae latae stretch |
| ST4 | Gluteal and hamstring stretch |
| ST5 | Iliopsoas stretch |
| ST6 | Quadriceps stretch |
| ST7 | Adductor stretch |
| ST8 | Supine back stretch |
| ST9 | Spine stretch |
| ST10 | Neck stretch |
| ST11 | Neck, shoulder and upper back stretch |
| ST12 | Sitting back stretch |
| ST13 | Prone back stretch |
| ST14 | Standing back stretch |
| ST15 | Spine roll down and up |
| ST16 | Spine curl |
| ST17 | Hip rolls with stretch |
| ST18 | Front of chest stretch |
SUPINE PECTORAL GIRDLE MOBILIZATION (EXERCISES UBE1–5)
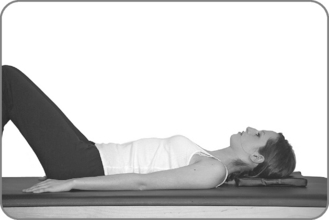
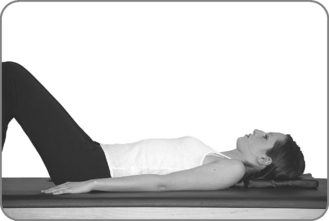
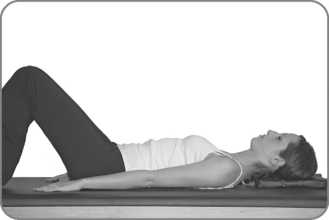
Exercise UBE1 – Shoulders forwards and back (scapular protraction and retraction)
Target muscles
Body position
Action
Common problems
 Upper body/neck tension: Ensure sufficient head and neck support for correct alignment and comfort. On the exhalation, cue for the neck muscles to release, the thoracic cage to relax and monitor abdominal muscle control over lumbar spine stability.
 Insufficient abdominal muscle control over lumbar spine stability: Consider performing the exercise with an imprinted lumbar spine and raising the feet; cue for improved pelvic floor and lower abdominal muscle action.
Table 6.1 Teaching points – Shoulders forwards and back
| Focus on | Examples of verbal/visual cues |
|---|---|
| Relaxation of the neck and upper body | |
| Vertebral column length | Reach the crown of the head and the sitting bones away from each other |
| Correct resting scapular alignment | |
| Length through the arms as they reach for the ceiling | |
| Maintaining a stable lumbar spine | |
| Scapular mobility during protraction | Imagine the shoulder blades gliding forwards around the ribcage |
| Scapular mobility during retraction | Imagine the shoulder blades gliding around and hugging the ribcage as they move back and down to rest on the floor |
| Lower limb stability | Imagine the knees are suspended from the ceiling by strings |
 Neck and shoulder pathology – provide sufficient support for comfort; monitor to ensure that the range of movement is appropriate and pain free; seek medical/physiotherapy advice if unsure.
Exercise UBE2 – Shoulder shrugs (scapular elevation and depression)
Target muscles
Body position
Action
Common problems
 Upper body/neck tension: Provide sufficient head/neck support for correct alignment and comfort. On the exhalation, cue for the neck muscles to release, the thoracic cage to relax and monitor abdominal muscle control over the lumbar spine stability.
 Insufficient abdominal muscle control over lumbar spine stability: Consider performing the exercise with an imprinted lumbar spine and raising the feet and cue for improved pelvic floor and lower abdominal muscle activation.
Table 6.2 Teaching points – Scapula elevation and depression
| Focus on | Examples of verbal/visual cues |
|---|---|
| Relaxation of the neck and upper body | |
| Breadth across the front of the torso | Broaden across the collarbones and allow the shoulders to drop back to the floor. Maintain this contact throughout |
| Spine elongation | Lengthen from the crown of the head through to the sitting bones |
| Length through the arms with the shoulders dropping back towards the floor | Imagine the arms begin where the breastbone and collarbones join before reaching the fingers for the toes |
| Maintaining a stable lumbar spine | |
| Scapular mobility during elevation | Imagine the outer tips of the shoulders touching the posterior portion of the ear lobes |
| Scapular mobility during depression | Imagine the shoulder blades as skis gliding down and across the back to the opposite sides |
| Lower limb stability | Imagine the knees are suspended from the ceiling by strings |
 Neck and shoulder pathology – provide sufficient support for comfort; monitor to ensure that the range of movement is appropriate and pain free; seek medical/physiotherapy advice if unsure.
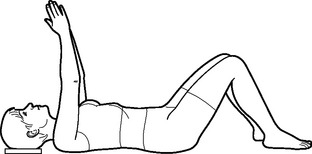
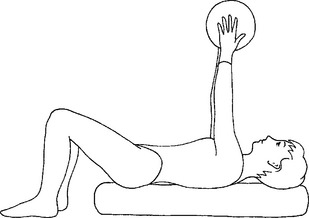
Exercise UBE3 – Bilateral arm arcs (shoulder joint flexion)
Target muscles
Body position
Action
Progression 2
Common problems
 Limited range of independent shoulder joint movement (observed by the occurrence of lumbar spine extension during shoulder joint flexion): Reduce the range of flexion by blocking the overhead motion of the arm with a stack of yoga blocks, a triangle or pillow placed near the head; cue to maintain the relationship between the lower ribs and the pelvis and for stronger pelvic floor and lower abdominal engagement.
 Upper body/neck tension: Provide sufficient head and neck support for correct alignment and comfort. On the exhalation, cue for the throat to soften, the thoracic cage to relax and monitor abdominal muscle control over lumbar spine stability.
 Insufficient abdominal muscle control over lumbar spine stability: Consider raising the feet, performing the exercise with a flattened lumbar spine throughout and cue for improved lower pelvic floor and lower abdominal muscle activation.
Table 6.3 Teaching points – Bilateral arm arcs
| Focus on | Examples of verbal/visual cues |
|---|---|
| Relaxation of the neck and upper back | Imagine the body imprinting itself in warm sand |
| A correctly aligned and lengthened spine | |
| Maintaining a stable lumbar spine and the correct relationship between the upper torso and the pelvis throughout | |
| Breadth across the front and back of the torso | Broaden across the collarbones and the back of the chest |
| Length through the arms | Imagine the arms begin where the collarbones join the breastbone before reaching the arms away. As the arms lift, allow the arm bones to drop down into the shoulder joints and visualize the shoulder blades gliding down the back |
| Scapular depression at the end range of flexion | As the arms move to the ear, imagine the shoulder blades sliding down the back |
| Lower limb stability |
 Neck and shoulder pathology – provide sufficient support for comfort; monitor to ensure that the range of movement is appropriate and pain free; seek medical/physiotherapy advice if unsure.
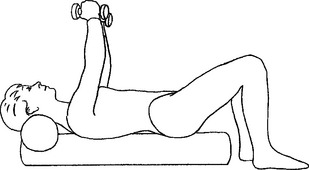
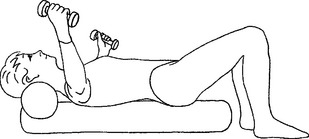
Exercise UBE4 – Chest opener (shoulder joint flexion, abduction and adduction)
Target muscles
Body position
Action
Progression 3
Common problems
 Upper body/neck tension: Ensure sufficient head and neck support for correct alignment and comfort. On the exhalation, cue for the throat to soften, the thoracic cage to relax and for pectoral girdle stabilization.
 Impaired scapular stability: Consider reducing the range of motion and cue for increased breadth across the front of the chest and for stronger pectoral girdle muscle engagement.
 Insufficient abdominal muscle control over lumbar spine stability: Consider raising the feet, performing the exercise with an imprinted lumbar spine throughout and cue for improved pelvic floor and lower abdominal muscle action.
Table 6.4 Teaching points – Chest opener
| Focus on | Examples of verbal/visual cues |
|---|---|
| Relaxation of the neck and upper body | |
| Vertebral column length | Reach the crown of the head and the sitting bones away from each other |
| Maintaining a stable lumbar spine | Imagine the pelvis as a bowl of water and the surface of the water is absolutely level and still |
| Breadth across the front and back of the torso | |
| Length through the arms | Imagine the arms begin where the collarbones join the breastbone as the arms curve as if around a large ball |
| Scapular stability throughout | |
| Lower limb stability |
 Neck and shoulder pathology – provide sufficient support for comfort; monitor to ensure that the range of movement is appropriate and pain free; seek medical advice if unsure.
 Back or spine pathology – provide sufficient support for comfort; ensure sufficient abdominal muscle control over lumbar spine stability; consider raising the feet or performing with the lumbar spine flattened.


 Precautions
 Contraindications

 Precautions
 Contraindications


 Precautions
 Contraindications


 Precautions
 Contraindications


