Unicompartmental Knee Arthroplasty Technique
Before proceeding with unicompartmental knee arthroplasty (UKA), the surgeon must decide at arthrotomy whether the patient is an appropriate candidate. Both cruciate ligaments should be intact, although a deficient anterior cruciate ligament (ACL) occasionally is acceptable if certain criteria are fulfilled. These criteria include a tibial wear pattern that remains in the anterior two thirds of the tibial plateau. A posterior wear pattern represents unacceptable ACL deficiency. No evidence should be found of significant mediolateral tibiofemoral subluxation. Finally, if UKA is performed in an ACL-deficient knee, little or no posterior slope should be applied to the tibial resection during surgery to discourage a posterior wear pattern from evolving.
Changes no greater than grade I should be present in the opposite compartment.1 The patellofemoral compartment can have up to grade III changes, but the presence of eburnated bone is probably a contraindication to the procedure. Significant inflammatory synovitis is a contraindication as is the presence of crystalline disease in the form of gout or pseudogout.
The technique that follows is as generic as possible regarding UKA. Each prosthetic design will have individualized features in alignment, cutting jigs, and modes of prosthetic fixation such as lugs or fins.
Basic Principles
A significant advantage of UKA is its potentially conservative nature. It preserves both cruciate ligaments, the opposite compartment, and the patellofemoral articulation. If the prosthetic design and surgical technique remain conservative, bone also is preserved in the compartment being resurfaced. My goal is to prepare a unicompartmental replacement in such a way that no augmentation methods will be necessary at the time of any future revision. The only possible deficiency would occur in a medial compartment replacement on the tibial side resulting from subsidence of the tibial component. Fortunately, osteolysis compromising bone stock is extremely rare in UKA. The following are my basic principles for unicompartmental arthroplasty:
• Conservative tibia-first resection
• Assessment of the resultant extension and flexion gaps
• Distal femoral resection in the proper alignment and amount
• Sizing the femur and aligning it relative to the tibia in 90 degrees of flexion
• Completion of the femoral preparation
• Sizing, orienting, and completing tibial preparation
Preoperative Planning
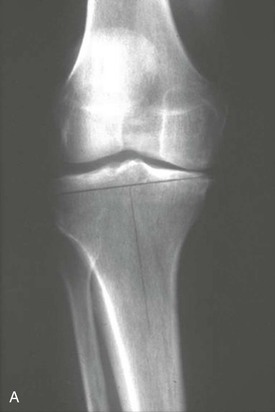
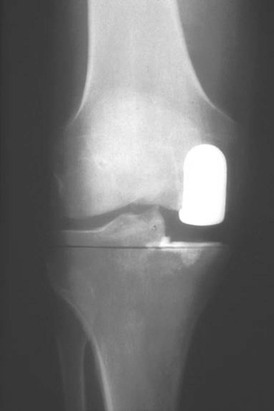
To accomplish a conservative tibia-first preparation, the preoperative anteroposterior radiographs should be used to plan the level of the resection. A conservative resection line is drawn on the radiograph at 90 degrees to the long axis of the tibia (Figure 17-1). The level of this resection is determined on the lateral side 8 to 10 mm below the joint line. The level of the initial tibial resection should be no lower than this line, whether it is for a medial or a lateral compartment arthroplasty. For medial compartment replacement, the resection begins where this line intersects with the most peripheral aspect of the plateau. For most knees, this will be between 0 and 2 mm of resection. This amount of resection makes sense, because for every millimeter of elevation of the joint line from the periphery of the plateau, approximately 1 degree of correction is obtained. Therefore, if the peripheral resection is 0 and a 7-mm tibial component is used, approximately 7 degrees of correction will be achieved. This would take a typical UKA candidate in 3 degrees of anatomic varus back to 4 degrees of anatomic valgus (Figure 17-2).

Operative Exposure
Traditionally, UKA of the medial side was performed by a standard total knee exposure using a median parapatellar arthrotomy with complete eversion of the patella. Care would be taken not to derange the anterior horn of the lateral meniscus. This exposure gave the surgeon the opportunity to completely explore the knee and make an intraoperative decision about whether the patient was a candidate for UKA.
Minimally invasive unicompartmental surgery and exposure are now popular.2 The shorter incisions permit a shorter hospital stay and faster recovery. They have several disadvantages, however.3 The limited exposure does not allow as complete an assessment of the opposite compartment. It also does not allow as thorough an assessment of component orientation. The result could be malpositioning of components and an increased incidence of both early and late failure of the procedure. Concern exists that the amount of stretching of the skin needed for adequate visualization could lead to an increased incidence of wound healing difficulties and subsequent infection. It is my opinion that a more rapid recovery associated with minimally invasive UKA is not so much due to a short incision but rather to the treatment of the quadriceps mechanism. If the patella is subluxated laterally, rather than everted, rapid recovery is possible.
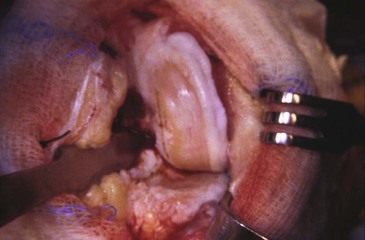
I use a shorter than normal skin incision approximately 10 to 12 cm in length and begin the arthrotomy approximately 2 cm above the superior pole of the patella. The incision into the joint ends distally at the midportion of the tibial tubercle. Adequate inspection of the joint can usually be accomplished by flexing the knee 30 to 40 degrees and manually subluxating the patella. Digital palpation of the patella allows for the detection of eburnated bone on its surface. A retractor such as a bent Hohmann is anchored in the intercondylar notch and allows maintenance of the lateral subluxation of the patella during the procedure (Figure 17-3).
For lateral compartment replacement, many surgeons use a short lateral arthrotomy. My concern with this approach is the fact that a formal lateral parapatellar exposure to the knee would be necessary if the UKA is abandoned for a total knee arthroplasty (TKA). My preference is to use a standard median parapatellar approach for a valgus knee requiring lateral compartment replacement.4 As the arthrotomy approaches the anterior horn of the medial meniscus, the dissection is taken laterally anterior to the coronary ligament to avoid derangement of the medial meniscus (Figure 17-4). The patella is everted and the knee flexed. Enough of the fat pad is removed from the anterior aspect of the tibia to expose it for the tibial resection. An incision is made at the midcoronal plane of the lateral plateau just outside the lateral meniscus for placement of a bent Hohmann retractor. Moist wound towels protect the subcutaneous tissue and the medial compartment throughout the remainder of the procedure.
Other Elements of Medial Exposure
Before execution of the bony resections, the anatomy should be defined and measures taken to protect the medial collateral ligament (MCL) from injury. First, the anterior third of the medial meniscus is removed. This defines an entry point between the deep MCL and the proximal tibial plateau. At this level, a curved 1-cm osteotome is inserted tangential to the plateau, with half its surface above and the other half below the level of the plateau. It is then tapped with a mallet along the border of the plateau until it reaches the level of the semimembranosus bursa. This creates a pathway for insertion of a retractor that will protect the MCL during tibial preparation.
As noted earlier, a bent Hohmann type of retractor is placed with its tongue in the intercondylar notch and its blade against the medial border of the patella, subluxating it laterally for adequate exposure of the entire medial femoral condyle. If this exposure is compromised, the arthrotomy can be extended proximally for approximately 1 cm. Medial and lateral osteophytes are removed to define the true mediolateral dimension of the condyle. Removal of intercondylar osteophytes relieves any potential impingement between them and the tibial spine and provides a pathway for the resection that will take place along the spine. Removal of medial osteophytes (see Figure 4-3) releases the MCL and allows passive correction of the deformity.5
The chondroosseous wear pattern on both femur and tibia is defined with a marking pen or electrocautery. This gives an initial guide to the proper rotatory alignment of the femoral and tibial components (Figure 17-5). Final rotational alignment of each is confirmed as the bone preparation proceeds.

Preparation of the Tibia
I describe here the technique for an “onlay” type of tibial component. The same general principles of preparation apply for an “inlay” technique.
An external tibial alignment jig is applied, with the level of resection based on the preoperative templating for a conservative cut (see Figure 17-1). The varus and valgus alignment should be more or less perpendicular to the long axis of the tibia and the amount of initial posterior slope applied between 3 and 5 degrees. The exception to this amount of slope is the rare ACL-deficient knee and lateral compartment arthroplasties in which posterior slope is limited to between 0 and 3 degrees.
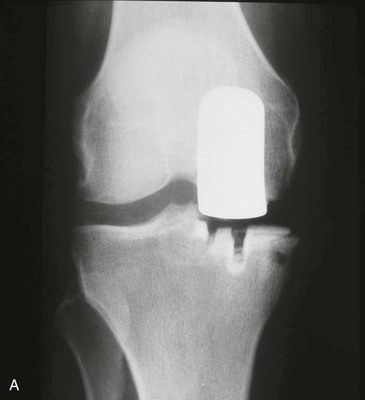
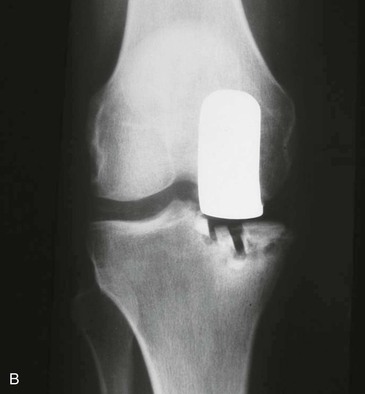
If the alignment jig is to be stabilized by a fixation pin, I recommend that only one inboard pin be used. Outboard pins that come close to the medial cortex are associated with postoperative stress fractures, as are techniques that call for the application of multiple stabilizing pins (Figure 17-6).6 It is important to use a narrow oscillating saw blade for this cut to avoid undercutting the tibial spine or injuring medial soft tissues.
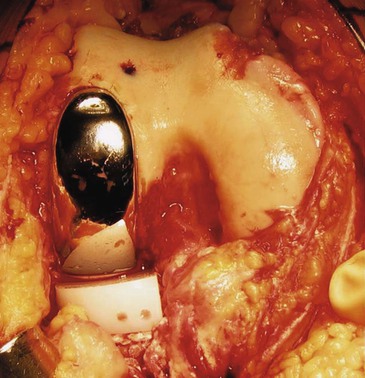
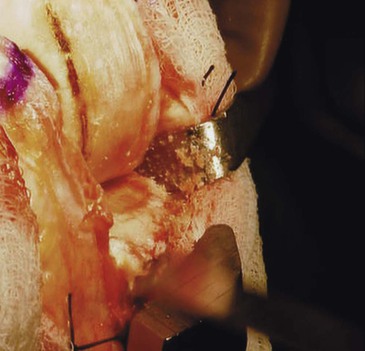
Further protection of the medial tissues is afforded by the placement of a 1.5-cm-wide retractor into the tissue plane created by the curved 1-cm osteotome in the initial exposure (Figure 17-7). After completion of the horizontal bone cut, a vertical cut is made along the tibial spine with a reciprocating saw that is parallel to the tibial chondroosseous wear pattern. Removal of the medial femoral osteophyte creates a pathway for the saw (Figure 17-8). The lateral placement of this cut is, in general, halfway up the slope of the medial tibial spine. The resected tibial bone is easier to remove with the knee in extension than in flexion because cartilage usually remains posteriorly on both femur and tibia. The resected bone can be grasped with a Kocher clamp while the knee is in flexion and then pulled free when the knee is extended. The resected piece will usually show a wear pattern that is anterior and medial (Figure 17-9). With the knee in extension, the thinnest tibial trial is slid into the space created by the tibial resection (Figure 17-10). If this tibial thickness is correct, the knee should come to full extension and the anatomic alignment should lie between 2 and 5 degrees of valgus. The knee should be stable to valgus stress. It is permissible for the medial side to spring open 1 or 2 mm with the valgus stress but not remain open by this amount when the stress is released. If the alignment is undercorrected or the medial side is lax, a thicker trial insert is necessary. Alternatively, the distal femoral resection can be less than anatomic to allow tightening of the extension gap. Deciding between these alternatives depends on the corresponding flexion gap. For example, if both extension gap and flexion gap are loose, a thicker tibial insert is appropriate. If the extension gap is loose but the flexion gap is appropriate, diminished distal femoral resection is recommended.
Related posts:
 Flexion Contracture Associated with Total Knee Arthroplasty
 Total Knee Arthroplasty in Rheumatoid Arthritis
 Sepsis and Total Knee Arthroplasty
 Patellofemoral Complications Associated with Total Knee Arthroplasty
 Staying Out and Getting Out of Trouble During Total Knee Arthroplasty
 Posterior Cruciate Ligament Retention Versus Substitution
Stay updated, free articles. Join our Telegram channel

Full access? Get Clinical Tree


