| 7 | Treatment of Infected Prostheses
Total Replacements of the Knee and Hip Two-Stage Exchange of a Total Knee Replacement Using a Temporary Antibiotic Spacer Prosthesis |
Total Replacements of the Knee and Hip
T. Gehrke
Introduction
In its pathogenesis and specific disease progression, a periprosthetic infection is a peculiarity among inflammations in the human body. In contrast to many other infections of the soft tissues and the bones, a foreign body colonized by bacteria is the starting point of this disease (Fig. 7.1).
Therapy begins with the obligatory removal of all colonized foreign bodies in a consistent surgical and microbiologic procedure. It is of no importance whether the implant is changed in one-stage, two-stage, or even multiple-stage interventions. The decisive factor is that all infected foreign bodies are removed and surgical debridement of the soft tissues and bones is painstakingly and thoroughly performed. Necrotic portions of bone (sequestra) are radically removed because they must also be considered as foreign bodies liable to bacterial colonization (Fig. 7.2).
There is principally no difference in the diagnostic and therapeutic concept among the different joints. An infected hip prosthesis is subject to the exact same pathologic process as an infected total replacements of the knee or shoulder.
NOTE
Decisive factors for successful therapy of periprostatic infections, regardless of their localization, are:
• Removal of all foreign material
• Complete surgical debridement of all infected tissues
• Radical removal of all necrotic bone
Classification
An infection occurring within the first 3 postoperative weeks is referred to as an acute infection.
An infection occurring after the third postoperative week is referred to as a late infection.
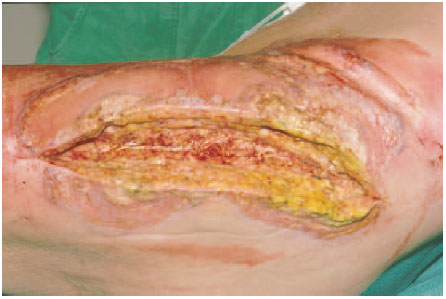
Fig. 7.1 Periprosthetic infection caused by streptococci.
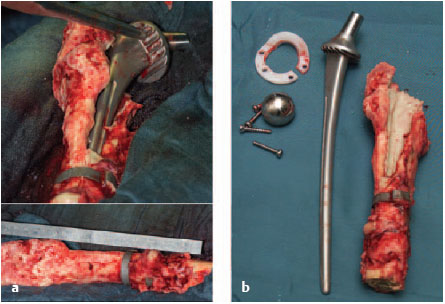
Fig. 7.2a, b Radical removal of foreign material, including the necrotic bone.
Diagnosis
Clinical Symptoms
• Pain (main symptom, often appearing after a painless interval)
• Redness
• Swelling
• Local warmth
• Wound dehiscence
• Fistulas
• Fever (rare, but an alarming sign): risk of sepsis!
Laboratory:
• C-reactive protein (CRP)
• Erythrocyte sedimentation rate (ESR)
• (Leukocyte count)
NOTE
The main clinical symptom of a periprosthetic infection is pain, which either persists after the operation or, in late infections, appears in the operated joint after a painless interval (see Fig. 7.3).
Any joint that is painful after implantation of a prosthesis is considered to have a periprosthetic infection until this has been definitely excluded.
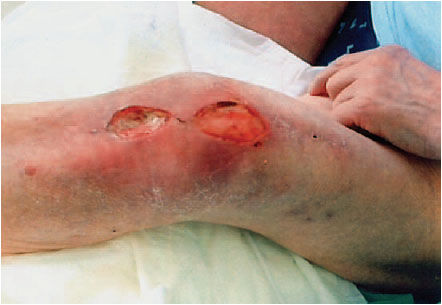
Fig. 7.3 Clinical picture of a periprosthetic infection of the knee joint.
NOTE
Both CRP and ESR always rise after an operation. The CRP level should have normalized after 2 to 3 weeks, while the ESR can remain elevated for up to a year. Therefore, controlling CRP values is of decisive importance. The leukocyte count has no or only very limited clinical relevance because it is generally within the normal range.
Radiologic Diagnosis
Plain films in standard planes should be taken and, if necessary, distance radiographs with a radiopaque scale.
Radiologic changes in periprosthetic infections:
• There are no pathognomic changes in the plain films.
• The bones show both areas of sclerosis and lysis (Fig. 7.4).
Scintigraphy: A bone scan is not recommended because it is very expensive, but has little clinical relevance.
Computed tomography (CT): Prosthetic materials create artifacts. This is only appropriate for individual implants with large bone defects.
Magnetic resonance imaging (MRI): Prosthetic materials create artifacts. The investigation is very expensive, but has little clinical relevance. It is appropriate to evaluate the condition of soft tissues (Fig. 7.5).
Distance radiographs with a radiopaque scale of the affected extremity with a precisely defined film-focus distance are often useful for planning an operation, especially if special implants or so-called megaprostheses (e.g., total femoral replacement) are required (Fig. 7.6).
NOTE
Radiologic Diagnosis is of secondary importance. Generally speaking, none of the techniques provide useful information. Late infections have typical signs in plain films, like periosteal reactions, ossifications, resorption margins, or osteolyses. Scintigraphy, CT, and MRI cannot differentiate septic loosening of a prosthesis from aseptic loosening. Artifacts in CT and MRI make it difficult to evaluate the condition of the bones.
Combined 111In (indium) and 99mTc (technetium) leukocyte scintigraphy is superior to conventional scintigraphic procedures in making this differentiation, but is very expensive and can only be recommended in selected cases.

Fig. 7.4a, b Plain radiograph of a periprosthetic infection of the knee joint.
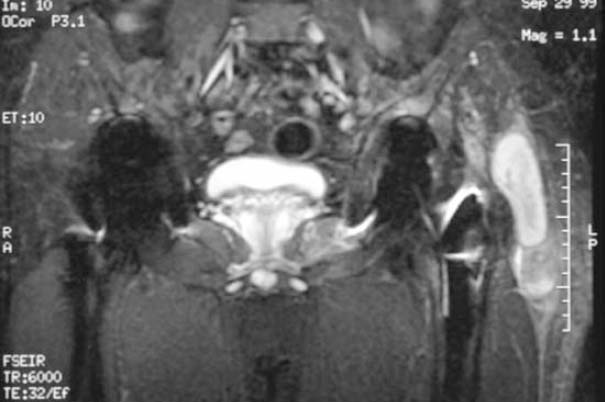
Fig. 7.5 MRI of the patient in Fig. 7.6 showing a large soft-tissue abscess on the left greater trochanter.
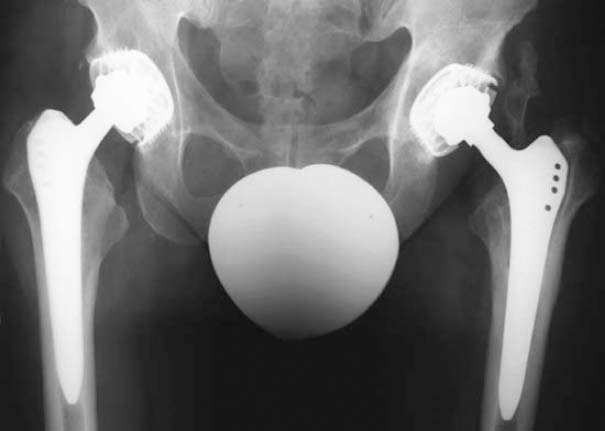
Fig. 7.6 Unremarkable radiograph of a periprosthetic infection of the left hip.
Joint Aspiration
Joint aspiration is the method of choice to obtain a representative sample to determine the pathogen (Fig. 7.7).
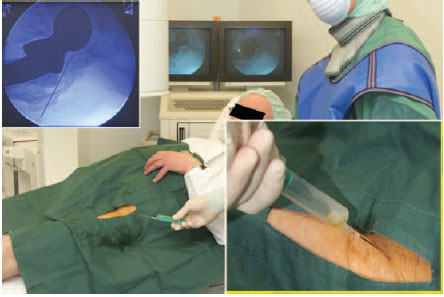
Fig. 7.7 Aspiration of a hip joint from anterior under fluoroscopic control.
NOTE
Discontinue systemic antibiotics 10–14 days before the aspiration.
Do not administer a local anesthetic during the aspiration (antimicrobial effect).
Do not irrigate or apply a contrast medium (dilution).
The obtained material must be incubated in the laboratory for at least 14 days.

Fig. 7.8 Sterile injection of aspirated fluid into a plain test tube.
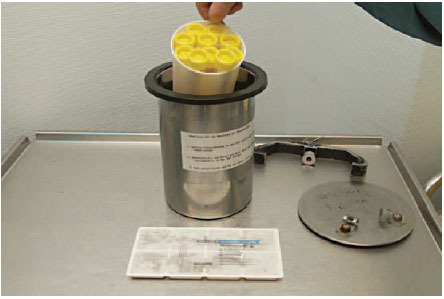
Fig. 7.9 Special container for transportation of an anaerobic sample.
Planning the Operation
Anesthesia
• Internists and anesthesiologists must evaluate the operative risk.
• There should be no preoperative autohemotransfusion or perioperative mechanical autotransfusion due to the risk of reinfection.
• At least eight units of banked blood should be available.
Radiographic Preparations
• In general, conventional radiographs of the affected joint in two to three planes in the standard position and exposure technique are sufficient (O’Neill and Harris 1984) (see above).
• Distance radiographs with a radiopaque scale of the affected extremity with a precisely defined film-focus distance may be required, particularly for special implants or so-called megaprostheses (e.g., total femoral replacement).
Informed Consent
• The success rate for operative replacement of an infected prosthesis is between 80% and 90%.
• This means there is a 10%-20% possibility of continuing or recurring infection.
• Disturbances in wound healing may require operative revision.
• The sciatic or femoral nerves could be damaged.
• There could be considerable blood loss, especially if the socket protrudes into the lesser (true) pelvis.
• There may be a loss of function and stability of the muscles surrounding the hip.
• The legs may differ in length.
• There is risk of an intraoperative and/or postoperative fracture
• The risk of aseptic loosening of the prosthesis or even early loosening is increased
• Large bone defects, especially of the acetabulum, will require another operation later to reconstruct the bone.
• There may be restriction of movement.
• The operated leg often cannot fully bear weight for up to 12 weeks postoperatively.
• If treatment of the infection is unsuccessful (persisting infection), amputation or exarticulation may be necessary.
NOTE
The dislocation rate after changing an infected prosthesis is considerably higher and is cited in the literature as between 5% and 30%.
Therapeutic Concept
Therapeutic Goals
• Eradication of the infection
• Maintenance of joint function
Therapeutic Options
• Conservative therapy (antibiotic suppression of pathogens)
• Surgical debridement without removing the prosthesis
• One-stage prosthesis exchange
• Two-stage prosthesis exchange
• Multiple-stage prosthesis exchange
• Arthrodesis
• Resection arthroplasty
• Amputation or exarticulation
Conservative Therapy (Antibiotic Suppression of Pathogens)
Indication: inoperability due to high operative risk.
Disadvantages:
• Noneradication of the infection
• Danger of pathogen selection
• Development of resistant species
• Nonhealing fistulas as a permanent source of additional pathogen colonization
NOTE
Conservative therapy of periprosthetic infections with antibiotic suppression of pathogens is not sufficient unless the patient is considered inoperable.
Exchange of Septic Hip Prosthesis
Surgical Preparations
• Identification of pathogens and availability of an antibiogram are prerequisites.
• Systematic and local antibiotics must be available.
• If there are large soft-tissue defects, a plastic surgeon must be called in.
Choice of Implants
• Implants of different lengths and shaft diameters must be available.
• If there is a loss of bone substance, intraoperative complications, like shaft fractures, perforations of the cortical layer and/or fenestration, and pelvic destruction are more likely. These must be taken into consideration when choosing an implant.
• In our hospital population we have been able to use a standard implant in approximately 60% of cases. In all other cases, we had to choose a longer stem to ensure sufficient anchorage in the bone.
• Large areas of pelvic destruction can cause difficulties because here the implantation of supportive cages or rings for the acetabular cup or in some cases even partial replacement of the pelvis is necessary.
• Allogenic shaft and socket reconstruction must not be performed if there is an infection because this means implanting another foreign body that is not protected from bacterial colonization by antibiotic bone cement.
• We only use megaprotheses, which generally replace two neighboring joints, when exchanging a prosthesis similar to the infected one (e.g., a periprosthetic infection of a total femoral replacement) because under certain circumstances the infection can spread to a healthy joint.
• If the pelvis is involved to the extent that the urinary bladder or iliac vessels could be injured, a vascular surgeon, abdominal surgeon, and an urologist should be called in.
Approach
The following approaches are recommended for surgical revisions or exchanging prostheses.
Suitable approaches to the hip joint for exchanging a prosthesis:
• Posterior
• Transtrochanteric
• Transgluteal
• Transfemoral
Less suitable approaches to the hip joint for exchanging a prosthesis:
• Anterolateral
• Anterior
We consider the main advantages of a posterior approach, also for operative revisions, to be the far-reaching protection of the abductor muscles, which are the most important pelvic stabilizers in the coronal plane. Nerves and vessels lying anterior are generally not traumatized, and even the relatively close sciatic nerve can be easily palpated and protected.
NOTE
The dorsal approach provides better exposure of the cranial and cranioposterior portions of the acetabulum, which are most often affected by bone loss, and is also suitable for extensive reconstructive surgery. Lengthening the incision toward proximal exposes almost the complete pelvic wing.
The increased danger of dislocation is considered a disadvantage, which, however, can be compensated by taking great care in the proper placement of the acetabular cup and reconstruction of the posterior soft tissues when closing the wound.
Incisions of the Skin and Fascia
Old scars which lie in the path of the skin incision are excised. If they are not directly in the planned incision, the surgeon must assure that there is sufficient distance between the new and the previous incision (Fig. 7.10).
Avoid crossing old scars at a sharp angle or changing directions.
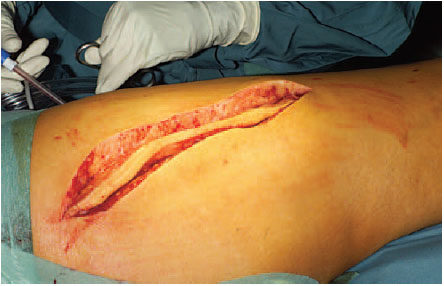
Fig. 7.10 Former incision scars are excised.
Fistulas should, whenever possible, lie in the line of incision and be radically excised by dissecting them down to the joint. If they are located too far anterior or posterior, they should be resected from a separate incision (Fig. 7.11).
After cleaving the fascia, all infected tissues, including muscle fasciae and infected portions of the muscle, are debrided (Fig. 7.12).
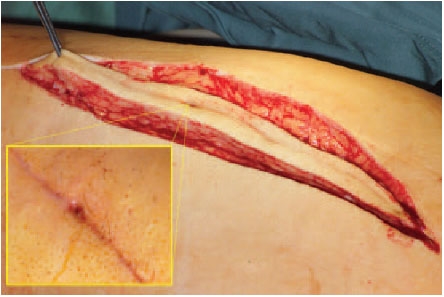
Fig. 7.11 Fistulas are included in the incision if possible.
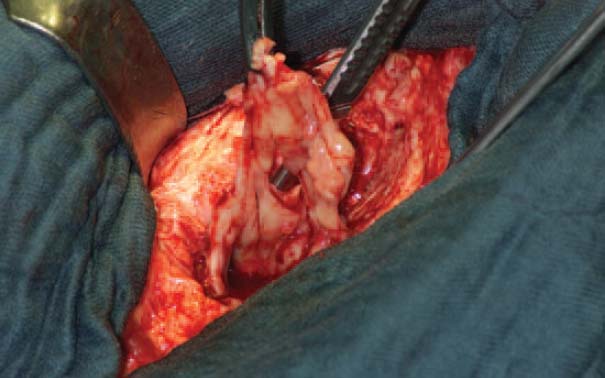
Fig. 7.12 Radical debridement of soft tissues.
This may require an L-shaped detachment of the vastus lateralis muscle to be able to dissect right down to the femoral shaft in a distal direction and remove infected tissue adjacent the bone. This also exposes perforations, fenestrations, and other infected defects in the cortical layer of the femoral shaft so that they can be removed and cleansed with sharp curettes, chisels, drills, Luer bone rongeurs, raspatories, burrs, etc. Especially defects in cortical bone or the small cortical openings for the perforating blood vessels can provide the starting point for extensive abscesses in the surrounding muscles.
Biopsies
Sample biopsies from all relevant areas must routinely be taken, labeled, and sent for microbiologic diagnosis.
Biopsies (routine):
• Joint capsule
• Shaft entrance
• Shaft interior
• Floor of the acetabulum
Biopsies (when necessary):
• Fistulous tracts
• Abscess contents
Technique for Explantation of Prostheses (Cemented Shafts)
Removing a cemented shaft is generally far easier and less complicated than removing cementless shafts.
The required instruments for removing cemented shafts are shown in Fig. 7.13.
Instruments for removal of the prosthesis (Fig. 7.14, 7.15, 7.16, 7.17, 7.18):
• System-specific extraction instruments
• Self-cutting cement extractors
• Taper extraction instrument
• Box-type stem extractor for firmly fixed or nonmodular heads
Chisels of different lengths and widths (Fig. 7.14):
• Sraight chisel
• Hollow chisel (sharpened on the inside and outside)
• Lambotte chisel
• Angled chisel
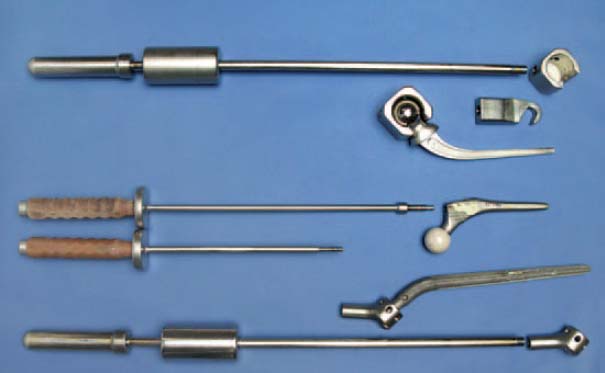
Fig. 7.13 Extraction instruments
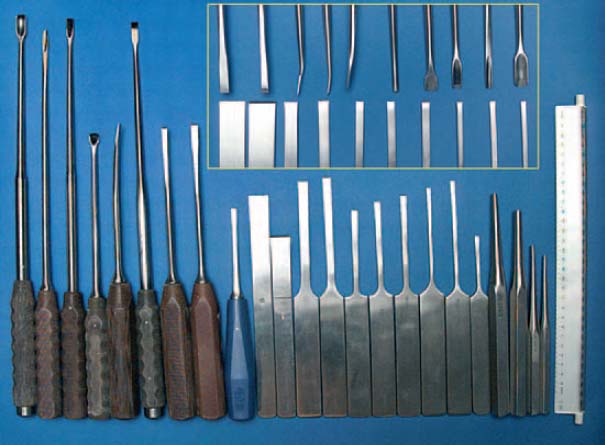
Fig. 7.14 Chisels of different lengths, forms, and widths.
NOTE
When removing cement from the femoral medullary cavity with a chisel, the cement must be chiseled radially to avoid perforating or lifting the cortical bone layer.
Curettes (Figs. 7.15):
• Ball-headed reamers (diameter: 8–16 mm)
• Sharp curettes of different lengths and sizes
• Jet lavage
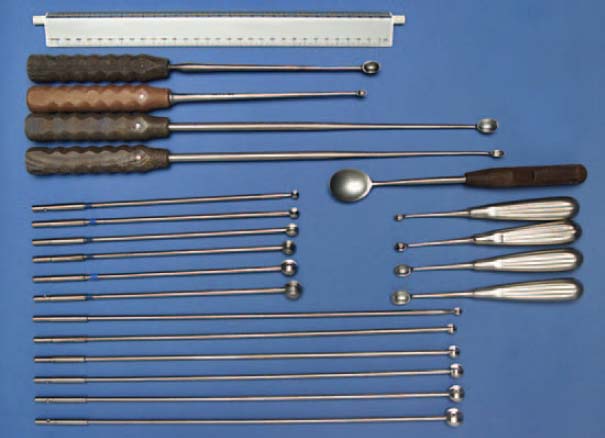
Fig. 7.15 Curetting instruments
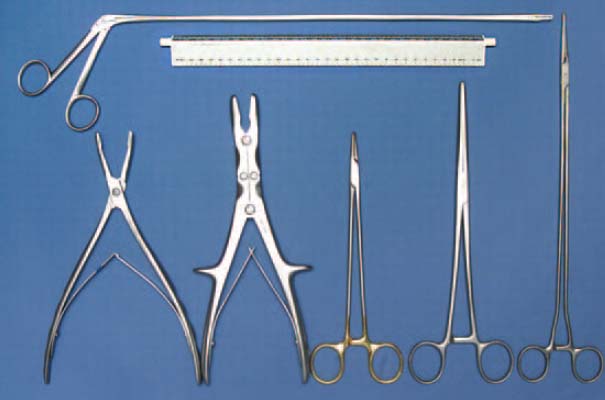
Fig. 7.16 Clamps and forceps for removing bone cement.
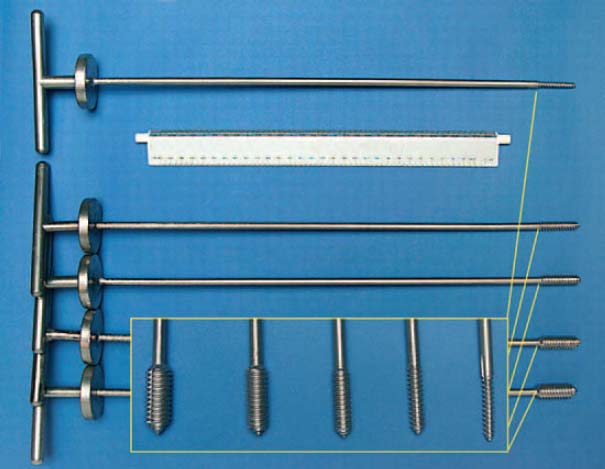
Fig. 7.17 Thread cutters of different diameters for removing bone cement.
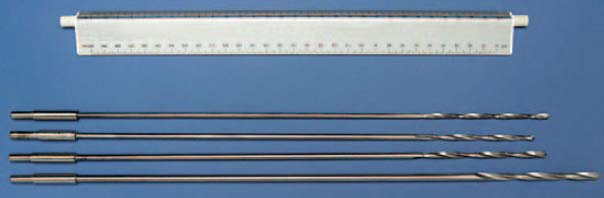
Fig. 7.18 Long drill bits (4.5 mm in diameter) for boring into the distal bone-cement plug.
Removing a Prosthesis
1. Remove the bone cement between greater trochanter and the shoulder of the prosthesis.
2. Remove the cement between the prosthetic collar and the cortical bone of the femur.
3. Drive out the prosthetic shaft with a special taper extraction instrument. The punch is placed under the prosthetic collar. Use a box-type stem extractor for fixed, nonmodular heads.
4. Place the punch under the prosthetic collar.
5. Use a box-type stem extractor for rigid, nonmodular heads.
Removing the Cement
1. Remove the proximal portions of cement with narrow, straight chisels with symmetrical sharp blades.
2. Use a thread cutter in distal portions with a closed cement column.
3. Cement plugs remaining distal to the prosthetic shaft are drilled in the center and then removed with an appropriate tap (Fig. 7.19).
NOTE
The thickest possible thread cutter is twisted into the lumen with several turns until the resistance increases and there is a creaking noise.
The thread-cutting technique is only feasible and useful if the cement column is solid throughout. If one side is open, the thread cutter pierces the cancellous or cortical bone and may tear it open.
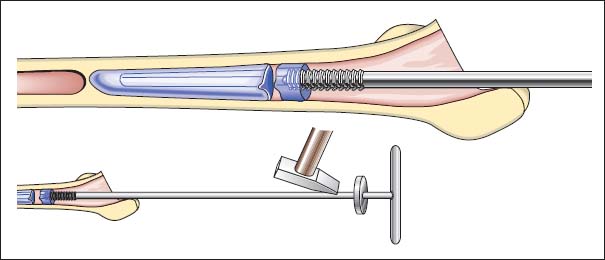
Fig. 7.19 Removal of bone cement with thread cutters.
NOTE
If the risk of drilling through the cortical bone is too great due to a cement plug which has broken off at an oblique angle or the femur has a strong anterior curvature, drilling must be performed under visual control through a window in the bone.
Removing Cementless Shafts
Cementless implants are often extremely difficult to remove. This is especially true because a large number of periprosthetic infections are so-called early infections, that is, they appear within the first year after the pros-thesis was implanted. The following situation is often the cause: The infection started somewhere on the interface between the bone and the prosthetic shaft; the rest of the prosthesis is still well integrated in the bone.
Instruments for removing prosthetic cementless shafts:
1. Extraction instruments:
– Systemic specific extraction instruments
– Self-cutting cement extractors
– Taper extraction instruments
– Box-type stem extractor for firmly fixed or non-modular heads
2. Chisels:
– Fine flexible osteotomes
– Lambotte chisel
3. Punch:
Drills and thin saw blades (for fenestration of bones).
The prosthetic shaft is loosened with fine flexible or Lambotte chisels, which are driven between the bone and the prosthesis (Fig. 7.20).
Place a self-cutting cement extractor device and drive out the prosthesis (Fig. 7.21).
If necessary, fenestrate the bone or use a transfemoral approach.
The prosthetic shaft can be circularly chiseled with a curved Lambotte chisel or sawn out with a curved saw blade from the bone window. Afterwards, it is usually possible to drive out the shaft with a punch after drilling into the shaft with a hard-metal drill bit (Fig. 7.22).
NOTE
When removing a cementless prosthetic shaft, the surgeon should decide to fenestrate the bone at a very early stage. In many cases fenestration is by far the more time-saving and gentle procedure. Windows should be cut in the anterior femur.
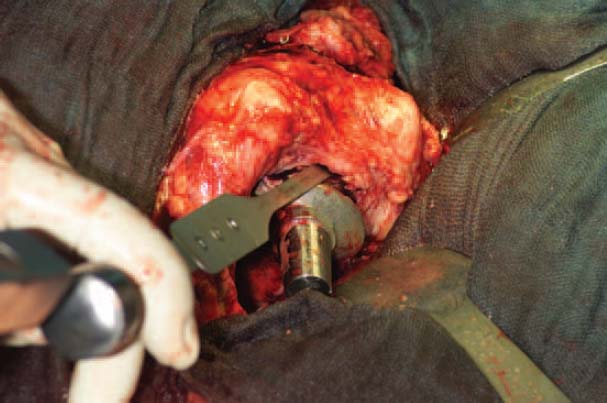
Fig. 7.20 Placing the fine flexible osteotomes at the prosthesis-bone interface.
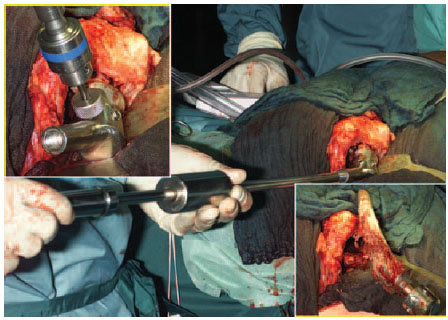
Fig. 7.21 Screwing in the taper extractor and driving out the prosthesis.
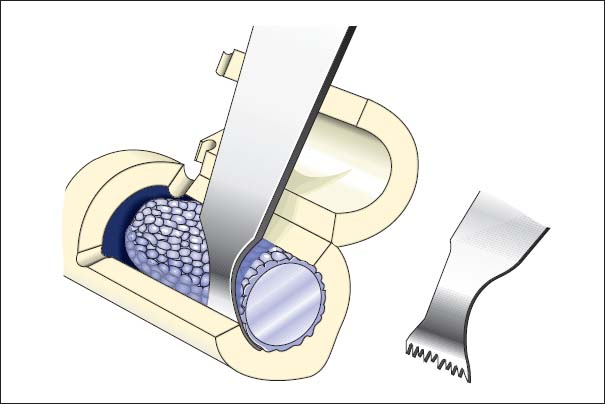
Fig. 7.22 Fenestration of the bone and sawing around the fixed prosthetic shaft.
Curettage
Instruments for curetting the medullary cavity:
• Jet lavage, possible with Lavasept (Fresenius Kabi, Bad Homburg, Germany) (2%; Fig. 7.23)
• Ball-headed reamers
• Long sharp curettes
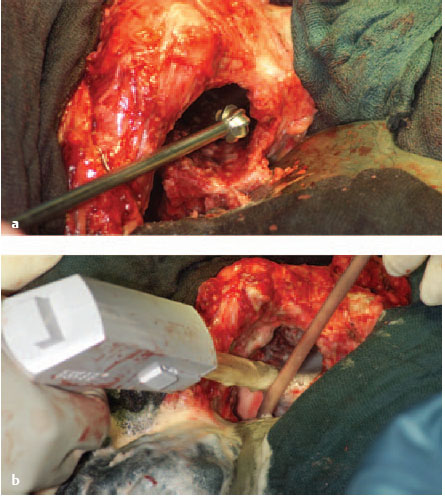
Fig. 7.23a, b Curetting the medullary cavity of the femur with a ball-headed burr and performing jet lavage.
Removal of the Acetabular Cup
Instruments for removing the acetabular cup:
• Special socket chisel
• Lambotte chisel
• Retrograde chisel
• Punch
• Bone-holding forceps
• 4.5-mm drill bit
• Thread cutter
• Sharp curette
• Ball-headed reamer
Removing Cemented Acetabular Cups
It is generally not very difficult to remove cemented acetabular cups. Cups which have been loosened are drilled in the middle with a 4.5-mm drill bit and then driven out in a retrograde direction with a thread cutter (Fig. 7.24).

Fig. 7.24a, b Removing a cemented acetabular cup.
If the cup is still well anchored, it can be loosened with a distally angulated and spherically curved chisel at the polyethylene (PE)-cement interface.
Remaining cement on the floor of the acetabular cup can be divided radially with the Lambotte chisel or scraped out with a sharp curette.
ERRORS AND RISKS
When loosening the acetabular cup with the chisel, take care not to destroy the bone, especially on the roof of the acetabulum.
Removing Cementless Acetabular Cups
After exposing the edge of the cup and cutting it free, pry out the PE inlay with a straight chisel. Then loosen the screwed-in or press-fit cup circularly with a socket chisel whilst being extremely careful to protect the bone. The cup can then be removed with a bone-holding forceps or be driven out with a punch.
< div class='tao-gold-member'>


