I. OBJECTIVES. Although traction is being used with decreasing frequency for fracture care in the Western world, a knowledge of these effective principles is necessary for special indications or situations in which equipment or expertise is not available or patient comorbidities do not permit operative intervention. Traction remains a useful temporizing method in the severely injured patient with femoral shaft or pelvic/acetabular fractures.1
A. Traction maintains the length of a limb as well as alignment and stability at the fracture site. Treating femoral fractures with fixed skeletal traction is an example.
B. Traction can allow joint motion while maintaining the alignment of the fracture. For example, the Pearson attachment on a Thomas splint allows knee movement during traction treatment of a femoral fracture; overbody or lateral skeletal traction allows elbow motion while maintaining the alignment of a humeral fracture.
C. Traction can overcome muscle spasm associated with bone or joint disease. An example is Bucks traction, which is sometimes recommended for patients with hip injuries.
D. Edema is reduced in an extremity by a traction unit that elevates the affected part above the heart.
II. ESSENTIAL MATERIALS. The bed must have a firm mattress or a bed board. Elevate the head or the foot of the bed using either shock blocks or the bed’s intrinsic elevation system. Attach an overhead frame, trapeze, and side rails to the bed so the patient can shift position. Traction equipment includes bars, pulleys, ropes, weight hangers, skeletal traction apparatus, and, in some instances, plaster cast materials. Various figures in this chapter show the type and placement of equipment about the bed.
III. SKIN TRACTION
A. Skin traction may be used as a definitive method of treatment as well as a first aid or temporary measure. The traction force applied to the skin is transmitted to bone through the superficial fascia, deep fascia, and intermuscular septa. Skin damage can result from too much traction force. The maximum weight recommended for skin traction is 10 lb or less, depending on the size and age of the patient. If this much weight is used, discontinue the skin traction after 1 week. If less weight is used and if the skin is inspected biweekly, skin traction may be safely used for 4 to 6 weeks. Pediatric patients need skin inspection on a more frequent basis.
B. Application
- Carefully prepare the skin by removing the hair as well as washing and drying the area.
- Avoid placing adhesive straps over bony prominences. If bony prominences are in the area of strap application, cover them well with cast padding before the adhesive straps are applied. Always use a spreader bar to avoid pressure from the traction rope on bony prominences.
- Make the adhesive straps from adhesive tape, moleskin adhesive, or a commercial skin traction unit consisting of foam boots with Velcro straps. Place the straps longitudinally on opposite sides of the extremity, with free skin left between the straps to prevent any tourniquet effect. Attach the free ends of these straps to the spreader bar. Hold the straps in place by encircling the extremity with an adhesive or elastic wrap. Then apply the traction rope to the spreader bar.
- Support the leg in traction with pillows or folded bath blankets without contact under the heel to prevent edema and irritation of the heel.
IV. SKELETAL TRACTION
A. Definition. Skeletal traction is applied through direct fixation to bone.
B. Equipment
- Kirschner wire is a thin, smooth wire with a diameter of 0.0360 in to 0.0625 in. The advantages of Kirschner wire are that it is easy to insert and that it minimizes the chance of soft-tissue damage or infection. The disadvantage is that it rotates within an improper bow and can cut through osteoporotic bone. These complications are minimized using the proper traction bow. Even though Kirschner wire is small in diameter and flexible, it can withstand a large traction force when the proper traction bow is used. This special bow (Kirschner bow) provides the wire with rigidity by applying a longitudinal tension force (Fig. 10-1). If properly placed and not improperly stressed, the wire does not break and causes less bone damage than the larger Steinmann pins.
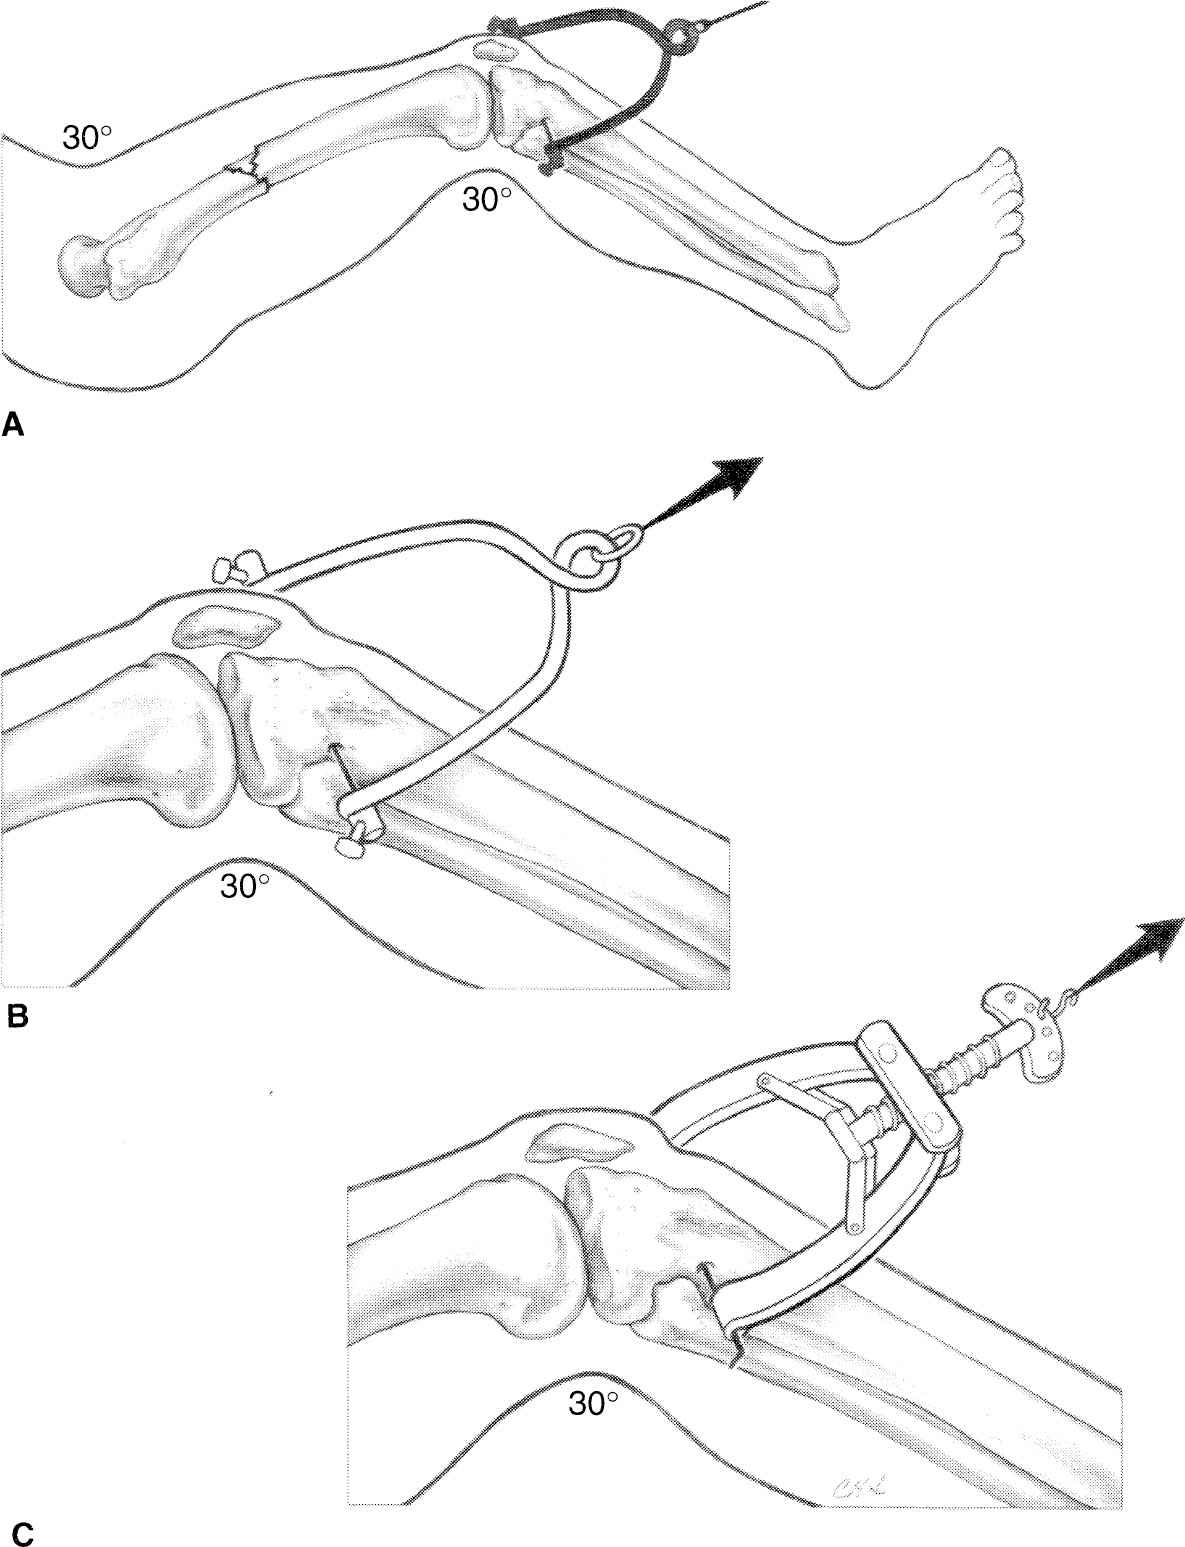
Figure 10-1. Traction bows. When using skeletal traction to treat femoral fractures, the knee is kept in slight flexion (A). Proximal tibial traction is reserved for adults. To avoid physeal injury in children with resultant recurvation deformity, distal femoral traction proximal to the distal femoral physis is used. For larger Steinmann pins, a Bohler bow is used (B). The tensioning capabilities of the Kirschner bow allow the use of smaller Kirschner wires (C).
2. Steinmann pins vary in diameter from 0.078 in to 0.19 in and come in smooth and threaded forms. Because they are large enough to have inherent stability, the Steinmann pin bow (Bohler bow), which attaches to these pins, does not exert tension along the pin as does the Kirschner traction bow. The two types of pins should be readily recognized and used with the appropriate bow (Fig. 10-1).
3. Factors to be considered
a. Nonthreaded wire or pin is smaller, more uniform, less easily broken, more easily inserted, and removed with less twisting than the threaded type. A disadvantage is that it can slide laterally through the skin and bone. Even with careful attention, it can move enough to disturb the traction or predispose to a pin tract infection.
b. The threaded wire or pin has stress risers at each thread, breaks more easily, must be larger in diameter to gain the same strength, and takes a longer time to insert. In inserting a threaded pin, one is tempted to go rapidly with the hand or battery powered drill, which creates an undue amount of heat. On the other hand, because the threads prevent lateral slippage of the pin, this type is preferable to the nonthreaded variety for long-term (longer than 1 to 2 weeks) traction.
4. The wires and pins are available with two types of points. One is a trocar, a blunted point that tends to grind through the bone with relatively little cutting ability. The other is a diamond-shaped point, a modified type of drill that passes through bone more easily and with less heating. Wires and pins that are dull, sharpened off-center, or bent should not be used. These wander during insertion and create a hole that is too large.
5. Note that pins and wires are frequently used as internal fixation devices for fractures; such use is discussed in Chapter 11 and the chapter on hand fractures, Chapter 21.
C. Pin and wire insertion guidelines
- Pin or wire insertion is a surgical procedure, so some form of consent is needed, at least with a witness in attendance who signs a note in the chart attesting that informed consent was obtained. A signed, witnessed surgical consent is preferred. The site of pin application should be signed with a surgical marking pen, and a time out should be held as if the procedure were being done in the operating room.
- Establish the status of neurovascular structures before inserting the pins. Placement of the pins requires knowledge of the specific anatomy and the location of vital structures. Rule: Always start the pin on the side where the vital structures are located. This gives better control and better avoidance of these structures. For instance, start an olecranon pin on the medial side to avoid the ulnar nerve.
- Skin preparation. The skin should be free of signs of infection. Follow aseptic procedures, using a topical germicidal antiseptic, drapes, mask, and gloves.
- It is difficult to obtain enough anesthesia to block the periosteum completely. Anesthetize the skin and subcutaneous tissue with 1% lidocaine on the starting side of the bone. Go down to the periosteum with the needle tip and insert enough lidocaine around this area to produce some anesthesia. If there is pain as the pin is inserted and approaches the bone, inject more anesthetic. Drill the pin approximately halfway through the bone, get an idea where it will come out, and then anesthetize the opposite side. In a case in which the wire penetrates two bones, such as the tibia and fibula, it is impossible to anesthetize the area between the two bones. Tell the patient ahead of time that this may be painful for a few seconds but that as soon as the drilling stops, the pain will cease. If done in the emergency department, conscious sedation should be utilized.
- Skin incision. When starting the procedure, pass the wire or pin through a stab wound made with a no. 11 blade. If only a puncture wound is made by the pin, tight skin adherence to the pin predisposes to an infection. If an infection with abscess does occur, drain it by extending the stab wound. Dress the pin site with sterile 4 × 4s on each side with Betadine solution applied. Change the dressings daily.
- Pins and wires should be inserted using a hand drill rather than a power tool whenever possible. The time saved using power equipment is expended in preparation time. There is also a tendency to use too high a speed with power drills and generate too much heat, thereby promoting the development of bone necrosis around the pin insertion, resulting in a ring sequestrum. The smaller the pin and the slower the rotation of the hand drill, the faster the pin is inserted. Adequate support of the limb from adequate assistance must be available so that, as the pin is being inserted, the limb does not shift and cause the patient further pain.
- Traction wires or pins are best placed in the metaphyses, not in dense cortical bone. Use caution to avoid epiphyseal plate damage, which can result in a growth disturbance. In skeletally immature patients, the pin should be inserted under fluoroscopic control to avoid the physis. In the area of the tibial tubercle, assume in female patients younger than 14 years and in male patients younger than 16 years that the epiphyseal plate is open. Because of the risk of physeal injury in the proximal tibia, choose the distal femur for skeletal traction in younger patients if possible. Ideally, pass the pin through only skin, subcutaneous tissue, and bone. Avoid muscles and tendons.
- Do not violate a fracture hematoma by skeletal wires or pins for traction, or the equivalent of an open fracture will result.
- Do not penetrate joints with traction wires or pins because pyarthrosis can occur. Do not enter the suprapatellar pouch with distal femoral wires or pins. Here again, inserting the pin under fluoroscopic control can avoid these complications.
- Points to remember about wire or pin insertion:
a. Chuck the wire or pin so that a length of just 2 in to 4 in is exposed to prevent wandering and bending.
b. Tighten chuck sufficiently to prevent score marks that are sources of metal corrosion and fracture.
c. Be certain that the wire does not bend as it is inserted.
d. Use the proper traction bow (Fig. 10-1).
D. Specific areas of insertion
- Metacarpals. Place the wire through the metaphyseal–diaphyseal junction of the index and middle metacarpals. To facilitate insertion, push the first dorsal interosseous muscle in a volar direction and palpate the subcutaneous portion of the bone. Angle the wire to pass through the index and middle metacarpals and to come out the dorsum of the hand, so as to preserve the natural arch.
- Distal radius and ulna. Usually place the wire or pin through both the radius and the ulna. This site is rarely used.
- Olecranon. Take care to avoid an open epiphysis. Do not place the pin too far distally because this causes elbow extension, and it is more comfortable to pull through a flexed elbow than an extended elbow. Use a moderate-sized wire or pin and insert from the medial side to avoid the ulnar nerve. Use a very small traction bow.
- Distal femur.
Related posts:

Stay updated, free articles. Join our Telegram channel


Full access? Get Clinical Tree


