M. Bradford Henley

Sterile Instruments/Equipment
Irrigation and Debridement of Open Tibial Fractures
- Cystoscopy tubing or pulsatile lavage system
- ≥6 L of sterile saline
- Multiple small and large retractors, typically “L” shaped, such as Sofield, Langenbeck, or Army-Navy
- Large curettes (straight and curved)
- Small curettes (straight and curved)
- Dental picks
- Shoulder hooks, bone hooks
- Rongeurs (pituitary, etc.)
- Occasionally or available: motorized burr
Intramedullary Nailing of Tibial Shaft Fractures
- Multiple small and large retractors
- Gelpi retractor
- Medium or large radiolucent triangle for limb positioning
- Large and small pointed “Weber” bone reduction clamps
- Pigtailed awl or 2.8- to 3.2-mm guide pin and cannulated 8- to 10-mm drill bit
- Implants: small fragment plates and screws (for provisional stabilization of open fractures)
- Tibial nailing or plating system of choice
Patient Positioning
- Supine
- Cantilever-type OR table with radiolucent extension (diving board) so that the C-arm is unencumbered for imaging in the AP and lateral planes.
- Place a small bump (rolled towel or blanket) beneath the ipsilateral buttock and flank to neutralize the lower limb external rotation (patella pointed superiorly).
- Consider positioning the ipsilateral upper extremity across the body to avoid shoulder hyperextension and brachioplexopathy.
- Exclude the groin and perineum from the operative field with an impervious U-shaped drape.
- Prep and drape the affected lower extremity to the ipsilateral groin.
Surgical Approaches
Anterior Approach to the Proximal Tibia (For Tibial Intramedullary Nailing)
- With the knee flexed over the radiolucent triangle, make an incision longitudinally over the midline of the patellar tendon, or medial (or lateral) to the tendon, depending on the fracture pattern and surgeon’s preference.
- This approach portion may also be performed with knee in extension to 30 degrees of flexion.
- Dissect sharply down to the paratenon of patellar tendon.
- Avoid the occasional infrapatellar branch of the saphenous nerve inferiorly within the subcutaneous tissue.
- Patellar tendon splitting approach
- Incise the paratenon as a distinct tissue layer, separating its edges from the patellar tendon to facilitate closure.
- Assess the medial and lateral borders of the patellar tendon through visualization or palpation.
- Incise the patellar tendon longitudinally in its midline.
- Use a Debakey forceps to retract tendon split, to allow maintenance of single plane in tendon fibers (Fig. 20-1).
- Incise the paratenon as a distinct tissue layer, separating its edges from the patellar tendon to facilitate closure.
- Avoid the occasional infrapatellar branch of the saphenous nerve inferiorly within the subcutaneous tissue.

Figure 20-1. A Debakey forceps placed in the tendon split allows for retraction, and extension of the split within the same tendon fiber plane (parallel to and between tendon fibers rather than crossing fibers).
![]()
- Retract the medial and lateral portions of the tendon to visualize the retropatellar fat pad.
- Atraumatically elevate the fat pad from its distal position, superiorly to visualize proximal tibia.
- If the insertion point is not approached by elevation of the fat pad and periosteum, beware of injury to menisci or intermeniscal and coronary ligaments.
- Consider Gelpi or two “L” shaped retractors (e.g., Langenbecks) to provide visualization and to protect the patellar tendon from reamers.
- If Gelpi is used, it may be angulated when knee is placed in flexion by tension on the patellar ligament; this may be avoided by securing the retractor to the leg.
- A laparotomy sponge placed through finger holes and placed posteriorly around proximal leg will maintain position of Gelpi retractor.
- If Gelpi is used, it may be angulated when knee is placed in flexion by tension on the patellar ligament; this may be avoided by securing the retractor to the leg.
- Paratendinous approach
- May be performed medially (or rarely laterally) to the tendon.
- Tibial tubercle is lateral to the intramedullary tibial axis.
- Skin incision may be chosen to correspond more closely to the planned paratendinous approach.
- Tibial tubercle is lateral to the intramedullary tibial axis.
- Dissect sharply to the desired edge of the patellar tendon paratenon, and retract it.
- May be performed medially (or rarely laterally) to the tendon.
- Separate the posterior aspect of the tendon from the retropatellar fat pad bluntly, and sweep the fat pad and anterior periosteum superiorly and posteriorly with a blunt elevator.
- Bovie cautery may be used to assist in elevating the fat pad with the anterior tibial periosteum.
- Avoid penetration of the joint capsule or injury to the anterior intermeniscal ligament.
- The fat pad should be retracted just far enough to visualize the starting point for the tibial guide pin or awl/nail entry site.1
- To facilitate fracture reduction, heel should be elevated slightly off of the table by choosing a triangle of sufficient height.
- This will permit gravity to assist in restoration of limb length for reduction.
- To correct procurvatum angulation, place bolster or towels posterior to heel or under distal metatarsals, distal to fracture (dorsiflexing foot and increasing apex posterior angulation).
- For recurvatum deformities, place bolster or towels proximal to fracture, allowing distal tibia and foot to sag posteriorly.
Anterolateral Approach to the Tibial Shaft
- Make skin incision longitudinally 1 to 2 cm lateral to the anterolateral tibial crest.
- Dissect sharply through skin and subcutaneous tissue to the anterior compartment fascia.
- Incise the fascia sharply, approximately 5 mm lateral to the tibial crest, leaving a small fascial flap attached to the tibial crest to facilitate closure of the anterior compartment once fracture fixation has been achieved, if indicated.
- The lateral aspect of the tibial shaft can be exposed by elevating the anterior compartment from the lateral tibial periosteum, leaving the periosteum and periosteal vessels intact.
- Elevate the muscle from distal to proximal using the natural plane of muscle fiber insertion.
- This will minimize muscle injury, bleeding, and devascularization.
- Elevate the muscle from distal to proximal using the natural plane of muscle fiber insertion.
Posteromedial Approach to the Tibial Shaft
- Most often used for
- Stabilizing the tibial shaft component of a pilon or tibial plateau fracture.
- Nonunions/malunions.
- Stabilizing the tibial shaft component of a pilon or tibial plateau fracture.
- Make an incision longitudinally 1 to 2 cm posterior to the posteromedial tibial border, being careful not to place incision on the poor and traumatized soft tissues on the medial face of the tibia.
- Dissect sharply through skin and subcutaneous tissue.
- Dissect to the superficial and deep posterior compartment fascia of the tibia.
- Avoid injury to the saphenous nerve and branch of the saphenous vein.
- Incise the fascia sharply, leaving a 3- to 5-mm flap of fascia attached to the posteromedial tibial border to facilitate later fascial closure if indicated in atraumatic conditions.
- Superficial and deep posterior compartment musculature may be opened or elevated from the posterior aspect of the tibia.
- In the distal third of the tibia, the deep posterior compartment fascia is incised, and the musculature may be elevated off of the posterior tibial periosteum.
- Posterior soft tissue attachments represent the most robust blood supply to the tibia during fracture healing.
- Posterior submuscular and periosteal dissection should be limited to prevent further devascularization.
- Posterior soft tissue attachments represent the most robust blood supply to the tibia during fracture healing.
Management of Traumatic Wounds Associated with Open Tibial Shaft Fracture
- Elongate transverse lacerations that do not cross the tibial border in a Z-shaped fashion to maximize skin viability.
- T-shaped or cruciform wounds may be contraindicated in compromised tissues.
- Tendency to break down at the corners, and with ≥2 corners, can leave a sizeable defect that may not close or granulate sufficiently.
- Try to make transverse wounds or oblique wounds longitudinal, as these will be less likely to gap when fracture is brought back out to length.
- T-shaped or cruciform wounds may be contraindicated in compromised tissues.
- For a Type I or II open wound over the medial tibial border, it may be reasonable to consider leaving this wound alone and instead using a separate anterolateral or posteromedial surgical approach for excisional debridement and irrigation of the open fracture.
- It is best not to reconcile these “pre-tibial” open wounds into an extensile exposure over the medial aspect of the tibia, instead, only debride/excise the dermis, epidermis, and subcutaneous tissue (from outside-in).
- Debride the open fracture and deeper tissues via a separate surgical approach—from the inside-out (Fig. 20-2).
- It is best not to reconcile these “pre-tibial” open wounds into an extensile exposure over the medial aspect of the tibia, instead, only debride/excise the dermis, epidermis, and subcutaneous tissue (from outside-in).
Figure 20-2. In this patient with an anteromedial transverse traumatic laceration associated with an open tibial fracture, an anterolateral counter incision was used for the fracture debridement. This avoided extension of the medial traumatic wound, which has a more tenuous soft tissue envelope.
![]()
- Rationale: if edema precludes primary closure, anterolateral wound over the anterior compartment musculature will be amenable to skin graft, whereas a wound on the medial face may require rotational or free soft tissue flap for coverage.
- Do not use this technique if it is already clear that a free flap will be necessary.
- Consider a discussion with a plastic surgeon to avoid compromising options for soft tissue repair.
- Expose the proximal and distal bone ends for débridement.
- Be mindful that the zone of injury may extend in any direction further than the fracture and skin wounds themselves.
- Evaluate all sheared tissue planes for the presence of dirt and other foreign debris.
- Aggressively debride all foreign material and contamination.
- Excise necrotic skin, avascular or loose subcutaneous tissue and fascia, noncontractile muscle, and cortical bone fragments lacking soft-tissue attachments.
- As skin may be an important resource in patients who are not flap candidates, consider being somewhat conservative in the debridement of skin, removing only what is ischemic/nonviable.
- Marginally viable skin may serve at least temporarily as a biologic dressing if sufficiently cleaned.
- Remove, but do not discard, large, devitalized bone fragments that may be used to facilitate an anatomical reduction.
- Irrigate all wounds and bone ends after debridement with multiple liters of sterile saline to decontaminate.
- Be mindful that the zone of injury may extend in any direction further than the fracture and skin wounds themselves.
- Sizeable soft tissue and or osseous defects can be managed with creation of a bead pouch or application of a wound VAC (KCI Inc., San Antonio, TX) over a bone defect containing antibiotic beads.
- The risk of compartmental syndrome must be considered prior to, during, and following the stabilization of tibial shaft fractures (Fig. 20-3).
Figure 20-3. In this patient with a high energy proximal tibial fracture and a significant soft tissue injury, suspicion for acute compartment syndrome should be high.
Single Incision Fasciotomy 2
- Supine position.
- Long, straight, longitudinal incision along the posterolateral aspect of the leg in line with the fibula, from 4 to 7 cm distal to the proximal aspect of the fibular head to approximately 5 cm proximal to the distal tip of the fibula (Fig. 20-4).
Figure 20-4. A: Schematic representation of the right leg and the incision location relative to the fibula. B: Cadaveric dissection of the right leg demonstrating elevation of full-thickness anterior and posterior skin flaps. The anterior, lateral, and superficial posterior compartments can be identified at this point in the dissection. Note the presence of fascial perforating vessels. (From Maheshwari R, Taitsman LA, Barei DP. Single-incision fasciotomy for compartmental syndrome of the leg in patients with diaphyseal tibial fractures. J Orthop Trauma. 2008;22:723–730. With permission.)
![]()
- Full-thickness anterior and posterior skin flaps are elevated.
- Elevation of these flaps is facilitated with the use of a sponge to separate the skin and subcutaneous layer from the underlying fascia.
- Perforating arterial vessels are encountered, often located adjacent to the intermuscular septa, and are preserved.
- During distal elevation of the anterior skin flap, the fascial perforation of the superficial peroneal nerve from the lateral compartment is identified and the nerve is protected.
- Skin flap elevation is continued until the anterior, lateral, and superficial posterior compartments are identified definitively.
- Identification of these compartments is aided by the direct palpation of the anterior and lateral intermuscular septae.
- A long longitudinally oriented incision is then made in the fascia overlying the superficial posterior compartment followed by the lateral compartment, and finally the anterior compartment. Proceeding in this order will limit the amount of blood obscuring posterior (lower) operative sites.
- Transfascial entrance into each of the superficial posterior, lateral, and anterior compartments is verified by direct inspection of their muscular contents during ankle dorsiflexion, hind foot inversion, and ankle and metatarsophalangeal plantarflexion, respectively (Fig. 20-5).
- Elevation of these flaps is facilitated with the use of a sponge to separate the skin and subcutaneous layer from the underlying fascia.
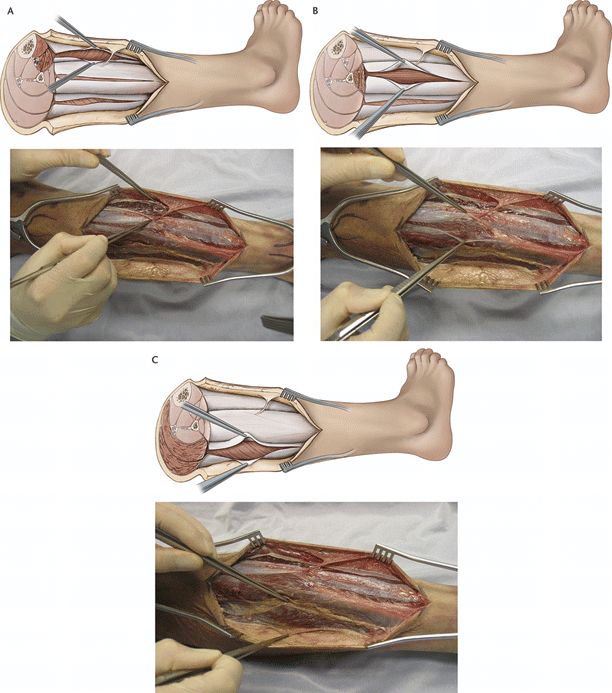
Figure 20-5. Schematic and cadaveric representations of the right leg demonstrating fasciotomy of the anterior compartment (A), lateral compartment (B), and superficial posterior compartment (C
Related posts:


Stay updated, free articles. Join our Telegram channel

Full access? Get Clinical Tree


