M. Bradford Henley
Sterile Instruments/Equipment
- Headlight.
- Tourniquet if desired.
- Femoral distractor.
- Langenbeck and/or Smilie retractors.
- Large and small pointed bone reduction clamps (Weber clamps).
- Large periarticular quadrangular bone clamps.
- Number 2 Ethibond suture for retraction of meniscus after submeniscal arthrotomy and repair of peripheral meniscal detachment (if required); choose a needle with a short radius of curvature (e.g., a GU needle).
- Dental picks and Freer elevators.
- Bone tamps, curved and straight.
- Lambotte osteotomes for metaphyseal cortical window.
- Alternatively, 2.5- to 4.5-mm drill bits
- Implants: anatomically contoured lateral proximal tibial periarticular plates, standard buttress plate(s) and/or locking plate(s).
- Long 3.5-mm cortical screws with 2.7-mm low-profile heads
- Periarticular plate, one-third tubular, or 3.5-mm compression plate for medial or posteromedial buttress (Schatzker Type IV)
- Distal radius 3.5-mm T-plate (old style); also useful for posteromedial side
- Mini-fragment screws and mini-fragment plates (2.0/2.4 mm) depending on fracture comminution and fracture repair requirements
- Cancellous allograft, osteobiologic bone void filler (e.g., CaPO4), cancellous allograft, or other product for subchondral support
- Long 3.5-mm cortical screws with 2.7-mm low-profile heads
- K-wires and wire driver/drill.
Surgical Approaches
- Posteromedial approach
- Positioning
- Supine on a radiolucent table.
- Elevate the extremity on a radiolucent foam ramp.
- Bump under the contralateral hip, unless sufficient hip external rotation is possible or simultaneous posteromedial and anterolateral approaches are planned.
- Can place inflatable IV bag bladders under each buttock, which can be inflated and deflated sequentially during the case when switching from one approach to the other.
- Positioning
- Incision is approximately 1 to 2 cm posterior to posteromedial tibial border, but may be more posterior if a posterior plate (rather than posteromedial plate) is needed or more anterior if a medial or anteromedial plate is required (Fig. 19-1).
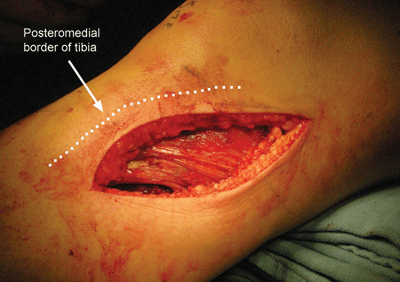
Figure 19-1. The posteromedial incision is made approximately 2 cm posterior to the tibial border, but may be made more anteriorly or posteriorly according to the fracture pattern and anticipated plate placement.
![]()
- Find saphenous vein and nerve.
- Palpate pes tendons through fascia.
- Incise fascia over medial gastrocnemius and follow this fascial incision along the posterior aspect of pes anserinus tendons (Fig. 19-2).
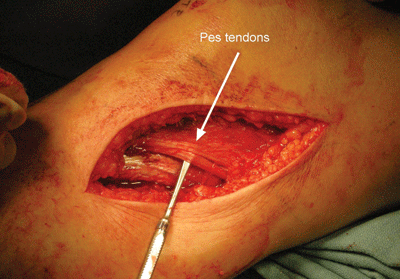
Figure 19-2. After incision of the deep fascia, the pes tendons are identified and protected, and usually retracted anteriorly.
![]()
- Work proximal to tendons, if necessary for exposure.
- Elevate the popliteus origin off the posteromedial proximal tibia, distally elevate a portion of the soleus’ origin off the posteromedial tibia.
- Placing towel bolsters under the knee and ankle lets the gastrocnemius-soleus hang freely for better fracture exposure during the posteromedial approach.
- Increased mobilization of the pes anserinus is obtained by releasing fascial bands that extend from the semitendinosus and the gracilus to the medial head of the gastrocnemius.
- Anterior retraction of the pes anserinus tendons away from the proximal medial tibia will reveal the broad tibial insertion of the superficial medial collateral ligament.
- For more anterior exposure, work in “windows” between tendons of pes anserinus.
- Placing towel bolsters under the knee and ankle lets the gastrocnemius-soleus hang freely for better fracture exposure during the posteromedial approach.
- The posteromedial plate is positioned ideally deep to the pes tendons and posterior to the posterior border and insertion of the medial collateral ligament (Fig. 19-3).
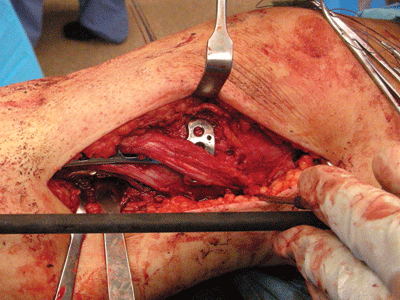
Figure 19-3. This T-plate is positioned on the posteromedial tibial surface, deep to the soleus and the pes tendons, and posterior to the insertion of the medial collateral ligament.
![]()
- The interval between the popliteus and the medial head of the gastrocnemius will lead to the popliteal artery.
- Alternatively, a plate can placed more posteriorly, rather than posteromedially, depending on the position of the fracture fragment’s apex (Fig. 19-4).
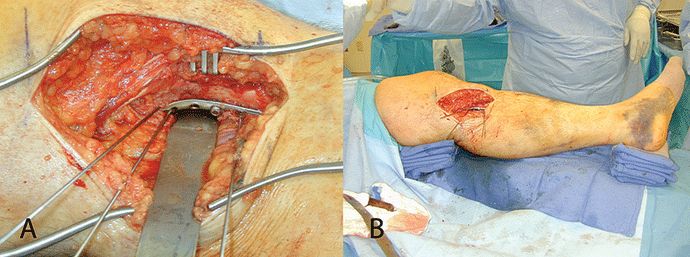
Figure 19-4. In this example, the plate is placed more on the posterior tibial surface, posterior to the hamstring tendons and the medial collateral ligament (A). Bumps under the knee and the ankle allow the gastrocsoleus to hang free to improve fracture site access (B).
![]()
- A medial arthrotomy can be performed if required for articular visualization.
- This is typically performed by following the coronal plane fracture proximally to its entry into the chondral surface of the medial plateau.
- Visualization of the articular surface is not as extensive as it is on the lateral side, as the meniscus and medial collateral ligament impede exposure.
- Anterolateral approach
- Positioning
- Supine on a radiolucent table, foam ramp under the injured extremity.
- Bump under the ipsilateral hip to internally rotate limb for true AP image of knee (so patella is pointing anteriorly).
- Can place inflatable IV bag bladders under each buttock, which can be inflated and deflated sequentially during the case when switching from one approach to the other.
- Supine on a radiolucent table, foam ramp under the injured extremity.
- Distally, skin incision is 1 to 2 cm lateral to the tibial crest, crosses the center of Gerdy’s tubercle, and is extended proximally approximately 8 cm proximal to joint line along the midaxial lateral femur at the level of the lateral epicondyle, splitting the IT band in line with its fibers.
- Incise anterior compartment fascia 5 to 10 mm lateral to tibial crest to allow for closure, elevate anterior tibialis muscle off the periosteum of the proximal tibial metaphysis, starting distally and working proximally, exposing the lateral tibial fracture line.
- Elevate the IT band anteriorly and posteriorly from Gerdy’s tubercle, working from distally towards the knee joint.
- Stop approximately 5 to 10 mm below the knee joint so as to avoid an inadvertent arthrotomy with its bulging lipohemarthrosis.
- Split the fibers of the IT band longitudinally (in line with its fibers), starting proximally (approximately at the level of the lateral femoral epicondyle).
- Working caudally, elevate the IT band off of the knee capsule both anteriorly and posteriorly.
- A Smilie retractor placed deep to the IT band can be used to pull its fibers away from the knee capsule as it bulges from hemarthrosis to prevent an unnecessary arthrotomy.
- Working caudally, elevate the IT band off of the knee capsule both anteriorly and posteriorly.
- Work distally towards the knee joint continuing to Gerdy’s tubercle.
- Place the Smilie retractor at the level of the knee joint and retract laterally and posteriorly (protecting the LCL) while releasing the posterior attachment of the IT band to Gerdy’s tubercle.
- Continue a posterior release on the proximal tibia, working posterior to the LCL (medial to the LCL and lateral to the tibial plateau and joint capsule), until the anterior capsule of the proximal tibia-fibular joint is encountered.
- The LCL is easily identified if it is placed under tension with a femoral distractor (see below).
- Next elevate the anterior IT band, again from proximal to distal, off the knee capsule and anterior tibia, continuing towards Gerdy’s tubercle.
- Below Gerdy’s tubercle, elevate the IT band and anterior compartment fascia towards the lateral border of the patellar tendon until the retropatellar fat pad is accessible.
- Lighten up on knife just proximal to Gerdy’s to avoid entering joint capsule.
- Placing a femoral distractor at this point facilitates distraction of the knee joint and permits palpation of the lateral collateral ligament, lateral joint space, tibial plateau, and meniscal rim (if present) to allow for an accurate submeniscal arthrotomy incision.
- Distraction places the knee capsule tension.
- Additionally, the LCL is placed on tension, clarifying the posterior limit of the submeniscal arthrotomy.
- Distraction places the knee capsule tension.
- Submeniscal arthrotomy, multiple sutures for retraction (Fig. 19-5).
- Positioning
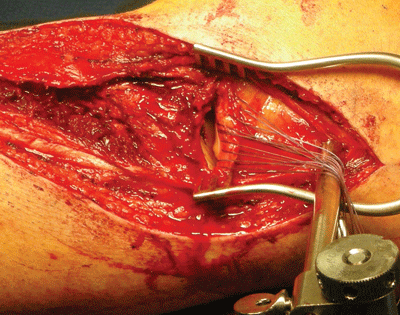
Figure 19-5. A submeniscal arthrotomy with retraction sutures in peripheral lateral meniscus and a femoral distractor (proximal pin in lateral femoral epicondyle) provide excellent visualization of the lateral tibial plateau.
- Arthrotomy should leave sufficient inferior capsule (tibial coronary ligament) attached to tibia to allow capsular repair.
- Passing capsular and meniscal sutures through plate has the disadvantage of pulling the meniscus inferiorly and away from it anatomic origin.
- Additionally, capsular disruption and meniscal injury may occur if subsequent hardware removal is necessary.
- Arthrotomy can extend anterior/medial as far as infrapatellar fat pad and patellar tendon.
- Arthrotomy can extend posterior/lateral until LCL and proximal tibiofibular joint are palpable or visible.
- Typically, the capsulotomy limit is 5 to 10 mm anterior to the popliteal hiatus.
- Occasionally, the joint will be entered and the lateral meniscus cannot be identified.
- Invariably, this is due to meniscal detachment from the lateral capsule at the meniscal “red zone.”
- The meniscus may be displaced medial to the split in the lateral tibial fracture and usually rests on the cartilage of the depressed articular segment.
- Often the meniscus is not so much displaced medially; rather the lateral split fracture component has been displaced laterally.
- Accurately narrowing the width of the tibial plateau is critical to restoring the lateral meniscal-plateau-femoral condyle relationships.
- Invariably, this is due to meniscal detachment from the lateral capsule at the meniscal “red zone.”
- A displaced meniscus can often be retrieved with a nerve hook or other curved instrument.
- A suture is placed into the peripheral margin of the meniscus and is used to continue “delivering” the meniscus laterally to accept additional peripherally placed sutures for repair to its capsular origin.
Reduction and Implant Techniques
- If a knee spanning external fixator was placed previously, prep the spanning external fixator into the surgical field to facilitate the sterile limb preparation and draping, and to minimize the risk of iatrogenic neurovascular injury.

Stay updated, free articles. Join our Telegram channel

Full access? Get Clinical Tree


