Fig. 12.1
Preoperative photograph of the surgical setup in a patient who eventually underwent the CAM procedure. Note that the C-arm is draped into the surgical field to allow for dynamic fluoroscopic examination intraoperatively
Examination under anesthesia is then performed bilaterally, specifically evaluating any range of motion limitations. In general, range of motion loss of >15° in any plane is consistent with capsular contracture. The affected motion planes are noted to aid in the planning of arthroscopic contracture releases.
The glenohumeral joint is localized with a spinal needle, and a standard posterior portal is established approximately 2 cm medial and 2 cm inferior to the posterolateral corner of the acromion. An anterosuperior portal is then created through the rotator interval and a 5-mm cannula is inserted. Diagnostic arthroscopy is then performed using a combination of 30° and 70° arthroscopes.
Glenohumeral Debridement and Chondroplasty
Following an evaluation of both the glenoid and humeral joint surfaces, an arthroscopic shaver is used for the debridement of unstable articular cartilage and degenerative labral tissues to stable borders to prevent the production of a stress riser which may lead to mechanical irritation and acceleration of joint degeneration. Microfracture is performed for focal, full-thickness chondral defects with stable borders. Loose bodies are removed using standard methods (Fig. 12.2). Particular attention is paid to the subscapularis recess, where loose bodies tend to localize. This area is best accessed with an anterior superior viewing portal and straight anterior working portal. Areas of synovial hypertrophy (Fig. 12.3) are resected using radiofrequency ablation or an arthroscopic shaver. In addition, scar tissue is removed from the rotator interval to restore the coracohumeral motion interface. The capsule is otherwise preserved at this time.
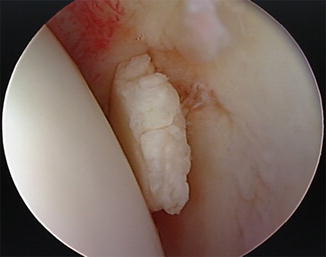
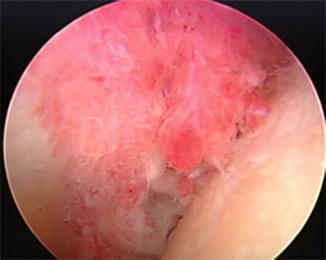
Fig. 12.2
Arthroscopic image of a loose body found upon diagnostic arthroscopy in a young patient with glenohumeral OA
Fig. 12.3
Arthroscopic image demonstrating the typical appearance of significant synovitis that ultimately underwent debridement and resection
Humeral Head Osteoplasty
Using an 18-gauge spinal needle, an accessory posteroinferior portal (i.e., low 7-o’clock portal) is established under direct visualization to allow access to the inferior axillary recess, humeral neck, and axillary nerve. The spinal needle should always enter the inferior recess near the junction of the medial and central thirds of the inferior capsule just anterior to the margin of the posterior band of the inferior glenohumeral ligament (IGHL). A small skin incision is made, and a switching stick is placed into the axillary pouch following the path of the previously placed spinal needle. Tissue dilators are inserted over the switching stick and a 5- or 6-mm cannula is inserted bluntly to avoid iatrogenic injury to the axillary nerve which runs from anteromedial to posterolateral through the inferior recess. The capsule of the axillary pouch is preserved at this point to protect the axillary nerve. When present, the intra-articular inferior osteophyte (Fig. 12.4) is then removed using a shielded, high-speed 4- or 5-mm arthroscopic bur, arthroscopic shavers, and handheld curettes. The arm is extended and internally and externally rotated during the procedure to bring all areas of the osteophyte into view or within the plane of the fluoroscope to ensure adequate bony resection. Curettes can also be used to remove hypertrophic bone from the anteroinferior areas that are more difficult to access with motorized instruments. While complete removal of hypertrophic bone is desired, this may not be possible in some cases. It is always the goal to remove enough bone to decompress the axillary nerve throughout the range of shoulder motion.
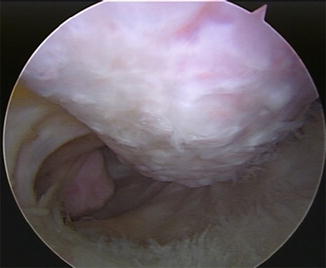
Fig. 12.4
Arthroscopic image showing a large osteophyte located on the inferior aspect of the humeral head
Inferior Capsular Release and Axillary Neurolysis
Large inferior humeral head osteophytes almost always occur in the presence of a thickened, contracted inferior capsule which limits both active and passive glenohumeral abduction capacity. Release of the inferior capsule is always performed after humeral head osteoplasty, as the intact capsular tissue can help protect the axillary nerve from iatrogenic injury [15]. Arthroscopic scissors, an arthroscopic punch, and a monopolar radiofrequency probe are used to complete this portion of the procedure. The inferior capsular release is begun posteriorly near the insertion site of the posteroinferior cannula, and the capsule is transected from proximal to distal. A blunt trocar is also helpful to establish tissue planes between the capsule and surrounding soft tissues. Once the axillary nerve is identified, dissection is carried out from proximal to distal to avoid damage to any branches of the axillary nerve. While the nerve classically has two main branches, it is not uncommon to find multiple arborations. Working from proximal to distal helps prevent damage to small distal branches of the axillary nerve as they course beneath the axillary pouch.
Axillary neurolysis is performed in patients who present with posterior or lateral shoulder pain (following the distribution of the axillary nerve) or those with evidence of nerve impingement on diagnostic images or direct arthroscopic visualization [16]. Isolated atrophy of the teres minor, best seen on T1 sagittal MRI images, suggests axillary nerve compression.
Following the inferior capsular release, the axillary nerve is identified just inferior to the junction between the middle and anterior thirds of the axillary pouch. Release of adherent tissues around the axillary nerve is performed from proximal to distal and from medial to lateral using blunt dissection to avoid inadvertent injury or irritation of the small distal branches of the axillary nerve (Fig. 12.5). It is important to maintain hemostasis during neurolysis in order to improve visualization, prevent postoperative hematoma formation, and reduce the risk of scar tissue postoperatively. Neurolysis is complete when the axillary nerve is clearly visible along its entire course between the subscapularis and teres minor muscles without soft tissue adherence or osseous impingement (Fig. 12.6). Adequate clearance is directly visualized arthroscopically during dynamic examination.
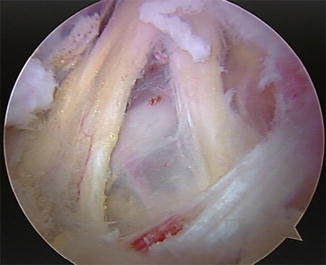
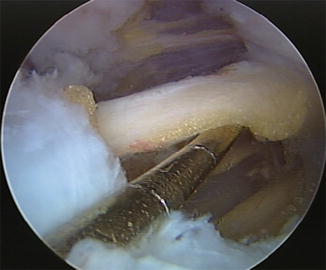
Fig. 12.5
Arthroscopic image showing the bifurcation of the axillary nerve. Neurolysis should always be performed from proximal to distal in order to mitigate the risk of iatrogenic injury to small, distal branches of the axillary nerve
Fig. 12.6
Arthroscopic image of the axillary nerve following neurolysis
Anterior and Posterior Capsular Releases
Anterior and posterior capsular releases should always be performed after osteophyte resection and axillary neurolysis to prevent fluid extravasation into the axillary space, which may limit visualization during these delicate procedures. Soft tissue releases are first performed within the rotator interval (medial to the biceps reflection pulley and inferior to the superior glenohumeral ligament) using electrocautery and a motorized shaver. The anterior capsule is released medially from superiorly to approximately the 5-o’clock position (in a right shoulder) along the capsulolabral junction. The fibers of the subscapularis muscle are then visualized. Care should be taken to avoid injury to the fibers of the subscapularis muscle (Fig. 12.7). Anterior capsular tissue is also released through the rotator interval from superior to inferior until the coracoid and coracoacromial (CA) ligament are clearly visible from within the joint.
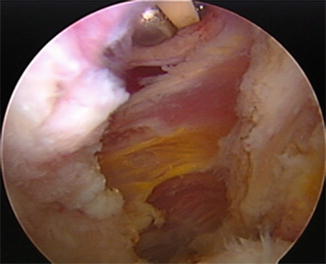
Fig. 12.7
Arthroscopic image showing the fibers of the subscapularis muscle following anterior capsular release
The arthroscope is then placed into the anterosuperior portal to allow visualization of the posterior capsule and capsulolabral junction. Using the posterior portal for instrumentation, the posterior capsule is released from inferior (approximately 7-o’clock position in a right shoulder) to superior (approximately 11-o’clock in a right shoulder) medially along the capsulolabral junction to avoid damaging the posterior cuff tendons which are situated more laterally. The posterior release is typically connected to the inferior release which was performed earlier in the procedure. Dynamic examination is then performed under both arthroscopic and fluoroscopic visualization to evaluate shoulder range of motion following capsular releases. Range of motion capacity is then compared to the contralateral shoulder. Manipulation of the shoulder can be performed at this point in the procedure to maximize functional range of motion of the shoulder.
Additional Procedures
1.


Subacromial Decompression/Acromioplasty
Related posts:


Stay updated, free articles. Join our Telegram channel
Full access? Get Clinical Tree
