Fig. 11.1
The saphenous nerve descends on the medial side of the knee, and the infrapatellar branch crosses the midline between the patella and the tibial tubercle. In this figure two branches cross the midline, which is most commonly seen. The dotted area represents the cutaneous innervation of the infrapatellar branch of the saphenous nerve (Reprinted from Kartus et al. [36] with kind permission of American Journal of Sports Medicine)
Kartus and colleagues extensively described the correlation of anterior knee pain with iatrogenic damage of the infrapatellar branch of the saphenous nerve [35–38]. They retrospectively analyzed 604 patients who underwent BTB ACLR. At 2–5-year follow-up, they found correlations between limited range of motion, sensitivity loss, and anterior knee pain [37]. They concluded that loss of motion and loss of sensitivity were the two major factors affecting anterior knee pain and knee walking ability.
Moreover, studies have reported that injury of the infrapatellar nerve is also possible during portal incision of arthroscopic knee surgery [63, 87]. One study retrospectively assessed infrapatellar nerve damage during arthroscopy and found an incidence of 22.2 % [87], while another study found that in 8 of 20 cadavers (40 %), branches of the infrapatellar nerve were located at the position of the anteromedial portal [63]. Because the infrapatellar nerve moves distally with knee flexion, these studies recommended a horizontal incision technique with the knee in flexion to minimize the risk of nerve damage.
11.3.1.2 Different Incision Techniques
With the classic single-incision technique, a vertical skin incision is made medial to the tibial tubercle approximately 0.5 cm medial of the medial edge of the patellar tendon and is extended proximally for 6–8 cm [48, 96]. The length of the incision can be minimized by using the “mobile window” concept in which the wound can be moved proximally and distally with retraction to expose the tibial tuberosity and inferior patella. The authors’ preferred technique is to make a paramedian longitudinal incision starting 0.5 cm medial to the inferior pole of the patella and extend distally to the level of the tendon insertion to the tibial tubercle (Fig. 11.2). At this point the incision is gently curved medially and distally for a further 1 cm to allow access for drilling of the tibial tunnel during ACLR. The overall length of the incision is usually between 4 and 6 cm. As mentioned above, we make full use of the “mobile window” concept, especially proximally, as the patella is mobile and can easily be delivered into the incision with the use of a Richardson-type retractor (Fig. 11.3).
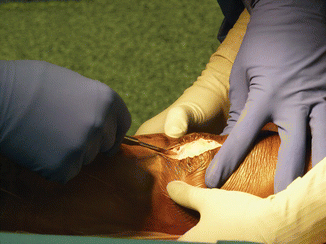
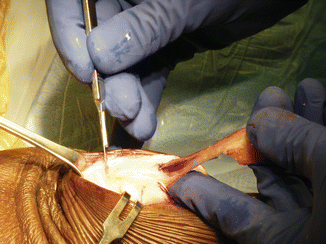

Fig. 11.2
The creation of a mobile window when making a limited incision from BTB harvest

Fig. 11.3
Delivery of the patella into the mobile window with the use of a Richardson retractor and distal traction on the patella tendon
Because this incision can compromise the aforementioned innervation and also vascularization, several authors prefer a two-incision technique to prevent donor-site morbidity [5, 27, 35, 57, 62, 74]. This technique is usually performed with two vertical incisions (Fig. 11.4) [5, 27, 35, 57, 74] although also horizontal incisions can be used [62]. With the vertical incision technique, the tibial incision is located 1 cm medial of the tibial tubercle because the tibial tunnel drill guide will be positioned through this incision. A 25-mm vertical incision is then made centered on this position. The proximal incision is located at the center of the inferior pole of the patella and is extended proximal for 25 mm. In a cadaveric study, it was shown that with this technique the prevalence of iatrogenic infrapatellar nerve injury is only 5 % [35]. In addition, with this technique the average length of preserved paratenon is 27 mm (±11 [SD]), and this is important with its role in the vascularization of the patellar tendon.
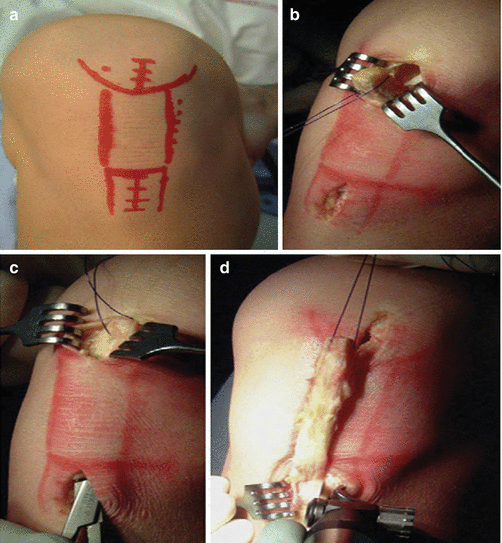

Fig. 11.4
The two-incision graft harvesting approach is shown. (a) The incision landmarks are drawn on the skin. (b) The patellar bone block with thread is harvested. (c) The paratenon is separated from the patellar tendon. (d) The patellar bone block and mid-third of the patellar tendon are drawn toward the tibial incision, and the graft is harvested via the tibial incision (Reprinted from Gaudot et al. [27] with kind permission of Elsevier)
Gaudot and colleagues compared the single-incision with the two-incision technique [27] and found that in the two-incision technique, patients reported significantly less anterior knee pain (19 % vs. 58 %), less cases of hypoesthesia (43 % vs. 89 %), and a smaller surface of hypoesthesia (4.9 cm2 vs. 11.5 cm2). In addition, Liden and colleagues assessed the incidence of anterior knee pain in patellar tendon harvesting with the vertical two-incision technique compared with hamstring tendon harvesting [45]. They found no significant difference in incidence of anterior knee pain between patellar tendon and hamstring tendon harvesting (32 % vs. 35 %, respectively).
11.3.2 Open Versus Arthroscopic
While good results of ACL reconstruction have been published using both open and arthroscopic ACLR [1, 15], we would strongly advise against the traditional open procedure of ACL reconstruction using BTB autograft. With the open procedure, the fat pad is excised in order to access the joint through the patellar tendon defect. The fat pad plays an important role in vascularity of both the patellar tendon and the patella. Moreover, the fat pad is highly innervated and is thought to be a major source of pain [12, 22]. The fat pad has a great tendency to scar, which interferes with its ability to move and deform during knee motion. The scarring process can lead to contracture of the patellar tendon and subsequent patella baja. The inability of a scarred fat pad to move out of the anterior knee recess during knee extension can cause a fixed flexion deformity. Other good reasons to prefer an arthroscopic technique is the improved ability in identifying the appropriate position for the femoral tunnel.
11.3.2.1 Vascularity
Some authors have suggested that the decreased vascularity of the remaining patellar tendon can cause anterior knee pain, extension deficits, and patellar tendon ruptures [13, 27, 51, 66]. The patellar tendon is thought to have three major sources of blood supply [66]. The antero-proximal part of the tendon is mainly vascularized by the inferior-lateral genicular artery, and the antero-distal part is vascularized by an anastomotic arch of the anterior tibial recurrent artery and the inferior-medial genicular artery. Posteriorly, the patellar tendon is vascularized by the retropatellar anastomotic arch, which is located in the fat pad (Fig. 11.5). The importance of the role of the fat pad in patella tendon vascularization was previously described [66, 83]. Furthermore, it was shown that the paratenon, a sheath surrounding the patellar tendon, plays an important role in vascularization of the patellar tendon [66, 77, 83, 92]. Therefore multiple authors have proposed preservation of the paratenon during BTB autograft harvest [3, 35, 40, 54, 66, 77]. We make a longitudinal incision in the paratenon, in the central aspect of the patella tendon with a 15 blade. Medial and lateral flaps are elevated, and the longitudinal incision is extended proximally and distally with Metzenbaum scissors, protecting the underlying tendon (Fig. 11.6). At the end of the procedure, the paratenon is closed with a running Krakow-type suture using 2-0 Vicryl.
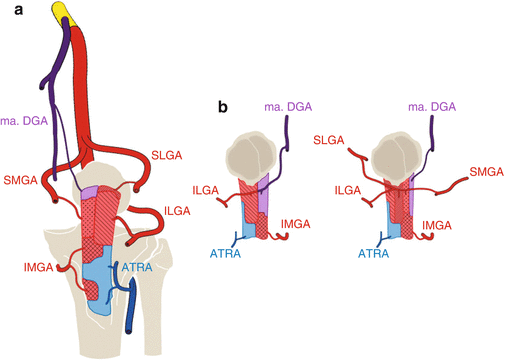


Fig. 11.5
The vascular supply of the patellar tendon is shown, (a) indicates the anterior surface of the patellar tendon, and (b) shows the two most common varieties of arterial supply of the posterior surface. Ma. DGA indicates muscular-articular part of descending genicular artery, SMGA superior medial genicular artery, SLGA superior lateral genicular artery, IMGA inferior-medial genicular artery, ILGA inferior-lateral genicular artery, ATRA ascending tibial recurrent artery (Reprinted from Pang et al. [66] with kind permission of permissions@wiley.com)

Fig. 11.6
Division and preservation of the paratenon
Other authors have suggested that decreased vascularity of the remaining patella could contribute to anterior knee pain [28, 42]. The main vascularization of the patella is from inferomedial (80 %), whereas vascularization from inferolateral (15 %) or inferior (5 %) is less common [42]. This finding has recently been confirmed by Jones and colleagues [34]. They assessed the vascularization of the patella before and after BTB autograft harvest in cadaveric knees and found that the vascularization of the patella decreased by 31 % (range 7–70 %) after tendon harvest. They suggested further clinical studies are needed to assess the relationship between patellar devascularization and anterior knee pain.
11.3.3 Patellar Tendon Incision
The incisions in the patella are made longitudinally to allow for the harvest of the central one-third of the patellar tendon. There are also reports of good results with harvest of the medial one-third of the tendon [50]. One of the major downsides of using the medial patellar third is postoperative maltracking of the patella to the lateral side [20] and subsequent alteration of patellofemoral contact pressure [17].
Before the patellar tendon is incised, the width should be measured. The width of the patellar tendon is on average 32 mm [9], and a tendon width of 10 or 11 mm is appropriate for BTB ACLR. Although it seems logical to use a larger part when the tendon is significantly wider than 30 mm, we recommend to not use a graft wider than 10–11 mm since this makes the graft impingement more likely [86]. Once the central one-third of the patellar tendon is measured, the width of the patellar tendon and the tendon-bone junctions should be marked with ink.
Two different techniques can be used for the incisions into the patellar tendon incision. One of the authors (AW) makes two single incisions with a scalpel, while the other author (DN) prefers to use a double-blade harvester (Fig. 11.7) [56]. This tendon harvester has two parallel scalpel blades, which ensure a uniform graft width from proximal to distal. Reliable results can be achieved with the two single incisions, but care should be taken to make parallel incisions to prevent variability in the width of the graft. This risk is increased when the patellar tendon is harvested with two skin incisions. In this case, scissors could be used within the paratenon to carefully extend the incision.
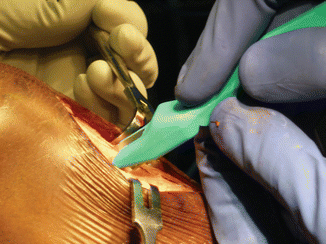

Fig. 11.7
Utilization of a double 10-mm blade to harvest the patella tendon
A few technical tips should be considered. First of all, the paratenon should be separated from the tendon and preserved as much as possible since the paratenon provides blood supply to the remaining patellar tendon [66, 77, 83, 92]. Secondly, there must be strict attention to preservation of the underlying fat pad, especially at its proximal aspect where it attaches to the inferior patella and vascularizes the patellar tendon [66, 77, 83] and the patella [34, 42]. Perforation of the fat pad proximally will also result in fluid extravasation during the subsequent arthroscopic procedure, compromising visualization. Finally, the order of incising the patellar tendon and bone block is important. When the bone blocks are sawn first and subsequently the patellar tendon is incised, it is easier to misalign the tendon and bone blocks’ edges [56]. It is safer to make the tendon incisions first and then match the edges of the bone blocks to them.
11.3.4 Bone Block Harvesting
There are some important technical considerations for bone block harvesting. First of all, saw cuts should be angled at 45–60° in order to create trapezoid-shaped bone blocks. Matava and colleagues analyzed the cross-sectional area and the ratio of the bone block diameter to the tunnel diameter with triangle, rectangle, trapezoidal, and square cross-sectional blocks [53]. They found that a trapezoidal bone block had a large surface area in the tunnel and better contact with a curved surface, which optimizes bone-to-bone healing. They also reported that using a trapezoidal bone block enabled using a smaller tunnel for the graft when compared to a square cross-sectional block. If the bone block is not the correct shape, it can easily be trimmed on the back table. In primary reconstructions usually a 9- or 10-mm bone block is sufficient.
11.3.4.1 Tibial Bone Block
With lateral retraction of the skin, the distal tendon attachment site can be visualized since the skin incision is 1 cm medial to the center of the tibial tubercle. It is essential to identify the tendon insertion point of the patella into the tibia. Through one of the tendon incisions, this can be identified, and from this point the length of the bone block can be measured distally. The usual tibial bone block length is approximately 25 mm long and is marked out using electrocautery or a knife. An oscillating saw blade is then used to make two parallel longitudinal cuts. The saw blade is angled slightly by approximately 10–20°. The cuts are started at the proximal end of the tibial tubercle and extended distally for 25 mm. A horizontal saw cut is performed to connect the two vertical cuts (Fig. 11.8). It is important for the edges of the bone block to match up with the tendon or else some of the tendon will lack bony insertion [56]. A small osteotome is then used to lever the bone block out of place. Hammering of the osteotome should never be necessary and runs the risk of causing fractures. The graft is then elevated from the fat pad with sharp dissection, and the deep surface of the bone block is trimmed using bone nibblers and sized (usually 10 mm). The bone trimmed from the bone block is saved and used to graft the patellar bone defect later. If the cancellous bone here is excessively soft then, rather than removing it, it can be pressed by using pliers to harden the bone block.
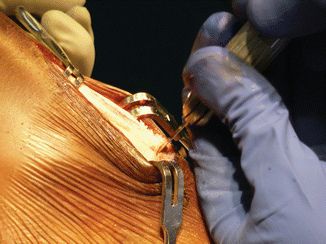

Fig. 11.8
Making the horizontal cut during harvest of the tibial tubercle bone block
11.3.4.2 Patellar Bone Block
The desired patellar block is marked out with ink or a knife. The width of the block is usually the same as the width of the harvested tendon and tibial tubercle bone block. In cases where the patella is small, the patella bone block may have to be downsized. A 10-mm saw is used for the two vertical medial and lateral cuts, and attention should be paid only to cut the cortex with the oscillating blade. The saw is angled at 45°. Some surgeons attach a depth stop to the saw blade to prevent differences in depth of drilling [56]. The depth stop aims to prevent differences in depth of sawing and therefore minimize the risk of producing points of stress concentration (“stress risers”) and subsequent patellar fractures. The depth stop will also prevent injury to the retropatellar surface from inadvertent very deep sawing. Similar attention should be paid to the horizontal cut joining the two vertical cuts. A 5-mm saw is used for the transverse cut to connect both vertical cuts. Care must be taken to use the saw to simply connect the vertical cuts because “cross-hatching” increases the risk of patellar fractures (Fig. 11.9) [56].
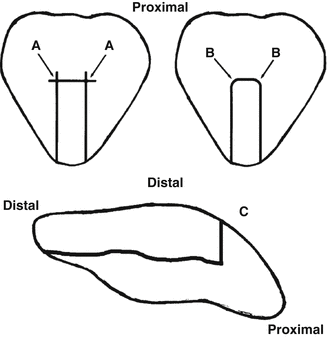

Fig. 11.9
The patella is shown with several cutting techniques. In example (a) the corners of the vertical cuts are overcut by the horizontal cut, and this can lead to stress risers and patella fractures. Example (b) shows the correct method of cutting the corners with the aid of a motorized burr. (c) Shows the depth of the vertical cuts and the horizontal cut and no overcutting is seen (Reprinted from [56]) with kind permission of Lippincott Williams & Wilkins)
The graft is then pulled anteriorly and the 5-mm saw is inserted posteriorly to the patellar tendon insertion, and the saw is used to cut the bone block out in the coronal plane (Fig. 11.10). Usually the bone plug separates and using this method will ensure minimal bone resection from the patella. If required, soft tissue connections have to be divided, and inserting a small osteotome along the posterior aspect of the bone block and along the vertical cuts will help separate the block (Fig. 11.11). Hammering should not be necessary with the correct technique since this could cause fractures.
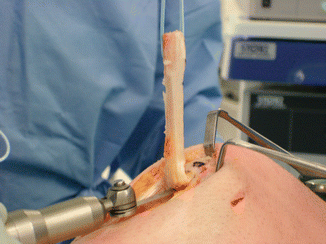
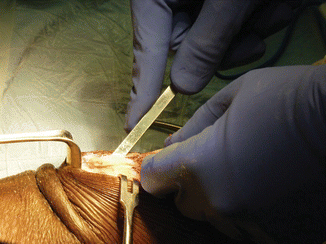

Fig. 11.10
Patella bone block being undercut to minimize bone loss and articular surface penetration

Fig. 11.11
Careful use of osteotome to lever out the patella bone block
The graft is then taken to the back table and laid out on a graft prep station. The bone blocks are first trimmed to the planned diameter (usually 9–11 mm) and length. Either rongeurs or cylindrical crimpers can be used for this task. Sizers are used to ensure accurate sizing of the bone blocks (Fig. 11.12). One of the authors (DN) prefers to use the tibial tubercle bone block in the femur due to the increased offset between the tendon and bone at the tibial tubercle insertion and hence potentially less damage to the graft when inserting the femoral interference screw. The length of this block is made to between 20 and 23 mm. The bone-tendon junction is marked with blue ink to aid the surgeon during the subsequent ACLR, as a guide to ensure that the graft has bottomed out in the femoral socket. Two equally spaced drill holes are made with a Keith needle, with the proximal hole being 5 mm from the tip of the bone block to allow for maximal control when guiding the bone block into the femoral socket. The tip is also “bulleted” to aid with graft passage. Subsequently, #5 Ethibond (Excel Ethicon, Somerville, NJ, USA) or #2 FiberWire (Arthrex, Naples, FL, USA) sutures are passed through these drill holes.
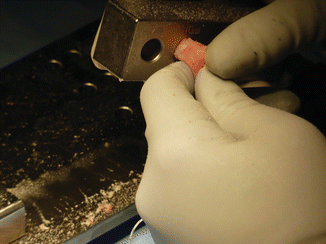

Fig. 11.12
Graft sizing is being performed to ensure easy passage of graft into tunnels during ACLR
The patella bone block is then fashioned to the planned diameter and length (usually 25 mm). Three equally spaced drill holes are made with a Keith needle, and sutures are passed as done with the previous bone block. The holes are made obliquely across the bone block, and the bony surface that is devoid of drill holes is marked with blue ink. This guides the surgeon to place the tibial interference screw along this surface, thereby preventing damage to the sutures (Fig. 11.13). The final construct is then wrapped up in a saline-soaked gauze, placed in a kidney basin and inserted into a sterile clear bag to avoid contamination.
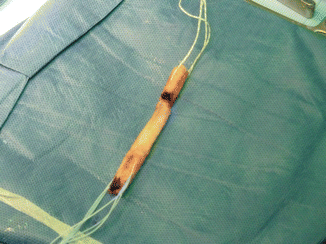

Fig. 11.13
The final BTB graft construct
11.3.5 Tunnel Length
We tend to drill the femoral socket approximately 2 mm longer than the bone block length. This allows the potential problem of buildup of bony debris in the tunnel that would block adequate seating of the graft. With long tendons we occasionally drill 5 mm longer to allow some recessing of the graft if the tibial tunnel is not adequately long.
To calculate the length of the tibial tunnel, the length of the patellar tendon graft from the base of the femoral bone block to the tip of the tibial bone block should be measured. This graft occupies the intra-articular portion plus that in the tibial tunnel. Assuming an intra-articular graft length of 25–30 mm, depending on patient size, the required tibial tunnel desired length can easily be calculated. This calculation approximates very well and should prevent large graft-tunnel mismatches. Most modern ACL tibial aiming guides help the surgeon determine the required angle of drilling for the tibial tunnel in order to establish a tunnel of the appropriate length.
11.3.6 Graft Insertion
Before the graft is inserted, the soft tissue around the external aperture of the tibial tunnel must be cleared to prevent resistance on the graft as it is pulled into place. The sutures of the femoral bone block are tensioned so that they are all under equal tension. A steady traction force is applied and the femoral bone plug enters the external aperture of the tibial tunnel. If it catches here, applying further tension is rarely appropriate. Often the plug can be manipulated with a clamp and pushed into the tunnel. Usually the traction is applied with the knee at 90°, and as a result, when the bone plug emerges into the joint cavity, it does so at a steeper angle than the sutures going through the joint to the femoral tunnel. This will tend to rotate the bone plug at the proximal end of the tibial tunnel and may cause jamming. To overcome this the knee is simply extended so that the line of the bone block is parallel to the sutures. When this does not resolve the problem, an arthroscopic hook can be used to put traction within the joint to pull the bone plug into the joint cavity. The bone block is then free to be pulled up to the femur. The arthroscopic hook is also useful when directing the bone block into the femoral socket, particularly when it has been created by anteromedial portal drilling, and is not collinear with the tibial tunnel. As long as the calculation of length is correct, as the tip of the femoral bone plug engages the aperture of the femoral tunnel, the tibial bone plug will be close to the external aperture of the tibial tunnel. The graft is then pulled into place before fixation with interference screws.
11.3.7 Graft-Tunnel Mismatch
A graft-tunnel mismatch is still reported in 13–26 % of primary cases, and in most of these cases, the graft is too long compared to the tunnel [78, 91]. It is commonly seen when a hamstring graft ACL reconstruction is revised to tendon BTB ACLR using the same tibial tunnel. Several options are proposed to deal with this problem and mainly depend on the size of the mismatch. Some authors suggested using a cutoff of 12 mm to evaluate a mismatch being rather small or large [94].
When the mismatch is noted before graft insertion and the mismatch is smaller than 12 mm of excess length, it is suggested to externally rotate the block approximately two complete revolutions which results in 25 % graft shortening [4]. Also having a femoral tunnel longer than the femoral bone block will allow some recessing of the graft into the femur to take up length.
If after graft insertion a relatively small mismatch is noted with some of the tibial bone block protruding from its tunnel with a minimum of 15 mm of bone block left within the tibial tunnel and good bone quality, the protruding portion of bone block can simply be excised after fixation with an interference screw. This screw will pass across the bone block but also fix the soft tissue. It is therefore important to use an interference screw with soft thread to prevent the risk of damaging the graft. If there is a suture remaining in the bone block within the tibia, this can be used to provide supplementary fixation by means of a posting screw or suture anchor.
If the mismatch is greater, a “free bone block technique” can be used in which the bone block is removed from the tendon, the free end of the tendon is whipstitched, and the bone block is slid alongside the tendon in the tibial tunnel and secured with an interference screw while maintaining tension on the intratendinous sutures [91, 94]. The bone block can also simply be removed, thereby giving a graft with a single bone block at the femoral end and soft tissue to bone fixation at the tibial end. Another option is rolling the distal block back onto the tendon and suturing the block to the tendon thereby shortening the graft by the length and thickness of the bone block [33]. With a really large mismatch, a bony trough can be created in the tibia distal to the external aperture of the tibial tunnel. The bone block of the distal graft can be recessed into it and fixed with staples.
If the graft is too short, it is important to first ensure that the femoral bone block has not been pulled in excessively, by checking the tendon-bone junction arthroscopically. The junction should usually be at the femoral tunnel aperture into the joint. It is helpful to view this arthroscopically by marking the tendon-bone junction with blue ink during graft preparation. If the graft is in the correct position within the femoral tunnel and the mismatch is a few millimeters, then the graft can be tensioned with the sutures and the screw can be introduced carefully into the tibia. The safest option is to place the screw away from the tensioning suture to avoid cutting the sutures as previously described. If the sutures fail, there are three scenarios. If at the moment of suture failure most of the screw is already inserted and good fixation is noticed, a prominent screw can be accepted with a view to early removal at 12 weeks postoperatively if needed. If the screw has barely been inserted and fixation is inadequate, the tibia overlying the tunnel has to be “de-roofed” to expose the graft for retrieval. In a case of a large mismatch and a graft up the tibial tunnel, a decision can be made not to use interference screw fixation and to tie the tibial bone block sutures over a posting screw or an anchor. In worst-case scenarios, a different graft should be considered [94].
11.3.8 Grafting of Bone Defects
Fragments of bone removed from the bone blocks and drilling are impacted in the patellar bone defect. When harvesting the tibial tubercle bone, we deliberately harvest the graft with a V-shape at the apex deep to provide good amount of cancellous bone for later bone grafting. The small fragments of bone from the drilling provide a “grout” to hold the larger fragments in place. The scrupulous collection of these bone chips is usually enough to fill the tibial defect as well. If this is not sufficient, an osteotome can be used to elevate cancellous bone from deep in the tibial harvest site to fill the defect. While the patellar bone defect needs to be filled flushed with the surface of the patella, it is important to realize that the tibial defect only needs to be filled as far as the anterior extent of bone and not up to the anterior extent of the tendon.
One of the authors (DN) routinely uses a “coring” reamer (Arthrex, Naples, FL, USA) when drilling the tibial tunnel. This particular reamer preserves the reamed tibial bone as a cylinder within the reamer, which can then be removed and fits almost perfectly into the patellar bony defect (Figs. 11.14 and 11.15).

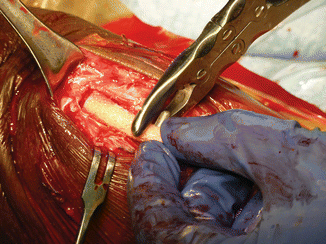

Fig. 11.14
The cylindrical “core” of bone that is generated from a “coring” reamer after drilling of the tibial tunnel

Fig. 11.15
The “core” of bone usually fits perfectly into the patellar bone defect
11.3.9 Patellar Tendon Closure
Historically, the patellar tendon was closed after patellar tendon grafting, but authors showed that, after complete closure, the patellar tendon is shortened by 10 % in 73 % of the cases [25] and this was thought to be correlated with patella baja, anterior knee pain, and crepitus [70, 89]. However, some authors questioned this shortening [58] and others showed that the patella defect could regenerate into a firm scar, and both findings led to a debate whether it was necessary to close the defect [8, 23, 46, 73].
Generally, there are three options regarding the management of the patellar tendon defect: (1) closure of both the patellar tendon and paratenon, (2) closure of the paratenon only, or (3) leaving both the tendon defect and paratenon unrepaired. A recent systematic review reported four randomized clinical trials that compared closure versus non-closure of the patellar tendon defect [24]. They found no differences regarding pain, range of motion, clinical outcome scores, and incidence of patella alta between both surgical procedures. One randomized clinical trial compared the effect of closure of the paratenon and bone grafting on patellar defect closure. Their results showed that closure of paratenon enhances healing of the patellar tendon defect and restores normal appearance of the tendon within 2 years [41]. Therefore, both closing and leaving the defect unrepaired are possible although it is advised to close the paratenon and thus optimize the vascularity and healing of the patellar tendon [48]. If the surgeon prefers to close the patellar tendon, this should be performed in 90° of knee flexion since this allows equal tension on the medial and lateral thirds of the tendon. Our preference is to close the defect with interrupted absorbable sutures [96].
Stay updated, free articles. Join our Telegram channel

Full access? Get Clinical Tree


