Fig. 10.1
Temporarily restoration of ankle function with standing, walking, or heel rises after circumferential taping of syndesmosis is considered diagnostic of syndesmosis injury
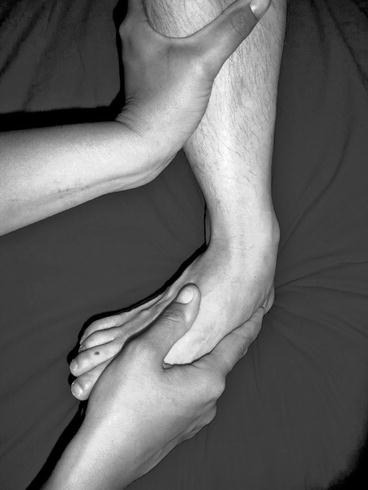
Fig. 10.2
External rotation of the foot on the leg can elicit acute pain to an injured ankle syndesmosis
10.6 Radiographs
Medial clear space, tibiofibular clear space, and tibiofibular overlap are common radiographic parameters used to measure anatomic joint alignment and syndesmosis integrity. Though commonly used, these radiographic parameters have sensitivity for identifying occult syndesmosis injuries. In a study correlating radiographic and magnetic resonance imaging (MRI) for syndesmotic injuries, only medial clear space widening greater than 4 mm correlated with syndesmotic and deltoid ligament rupture (Fig. 10.3).14
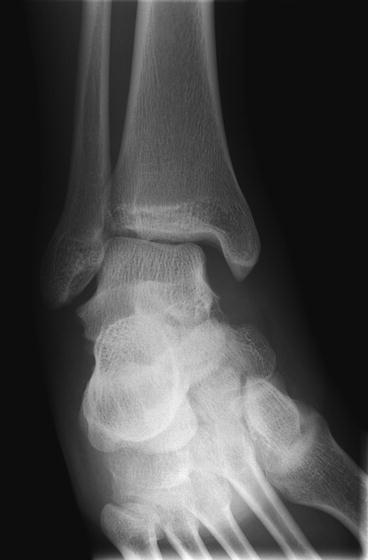
Fig. 10.3
Radiographic findings of an increased medial clear space and tibiofibular clear space widening are both indicators of both deltoid and syndesmotic disruption, respectively
10.7 Computed Tomography and Magnetic Resonance Imaging
Occult syndesmosis injuries are often subtle and difficult to identify with conventional radiographic studies in the absence of frank diastasis. Axial views of the syndesmosis from computed tomography (CT) can improve detection of syndesmotic widening by quantitatively comparing tibial fibular distance to the contralateral limb. A difference of 2 mm or greater is considered abnormal.15 Magnetic resonance imaging (MRI) can identify specific syndesmotic ligament tears with high sensitivity and specificity and can be used in conjunction with biomechanical criteria to predict degree of syndesmosis injury and level of instability.16
10.8 Stress Imaging
Stress imaging of ankle injuries can improve identification of syndesmosis injuries previously undetected by plain radiograph.17 Ligamentous insufficiency can be detected with stress testing demonstrating increased medial clear space or tibiofibular clear space widening under radiograph or fluoroscopic imaging. The lateral stress test reproduces the greatest increase in tibiofibular clear space in experimentally induced syndesmotic ligaments injuries.36 Results of stress testing may vary due to inconsistency of projection beam angle and stabilizing the proximal limb from motion during stress maneuver.
10.9 Nonsurgical Treatment
There is no consensus regarding the duration and method of treatment for nondisplaced syndesmotic injuries; however, most agree that these injuries recover well with a short course of immobilization followed by progressive stages of non-weight-bearing mobilization, resistance training, and functional rehabilitation.13,18 A period of non-weight-bearing with the foot kept in slight plantarflexion, protected in a below-knee cast or brace should be rendered. Early institution of physical and manipulative therapy has been proposed in the rehabilitation of syndesmotic injuries; however, its role remains controversial and undocumented.
10.10 Surgical Treatment
Surgical intervention for tibiofibular syndesmotic injuries is indicated if greater than 2 mm of syndesmotic widening or greater than 4 mm of medial clear space widening of the ankle mortise is identified on radiograph or stress imaging. The authors also recommend stabilization when two or more syndesmotic ligaments are compromised with concomitant deltoid ligament injury, regardless of fibular position.
10.10.1 Surgical Technique
10.10.1.1 Positioning
Patient is placed in the supine position on the radiolucent operating room table. A bump may be placed beneath the hip of the surgical limb to internally rotate the ankle allowing surgical access to the lateral ankle and proper positioning of fluoroscopic C-arm imaging. Folded blankets are used to elevate the surgical limb to avoid obstruction of contralateral limb during lateral imaging.
10.10.1.2 Reduction of the Syndesmosis
The tips of the medial and lateral malleoli of the ankle are identified. The syndesmosis is reduced by placing a reduction clamp across the medial and lateral malleoli matching the biomechanical axis of the ankle. This axis is approximately 25° from posterolateral to anteromedial direction (Fig. 10.4). Once clamp is tightened, reduction is verified with mortise and anterior-posterior views under fluoroscopy (Fig. 10.5).

Fig. 10.4
(a) Periarticular reduction clamp traverses the bi-malleolar axis of the ankle. (b) The tips of the reduction clamp are positioned approximately 20–25° posterolateral to anteromedial matching the bi-malleolar axis
Fig. 10.5
Once the periarticular clamp is tightened, fluoroscopic imaging is used to verify syndesmotic reduction
10.10.1.3 Screw Fixation
Under fluoroscopic imaging, a 2.5-mm drill hole is made from the fibula to the tibia approximately 1.5–2.0 cm superior as well as parallel to the tibiotalar joint line and angulated 25° from posterolateral to anteromedial trajectory. The cortices are tapped to avoid distraction of the fibula from the tibia when engaging the 3.5-mm screw through the third cortex and to achieve non-lag technique. The hole is measured and a 3.5-mm fully threaded cortical screw is placed tricortically maintaining the reduction of the tibiofibular syndesmosis. Two 3.5-mm fully threaded cortical screws with tricortical purchase or one 4.5-mm fully threaded cortical screw tetracortical have equivocal purchase strength.19
Screw fixation through a one-third tubular plate can increase stability of fixation by distributing the stress of screw head purchase to the fibula.20 For an isolated syndesmotic disruption without distal fibula fracture or syndesmotic disruptions with a Maisonneuve fracture, a 2-hole one-third tubular plate may be incorporated with transsyndesmotic fixation (Fig. 10.6).
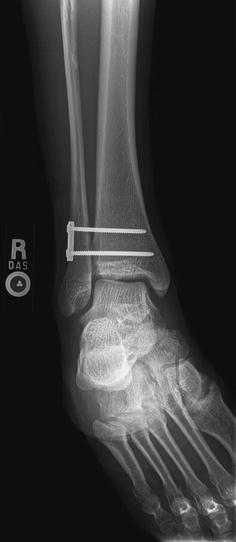
Fig. 10.6
Two 3.5 fully threaded cortical screws are placed through a one-third tubular plate to increase torsional stability and purchase of the screws
10.10.1.4 Suture Button
A proposed advantage of tensioned suture button fixation of the syndesmosis was that it did not require removal. Though mechanical studies comparing the stability of suture versus screw fixation reveal that screw fixation better resists syndesmotic widening and external rotation compared to suture, there are no significance differences with clinical outcomes of either technique.21–23
Using the same drill hole orientation as described for transsyndesmotic screw fixation and with the reduction clamp in place, all four cortices are drilled. The straight needle attached to the suture-button fixation is passed from lateral to medial through the drill hole and out of the intact medial skin while avoiding injury of the saphenous nerve and vein. The oblong button is advanced through the drill hole of the medial tibial cortex. The two medial lead sutures are pulled in opposite directions to seat the oblong button flush to the medial tibial cortex. Both lead sutures are cut and removed. The suture attached to the trailing lateral button is tensioned by pulling on either free end of the suture tightening the syndesmosis. Once the lateral button is flush to the fibula, the suture ends are secured with 4–5 ties and cut 1 cm long to allow the knot to lay flush, reducing suture prominence. Position of the buttons is confirmed with fluoroscopy. A second tightrope may be placed 1 cm proximal using the same method but divergent angle to improve rotational stability (Fig. 10.7).
Fig. 10.7
(a) Widening of the syndesmosis with decreased tibiofibular overlap is identified. (b) Suture button is shown maintaining syndesmotic reduction. (c) Suture-button fixation provides adequate stability and more physiologic rehabilitation of the syndesmosis
10.10.2 Postoperative Course
Though there is little consensus regarding postoperative weight-bearing status surgeons generally instruct patients to be non-weight-bearing for 6 weeks, then transition into a weight-bearing walking boot for 2 weeks, followed by a soft lace-up ankle brace thereafter. Despite studies reporting similar clinical outcomes whether syndesmosis screws were retained, removed, or eventually failed, the convention of practice is to remove the screws at 6–12 weeks.24–27
10.11 Rehabilitation
Early return to function is often the goal of either conservative or surgical treatment; however, timing of return may vary with the degree of injury and type of activity. Most rehabilitation programs involve three progressive phases of therapy. In the acute phase, protection of the limb by immobilization is needed to reduce the inflammatory response and pain of the acute injury or the immediate postoperative period. Goals of the second phase are to restore strength, mobility, and normal gait. Patients who are able to perform repetitive hopping without pain proceed to the final phase of rehabilitation which involves increasing strength, proprioception, neuromuscular control, and sport-specific training.2,13
Related posts:


Stay updated, free articles. Join our Telegram channel

Full access? Get Clinical Tree


