(1)
Department of Orthopedic Surgery ASAN Medical Center, University of Ulsan College of Medicine, Seoul, Korea, Republic of South Korea
Abstract
The surgical techniques of TKA demand probably the highest degree of precision. Achieving the primary purpose of TKA, which is pain relief and restoration of function with minimal complications, depends on whether or not the operation has been performed properly, and these surgical factors also affect the long-term survival of TKA.
The surgical techniques of TKA demand probably the highest degree of precision. Achieving the primary purpose of TKA, which is pain relief and restoration of function with minimal complications, depends on whether or not the operation has been performed properly, and these surgical factors also affect the long-term survival of TKA.
For a successful operation, the surgeon should be able to perform the surgical techniques appropriately based on the knowledge of anatomy and biomechanics of the knee joint. The surgeon should be experienced and he/she is also required to have an understanding of the implants to be used. Also, there should be good teamwork among the attending medical staff and the surgical environment should also be favorable.
Since the operation comprises of successive steps which are interrelated, it cannot be divided into separate procedures. But I would like to describe the successive steps here by dividing them into: drape, surgical approach, soft tissue procedure, osteotomy and bone preparation, balancing, fixation, closure, and miscellaneous techniques.
4.1 Drape
Drape is the first step to preventing surgical infection. Tourniquet should be applied as proximal as possible so that it does not slip down and the limb should be cleaned up to the toes with Betadine and alcohol. After drying, the ankle and toes are wrapped lightly with rubber gloves twice so as to allow the detection of landmarks around the ankle joint easily (Fig. 4.1). The drape should not interfere with the knee joint motion, and the topographical landmark on the hip joint should be detectable easily in case of a special situation. A sufficient amount of adhesive surgidrape is used so that the skin is not exposed at all. Alternatively, a commercially available surgical drape can be used. The operation table should be covered with a waterproof sheet. C-arm compatible operation table should be available for revision cases.
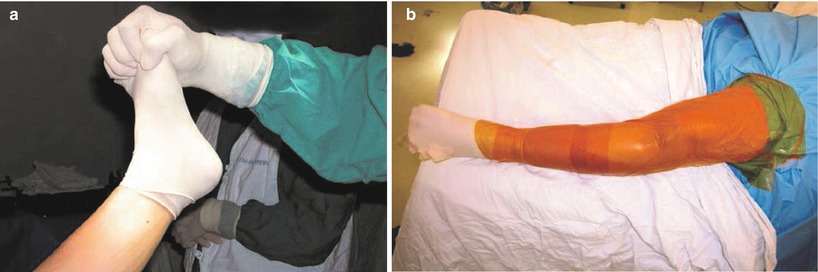
Fig. 4.1
(a) Drape on the foot and ankle, (b) after full drape
Since the knee has a tendency to rotate externally, the operation table is tilted so that the knee to be operated faces towards the ceiling.
Everyone who attends the operation should wear double gloves to prevent contamination and to protect themselves. Also, protective goggles or body exhaust suit is necessary when operating on the patients who have infectious disease.
The Esmarch bandage or elastic bandage is used to exsanguinate the limb to be operated upon, and a tourniquet pressure of up to 300–350 mmHg is applied. Theoretically, a tourniquet pressure which is either 100 mmHg greater than the systolic pressure or twice that of the systolic pressure is enough. But, in patients with obesity and bigger skeleton, a lot of bleeding from the cancellous bones and the medullary canal can occur with a tourniquet pressure that is less than 300 mmHg.
It is safe to release and reinflate the tourniquet if the operation lasts more than 90 min. The use of tourniquet contributes to provide a better operation field which enables the surgeon to perform the operation more accurately, to reduce the operation time and bleeding, and to achieve better durable cement fixation. However, Wakankar et al. reported that the operation time was not prolonged, the bleeding did not increase, and the incidences of postoperative pain, superficial infection, and deep vein thrombosis were reduced in cases in which a tourniquet was not used.
The drawbacks of tourniquet inflation are that it increases the cardiovascular blood flow to cause cardiovascular overloading with transient increase in blood pressure and may cause pulmonary edema or cardiac failure when the tourniquet is released. Other drawback is that it may provoke ischemic condition in the limb to be operated. Therefore, caution should be paid when using a tourniquet in the patients who have cardiovascular diseases or peripheral vascular problems.
4.2 Surgical Approach
The surgical approach is the first step to an operation, and it is very important as an inappropriate surgical approach makes the subsequent procedures inaccurate and difficult to perform, and a longer operation time is required, which influences the results of the operation significantly.
A poor surgical approach can cause skin and deep tissue necrosis in patients with a severe deformity, history of previous knee operation, or poor skin conditions. If any skin and soft tissue problem develops, the recovery is delayed and the prognosis becomes poor. A good surgical approach should provide adequate exposure, protect the important tissues such as vessels and nerves, preserve the function of TKA as much as possible, and provide convenience and reproducibility.
Minimally invasive surgery reduces the length of the skin incision and arthrotomy. This is further described in Chap. 10.
The anterior approach is adopted in TKA because all the important nerves and vessels are located posteriorly. In practice, the skin incision, arthrotomy, and other ancillary procedures such as the treatment of the extensor mechanism are performed independently to each other. However, most of the literature suggest as if one skin incision belongs to one arthrotomy. I would like to describe these approaches in three separate categories: skin incision, arthrotomy, and ancillary procedures to the extensor mechanism.
4.2.1 Skin Incision
Skin incision should be determined based on the subsequent exposure, extensibility, cosmesis, and wound healing.
4.2.1.1 Neurovascular Anatomy
Blood Supply
Skin incision for TKA should be done precisely to achieve good wound healing. In order to do so, it is important to know the vascular supply. The blood supply comprises of the extrinsic arteries from the outside of the knee joint and the intrinsic arteries that form a ring around the patella. The extrinsic arteries exist in the subcutaneous layer and include the saphenous artery, the descending genicular artery, and the muscular branches coming from the medial side. The intrinsic arteries exist in the subfascial layer and comprise of the medial superior genicular, the medial inferior genicular, the lateral superior genicular, the lateral inferior genicular, and the anterior tibial recurrent arteries, which together form a ring around the patella (Fig. 4.2). The extrinsic arteries mostly impact the wound healing. The vessels in the superficial layer anastomose with the deep-seated intrinsic arteries through the perforating arteries, rather than anastomosing with each other.
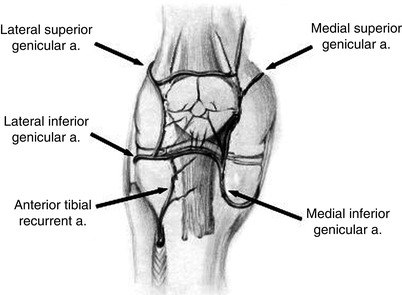
Fig. 4.2
Intrinsic arteries around the knee joint
Due to this pattern of the vascular supply, when the skin incision is made more medially, more vascular disruption occurs on the lateral side. Too much dissection of the deep fascia compromises the perforating arteries to cause a wound healing problem (Fig. 4.3). Therefore, making the skin incision too far medially and too much subcutaneous dissection on the lateral side of the incision should be avoided (Fig. 4.3).
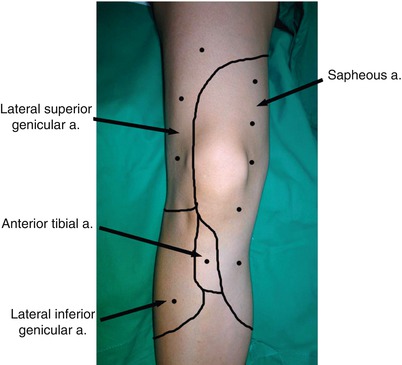
Fig. 4.3
Schematic drawing of the point where perforating arteries appear to the superficial layer from deep arteries
Nerve Innervation
In the anterior part of the thigh, the medial and intermediate cutaneous nerve of the thigh runs from the medial to the lateral side and innervates the anterior area of the thigh. On the tibial side, the infrapatellar branch of the saphenous nerve runs from the medial to the lateral side. If the skin incision is extended too proximally, the nerves of the thigh that are mentioned above are most likely to get injured. The injury to the branch of the saphenous nerve is inevitable.
4.2.1.2 Principles of Skin Incision
If a wound healing problem develops during the postoperative period of TKA, it increases the risk of deep infection as the knee joint is close to the skin and it affects the rehabilitation program resulting in a poor prognosis. Hence it is necessary to keep certain principles of skin incision.
The method of skin incision differs between the ordinary patients, patients with history of knee surgeries, and patients with a severe deformity. The skin incision in the elderly patients should be long enough so as to reduce the skin tension during retraction. The end of the incision should not be U-shaped but V-shaped on retraction. The recently introduced minimally invasive surgery should be applied to patients with no major skin problems.
The skin incision is made vertically in TKA. In the patients with history of previous knee operation, the arthroscopy portal scar may be ignored, and a transverse incision scar may not cause problems if the new incision is made perpendicular to the old scar. If the scar is small, it is recommended that the new incision should meet the old scar at an obtuse angle. If the scar is long, it is recommended to follow the existing scar as far as possible. If making an incision along the previous scar seems to compromise the operative field, a new incision can be made lateral to the existing scar. However, the distance between the new incision and the existing scar should be at least 7 cm apart. If the wound healing is doubtful with the above methods, sham incision can be considered.
If the skin has poor elasticity due to the previous surgery, it is also possible to expand the skin using a tissue expander.
4.2.1.3 Methods of Skin Incision
There are three methods of making a skin incision, and the infrapatellar branch of the saphenous nerve is cut in every method (Fig. 4.4).
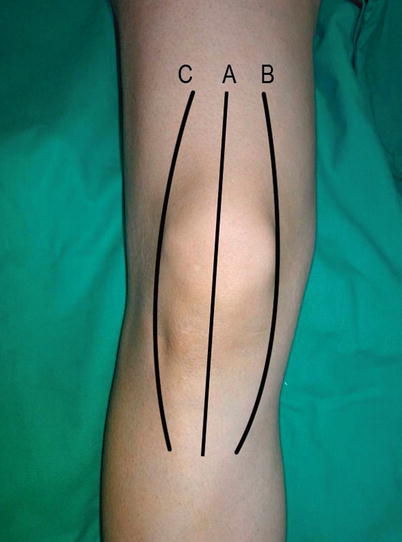
Fig. 4.4
Skin incision. A: midline, B: paramedial, C: lateral
Midline Incision
In this method, a straight incision about 12–14 cm long is made at the center of the knee joint. The proximal incision starts from 4 to 5 cm proximal to the patella and the distal incision ends at about 1 cm medial to the tibial tuberosity. A too short distal incision is to be avoided as the skin is thin and vascularity is poor in this area. When the incision is made directly over the tibial tuberosity, it can cause problems related to wound healing and pain. If the incision ends lateral to the tibial tuberosity, Yacoubian and Scott stated that it has an advantage of reducing tension on the incision scar when the tibia is internally rotated or during kneeling.
This is the most widely used incision because it can ensure a better blood supply than that provided by the paramedial incision, it is possible to perform any arthrotomy through this skin incision, it can be easily extended proximally and distally, and it can be used in revision cases.
Paramedial Incision
This is a curved incision with its center located on the medial side of the patella and its proximal and distal ends are just the same as or a little medial to those of the midline incision. It has been widely used in the past, but it often causes skin problems on the lateral side due to excessive subcutaneous dissection over the patella when the curve is too acute. Also, this incision may be difficult to use in revision TKA. Therefore, it is only used in exceptional cases.
Lateral Incision
In this type of incision, the center of the incision is located on the lateral side of the patella. This incision preserves more blood supply, but it provides poor exposure because arthrotomy also needs to be performed on the lateral side. Besides, this incision can cause orientation problems to the surgeons who are accustomed to the usual midline incision. Hence, this incision is used exceptionally for TKA in the patients with valgus deformity.
4.2.2 Arthrotomy
While performing an arthrotomy, it is important to know the distribution of blood supply around the patella. This is because various arthrotomy methods differ according to the blood supply. An anastomosis of six intrinsic arteries forms a ring around the patella. The relationship between each type of arthrotomy and arterial supply is shown in Fig. 4.5.
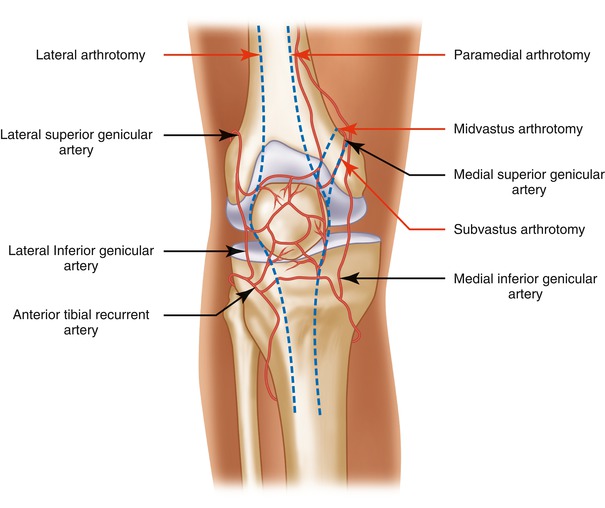
Fig. 4.5
Relationship between the arteries around the patella and arthrotomy
The arthrotomy methods include the paramedial, subvastus, midvastus, and medial trivector-retaining arthrotomy for the medial side and lateral arthrotomy for the lateral side (Fig. 4.6).
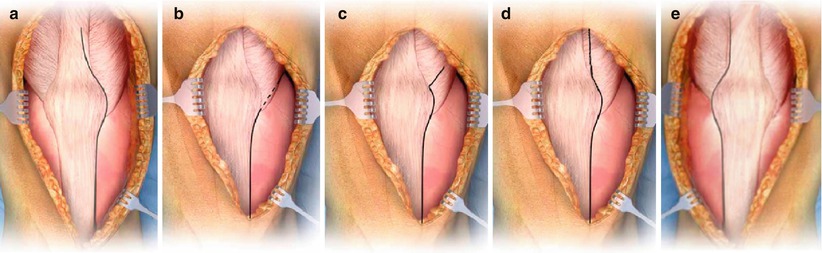
Fig. 4.6
Various arthrotomies. (a) Paramedial, (b) subvastus, (c) midvastus, (d) medial trivector, (e) lateral
4.2.2.1 Paramedial Arthrotomy (Fig. 4.7a)
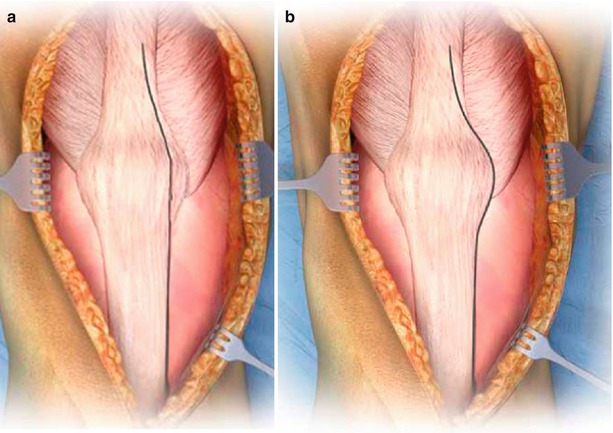
Fig. 4.7
Paramedial arthrotomy, (a) Insall method, (b) standard method
As it provides good exposure and allows for proximal extension, the paramedial arthrotomy is the most commonly used arthrotomy.
The quadriceps tendon can be incised longitudinally in the center, at the medial one-third or at the medial musculocutaneous junction. However, the quadriceps tendon is usually incised at the medial one-third because it is associated with less bleeding, less fibrosis, and less difficulty in suturing compared to that with the incision through the muscle. In fact, the width of the quadriceps tendon differs in each patient and the incision can be placed at the center or on the sides during arthrotomy according to the width of the tendon.
In the patellar area, Insall recommended peeling off a part of the anterior longitudinal fiber in order to prevent cutting of the longitudinal fibers of the extensor mechanism. But many surgeons prefer cutting at 5 mm medial to the patella because it takes less time and is easier to suture (Fig. 4.7). In the tibial portion, incision should be placed far medial to the tibial tuberosity in order to protect the patellar tendon.
The drawbacks of this arthrotomy are that when the quadriceps tendon is incised, it can cause weakening of the extensor mechanism postoperatively and it disrupts all the blood vessels on the medial side.
4.2.2.2 Subvastus Arthrotomy (Fig. 4.6b)
Subvastus arthrotomy involves blunt oblique dissection beneath the vastus medialis muscle starting from the superomedial part of the patella extending proximally up to the intermuscular septum which is located at about 10 cm proximal to the adductor tubercle, and the medial joint capsule is incised distally to form an L shape. Mostly the patella is not everted but is retracted laterally.
The advantages of this method are that the extensor mechanism is not incised, and the supreme genicular artery on the medial side of the patella is preserved. The arthrotomy method in which the quadriceps tendon is cut causes weakening of the muscle strength and increases the incidence of lateral subluxation of the patella. When the patella is not everted, it is also helpful for early restoration of muscle power. But it is known that this arthrotomy has no benefit in terms of preservation of the muscle power in comparison to the other arthrotomies at the long-term follow-up.
The drawbacks of this arthrotomy are inadequate surgical exposure and increased postoperative pain in comparison with that after the midvastus arthrotomy. The complications of this method include hematoma in the vastus medialis muscle and weakness of muscle strength when excessive retraction is applied.
This arthrotomy is not recommended in obese patients, muscular patients, patients with a history of previous knee surgery, or patients with deformity or ankylosis, as it provides poor surgical exposure in these cases.
4.2.2.3 Midvastus Arthrotomy (Fig. 4.6c)
This arthrotomy has been developed by Engh, and it involves splitting the vastus medialis muscle along its center starting 4–5 cm proximal to the superomedial portion of the patella. The arthrotomy is extended distally by incising the insertion area of this muscle to the patella and the medial joint capsule. Distal incision is located either on the medial side of the patellar tendon or on the medial 1/4 of the patellar tendon. The patella can be everted or retracted laterally.
The advantage of this method is that the quadriceps tendon in the proximal portion of the patella and one-half of the vastus medialis muscle are preserved. Thereby, the extensor mechanism is maintained and the blood supply to the patella is preserved to some extent. The vastus medialis muscle is innervated by the saphenous nerve which is a branch of the femoral nerve. This nerve remains undamaged in this arthrotomy as it enters near the origin of the vastus medialis muscle. Also, the superior genicular artery has two branches and proximal one of them is preserved as it anastomoses with the highest genicular artery (descending genicular artery). So, the blood supply is relatively well preserved.
This arthrotomy allows for full retraction or eversion of the patella and can be extended to a rectus snip. Engh states that this arthrotomy can be utilized in obese patients, patients with severe deformity, or in revision cases in which this arthrotomy had been done previously, provided the knee can be bent more than 90°.
However, there are reports that this approach has problems of poor orientation of surgical field, bleeding, and decrease of muscle power. White et al. reported that the incidence of lateral retinacular release was lower with this arthrotomy than the paramedial arthrotomy, and benefits of this arthrotomy were seen for the first postoperative 6 months in terms of postoperative pain and leg elevation, which became similar to those with the paramedial arthrotomy thereafter. Meanwhile, Keating et al. reported that there was no difference in the prognosis between the midvastus arthrotomy and the paramedial arthrotomy.
4.2.2.4 Medial Trivector-Retaining Arthrotomy (Fig. 4.6d)
The most common complication of TKA is abnormal patellar tracking. The theoretical background of this arthrotomy is that most of the maltracking occurs due to the imbalance of the quadriceps muscles. If the incision passes through the center of the quadriceps vector, the forces that naturally stabilize the quadriceps tendon are balanced and this helps to normalize the patellar tracking.
This method was designed by Bramlett et al. who stated that the center of the quadriceps muscle vector is on the vastus medialis muscle about 1.5–2.0 cm medial to the quadriceps tendon.
In this arthrotomy, the vastus medialis muscle is vertically incised about 1.5–2.0 cm medial to the quadriceps tendon, and the incision is extended distally to 1 cm medial to the patellar tendon and to the tibial tuberosity in order to maintain the intrinsic stability of the vastus medialis muscle.
This method resembles the paramedial arthrotomy anatomically and the midvastus arthrotomy biomechanically.
The disadvantages of this arthrotomy are that the blood supply from the medial side is interrupted and the vastus medialis muscle is incised. Bramlett et al. reported that the complications of the extensor mechanism were found only in 0.5 % of cases in which this arthrotomy was used.
4.2.2.5 Lateral Arthrotomy (Fig. 4.6e)
This arthrotomy was first introduced by Keblish and involves a lateral incision on the skin and opening the joint on the lateral side of the patella. This arthrotomy is used exceptionally in patients with a valgus deformity. The skin incision is made on the lateral side of the quadriceps tendon, patella, and patellar tendon following the Q angle and ends at the medial edge of Gerdy’s tubercle, which is 1–2 cm lateral to the tibial tuberosity. However, a standard midline skin incision can be used with the distal incision ending at the lateral side of the tibial tuberosity.
Keblish’s lateral approach comprises of six steps from making a skin incision to the closure including soft tissue balancing according to the degree of deformity. This is because the knee joint cannot be visualized only with the lateral arthrotomy in patients with a valgus deformity, and tissue necrosis can be reduced when soft tissue management is performed in conjunction with the arthrotomy. When the paramedial arthrotomy is done in patients with a valgus deformity, it may aggravate the existing external rotation deformity of the tibia, cause problems in patellar tracking, and increase the risk of peroneal nerve injury or infection. Approaching the lateral structures in valgus deformity is difficult with the use of paramedial arthrotomy and requires an additional release of the lateral retinacular ligament, which increases the risk of circulatory disturbance from both the medial and lateral sides during the operation. The first step is to release the iliotibial band (ITB), because ITB is the main structure that causes the valgus and external rotation deformity of the tibia. The second step is arthrotomy with Z-plasty of the lateral retinacular ligament in the coronal plane. In patients with a valgus deformity, it is possible to perform coronal Z-plasty due to hypertrophy of the lateral retinacular ligament. The third step is to dislocate the patella. The fourth step is to release the soft tissues on the lateral side of the tibia from Gerdy’s tubercle. The fifth step is to release the lateral collateral ligament, popliteus tendon, and posterolateral capsule. The sixth step is to close the wound.
The advantages of this arthrotomy are that it allows the deformed site to be approached directly, it helps in better preservation of the blood supply, and it allows for natural release of the lateral retinacular ligament during arthrotomy. Its other advantages are that it reduces skin dissection which results in lesser skin problems and allows for gradual release of the soft tissues.
Its drawbacks are that it does not provide a good operation field on the medial side, makes eversion of the patella difficult, and is associated with the problem of disorientation for the surgeons who are accustomed to the medial approach, and the soft tissue defects on the lateral side cannot be repaired. In other words, it is a good method for correcting a valgus deformity and for releasing the contracture of soft tissues on the lateral side naturally, but it may cause more problems when performed by the inexperienced surgeons.
Buechel proposed three steps of lateral arthrotomy according to the degree of valgus deformity. This is described in Sect. 5.2.1.2.
4.2.3 Ancillary Procedures
Ancillary procedures are performed when sufficient surgical exposure is not possible due to severe deformity or ankylosis in primary TKA, and when the desired range of motion (ROM) cannot be achieved due to quadriceps contracture, or sufficient surgical exposure is difficult in cases of revision TKA.
When eversion or retraction of the patella is not possible, the first step is to extend the incision proximally followed by cutting the lateral patellofemoral ligament (Fig. 4.8) and the lateral joint capsule, or releasing the lateral retinacular ligament in advance.
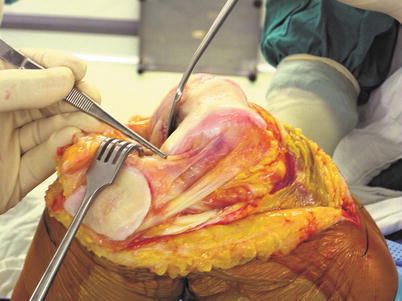
Fig. 4.8
Release of the patellofemoral ligament
If the patella cannot be everted or adequately retracted laterally despite of the above methods or injury to any portion of the extensor mechanism is likely, ancillary measures to the extensor mechanism are needed. Alternatively, ancillary procedures may be performed right from the beginning in difficult cases.
The methods of managing the extensor mechanism include rectus snip, multiple puncture, Z-plasty or V–Y quadricepsplasty, and tibial tubercle osteotomy. Comparing the three ancillary methods to the extensor mechanism, the rectus snip is the modest technique with good results and lower morbidity, and hence it is recommended in most of the cases. While comparing between tibial tubercle osteotomy and quadriceps turndown, Barrack et al. reported that quadriceps turndown offers a better range of motion and has a higher patient satisfaction. Whereas with tibial tubercle osteotomy, although the muscle power is preserved, it makes kneeling difficult and is followed by pain which makes many of the patients feel that the operation has failed.
Subperiosteal peel is a method of extensive medial release in case severe medial contracture is noted.
4.2.3.1 Rectus Snip (Fig. 4.9)
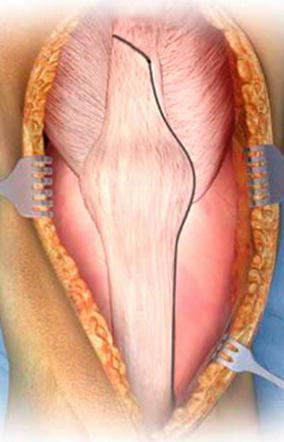
Fig. 4.9
Rectus snip
Rectus snip includes cutting (snipping) the rectus femoris muscle at the musculotendinous junction. This method was developed by Coonse and Adams and was modified by Insall.
The benefit of this method is that it is simple, the integrity of the vastus medialis muscle is maintained, and the superolateral genicular artery is preserved. So, extension lag rarely occurs postoperatively. This is the modest and the most conservative ancillary method to manage the extensor mechanism in revision and ankylosed knee.
The quadriceps tendon is cut superolaterally at an angle of 45° from the proximal end of the medial arthrotomy (Fig. 4.10). But it may be extended inferolaterally according to the level of the medial incision or may be extended superomedially from the lateral side in the lateral arthrotomy.
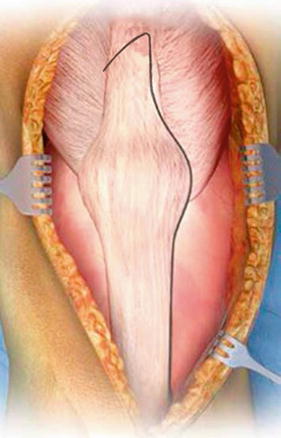
Fig. 4.10
Modified rectus snip
If a rectus snip is not enough for adequate exposure, the cut can be extended distally to the lateral side, and this makes the arthrotomy similar to the quadriceps turndown technique except for the shape and level of proximal apex. Lateral retinacular release is sometimes performed along with a rectus snip to preserve the superolateral genicular artery.
After rectus snip, immobilization in the extended position is required for 3 weeks postoperatively.
4.2.3.2 V–Y Quadricepsplasty (Quadriceps Turndown; Fig. 4.11) and Z-Plasty
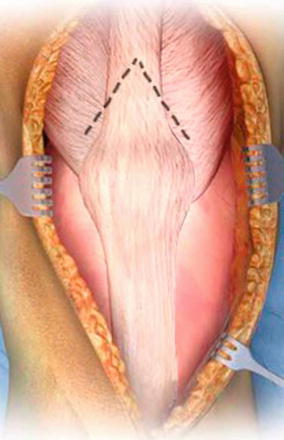
Fig. 4.11
V–Y quadricepsplasty
V–Y quadricepsplasty was developed by Coonse and Adams and it also allows for elongation of the extensor mechanism. This method can be modified into various types based on the shape of the incision over the quadriceps tendon. The Z-plasty is another form of quadriceps turndown which is performed to lengthen the quadriceps tendon. The patella can be turned down after Z-plasty. Both the V–Y and Z-plasty ensure good exposure, but the V–Y is more recommended because it elongates the tendon more gradually.
V–Y quadricepsplasty has been used when eversion of the patella is not possible after a rectus snip, the range of flexion is less than 60°, or the overall arc of motion is only 30–40°.
The drawbacks of V–Y quadricepsplasty are that the blood supply to the patella is disrupted, thereby increasing the incidence of avascular necrosis of the patella, and the strength of quadriceps muscle is inevitably weakened or an extension lag develops.
Therefore, too much elongation of the extensor mechanism is not recommended, and meticulous suturing together with allograft augmentation may be needed.
During postoperative care, ROM exercises should be restricted for about 6–8 weeks.
4.2.3.3 Tibial Tubercle Osteotomy (Fig. 4.12)
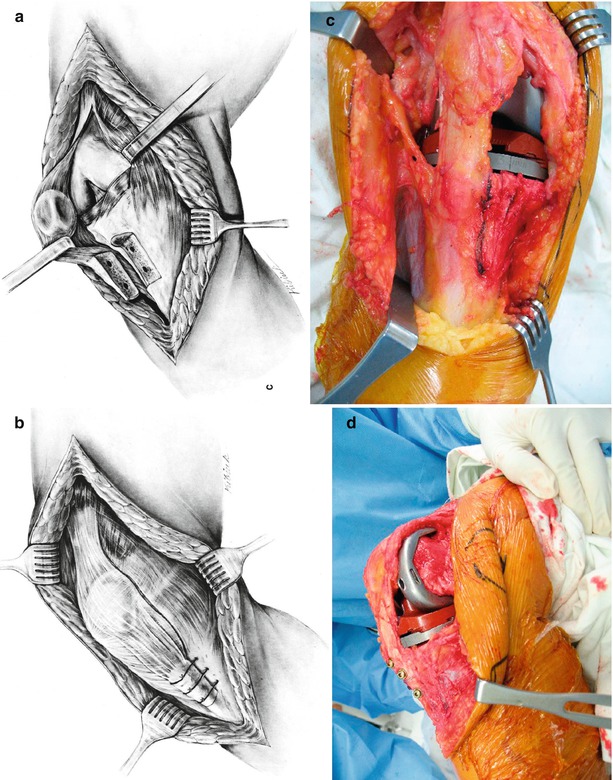
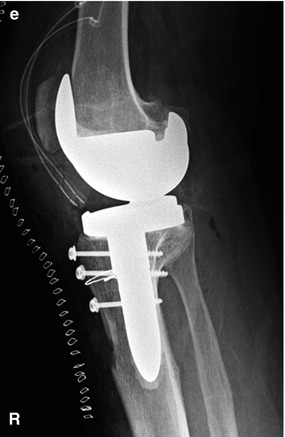
Fig. 4.12
Frontal and lateral views of tibial tubercle osteotomy. Left schematic drawings of wiring method (a, b) and right photographs show screw fixation method. (c) Osteotomy, (d) after fixation, (e) postoperative X-ray
This method was originally developed by Dolin, but the method that is being used as of now has been modified by Whiteside.
It is useful for patients with severe contracture of the quadriceps tendon or fibrotic ankylosis. The benefits of this method are that it can provide a good exposure, the position of the tibial tubercle can be adjusted, and it can be used to remove the tibial component during revision surgery. Also, it allows for early rehabilitation and maintains the strength of the quadriceps muscle as a result of bone-to-bone healing.
The drawbacks of this method are the possible complications, such as postoperative pain, nonunion of the osteotomy site, fragment fracture, patellar tendon rupture, infection, and it is a time-consuming method.
The bony fragment should be about 3 in. in length, 2 cm in width, and 1 cm in thickness on the thicker side. The distal part may be gradually beveled to reduce the incidence of tibial fracture.
During osteotomy, it is important to preserve the blood supply by not detaching the periosteum from the bone on the lateral side. If screws are used for fixation, fracture of bony fragments may develop, so it is recommended to use wires. Three wires are used most of the times and wire holes may be drilled for fixation before performing the osteotomy. The topmost wire may pass through the bony fragment to prevent slipping, and the two lower wires are fastened from the outer side for application of a compressive force. Postoperative care is not different from that after the usual TKA.
4.2.3.4 Subperiosteal Peel (Fig. 4.13)
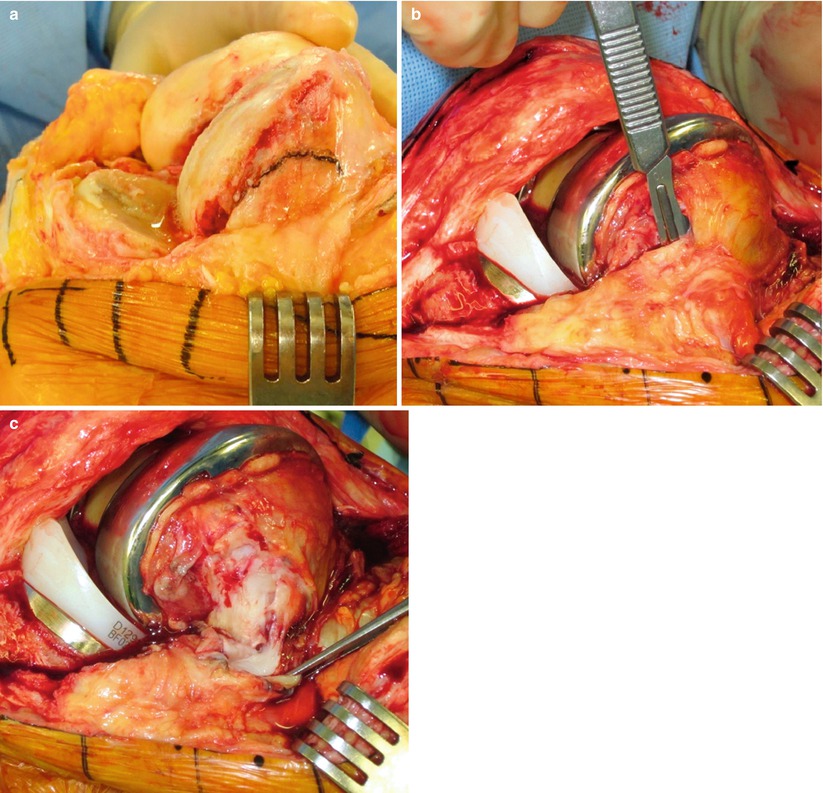
Fig. 4.13
Subperiosteal peel. (a) Planning, (b) subperiosteal peel, (c) after peel
The soft tissue envelope is peeled off from the distal femur in the form of continuous sleeve along with the origin of medial collateral ligaments and is retracted posteriorly, allowing the distal femur to be buttonholed.
This exposure was first described by Windor and Insall. Combined with the medial subperiosteal dissection of the proximal tibia, this method allows the knee to be flexed without the danger of damage or injury to the important soft tissue structures. The technique is useful for long-standing ankylosis of the knee joint, for reimplantation after infection, and in other difficult cases. The risk associated with extensive subperiosteal peel is devascularization with subsequent osteonecrosis of the condyle. As such, extensive subperiosteal release should be reserved for only the most extreme cases.
Author’s Method

With respect to the surgical approach, I usually use the midline skin incision and paramedial arthrotomy. They are simple to perform, provide a good exposure, have reproducibility, and do not cause serious problems even with lateral retinacular release. Therefore, they are suitable for most of the TKAs. I do not hesitate to extend the distal skin incision to minimize skin tension during the operation.
Paramedial arthrotomy is performed not by using the straight Insall’s arthrotomy, but by using a curved incision which is located 5 mm away from the medial border of the patella. The lateral patellofemoral ligament is incised when it is too tight during patellar eversion. If the patella cannot be everted, I perform lateral retraction of the patella or release of the lateral retinacular ligament in advance.
Forceful eversion of the patella may cause the patellar tendon to be stripped off from the tibial tubercle, or rupture of the patellar, or quadriceps tendon, or fracture of the patella may develop. This tends to happen more often in patients with advanced rheumatoid arthritis or severe osteopenia. I use pins, miniplate, or special instruments in these patients to prevent stripping off of the patellar tendon.
I have experienced some inconveniences while performing subvastus arthrotomy.
In patients with a valgus deformity, I have tried the lateral approach, but have experienced difficulties because I was not familiar with this approach. I perform the ordinary paramedial arthrotomy even in severe valgus deformity.
Among the ancillary methods, I believe that the rectus snip is the most recommended method. In case of V–Y turndown, the quadriceps tendon was weakened to a great extent. Even in cases when I reinforced the tendon with a tendon allograft, an extension lag or extensor weakness developed. When I did tibial tubercle osteotomy, the operation became more complicated and more time consuming, and the patients were not very satisfied.
4.3 Soft Tissue Procedure
4.3.1 Cruciate Ligament Treatment
Even though the posterior cruciate-retaining (CR) type is intended to be used initially, the posterior-substituting (PS) type should be used when the posterior cruciate ligament (PCL) shows severe degenerative changes or looks abnormally thin. If the PCL is tight, a recession can be considered after the insertion of trial implants.
If the PS type is used, the posterior cruciate ligament may be removed at any time, but it is generally removed during tibial osteotomy or before femoral notch cutting. However with the use of a mobile-bearing joint, the PCL should be removed after tibial osteotomy and before starting femoral osteotomy for proper gap balancing. Since the middle genicular artery is cut during resection of the posterior cruciate ligament, it is recommended to coagulate the bleeding focus immediately.
4.3.2 Meniscectomy
The medial meniscus is so firmly attached to the deep medial collateral ligament that the boundary between the two is not clear to the naked eye. Excessive resection of the medial meniscus can weaken the deep medial collateral ligament and too little resection hinders the performance of the surgical procedure and causes impingement.
The lateral meniscus can cause impingement when it is resected to a lesser extent, and the lateral inferior genicular artery can be injured thereby increasing the bleeding when more amount of lateral meniscus is resected. Since this artery runs around the boundary of the lateral meniscus, it can be cut longitudinally. Hence, cauterization of every bleeding point should be done immediately after the lateral meniscectomy (Fig. 4.14).
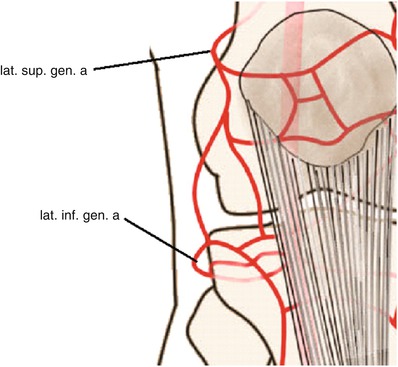
Fig. 4.14
Course of the lateral inferior genicular arteries (arrow)
If the joint space is too narrow for performing lateral meniscectomy, preliminary medial release can be performed in advance in order to make performance of the lateral meniscectomy a little easier.
4.3.3 Soft Tissue Release
Mediolateral balance should be achieved through soft tissue release on the tibial side if there is a varus deformity or on the femoral side if there is a valgus deformity. The reason for the soft tissue release on the femoral side in case of a valgus deformity is to reduce the risk of peroneal nerve injury.
The ligaments should be released vertically and left in the form of a sleeve instead of cutting them transversely. First, all or part of the deep medial collateral ligament (MCL) should be released in most of varus deformities so that the tibia can be translated anteriorly and externally rotated. After the preliminary release of the superficial MCL, final balancing is performed during checking the balance or after insertion of the trial implants.
4.3.4 Fat Pad Removal
The fat pad is supplied by the superior genicular artery. The amount of fat pad to be retained in order to preserve the blood flow may be a controversial issue. If the fat pad can be retained too much in order to preserve the blood flow, but this may interfere with the surgical procedure and cause pain due to impingement and scar formation. Hence, removal of a certain amount of fat pad is inevitable for a better exposure and to prevent impingement postoperatively. Lemon et al. reported the occurrence of patella baja when a large amount of fat pad has been removed. However, in patients with a valgus deformity, it is necessary to preserve the lateral fat pad to cover the lateral portion of the joint.
4.3.5 Removal of Posterior Soft Tissues
Soft tissues in the posterior joint space not only restrict the joint motion but also cause pain due to impingement. The posterior space should be clean for achieving better ROM (Fig. 4.15). It is easier to remove these tissues after osteotomy. There can be remaining menisci, loose synovial tissue, and some fibrotic tissue in the posterior space.
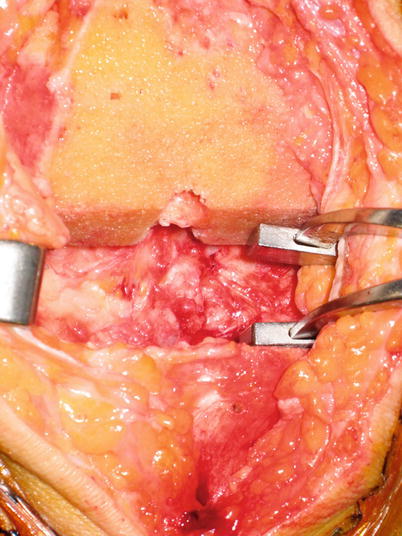
Fig. 4.15
A clean posterior space after the removal of soft tissues
Author’s Method

After resection of the ACL, I perform a medial meniscectomy. The medial meniscectomy starts from the midportion, 1–2 mm away from the peripheral border. On the anterior part, the incision should not extend along the shape of the meniscus but should extend straight anteriorly and distally so that all the anteromedial soft tissues can be removed at this time. This is because these tissues not only interfere with the operative procedure but also cause anterior impingement postoperatively.
The posterior portion of medial meniscus cannot be removed at this time and the remaining meniscus is removed after osteotomy (Fig. 4.16).
Fig. 4.16
Adequate amount of medial meniscal resection
After this, preliminary release of the MCL is performed for better visualization of the lateral side. I perform medial release by pushing down a periosteal elevator into the posteromedial corner and turning its handle anteriorly to 90°. After this, further medial release is performed by palpating the tight ligamentous structure.
The lateral meniscectomy is performed starting from the hiatus. The anterior portion of the hiatus is resected along the shape of the meniscus and the anterior horn is detached. A complete meniscectomy is performed by pulling the detached anterior horn anteriorly.
This is followed by removal of the fat pad. When the patella is everted, a groove is found between the fat pad and the patellar tendon. The scissors are inserted into the groove and then opened. The fat pad located above the scissors is removed. By doing this, the fat pad can be safely removed without damaging the patellar tendon.
After forceful eversion of the patella, any remaining fat pad over the lateral plateau is removed (Fig. 4.17).
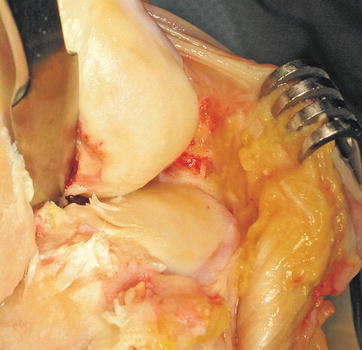
Fig. 4.17
Operation field after appropriate fat pad removal
If bleeding is noted at the lateral meniscectomy site during this procedure, every bleeding point is coagulated.
PCL resection can be done at any time of surgery. Generally, I perform PCL resection after femoral osteotomy for fixed-bearing joint and after tibial osteotomy and before femoral osteotomy for mobile-bearing joint.
When the CR type is used, particular attention is paid to protect the PCL. Sometimes, I create a bony island at the point of PCL attachment site. I do not recess the PCL because PCL recession has critical drawback: the tension is unreliable and the ligament markedly weakens even with minor recession.
I perform soft tissue removal in the posterior joint space meticulously after osteotomy of the femur and tibia.
4.4 Osteotomy and Bone Preparation
Osteotomy and bone preparation is the most critical step for alignment of implant, balancing of the joint, and secure fixation of prosthesis in arthroplasty, which starts from choosing the right size of the implant.
Osteotomy should be highly reproducible, but it is prone to errors not only due to incorrect alignment but also due to the technical problems during installation of instruments or during osteotomy. In soft bones, the instrument can displace during sawing and drilling. In hard bones, the instrument may be positioned incorrectly during fixation or less amount of bone cutting may occur during osteotomy due to deviation of the saw blade.
Use of the navigation system increases the reproducibility by reducing errors caused due to incorrect alignment, but malalignment cannot be prevented if osteotomy is not done properly.
4.4.1 Osteotomy
4.4.1.1 Differences in Technique According to the Resection Method
The method of osteotomy is largely divided into the measured technique and the tension technique (gap technique).
The measured technique was the traditional method of osteotomy for the CR type. The basic concept is to resect the bone of the same thickness as that of the implant thickness in order to maintain the anatomical joint line. For example, if the thickness of tibial plate plus PE is 10 mm, the amount of tibial resection plus meniscal thickness should also be 10 mm. The amount of femoral condylar osteotomy is approximately the same as the thickness of the femoral prosthesis.
This method was designed based on the assumption that the ligament is balanced if the amount of osteotomy performed is the same as the thickness of the prosthesis. Hence the size of the implant is important. Theoretically, the posterior cruciate ligament (PCL) should be intact and soft tissue balancing should be done after osteotomy. Currently, however, various shapes and sizes of implants are available and new surgical techniques have been developed. So, the measured technique is used regardless of the PCL retention and soft tissue balancing is sometimes done before osteotomy.
The benefit of this method is that it is easy and convenient to perform osteotomy, whereas its drawback is that osteotomy of each bone is done independently causing soft tissue imbalance.
The tension technique was used when there were limited sizes and shapes of femoral implants available in the early stage of the PS type. This technique prevents over-resection of the posterior condyle of the femur and the flexion gap is adjusted through appropriate tibial resection.
In this technique, all spurs are removed from the beginning, the ligament is balanced before osteotomy, and osteotomy is performed according to the flexion and extension gap balance. Thus, osteotomy of the femur and tibia is correlated sequentially. Although the procedure may differ from surgeon to surgeon or from implant to implant, most of the times, the procedure starts with a tibial osteotomy. The external rotation of the femur is automatically determined by the tension technique. This method makes ligament balancing easy, but often inadequate-sized implants are used for ligament balancing. The joint line is elevated as the distal femur has to be resected more in order to widen the extension gap in a flexion contracture. And there may be instability in mid-flexion if the posterior joint capsule is tight as the ligament balancing test is done in 90° flexion and full extension state.
In brief conceptually, in the measured technique, the amount of osteotomy is determined according to the size of implant and ligament balancing is independent of the osteotomy. In the tension technique, the amount of osteotomy varies according to the ligament balance and no further ligament balancing is needed after osteotomy. Both these techniques have their advantages and drawbacks, and the current osteotomy technique is done in combination of both the techniques (Fig. 4.18).
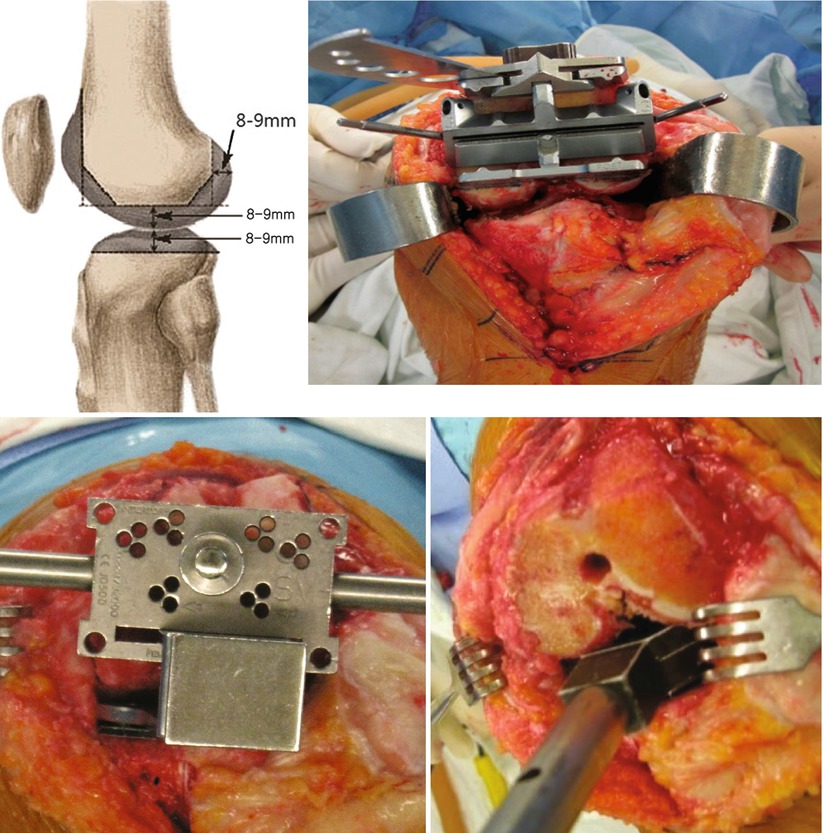
Fig. 4.18
Comparison between the measured technique and the tension technique. The top images show the measured technique. The thickness of osteotomy is nearly the same as the thickness of prosthesis. The bottom images show tension technique. Osteotomy is done according to ligament tension
4.4.1.2 Concept of Alignment
Mechanical Alignment
Alignment is critical for long-term survival of the implant regardless of the osteotomy method. Alignment includes coronal, sagittal, and rotational alignment. For ensuring correct alignment, it is necessary to consider the mechanical aspect based on the anatomy.
In the coronal plane, the line from the center of the femoral head to the center of the talus is called the mechanical axis. In TKA, most of the surgical techniques focus on this mechanical axis with the aim so as this axis to pass through the center of the knee joint.
The axis extending along the femoral and the tibial shaft is called the anatomical axis. In the femur, the angle between the mechanical and anatomical axes is about 6° (4–7°), whereas the two axes are coincident in the tibia.
However in an upright position, the center of weight transmission is actually on the medial side of the femoral head and the angle between the gravity line and the mechanical axis is about 3°. Therefore, the angle between the gravity line and the anatomical axis is 7–10° in the femur. The point where the gravity line falls upon the knee joint depends on the pelvic width, femoral neck offset, and the length and shape of the femur and tibia.
If the gravity line falls at more than 5 mm to the medial side, more than 40–70 % of the weight is transmitted onto the medial side. This is one of the reasons why osteoarthritis is found more often on the medial side.
The tibial plateau is inclined in varus by 3°, in order to be able to bear the weight more effectively (Fig. 4.19).
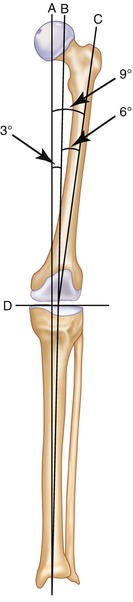
Fig. 4.19
Anatomical and mechanical axis of the limbs. A: Gravity line, B: mechanical axis, C: anatomical axis of femur, D: tibial articular surface. A − B = 3°, B − C = 4 − 7°, B − D = 93°, A − D = 90°
Green et al. reported, based on their cadaveric study, that in a varus osteotomy, stress was concentrated on the posteromedial portion of the tibial plateau, and a lateral thrust was noted. The structures that prevent the lateral thrust include the joint capsule, arcuate ligament, lateral collateral ligament, popliteus muscle, and posterior cruciate ligament.
If the limb is aligned physiologically in TKA, the wear may progress rapidly on the medial side just like osteoarthritis occurs more often on the medial side of the joint. Also, if the structures that resist lateral thrust are weakened by arthritis or operation, the lateral thrust cannot be prevented, thereby causing instability and accelerating the wear.
In summary, osteotomy is designed such that the mechanical axis falls upon the center of the knee joint so as to reduce the PE wear and loosening. This is not physiological, but it is the mechanics of TKA.
A mild varus alignment is acceptable since it is physiological. Also, in patients who have had medial compartmental arthritis due to a varus deformity since their young age, the axis may have got adjusted according to their lifestyle, and hence it is questionable whether it is desirable to align the limb according to the mechanical axis in these patients. Bellemans et al. reported 32 % of men and 17 % of women have constitutional varus which had varus alignment since they reached skeletal maturity, and restoring neutral alignment in these cases may be abnormal and undesirable.
On the contrary, valgus alignment should best be avoided. Valgus alignment may cause walking disturbance along with cosmetic problems. In obese patients, it is important to limit the amount of valgus to 5° so as to avoid contact of the medial soft tissues of the both thighs.
Interestingly, Mullaji et al. suggested the importance of hindfoot alignment and that hindfoot alignment should be reflected in the overall alignment. They emphasized that limb alignment after TKA should reflect the ground mechanical axis. In hindfoot valgus deformity, the axis passes lateral to the center of the knee joint even though tibiofemoral alignment is correct, and this could have implications on the long-term survival of the implant.
In the sagittal plane, the mechanical axis is a line from the center of the hip to the center of the ankle. However, since weight shift is so marked by the knee and ankle motion, there is no fixed theory about the sagittal axis.
Axial alignment affects extensor mechanism and ROM, and femoral rotation is closely related with mediolateral gap in flexion state.
Kinematic Alignment
The concept of kinematic alignment was introduced by Howell and Hull. Kinematics refers to the relative relationship of the femur, patella, and tibia at any flexion angle without application of force to the knee joint. About 20 % of patients are not satisfied with the conventional mechanical alignment method because of continued pain and poor functioning in activities of daily living. They emphasized that kinematic alignment can reduce the loss of flexion and extension motion, stiffness, instability, pain, and prolonged recovery associated with mechanical alignment.
For the kinematics of a TKA to be the same as that of a normal knee joint, the three-dimensional placement of the femoral and tibial components have to be chosen so that the orientation of the three kinematic axes is unchanged from the normal knee joint.
After acquisition of MRI scans, three-dimensional arthritic knee model and normal knee model are generated. Shape matched patient-specific cutting guides are made on the basis of the transverse axis around which the femur flexes and extends, the transverse axis around which the tibia flexes and extends, and the longitudinal axis around which the tibia rotates internally and externally. The osteotomy planes corresponding to the positions of the femoral and tibial components in the normal knee model are transferred onto the arthritic knee model. After shape matching of the femoral component to the restored articular surface of the femur, there are just four subsequent steps to restore motion and to balance the knee joints: osteophyte removal, adjusting the tibial cutting plane, releasing the posterior capsule off the femur, and medialization or lateralization of the tibial component. For this purpose, single radius femoral component is an optimal design.
However, there are some controversies regarding this concept. First, this method cannot be used without the patient-specific template system. Second, kinematic alignment is used despite of the fact that normal kinematics is altered due to the sacrifice of the ACL and both the menisci. Third, the kinematics without weight bearing is different from that with weight bearing. Fourth, ligament balancing can be achieved by sacrificing the alignment, although there are reports that the mechanical axis in kinematically aligned TKA is similar to that in conventional and computer-assisted TKA. Finally, there are no reports of clinically established long-term results.
Resection Technique for Ensuring Mechanical Alignment
Based on the mechanical alignment, there are two osteotomy methods for ensuring mechanical alignment in the coronal plane: the classic method and the anatomical method.
The classic method was introduced by Lotke and Ecker in which distal osteotomy of the femur and proximal osteotomy of the tibia are performed perpendicular to the mechanical axis, and then the soft tissues of the knee joint are balanced thereafter. In this method, the line from the center of the hip joint to the center of the ankle joint passes through the center of the knee joint. In other words, since the discrepancy between the mechanical axis and anatomical axis is a 4–7° of valgus in the femur, a 4–7° valgus osteotomy is performed perpendicular to the mechanical axis. Even though the articular surface of the tibia has a 3° varus, osteotomy perpendicular to the tibial axis makes the mechanical axis to pass through the center of the knee joint (Fig. 4.20a).
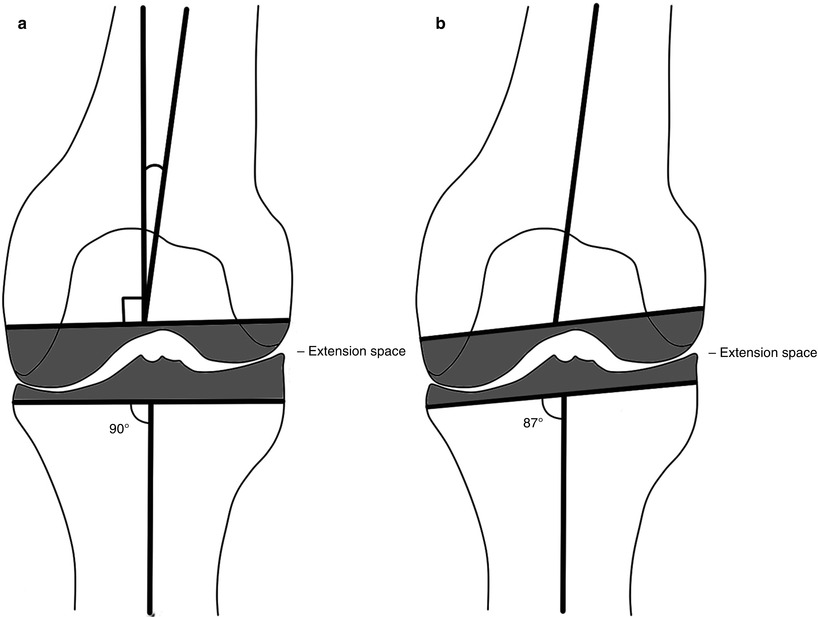
Fig. 4.20
Classic and anatomical method of osteotomy. (a) Classic method, (b) anatomical method
As the human eyes are accustomed to the perpendicular or parallel angle, perpendicular cutting can be done almost similarly on every occasion. This is the most commonly used method as it ensures high reproducibility.
On the other hand, the anatomical method was developed by Hungerford et al. and is used mostly for the CR type (Fig. 4.20b). As the tibial plateau has a 3° varus, this method consists of varus cutting of the tibial plateau at 3° and an additional valgus cutting at 3° from the mechanical axis of the femur, resulting in a total valgus cutting of femur at 7–10°. This method reflects the ground force more biomechanically. But as mentioned before, it lowers reproducibility to result in more than 3° of varus tibial osteotomy and may damage the lateral collateral ligament and/or popliteus tendon due to excessive valgus osteotomy on the femoral side.
In any method, the mechanical axis passes through the center of the knee joint and the tibiofemoral angle is 6° ± 1–2° valgus.
On the other hand, some surgeons recommend 5–6° of femoral valgus osteotomy routinely, since in most of the cases the difference between the anatomical and mechanical axis is 5–6°.
In the sagittal plane, there is no definite theory and the angle of osteotomy varies slightly according to the implants. Usually femoral osteotomy is performed according to the anatomical axis of the distal femur. The mechanical axis can also be considered in the sagittal plane, but it is very difficult to perform the osteotomy along the mechanical axis as most of the instruments are designed to fit the anatomical axis. Furthermore, the center of gravity shifts markedly according to the motion of the knee and ankle joints during walking, and the knee tends to be hyperextended due to anterior bowing of the femur. In navigation surgery, anterior notching develops frequently when the osteotomy is performed according to the mechanical axis, since the implant and the instrument are adjusted according to the anatomical axis of the distal femur.
The posterior slope of the tibial articular surface is known to be 10° in the sagittal plane, but some surgeons state that the posterior slope of the lateral condyle is less than 10° (Fig. 4.21). Others state that even though the posterior slope is 10°, it is actually less than 10° considering the menisci. They emphasize that there is no posterior slope as the posterior horn of the meniscus is thicker than the anterior horn.
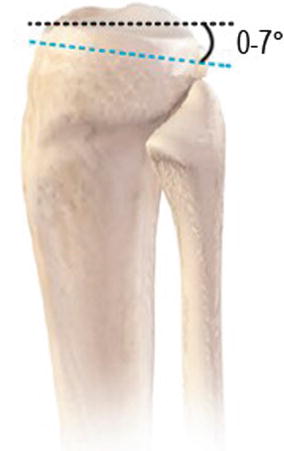
Fig. 4.21
Posterior slope of tibial resection
The posterior slope affects the range of motion to a great extent. Bellemans et al. reported the result of a cadaveric study which suggested that an average increase of 1.7° knee flexion was noted for every degree increase in the posterior slope. According to the Bellemans’ report, the knee joint can get 17–20° more flexion by increasing the posterior slope by 10°.
If the anterior and posterior thickness of the PE is almost the same, the posterior slope of 10° is too great. In particular with the PS type, posterior slope of 7° or more imposes too much stress on the post to cause an early post wear. The recommended degree of posterior slope varies from implant to implant, and it is mostly between 3 and 7°. However, it is often set at 0° when using extension stem.
The fibula is known to be parallel to the tibial axis in the sagittal plane, and it is believed that cutting perpendicular to the fibular axis in the sagittal plane is similar to cutting perpendicular to the tibial axis.
Rotational alignment greatly affects patellar tracking and femoral rotation is closely related to the flexion gap. Hence, these two factors should be considered in rotational alignment. This has been described in more details under “External Rotation” in this chapter.
Author’s Opinion

I think femoral valgus osteotomy of more than 9° in the coronal plane is to be avoided even when the angle between the anatomical and mechanical axes is more than 9°. This is because the LCL and popliteus tendon is likely to be injured and the mechanics of flexion and extension can be altered by too much valgus osteotomy of the distal femur.
Also, I am not in favor of performing an osteotomy according to the mechanical axis in the sagittal plane, since the weight shifts markedly according to the knee and ankle motion on walking in the sagittal plane. So the mechanical axis is less meaningful in the sagittal plane than in the coronal plane.
In the sagittal plane, the extensor mechanism and flexion–extension motion of the knee joint are more important. Hence, osteotomy in the sagittal plane should be performed according to the anatomical axis of the distal femur and the design of each prosthesis.
Another opinion is that the center of flexion–extension motion is different from the mechanical center, since the posterior part of the femur and the tibia plays a major role not for the weight transmission, but for the joint motion. In other words, the point of weight transmission falls anterior to the center of flexion–extension motion. Thus, the center of the knee joint in navigation system is not the center of the mechanical axis in the sagittal plane. This is the reason why anterior notching develops more often after navigation surgery.
4.4.2 Osteotomy of Each Bone and Preparation for Fixation
Osteotomy and preparation for fixation can be started from any bone. Most of the surgeons start the osteotomy from the femur except in the case of a mobile-bearing joint.
4.4.2.1 Femur
Removal of Spurs
It is necessary to remove the spurs before osteotomy. By removing the spurs, it becomes possible to select the correct implant size, balance the ligament accurately, remove the source of pain, and achieve a better ROM. In particular, spurs buried under the superficial MCL should be completely removed for correct ligament balancing.
Also, the spurs on the articular surface of the medial condyle of femur project too far distally in severe osteoarthritis, and these spurs keep the cutting guide away from the articular surface during distal cutting, which results in less distal osteotomy. Hence, they need to be removed so as to be able to perform distal osteotomy accurately (Fig. 4.22).
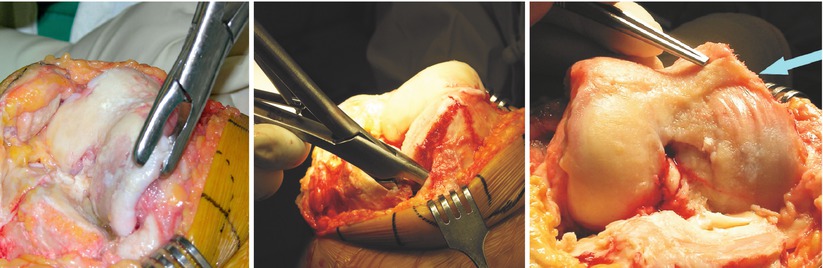
Fig. 4.22
Spur removal before femoral osteotomy. The left image shows removal of the peripheral spur. The middle image shows removal of the spurs hidden beneath the medial collateral ligament. The right image shows spurs in the tidemark in the articular surface of the medial femoral condyle. These spurs should be removed before osteotomy for correct implant size, ligament balancing, more ROM, and accurate distal osteotomy
The spurs on the posterior condyle impinge on the PE and hence reduce the ROM. These spurs should also be removed after femoral and tibial osteotomy for achievement of a better ROM. In the PS type, the composite of trial implant of the tibial plate and the PE should be inserted smoothly into the posterior side (Fig. 4.23 ) in a flexed position.

Fig. 4.23
The reason why the posterior spurs (arrow) interfere with flexion and its X-ray
Axial Alignment
An intramedullary guide or an extramedullary guide may be used for coronal alignment, but it is difficult to point out the landmark of the hip joint with an extramedullary guide and hence its accuracy is decreased. It is only used when an intramedullary guide cannot enter into the medullary canal such as THA on the ipsilateral side, the presence of IM nailing, severe deformity of femoral shaft, or patients with an extremely small skeleton.
The pilot point of the intramedullary guide is 5–10 mm anterior to the notch on the A–P and at the center or slightly medial to the center mediolaterally (Fig. 4.24). This is because the anatomical axis of the femoral shaft falls at this point. Even though the pilot point is located at the center, a slightly lateral placement of the prosthesis is recommended for better patellar tracking. The more posterior is the entry portal, the greater is the anterior angulation of the prosthesis. Mihalko et al. suggested inserting the intramedullary guide as posteriorly as possible. By doing so, osteotomy is performed more anatomically, notching is prevented as the prosthesis is angulated anteriorly, and flexion motion is increased.
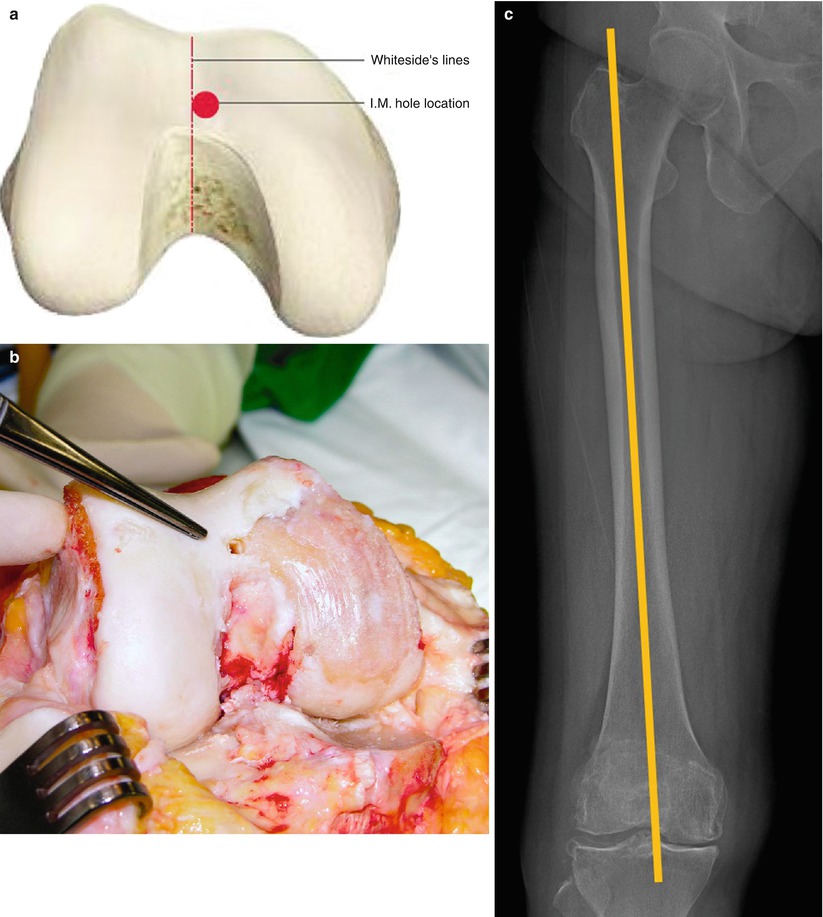
Fig. 4.24
Point of insertion of an intramedullary guide in the femur. The point is a little medial to the center. (a) Schematic drawing, (b) operation findings, (c) the reason why the point is a little medial to the center
Reaming
It is desirable to use a reamer that minimizes the risk of fat embolism, especially when performing a simultaneous bilateral operation or when using an intramedullary guide in the femur and the tibia concomitantly. Ries et al. reported that larger flute-shaped reamers would reduce the risk of fat embolism. Adequate reaming should be performed so as to be able to insert the alignment guide smoothly. It is desirable to insert the guide gently and to suction out the contents of the medullary canal when inserting the guide rod after reaming.
Author’s Method

When reaming, I recommend not to apply excessive force and I allow the reamer to follow naturally the path of the medullary canal. In order to do so, it is recommended to hold the reamer with just the thumb and the index finger.
I do not perform reaming currently, but I take out a bone plug using the bone harvester which I have designed and then I widen the medullary canal with a trocar which is used in IM nailing (Fig. 4.25). Before insertion of the medullary guide, I perform suction routinely.
This method has certain benefits especially in reducing the intramedullary pressure and reduce the incidence of fat embolism. The bone plug is reinserted with the bone fragment or is wrapped with Surgicel® (Johnson and Johnson Medical, Arlington, TX) for a tight fit into the canal just before cement fixation in order to block bleeding from the medullary canal.
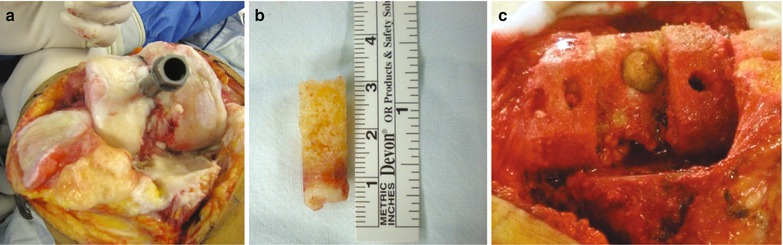
Fig. 4.25
Harvesting the bone plug (a), harvested bone plug (b), reinserted bone plug (c)
External Rotation
The amount of external rotation of the femur is related to patellar tracking, mediolateral balancing in flexion, and the axis of flexion–extension motion. If femoral rotation is inaccurate, patellar tracking is adversely affected causing patellar subluxation/dislocation and anterior knee pain. Flexion instability and changes in the axis of flexion–extension motion due to poor rotational alignment may cause eccentric wear and loosening of the prosthesis.
As the landmarks are not clear and each patient has a unique bony anatomy, it is not so easy to determine the amount of external rotation. Anyhow, the femur should not be internally rotated and the amount of external rotation should be determined specific to each patient. However, Scott stated that external rotation of the femur does not affect patellar tracking as much as expected, and he accepted internal rotation of the femur for mediolateral balancing in flexion in case of a valgus deformity, and he recommended adjustment of patellar tracking by adjusting the position of prosthesis or by other techniques.
The methods for determining external rotation include the transepicondylar method, transcondylar method, Whiteside’s line, and transtibial or ligament tension method.
In the transepicondylar method, both the epicondyles are the references, while in the transcondylar method both the posterior condyles are the reference. In Whiteside’s method, a line perpendicular to the patellar groove is used. The transtibial method implies cutting perpendicular to the tibial axis, and the ligament tension method uses ligament tension after tibial osteotomy. The transtibial method and the ligament tension method are often regarded as one and the same (Fig. 4.26).
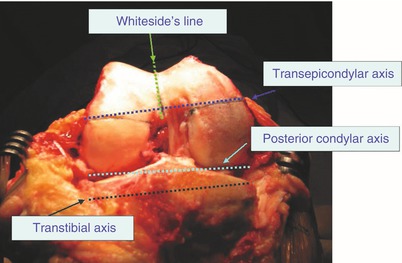
Fig. 4.26
Different guidelines for external rotation
These methods are used differently according to the gap technique and the measured technique. In the anterior reference system (ARS) of the measured technique, the external rotation is usually determined by the use of the transepicondylar or transcondylar method and the anterior osteotomy is done first. Whereas in the posterior reference system (PRS), generally distal osteotomy is performed first and external rotation is mostly predetermined at 3° by the instrument. In the gap technique, external rotation is determined by the ligament tension after tibial osteotomy.
The transepicondylar method is the most ideal method since both the epicondyles are the attachment sites of the collateral ligaments and they accurately reflect the axis of flexion and extension motion. It is often used when there is a valgus deformity or the shape of the condyle is abnormal, i.e., in revision. However, it is not very easy to locate the epicondyles and this is time-consuming. The lateral epicondyle is easier to locate since it is pointed, but the medial epicondyle is blunt. Berger et al. divided the medial epicondyle into two: one is the clinical epicondyle to which the superficial medial collateral ligament (MCL) attaches and the other is the surgical epicondyle where the sulcus between the deep MCL and the superficial MCL is located. They reported that the discrepancy in the transepicondylar axis between the two points was an average 4.7° in men and 5.2° in women. The average discrepancy between the surgical transepicondylar axis and the transcondylar axis was 3.5° in men and 0.3° in women.
Generally, the condylar vessel passes through the ridge to which the superficial MCL is attached anteriorly and proximally. Hence, the condylar vessel helps in identifying the accurate location of the clinical medial epicondyle. To locate the clinical medial epicondyle, the synovial tissues should be peeled off around the medial epicondylar area so as to identify the condylar vessel (Fig. 4.27).
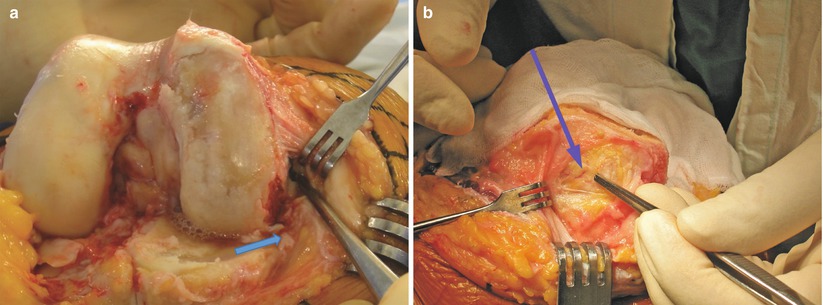
Fig. 4.27
The location of the medial epicondyle. (a) Superficial MCL is retracted and the arrow indicates deep MCL. The blue line (forceps) is sulcus line which is indicative of surgical medial epicondyle (left). (b) The line beneath the blue arrow is the condylar vessel and the forceps indicates the clinical medial epicondyle (right)
Stoeckl et al. reported the results of a cadaveric study by four surgeons, which suggested that the position of the medial epicondyle varied from surgeon to surgeon. Wai Hung et al. also reported the results of comparison between ten cadavers and CT findings which suggested that there was an average difference of 2.6° between the examiners.
Most of the surgeons prefer the transcondylar method as it is convenient. Three degrees of external rotation is preferred by most of the surgeons or 3° of external rotation is fixed by the instrument. However, the use of this method may lead to errors due to wear of the articular cartilage in severe osteoarthritis, and it is difficult to use this method if there is a severe deformity or a bone defect. If the articular cartilage in the posterior portion of the medial condyle is worn out, more amount of external rotation is achieved by this method. The posterior condylar axis and the transepicondylar axis are known to have a difference of 4–7°, although it varies from surgeon to surgeon. So, many surgeons state that it is not enough to set the angle of external rotation at 3° in all patients. Berger et al. reported that the difference is about 3.5° in a cadaveric study, while Cho et al. reported a difference of about 4.8° by measuring the axes through computerized tomography (Fig. 4.28). Assuming that the cartilage of the medial condyle is worn out in severe medial osteoarthritis, 3° external rotation by the transepicondylar method may correctly reflect the true transepicondylar axis.
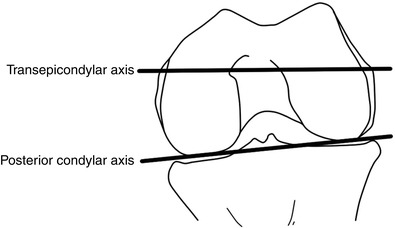
Fig. 4.28
The angle between the transepicondylar axis and the posterior condylar axis
Whiteside’s line defines a line connecting the deepest part of the trochlea and the center of the intercondylar notch, and a line perpendicular to it is generally aligned with the transepicondylar axis. However, there is significant variability in the anatomy of the trochlear groove, and this method may be inaccurate if there are excessive spurs in the notch area or when there is condylar dysplasia.
The transtibial method with cutting perpendicular to the tibial axis is similar to the ligament tension technique (gap technique), if the ligaments are balanced. The ligament tension technique is often used in a mobile-bearing joint in which the soft tissue balancing is utmost important. Osteotomy is generally started from the tibia followed by anterior and posterior cutting of the femur. Therefore, the amount of external rotation is automatically determined according to the osteotomy of the tibia and tension in both the collateral ligaments (Fig. 4.29). When mediolateral balance is established by the ligament tension technique, it results in less than 3° of external rotation in some cases, but good patellar tracking can be achieved most of the times.

Fig. 4.29
Determining external rotation in the ligament tension technique. The concept of transtibial method is similar to that of the ligament tension technique
Seon et al. stated that the transepicondylar method is the most ideal, but the ligament tension technique is more convincing as there are anatomical variances among the patients. Katz et al. reported that the axis of flexion and extension was maintained most reliably in the ligament tension method and there was a tendency for excessive external rotation with the transepicondylar axis compared to the ligament tension method. Fehring et al. reported that 45 % of cases showed at least 3° malrotation with the methods other than the ligament tension method. With respect to ligament balancing, Dennis et al. reported that the condylar lift-off is less common in the external rotation determined by the ligament tension technique than in the external rotation determined by the anatomical landmark. In this aspect, the ligament tension technique is gradually becoming the standard method for determining the external rotation.
However Hanada et al. stated that patellar tracking became worse by the ligament tension method due to shifting of the patellar groove to the lateral side, and a varus deformity was seen in 90° flexion with the external rotation determined by the ligament tension technique.
In order to achieve good patella tracking and mediolateral balance in flexion state, the surgeons’ experience based on one or two of the aforementioned methods is the best way to determine the external rotation, while keeping in mind that the ultimate goal is to secure patellofemoral alignment, mediolateral balance in flexion and flexion motion.
Author’s Method

I use the ligament tension technique for a mobile-bearing joint and 3° of external rotation according to the transcondylar method for a fixed-bearing joint.
Although the transepicondylar axis is the basis, I have experienced cases in which much more time is taken to draw the index line due to unclear landmarks, and the amount of rotation was inaccurate.
I use the transcondylar axis because it is easy and convenient to use. I have some principles and tips for using the transcondylar axis. First, I do not use this method in a severe deformity including a valgus deformity and in revision cases. In these cases, I usually use the ligament tension method. Second, a little less amount of external rotation is preferred in severe osteoarthritis as the cartilage of the medial condyle has been worn out.
I am in favor of the theory of the ligament tension technique because of inaccuracy of the transcondylar method when there is a severe deformity and atrophy of the bone. Particularly, in a valgus deformity, the tibia is cut more on the medial side and the posterior condyle of the femur is also cut more on the medial side, causing an imbalance in flexion due to a wider medial gap by the use of the transcondylar method.
Sometimes, the lateral femoral condyle is cut more than the medial femoral condyle with the ligament tension technique, which indicates internal rotation. In such a case, I check the tibial resection and ligament tension again and continue with the osteotomy according to the ligament tension technique if there are no problems of tibial osteotomy and ligament tension. I have seen the “grand-piano sign” in the anterior cutting surface and good patellar tracking in many cases even when the posterior portion of the lateral condyle was cut more than the medial condyle.
In conclusion, I use the ligament tension technique with reference to the transepicondylar axis concomitantly when the anatomical structures have been altered.
Osteotomy
The method and sequence of osteotomy depends on the type of reference system used: anterior reference system (ARS) or posterior reference system (PRS).
Osteotomy According to the ARS
In the ARS, anterior osteotomy is performed after determination of external rotation. Since the anterior osteotomy is the basis of all femoral osteotomies, an accurate anterior osteotomy is the first step to a successful osteotomy of the femur. In ARS, the amount of posterior osteotomy differed according to size (Fig. 4.30).
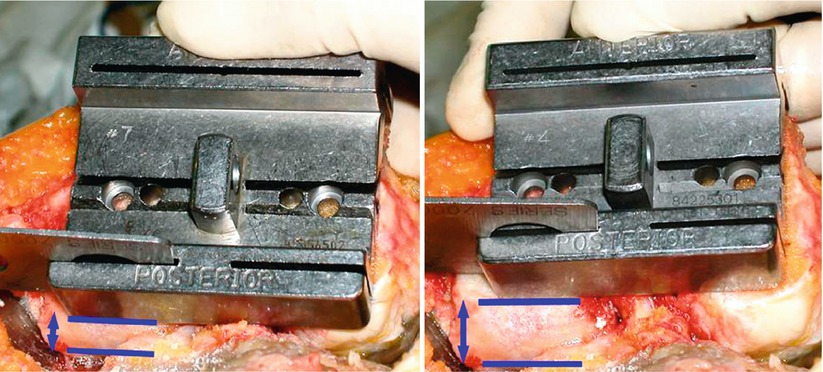
Fig. 4.30
Anterior reference system. The amount of posterior osteotomy is differed according to size of implant
The position of the stylus must be located accurately before anterior cutting. If resection has been done accurately, the resected surface should be flush with the anterior cortex of the femur; should it neither be projecting (tenting) nor should it be notched. The “grand-piano sign” is the sign of good external rotation (Fig. 4.31). If the shape of the cut surface resembles that of a boot (boot sign), it indicates that more external rotation has been achieved. And if the shape is round, it means that less external rotation has been done.
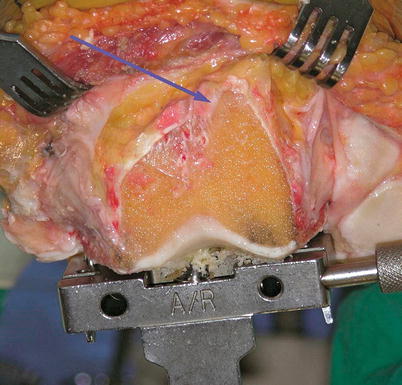
Fig. 4.31
The grand-piano sign (arrow). The lateral portion is cut more than the medial portion
Anterior notching not only predisposes to periprosthetic fracture but also reduces posterior cutting which decreases the flexion gap. On the other hand, too little anterior cutting causes anterior overstuffing to aggravate patellar maltracking and imposes much stress on the patella, which may be the cause of pain and early failure, and can increase the amount of posterior cutting which increases the flexion gap.
After anterior osteotomy, the distal, posterior, and chamfer cutting are performed. Before distal cutting, the cutting guide should be adjusted according to the difference in the angle between the anatomical and mechanical axis, which is measured preoperatively. Anteroposterior inclination of distal osteotomy in the sagittal plane differs from prosthesis to prosthesis. During distal cutting, it is important to protect the collateral ligaments on both sides. First, the distal cutting guide should be fixed and it should be confirmed whether the distal cutting guide makes contact with the condyle. Due to the difference in the size of the condyles, valgus setting of the instrument, and the cartilage erosion, the distal cutting guide will not make contact with both the condyles. If the cutting guide does not contact with any of the condyles, the amount of distal cutting is reduced and the extension gap is narrowed. If the extension gap is narrowed due to less distal cutting, it causes a flexion contracture. Bengs and Scott reported that a flexion contracture of about 9° occurs with every 2 mm decrease in the extension gap.
If there is a flexion contracture of more than 15° or if osteonecrosis exists, it is sometimes necessary to move the distal cutting jig proximally by one click to increase the amount of distal osteotomy so as to widen the extension gap.
When more than 2 mm of distal osteotomy is performed for the CR type and 4–5 mm of distal osteotomy is performed for the PS type, the joint line elevation affects the knee kinematics seriously. Changes in the joint line have various effects such as mid-flexion instability, an increase in PCL strain, alteration in the quadriceps function, and impingement of patella and patellar tendon on the tibial component. Hence, it is recommended not to perform distal osteotomy of more than 4–5 mm for the PS type.
However if there is severe osteoarthritis, the cartilages are completely worn out and the distal condyle is often cut more than intended. There are some signs of excessive distal cutting in the operation field: the articular portion of the posterior condyles is not seen in the frontal view, fibers of the PCL and popliteus tendon are fluttering, and the popliteus tendon has a tendency to subluxate during flexion and extension motion. The cutting surface should be flat, and if it is not so, the femoral implant loses its stability and the coronal axis alters (Fig. 4.32).