Fig. 10.1
Positioning the patient and application of isolation drapes
10.2.1 Anesthesia
The author’s preference for the majority of patients undergoing TKA is spinal anesthesia with accompanying sedation. Patients will usually request varying levels of sedation from very light to full general anesthesia, and this can be prescribed individually. Spinal anesthesia has a number of advantages: hypotensive effect that reduces intraoperative bleeding, particularly if the surgery is undertaken without tourniquet; postoperative analgesia effect that usually results in minimal or no pain for approximately 24 h which is reassuring for patients and facilitates ongoing pain management; protection against deep venous thrombosis (DVT); and less nausea due to avoidance of general anesthesia [1].
Periarticular local anaesthetic injections have been shown in a number of studies to provide a significant benefit in management of postoperative pain and have become a routine for most TKA surgeons [2]. Various “cocktails” have been described, with the author’s preference being use of 100 ml of 0.2 % ropivacaine, admixed with adrenaline and ketorolac, injected evenly throughout the knee joint capsule intraoperatively. Peripheral nerve blocks have also been used extensively in TKA surgery. Whilst there is no doubt that these blocks may provide excellent ancillary analgesia, there is a significant risk of complications with these techniques. Although uncommon, neuralgia post nerve block can lead to persistent pain postoperatively, sometimes indefinitely. The author has published separate studies about complications of femoral nerve blocks for knee surgery and comparative studies of femoral nerve blocks versus intra-articular injection of local anaesthetic, with the ultimate conclusion that the potential benefit of nerve block over intra-articular injection is marginal and not enough to justify the risk of nerve block, which was therefore discontinued [3].
10.2.2 Use of Tourniquets
Use of pneumatic tourniquet has become a routine in lower limb surgery, but in recent times it is used less in TKA by many surgeons, including this author. Avoidance of tourniquet results in less postoperative pain, improved postoperative quadriceps recovery and reduced thrombosis [4]. The potential disadvantage of this approach is increased intraoperative bleeding, with greater difficulty in visualisation. There may also be compromise of cementing technique if the field cannot be adequately dried. Maintenance of relative hypotension during the procedure, particularly facilitated by spinal anaesthetic, significantly reduces bleeding and negates these potential issues. This obviously requires a good understanding from the anaesthetist, but if done properly can result in a relatively dry surgical field, with less overall blood loss. A meta-analysis of over 800 citations concluded that tourniquet usage in TKA does not have a statistically significant advantage [4]. The author’s practice is therefore to not use a tourniquet in the presence of good hypotensive anesthesia. A tourniquet can be applied to the thigh and just inflated in cases of excessive intraoperative bleeding, but if adequate hypotensive anesthesia is achieved, then the need for this is rare.
10.2.3 Surgical Prep, Draping and Antibiotic Cover
Perioperative infection has become relatively rare in joint replacement, due to careful aseptic technique, improved operating room conditions and judicious use of perioperative antibiotics. Prepping and draping is an important preliminary step in avoidance of infection and should be performed carefully under supervision of the operating surgeon. The author’s preference is to use an iodine with alcohol formulation for prepping and to apply this to the entire leg including the foot. Draping is then completed, including a stocking to cover the leg, an adhesive U-drape to exclude the proximal region and an extremity drape to cover the entire field. The operative site is then exposed by cutting the stocking in the midline, and an iodine-impregnated adhesive sheet is then applied over the area (Fig. 10.1).
10.3 Surgical Approaches
10.3.1 Skin Incision
The skin incision for TKA should allow easy access to the chosen deep approaches, be extensile and, where appropriate and possible, incorporate previous incisions. A sound understanding of the blood supply of the skin around the knee joint is important and should be respected. The saphenous and lateral descending geniculate arteries are the main supply to the medial aspect of the knee [5, 6]. If more than one previous incision is present and possible to use, the more lateral one is less likely to cause skin breakdown. If previous scars are present from many years earlier, and are inappropriate for incorporation into a new incision, then an assumption can be made that a new midline incision can be safely used.
The anterior midline incision is the gold standard as it provides access to the medial and lateral aspects of the knee. It is usually centred over the medial edge of the patella, for the more common medial parapatellar arthrotomy and over the lateral margin of the patella and patellar tendon if a lateral arthrotomy is planned. This incision is extensile and lets the surgeon perform the conventional approaches. Healing rates and tensile strengths of the subsequent scars are theoretically improved if incisions are parallel to the Langer’s lines, and a more curved incision may achieve this [6]. The length of the skin incision will vary depending on the patient and surgeon and should allow clear exposure of the deep approach, without undue tension on skin edges. It is important to elevate full-thickness flaps to maintain adequate vascularity, and flaps should only be elevated sufficient to expose the deep approach. The arthrotomy is usually offset from the skin incision to avoid a direct pathway for communication with the external environment.
10.3.2 Medial Parapatellar Arthrotomy
This is the most commonly used approach for TKA and is an excellent extensile approach that can be used in virtually all primary knee arthroplasty. Following the skin incision, the arthrotomy will divide extensor mechanism, capsule and synovium in one layer and will usually begin approximately 5 cm proximal to the superior pole of the patella, leaving a 5–10 mm cuff of tendon attached to the vastus medialis obliquus (VMO) and distally around the medial edge of the patella and patellar tendon to the level of the tibial tubercle. A small cuff of retinaculum should be left on the patella, and paratenon on the tendon, for later closure. A transverse pen marking can be made at the level of the patella prior to the arthrotomy to guide later closure. The fat pad is partially excised, sufficient for exposure, and the anterior horns of both menisci divided. A release of the anterior part of the medial collateral ligament (MCL) attachment is then done sufficient to expose the tibial plateau to the level of likely resection. The patella is then either everted or simply dislocated laterally. Studies comparing patellar eversion to dislocation without eversion have suggested that the latter approach results in reduced postoperative pain and improved quadriceps recovery. Excision of fat and synovium immediately proximal to the trochlea is done sufficient to expose the site of anterior resection. If necessary, improved exposure can be achieved by extending the medial release, particularly in cases of fixed varus deformity, or by extending the quadriceps incision proximally.
10.3.3 Subvastus Approach
This approach is considered by proponents to be more “biological” than the medial parapatellar arthrotomy as it does not violate the quadriceps tendon and lifts the vastus medialis muscle as a whole. The skin incision is the standard midline, and the inferior border of the vastus medialis obliquus is then identified. The arthrotomy begins by incising the fascial sheath along this border from the patella medially to the intermuscular septum. The incision then continues distally along the medial patellar retinaculum along the medial border of the patella and along the medial patellar tendon to the tubercle. The vastus medialis is then peeled off the intermuscular septum, and the capsule of the suprapatellar pouch is then incised proximally to gain access to the joint and dislocate the patella.
This approach has the added advantages of preserving vascularity and causing less pain postoperatively although it may be more difficult to visualise the surgical field, particularly in larger patients or in cases of significant deformity, for whom this approach would therefore usually be unsuitable [7, 8]. Patients who have limited motion, severe flexion contracture, severe valgus alignment, patella baja or obese are not good candidates for this approach. Although this approach is technically more demanding, in appropriate patients it has been shown to have faster functional recovery, less postoperative pain and better knee flexion than the medial parapatellar approach [9, 10].
10.3.4 Lateral Parapatellar Approach
The lateral approach is for many surgeons the preferred choice in valgus deformities. It affords an excellent exposure of lateral structures that may require release for deformity correction and also preserves the medial ligament. It is particularly useful in cases of severe fixed valgus deformity, with lateral patellar subluxation. Potential difficulties include posteromedial exposure and a tendency to excessively externally rotate the tibial component. The skin incision is anterior longitudinal, just lateral to the midline and centred over the lateral margin of the patella. The arthrotomy begins proximally in the quadriceps tendon 5–10 mm medial to the vastus lateralis, from approximately 5 cm proximal to the patella distally around the lateral margin of the patella to the lateral edge of the tibial tubercle. The fat pad is partially excised for exposure, but it is beneficial to preserve as much fat pad as possible as this will assist in closing the defect lateral to the patellar tendon at the end of the procedure. The patella is dislocated medially, and the iliotibial band and lateral capsule can be released under direct vision as necessary for deformity correction.
10.3.5 Approaches That Pass Through the Quadriceps
10.3.5.1 Midvastus Approach
The benefits of the midvastus approach are that it violates less of the extensor mechanism whilst still providing a good surgical exposure [11]. The distal part of the arthrotomy is the same as the medial parapatellar approach, whereas proximally the arthrotomy extends through the centre of the VMO parallel to and splitting the muscle fibres. The capsule and synovium are then split longitudinally to the proximal limit of the suprapatellar pouch. The traditional midvastus approach extends the muscle split to the intermuscular septum, whereas a “mini-midvastus” extending just 2–3 cm into the muscle has been popularised as a minimally invasive approach. The theoretical advantage of this approach is that it preserves the lateral half of the VMO attachment, whilst still providing a good exposure for most cases. The main limitation is its non-extensile nature and therefore should be avoided in cases for which a difficult exposure is predicted.
10.3.5.2 Quadriceps Sparing Minimally Invasive Approach
Another variant popularised as a minimally invasive approach in recent years, this approach essentially involves a medial parapatellar arthrotomy extending distally from the superior pole of the patella and not extending proximally into the quadriceps tendon. This approach was particularly promoted by companies with side-cutting instruments to be used from a medial direction. It uses a short skin incision and was endorsed by a small number of authors [12]. The exposure obtained is not as good as with a standard arthrotomy and should be used with caution only in straightforward cases. As with other “minimally invasive” approaches, there is little evidence of any sustained improvement in outcome over standard approaches.
10.3.6 Extended Approaches
10.3.6.1 Quadriceps Snip
This extension is a simple addition to a standard medial parapatellar arthrotomy, allowing improved exposure particularly in knees that are stiff and difficult to visualise with the standard approach [13]. Having performed a standard medial arthrotomy and assessed the need for additional exposure, a 45° oblique incision is made in the proximal quadriceps tendon towards the vastus lateralis. This incision relieves tension on the extensor mechanism and tibial tubercle [13]. Another, more aggressive approach is the Coonse–Adams quadriceps turndown which involves a standard medial arthrotomy, with the incision in the quadriceps then taken distally and laterally from its proximal limit, distally to the lateral margin of the patella. This then allows complete displacement of the patella and excellent exposure, but is rarely used due to the high risk of patellar avascular necrosis [14].
10.3.6.2 Tibial Tubercle Osteotomy
This extended approach allows excellent exposure in knees that are particularly stiff and difficult to expose without undue tension on the patellar tendon attachment. It is also useful in revision arthroplasty to gain access to the medullary cavity for cement removal. Using an oscillating saw and osteotomes from the medial side, the tubercle is elevated from the tibia preserving the lateral periosteal hinge. The osteotomy is trapezoidal and approximately 5 cm long and tapered distally towards the anterior cortex [15]. Refixation of the tubercle is most commonly done with cerclage wires through or around the tubercle and secured through the posteromedial cortex.
10.4 Bony Cuts
The amount of bone resected to accommodate the prosthesis usually corresponds to the thickness of the component being implanted, otherwise known as “matched resection” in which the thickness of the resection is “matched” to the thickness of the implant. This thickness is implant specific with minor variations between implants. There are five standard femoral cuts in all prosthetic designs.
10.4.1 Distal Femoral Cut (Fig. 10.2)
Fig. 10.2
Distal femoral resection equivalent to the thickness of the component (matched resection)
For most implants this corresponds to 8–10 mm from the less affected surface. For example, in a varus knee the less affected side is lateral, and this serves as a guide to the correct joint line. This cut selectively influences the extension gap, and the amount resected can be adjusted depending on the surgeon’s desire to influence extension. In most cases a matched resection is performed, but additional resection may be considered in cases of fixed flexion deformity, particularly in cases with unrestricted flexion such that a preoperative flexion–extension imbalance is evident. Increased resection will raise the joint line, with implications for ligament balancing and patellar height.
10.4.2 Posterior Femoral Cut (Fig. 10.3)
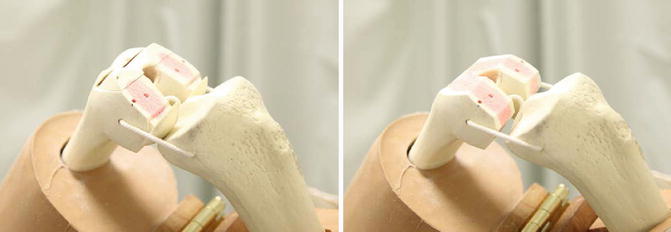
Fig. 10.3
The anterior, posterior and chamfer resections
This cut selectively influences the flexion gap. In most cases, a matched resection is indicated to restore posterior offset whilst avoiding overstuffing the flexion gap and restricting flexion. Increased resection can be considered in cases of relative flexion tightness, particularly after checking balancing after initial standard cuts, but excessive resection should be avoided as this will lead to flexion instability.
10.4.3 Anterior Femoral Cut (Fig. 10.3)
This cut will directly influence the anterior compartment and associated patellofemoral joint. In general the proximal limit of the cut should be flush with the anterior cortex of the femur, and whilst it is often not possible to perform a perfectly matched resection with this cut, care should be taken to remove at least as much bone as will be replaced by the prosthesis.
10.4.4 Anterior and Posterior Chamfer Cuts (Fig. 10.3)
These cuts do not directly affect bony gaps and will vary between different prosthetic geometries.
10.4.5 Tibial Cut
This cut equally affects flexion and extension gaps. The depth of the cut is usually 8–10 mm, but will be varied depending on implant thickness and patient factors. In particular, if the knee has equivalent significant restriction in extension and flexion, increased tibial resection will be beneficial in restoring range of motion.
10.5 Sizing of the Femoral Component
Selection of femoral component size is one of the more critical aspects of success with knee arthroplasty. Oversizing the component can result in pain and stiffness, whereas undersizing most commonly results in flexion instability. Implants are “off the shelf”, and although many companies now have a wide range of sizes, due to the variability in femoral anatomy, it is not usually possible to obtain an exact match, and therefore the surgeon’s judgement is critical to making the most appropriate selection.
The sizing of the femoral component is conventionally done in the anteroposterior plane, although assessment of prosthetic width to avoid any medial or lateral overhang is also important. Anterior or posterior referencing for sizing can be used, although experienced arthroplasty surgeons will have an appreciation of both concepts and use this knowledge to achieve the optimal prosthetic size and fit.
10.5.1 Anterior Referencing System
This concept prioritises the anterior cut using a point on the anterior femoral surface as a reference, in order to achieve a flush cut but avoid femoral notching; thus, the posterior resection is variable. If the assessment is between sizes, the smaller one is selected to avoid overstuffing the posterior space. This has the potential effect of a larger posterior resection, with a larger flexion gap and possible flexion instability.
10.5.2 Posterior Referencing System
This concept prioritises a matched resection posteriorly to restore posterior offset and avoid flexion instability. The posterior femoral condyles are the reference, and if between sizes the traditional recommendation is to choose the larger size in order to avoid femoral notching anteriorly. In practice however, in most cases it is usually possible to downsize and accept a small femoral notch anterolaterally. This is unlikely to increase risk of periprosthetic fracture and achieve the goals of restoring posterior offset without overstuffing anteriorly.
10.6 Concept of Gaps
Understanding the concept of flexion and extension gaps is fundamental to achieving the critical goal of a well-balanced knee arthroplasty. The extension gap refers to the gap between the distal femoral cut and tibial cut in extension, and the flexion gap is between the posterior femoral cut and the tibial cut, usually assessed at 90° of flexion. The goal is to have “balanced gaps”, i.e. equal tension in medial and lateral compartments in full extension and 90°. This is classically measured with spacer blocks (Fig. 10.4), but some systems will have a more dynamic method such as tensiometers, or this can also be measured throughout the range of motion with some navigation systems.
Fig. 10.4
Gap balancing – a spacer block is placed between the posterior femur and the tibia at 90° – of knee flexion. This should be balanced coronally and matched to the gap between the distal femur and the tibia in full extension
10.7 Surgical Technique: Gap Balancing Versus Matched Resection
There are two commonly used approaches to achieve the goal of a well-balanced knee arthroplasty: gap balancing and matched or measured resection. Which technique is used largely relates to surgeon preference and implant type. Both techniques can achieve good results, and there is no evidence to strongly favour one over the other. Most experienced surgeons will understand both techniques, and whichever technique is chosen it is therefore critical to understand the principles of the technique, as well as the potential limitations.
10.7.1 Gap Balancing
The primary principle of this technique is balancing flexion and extension gaps, with prosthetic alignment, particularly positioning of the femoral component secondary. After osteophyte excision the tibial cut is performed first, and referencing for positioning of the femoral cutting block is then taken from the tibial cut and directed by ligament tension. Having completed the posterior femoral cut, the resultant flexion gap is assessed. The knee is then brought into extension and the distal femoral cut completed at a depth to match the previously measured flexion gap. Having done this, the gaps are usually well balanced, and femoral finishing cuts are completed. Potential limitations of this technique are that it relies on the integrity of the collateral ligaments and an accurate tibial cut, as minor alterations in the tibial cuts could affect femoral component rotation and joint line. This should not be a significant problem for surgeons who have a good understanding of appropriate femoral component rotation and how to assess this intraoperatively.
Related posts:
 Aetiology of Patient Dissatisfaction Following Total Knee Arthroplasty
 Technological Aids in Total Knee Arthroplasty: Navigation, Patient-Specific Instrumentation, and Robotics
 Prosthetic Kinematics: Cruciate Retaining Versus Posterior Stabilized Versus Medial Pivot
 Longevity: Characteristics of a Well-Functioning, Long-Lasting Total Knee Arthroplasty
 Principles of Revision Total Knee Arthroplasty: Incisions, Approaches, Implant Removal and Debridement
 Periprosthetic Fractures
Stay updated, free articles. Join our Telegram channel

Full access? Get Clinical Tree


