Surgical Approaches to the Digits and Treatment of Finger Infections
Jason M. Rovak
Surgical exposure is both basic and critical to any surgical procedure’s success. While many surgical disciplines have standard approaches regardless of the underlying pathology, in the upper extremity, the surgical approach can require careful preoperative planning that is tailored to the individual procedure. The approach must maximize visualization while protecting underlying structures both during the procedure and in the course of postoperative healing. A carefully planned approach will also allow for the unexpected intraoperative finding that requires a change of course. In this chapter, we will address common surgical approaches in the digits as well as treatment for common finger infections.
VOLAR APPROACHES TO THE DIGIT
The primary principle governing exposure of the volar structures is avoiding linear scars across flexion creases. Since scars contract linearly, scars that cross flexion creases perpendicular to the crease can lead to postoperative flexion contractures. In trauma situations, the exposure is dictated by the
wound, and linear scars may need to be addressed either by proactively redirecting the orientation of the wound during closure with Z-plasties or by addressing the contractures at a second procedure in the subacute/chronic period if a contracture develops. In elective settings, the key is to avoid the problem altogether with careful preoperative planning.
wound, and linear scars may need to be addressed either by proactively redirecting the orientation of the wound during closure with Z-plasties or by addressing the contractures at a second procedure in the subacute/chronic period if a contracture develops. In elective settings, the key is to avoid the problem altogether with careful preoperative planning.
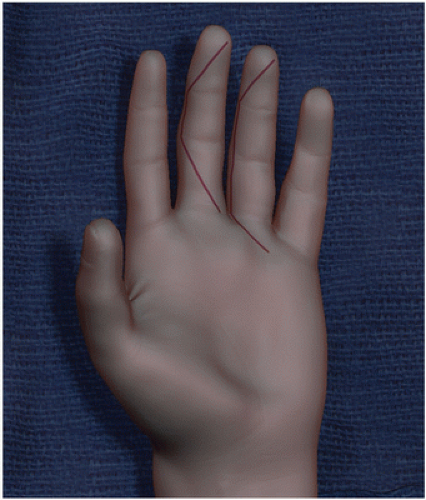
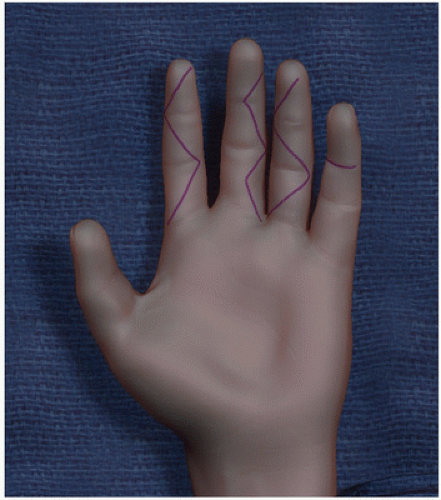 FIGURE 1-1 Index finger: Standard Bruner incisions; long finger: Mini-Bruner incision; ring finger: Bruner incision with curved flap tips; small finger: Incision within the joint flexion crease. |
There are three predominant methods of avoiding linear scars along the volar axis of the digit. These methods can either be used in isolation or combined:
Cross the joint crease obliquely.
Place the incision in the flexion crease.
Place the incision along the lateral aspect of the digit.
The first method entails a series of zigzag incisions that cross the flexion creases at roughly 45-degree angles. The incision extends from the radial to the ulnar aspect of the digit. This approach was originally described by Bruner (1) and provides excellent exposure of all volar structures. These incisions can be extended proximally and distally as far as the situation requires, including the palm and wrist (Fig. 1-1, index finger). Not every situation requires exposure of the whole volar surface, such as a single digital nerve laceration without tendon involvement. In these settings, a “mini-Bruner incision” may be adequate, placing the apex of the incision in the central volar aspect of the digit without extending completely across the digit (Fig. 1-1, long finger). Some surgeons prefer to round off the tips of the flaps to avoid tip necrosis (Fig. 1-1, ring finger). I have not found tip necrosis to be a problem with pointed flap tips.
The next method involves placing the incision directly in the flexion crease (Fig. 1-1, small finger). While the incision obviously involves the flexion crease, the direction of scar contracture is parallel to the crease, and perpendicular to the axis of the digit, so it does not lead to flexion contractures. The scar is nicely hidden within the flexion crease for excellent postoperative cosmesis. This method is generally not used in isolation, as it provides only a small window of exposure. I have only used this method in isolation as a counterincision when irrigating the flexor sheath, which will be described later in this chapter, or as an exposure for a trigger finger release, which is well described elsewhere.
Finally, incisions can be placed on the lateral aspect of the digit. When correctly designed, these incisions are placed in the “midaxial” line. This line connects the center of the phalangeal condyles when viewed from the side. While linear and crossing joints, an incision in the midaxial line does not contribute to a joint contracture since the scar is directly in line with the joints’ axis of rotation. A contracting scar volar to the axis of rotation, on the other hand, provides a flexion force. In order to identify the midaxial line, the digit is placed in flexion and the apex of the joint crease is marked. This indicates the center of the condyle (Fig. 1-2). These points are connected
to form the midaxial line. In isolation, midaxial incisions allow access to the PIPJ for contracture release. More commonly, these incisions are combined with Bruner incisions to provide wide exposure of the volar digital structures as is required when treating extensive infections, treating pressure injection injuries, or performing flexor tenosynovectomy, or in zone II flexor tendon repairs (Fig. 1-3). Some surgeons feel that another advantage to this approach is that it avoids scar tissue across the volar structures, though again, I have not found this to be a problem with a standard Bruner approach.
to form the midaxial line. In isolation, midaxial incisions allow access to the PIPJ for contracture release. More commonly, these incisions are combined with Bruner incisions to provide wide exposure of the volar digital structures as is required when treating extensive infections, treating pressure injection injuries, or performing flexor tenosynovectomy, or in zone II flexor tendon repairs (Fig. 1-3). Some surgeons feel that another advantage to this approach is that it avoids scar tissue across the volar structures, though again, I have not found this to be a problem with a standard Bruner approach.
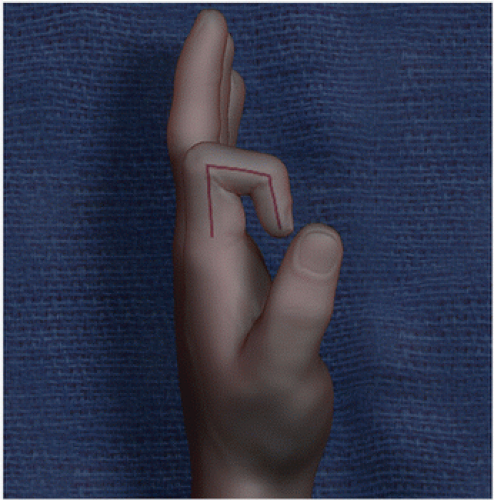 FIGURE 1-2 Marking the midaxial line. With a flexed digit, the apex of the joint flexion crease indicates the appropriate incision placement. |