Subscapularis Tendon Tears
You need spurs on a borrowed horse.
T he torn subscapularis tendon has several unique aspects that make it difficult to repair. First of all, the “comma sign” and its relation to the intact anatomic structures must be understood in order to achieve an anatomic repair. Secondly, complete tears of the subscapularis tend to retract more than other cuff tears, necessitating significant dissections and releases in order to mobilize the tendon and get it back out to length. Third, the retracted subscapularis tends to scar against the coracoid in close proximity to important neurovascular structures, so mobilization can be daunting. Finally, the dissection and repair must be performed in the tightly packed subcoracoid space, necessitating specific techniques, positioning maneuvers, and instrumentation. Because this space can become compromised rapidly by soft tissue swelling from extravasation of arthroscopic irrigant fluid, it is essential to address the subscapularis prior to repairing the rest of the cuff.
ANATOMY OF THE SUBSCAPULARIS TEAR AND THE COMMA SIGN
In order to understand the anatomy of the torn retracted subscapularis, the surgeon must first understand the complex interrelated anatomy of the subscapularis, the medial sling of the biceps, and the biceps tendon. He must also understand how best to visualize this rather inaccessible area.
We perform all of our arthroscopic subscapularis repairs in the lateral decubitus position. In order to “open up” the subcoracoid space, we typically have an assistant provide a “posterior lever push” in which he pushes posteriorly on the proximal humerus while pulling the distal humerus anteriorly (Fig. 6.1). This maneuver also draws the tightly draped subscapularis tendon away from its bone bed on the lesser tuberosity, showing partial articular surface tears or nonretracted tears that otherwise might have been missed (Fig. 6.2). Viewing with a 70° arthroscope will give a more complete view of the inferior footprint of the subscapularis (Fig. 6.3). Forward flexion and internal rotation of the shoulder can also provide a more complete view; however, this maneuver is more useful with the patient in the beach-chair position.
It is critical to understand the normal anatomy at the confluence of the superolateral subscapularis, the medial sling of the biceps, and biceps tendon (Fig. 6.4).The medial sling, composed of a robust deep layer (medial head of the coracohumeral ligament) and a thin superficial layer (superior glenohumeral ligament), has an insertional footprint at the top of the lesser tuberosity that is directly adjacent to the footprint of the superolateral subscapularis on the lesser tuberosity. As such, when the upper subscapularis tears away from its bone attachment, the medial sling (which is directly adjacent to it) also tears away from the bone. The torn medial sling forms a distinctive comma-shaped arc of soft tissue (comma sign) at the superolateral corner of the subscapularis (Fig. 6.5).
The comma sign is an extremely useful anatomic landmark during dissections and releases for retracted subscapularis tendons. Even if the comma sign is extremely retracted, all the way to the rim of the glenoid or beyond, it can always be located and can be followed to its confluence with the superolateral subscapularis. The constancy of this relationship will leave no doubt as to the location of the lateral border of the subscapularis, even in cases of extreme scarring and retraction (Fig. 6.6).
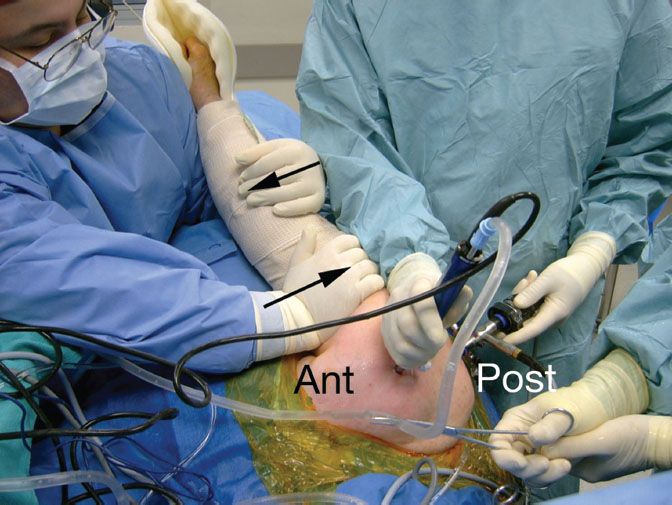
Figure 6.1 Posterior lever push. The second assistant simultaneously pushes the proximal humerus posteriorly and pulls the distal humerus anteriorly (blackarrows). This maneuver effectively increases the working space in the anterior shoulder as the humeral head is subluxed posteriorly.

Figure 6.2 Right shoulder. Posterior viewing portal with 70° arthroscope. A: Exposure of the subscapularis is limited prior to a posterior lever push. B: Same shoulder with a posterior lever push. This maneuver dramatically increases the exposure of the subscapularis (SSc) footprint, providing much more room for visualization, instrumentation, and bone bed preparation. LT, lesser tuberosity; blue comma symbol, “comma sign”.
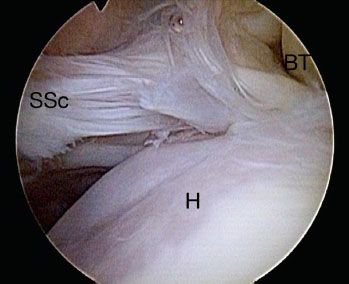
Figure 6.3 Right shoulder, posterior viewing portal demonstrates view of the subscapularis with a 70° arthroscope and a posterior lever push. The 70° arthroscope provides an “aerial view” of the subscapularis and gives a more complete view of the subscapularis footprint than that possible with a 30° arthroscope, particularly of the middle to inferior aspect. BT, biceps tendon; H, humeral head; SSc, subscapularis tendon.
After the subscapularis has been repaired, the comma sign is very useful for locating the anterolateral corner of the supraspinatus tendon, to which it remains attached (Fig. 6.7). Once again, this relationship is particularly useful in cases where the supraspinatus is retracted and scarred to the acromion.
NONRETRACTED SUBSCAPULARIS TEARS
Recognition of nonretracted subscapularis tears is critically important. Since a torn but nonretracted tendon can lie tightly draped across the lesser tuberosity, it may not be detectable on casual inspection with a 30° arthroscope (Fig. 6.8A). Viewing such a tear with a 70° arthroscope while a posterior lever push is applied will usually demonstrate the tear (Fig. 6.8B, C). Nonretracted tears may be either full-thickness tears or partial articular surface tendon avulsion (PASTA) lesions.
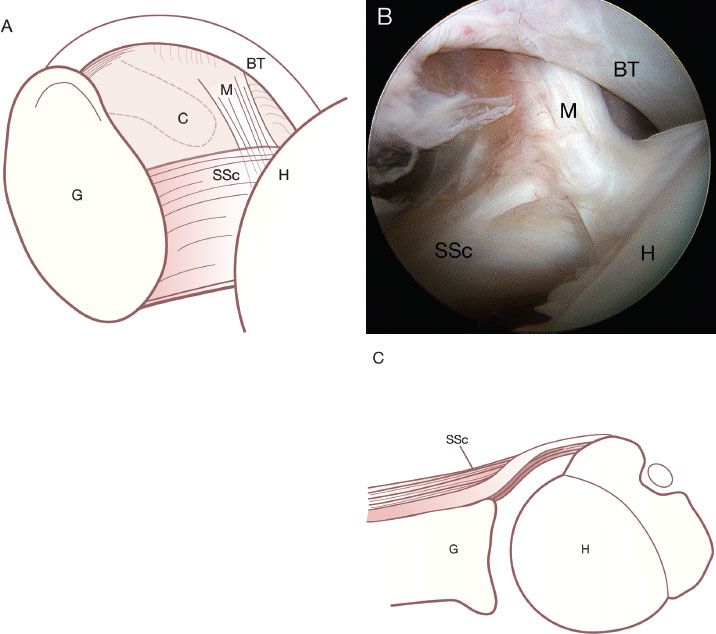
Figure 6.4 This drawing (A) and corresponding arthroscopic photo (B) represent the view of the anterior structures from a posterior viewing portal of a right shoulder. An axial schematic drawing (C) further clarifies the normal anatomy. The medial sling (M) of the biceps tendon (BT) inserts onto the lesser tuberosity of the humerus (H) adjacent to the superolateral margin of the subscapularis (SSc). C, coracoid; G, glenoid.
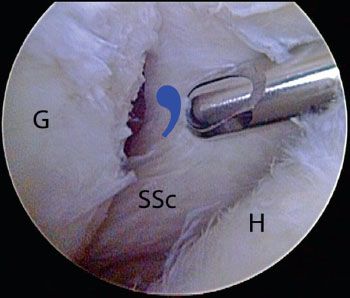
Figure 6.5 Right shoulder, posterior viewing portal. In the setting of a retracted subscapularis tear, the medial sling tears away from the bone with the subscapularis tendon. The medial sling forms a distinctive comma-shapedarc of soft tissue (bluecommashape) at the superolateral corner of the subscapularis. As demonstrated in this photo, the commasign serves as a landmark for locating a retracted subscapularis tendon. G, glenoid; H, humeral head, SSc, subscapularis tendon.
WORKING PORTALS
During subscapularis tendon repair, we view exclusively through a posterior portal, switching between 30° and 70° arthroscopes as necessary. We use two working portals, an anterior portal (for suture anchor placement) and an anterosuperolateral portal (for everything else) (Fig. 6.9). While viewing from an anterosuperolateral portal is an option in cases of complete subscapularis tears, this portal does not provide adequate visualization of partial thickness articular-sided tears. Furthermore, using this portal for visualization can create crowding with the anterior working portals used in repair. For these reasons, we prefer to view exclusively through the posterior portal when repairing the subscapularis.
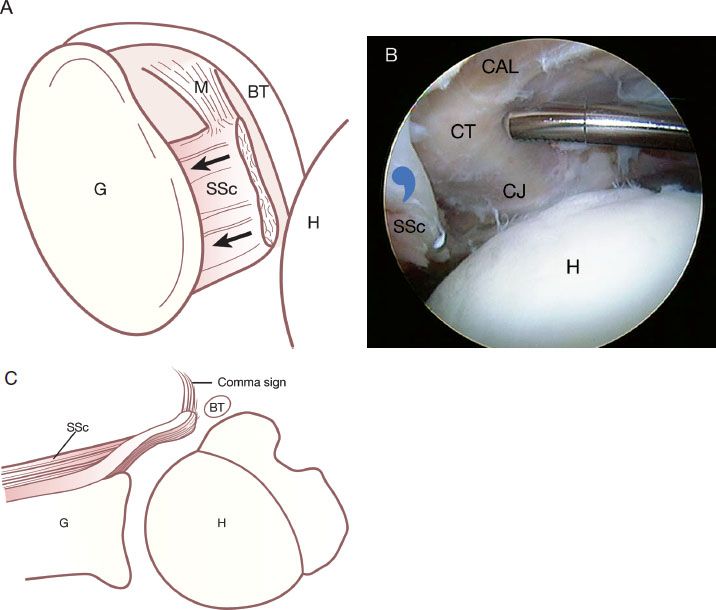
Figure 6.6 This drawing (A) and corresponding arthroscopic photo (B) represent a complete subscapularis tendon (SSc) tear with medial retraction (blackarrows) almost to the level of the glenoid (G) in association with a medially dislocated biceps tendon (BT). An axial projection is also shown in (C). In this situation, the comma sign (bluecommasymbol) leads to the superolateral border of the subscapularis tendon. CAL, coracoacromial ligament; CT, conjoined tendon; CT, coracoid tip; H, humerus; M, medial sling.

Figure 6.7 Right shoulder, posterior viewing portal, demonstrating the connection between the subscapularis (SSc) and the supraspinatus (SS) via the medial sling (MS). A: The rotator cable (RC) of the rotator cuff merges with the medial sling anteriorly. As such, when the medial sling detaches during a subscapularis tear, the comma sign may be followed to locate the anterolateral corner of the supraspinatus tendon. B: A profile view of the rotator cable further shows this constant relationship. C: In the case of a massive contracted rotator cuff tear, the relationship between the subscapularis and the supraspinatus is maintained and the comma sign (bluecommasymbol) can be used to identify the anterolateral supraspinatus tendon. BT, biceps tendon; G, glenoid; H, humerus.
The anterosuperolateral portal is truly the “workhorse” portal for subscapularis repair. To create this portal, start by placing an 18-gauge spinal needle adjacent to the anterolateral corner of the acromion and direct it toward the lesser tuberosity. Ideal placement will direct the needle at a 5° to 10° angle of approach toward the lesser tuberosity (Fig. 6.10). This angle of approach is perfect for preparing the lesser tuberosity, performing a coracoplasty, dissecting a retracted subscapularis, and placing antegrade sutures into the subscapularis.
The anterior portal is usually a percutaneous stab that is used only for insertion of suture anchors and for retrograde suture passage after anchor insertion. A spinal needle is used to determine the proper “deadman angle” of approach while viewing through a posterior portal. This portal is typically somewhat medial to a standard anterior portal because of the retroversion of the humeral neck as a factor in the angle of approach for suture anchor placement (Fig. 6.11).
WHAT TO DO WITH THE BICEPS
In almost all cases of a subscapularis repair, we do a biceps tenodesis. Since most tears of the upper subscapularis also involve a tear of the medial sling of the biceps, there is biceps instability that we feel cannot be adequately addressed by simply repairing the sling. Therefore, we typically perform a biceps tenodesis with an interference screw technique (BioComposite Tenodesis Screw; Arthrex, Inc., Naples, FL) at the top of the bicipital groove. For elderly low-demand patients, we sometimes do a biceps tenotomy rather than a tenodesis. For all other patients, we begin the tenodesis procedure by placing two half-racking sutures through the intra-articular portion of the biceps to securely hold it while we tenotomize the tendon at its root, adjacent to the anterosuperior labrum. Then, we exteriorize the biceps through the anterosuperolateral portal and place a whipstitch (Fig. 6.12). By flexing the elbow and the shoulder, one can exteriorize a greater length of biceps tendon, making it easier to place the whipstitch. The tendon is then allowed to retract back into the shoulder, and the biceps tenodesis is performed after doing the subscapularis repair. Visualization of the subscapularis is greatly improved after the biceps tenotomy (in preparation for tenodesis). We believe that biceps tenodesis or tenotomy in the face of subscapularis repair is very important because the force from a persistently subluxed biceps tendon will cause the subscapularis repair to ultimately fail.
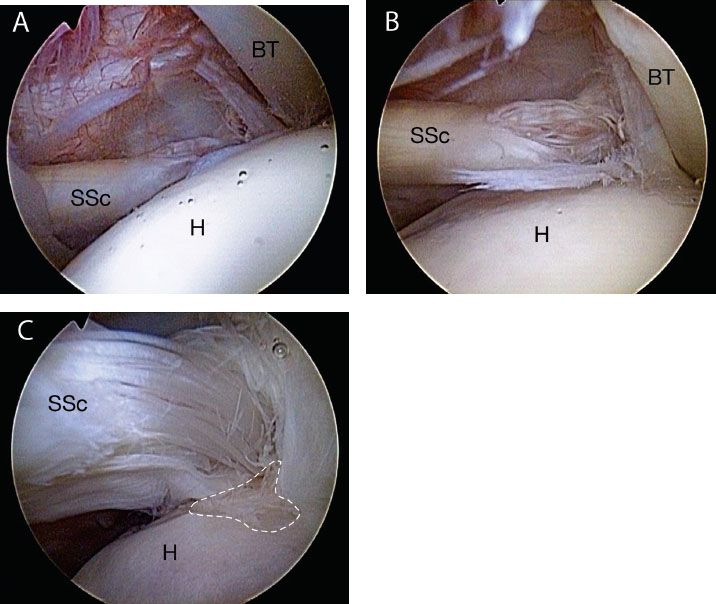
Figure 6.8 A: Right shoulder, posterior viewing portal with 30° arthroscope. The footprint of the subscapularis (SSc) is poorly visualized. B: Same shoulder. The use of a 70° arthroscope improves visualization, but in the standard lateral decubitus position, the subscapularis tendon is draped over the lesser tuberosity, obstructing the view of the lesser tuberosity footprint. C: Same shoulder viewed with 70° arthroscope and a posterior lever push. This maneuver dramatically increases the exposure of the subscapularis footprint, providing much more room for visualization, instrumentation, and bone bed preparation. In this case, an exposed subscapularis footprint (whitehashedarea) is quite evident at the 4 o’clock position of this picture. BT, biceps tendon; H, humeral head.
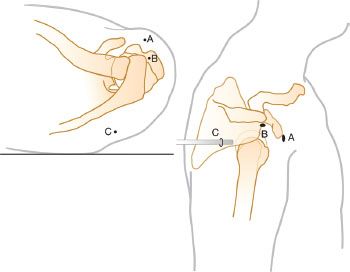
Figure 6.9 Portals for arthroscopic subscapularis tendon repair. The anterior portal (A) is used for anchor placement and retrograde suture passage. The anterosuperolateral portal (B) is used for subscapularis tendon mobilization, preparation of the bone bed, antegrade suture passage, and coracoplasty. The posterior portal (C) is used as an arthroscopic viewing portal.
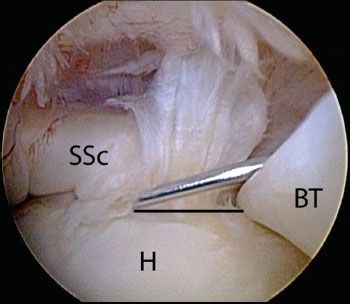
Figure 6.10 Right shoulder, posterior viewing portal with a 70° arthroscope, demonstrates spinal needle localization of an anterosuperolateral portal. Note: For subscapularis tendon repair, this portal should provide a 5° to 10° angle of approach to the lesser tuberosity (blackline). BT, biceps tendon; H, humerus; SSc, subscapularis tendon.
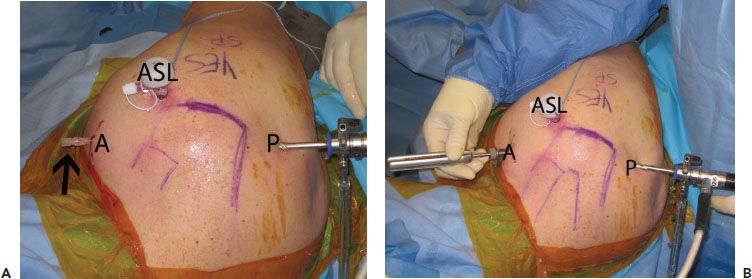
Figure 6.11 A: External view of a right shoulder demonstrates spinal needle placement (blackarrow) for an anterior portal. B: During subscapularis tendon repair, this portal is used for anchor placement (as shown in the figure) as well as retrograde suture passage (not shown). A, anterior portal; ASL, anterosuperolateral portal; P, posterior portal.
ORDER OF STEPS
In general, when the subscapularis is torn, the order of steps is as follows:
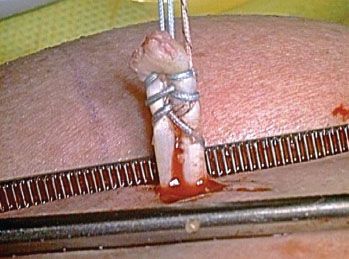
Figure 6.12 The cut end of the biceps tendon is pulled externally out of the joint through the anterosuperolateral portal by means of two half-racking sutures. Then, a whipstitch is placed and the tip of the biceps is contoured to prepare it for tenodesis.
RELEASES FOR THE RETRACTED ADHESED SUBSCAPULARIS
Using a 30° arthroscope through a posterior viewing portal, the comma sign is visualized and followed inferiorly to locate and identify the superolateral corner of the subscapularis. A traction suture is placed with an antegrade suture passer (FastPass Scorpion; Arthrex, Inc., Naples, FL) through the superolateral rolled edge of the subscapularis. While pulling laterally on the traction suture, a shaver or cautery electrode is introduced through the anterosuperolateral portal and is used to make a window in the rotator interval, just medial to the comma sign. The coracoid is identified through the window.
Then the arthroscope is pushed through the window in the rotator interval in order to view the coracoid, and the shaver and cautery are alternately passed anterior to the comma to skeletonize the coracoid tip and coracoid neck, continuing around to the coracoid base (anterior release) (Fig. 6.13). Then a 30° arthroscopic elevator is used to lyse the adhesions between the coracoid neck and the subscapularis tendon (superior release) (Fig. 6.14). The elevator is inserted only to the base of its blade, which is enough to release the adhesions to the coracoid. Contrary to some other arthroscopic surgeons, we have not found it necessary to dissect any farther medially than that, and we certainly do not feel that it is necessary to dissect and visualize any of the neurovascular structures during the releases.
The third part of the release is the posterior release of the subscapularis tendon. A 15° elevator is introduced into the plane between the posterior subscapularis tendon and the anterior glenoid neck, freeing the adhesions between tendon and bone (Fig. 6.15). This is a safe, relatively avascular plane in which the elevator can safely be manipulated blindly to do the posterior release. This completes the three-sided release (anterior, superior, posterior) (see “Bonus Videos,” Disc 2).
We have not found it necessary to do an inferior release. By doing a three-sided release, we have found that we can always mobilize the subscapularis to the lesser tuberosity, or at the very worst to within 5 mm of the lesser tuberosity. In cases where mobilization does not create enough lateral excursion for an arthroscopic repair of the subscapularis, we medialize the footprint 5 to 7 mm (Fig. 6.16). We have noted excellent subscapularis function at follow-up of over 6 years following repair in this somewhat medialized position (Unpublished data).
CORACOPLASTY
After the three-sided release, the subcoracoid space is evaluated to see if it is stenotic enough to warrant a coracoplasty. If the coracohumeral distance is <7 mm (approximately 1½ diameters of the barrel-shaped burr), then a coracoplasty should be performed through the anterosuperolateral portal to create a subcoracoid space that is at least 7 mm deep (Fig. 6.17).
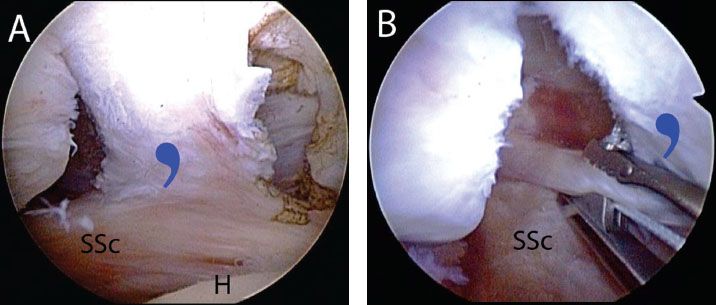
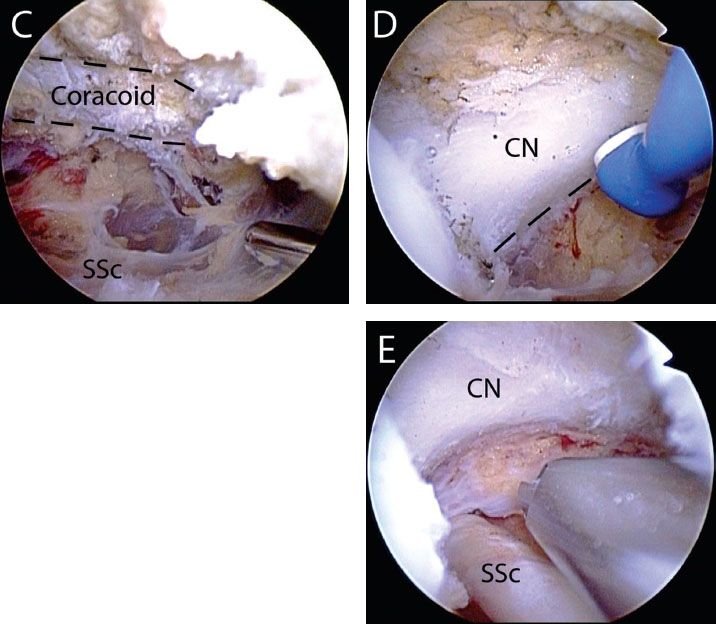
Figure 6.13 Anterior release of a retracted adhesed subscapularis tendon tear in a right shoulder, viewed from a posterior glenohumeral portal. A: While viewing with a 30° arthroscope, the comma sign is identified. B: A traction stitch is placed in the upper subscapularis tendon. C: The arthroscope is placed through a window in the rotator interval to identify the coracoid (dashedblacklines). D: While viewing with a 70° arthroscope, the posterolateral coracoid is skeletonized to the level of the coracoid neck (dashedblacklines) and coracoid base using an electrocautery. E: After the anterior release is completed, the coracoid neck and underlying subscapularis tendon are clearly visualized. CN, coracoid neck; H, humerus; SSc, subscapularis tendon; blue comma symbol, comma sign.
Related posts:

Stay updated, free articles. Join our Telegram channel

Full access? Get Clinical Tree


