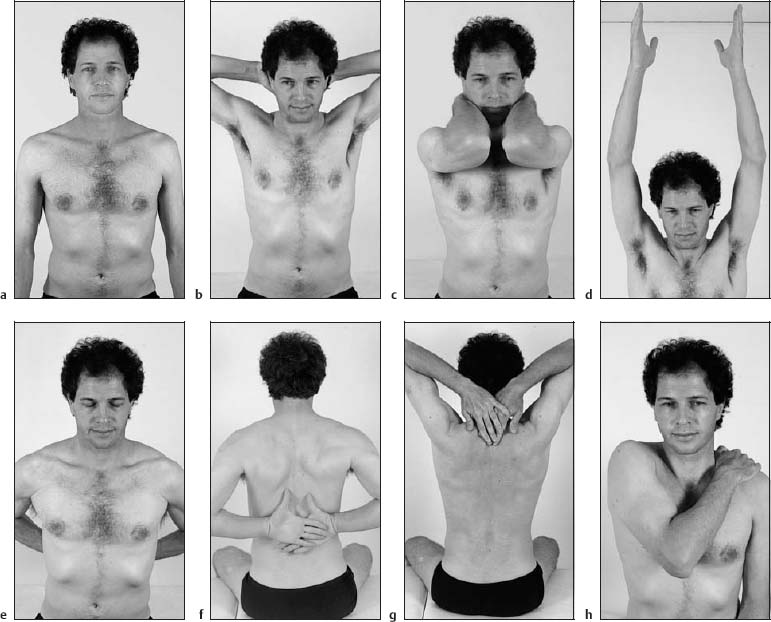
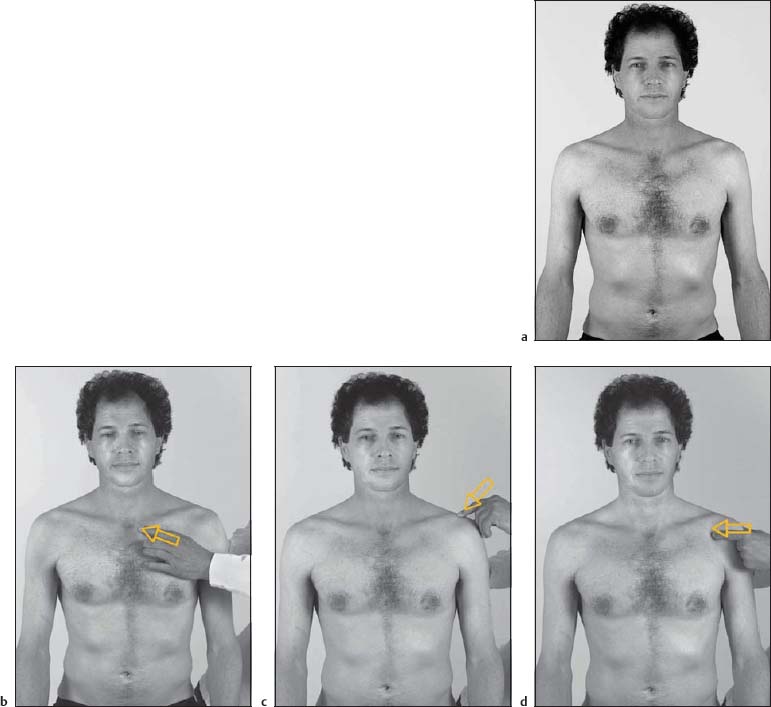
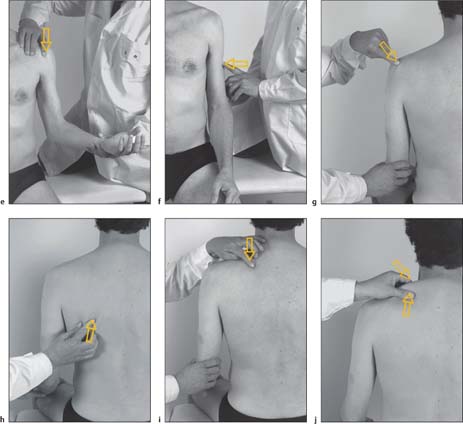
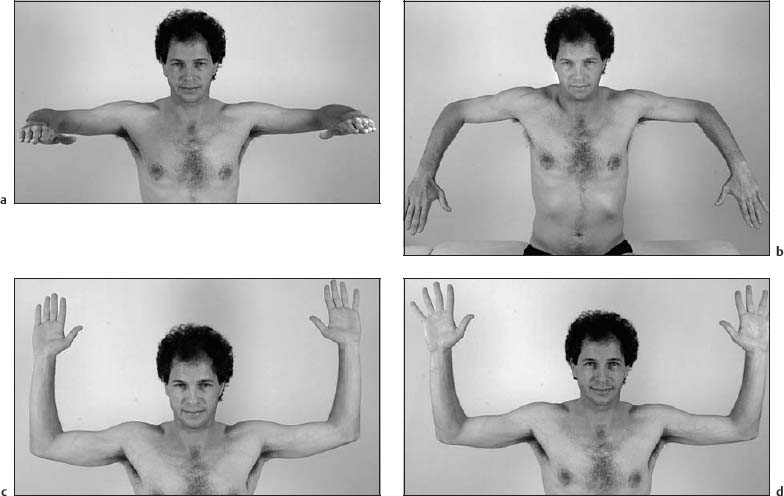
16 Structural Diagnosis and Functional Treatment of the Limbs The structural manual medicine diagnosis and functional treatment of the limbs is integrated into the overall neuro-orthopedic management of a patient with pain or loss of function. Before proceeding to the examination and treatment techniques that are particular to the field of manual medicine, the patient should always be assessed medically first in order to identify any potential “red flags” or sinister pathology. In one form or another, the following three-step sequence has found general acceptance when performing the standard neuro-orthopedic examination: 1. Inspection and observation (“look”). 2. Initial general palpation (“feel”). 3. Gross range of motion testing (“move”). Building upon those findings established by the above examination, the manual medicine structural examination aims to elicit further specific information related to the particular joints and their associated tissues. Furthermore, the additional examination is intended to determine if there are adaptive or compensatory regional and global changes beyond the incriminated joint. Once such information is obtained, the manual medicine techniques or maneuvers most appropriate for the individual presentation can be chosen. The primary “tool” used is palpation. Functional manual medicine treatment follows from the findings elicited with the structural examination: • Specific and detailed palpation (static and dynamic palpation) of a particular joint, tissue, or region to determine any joint and tissue abnormalities by assessing asymmetry in form and function (“ART”—asymmetry in range of motion and tissue texture). • Determination of a joint’s end-feel. The manual medicine examination, then, concentrates on all motion aspects by evaluating the joint’s end-feel, tissue texture reaction, and particular active and passive components. Again, the goal is to obtain additional information not elicited otherwise during the standard neuro-orthopedic examination and to provide direction for appropriate functional manual medicine treatment approaches. • Sequence of important maneuvers encountered in typical activities of daily living (ADLs) are evaluated from above to below (a–h). Differences in movements (quality and quantity of range of motion) and surface contours are observed as well as any substituted motion patterns while the patient actively performs these maneuvers. 1. Pathology that interferes with normal movement is quickly identified. 2. Restriction and asymmetry of mobility are visualized at once. 3. Any painful movements and substituted motion patterns are noted quickly. • The patient is sitting. • The shoulder is kept in neutral position. • The patient is inspected from front and back. Landmarks are identified and compared bilaterally for symmetry, positional abnormality, and gross deformity. • The following bony landmarks are inspected and palpated with regard to symmetry and pathologic changes (a–j): – Neutral position (a) – Sternoclavicular joint (b) – Acromioclavicular joint (c) – Coracoid process (d) – Minor tubercle, intertubercular sulcus (e) – Deltoid tuberosity (f) – Neck of the acromion and subacromial space (g) – Superior angle of the scapula and the levator scapulae muscle (h) – Inferior angle of the scapula (i) – Trapezius muscle (descending portion, upper part) (j) • The scapular landmarks are related to the corresponding vertebral levels as follows: – The spine of the scapula when continued medially until one reaches the scapular triangle is located typically at the third thoracic vertebral level. – The inferior angle of the scapula is at the seventh thoracic spinal level. • The patient is requested to perform a series of shoulder and upper-limb movements that allows the quick assessment of obvious muscle weakness (a–d). Differences in movements and potential weakness are observed. • With elbows flexed to approximately 90°, the shoulder is abducted to 90° to the horizontal plane (a). • With elbows flexed to approximately 90°, the abducted shoulder is internally rotated (b). • With elbows flexed to approximately 90°, the shoulder is externally rotated (c). • With elbows flexed to approximately 90° and externally rotated (as from figurec), the patient is requested to spread his fingers apart (d). 1. All important shoulder, elbow, and finger movements are performed in these maneuvers. 2. Pathology affecting a movement or movements is quickly identified. 3. Restriction and asymmetry of mobility are visualized at once. 4. Again, quality and quantity of range of motion are assessed but also any pain associated with assuming a particular position or maneuver. 5. Neurological or primary muscular causes of abnormal movement are considered as well. For instance, a pronator drift could easily be identified from position (a). • The patient is supine, with the shoulder joint being beyond the edge of the examination table. • Examination of the amount of passive external and internal rotation is performed by the examiner, who stands on the same side as the joint that is being evaluated. • The evaluation in this position may actually provide the best and most useful information about passive internal and external rotation. • “Throwing injuries” are detected by examining in this position. While passively initiating throwing action, the examiner suddenly resists the action to provoke pain response. 1. Motion restriction for external rotation, and especially if accompanied by pain, indicates the possibility of rotator cuff tear and/or subacromial bursitis. Note, however, that the degree of pain does not necessarily correlate directly with the degree of the tear (e. g., there could be no pain in the presence of a complete rotator cuff tear, for instance). 2. Hypermobility due to lesions affecting the anterior structures of the joint capsule. • The patient is sitting. • With the elbow flexed, the examiner introduces passive internal (a) and external (b) rotation at the glenohumeral joint in maximum adduction. • After initial palpatory assessment of the soft tissues and osseous structure surrounding the lateral and anterior portion of the acromion, the examiner evaluates the subacromial structures such as the rotator cuff and biceps tendon. • Monitor the range, quality, and end-feel of movement with pincer fingertip palpation over the humeral head. • Also evaluate for presence of any crepitus. 1. Restricted motion, and pain, crepitus, and defects in the rotator cuff (in maximum adduction) may be felt in the presence of a capsulitis, omarthrosis, or arthrosis/arthritis. There may be pain and crepitus due to rotator cuff tears or calcifications or bursitis. 2. Hypermobility and apprehension if anterior joint structures are lax. • Active and passive abduction in the plane of the scapula (30–40° anteversion) is performed. • Abduct the shoulder with the elbow flexed to 90° (pre-vents rotation). • The examiner monitors the arc of painful movement and relates this to muscles involved for that particular range of motion (a–c). Abduction 0°–60°: supraspinatus and deltoid muscles are mainly responsible. Abduction 60°–120°: deltoid, infraspinatus, and supraspinatus muscles are mainly responsible. Painful arc between 60° and 120°: suspicion of subacromial impingement (calcific deposits, rotator cuff tear, etc.). • During abduction to 120°, both the supraspinatus tendon and musculotendinous junction have to move under the arch formed by the acromion and coracoid process (defilé). Impingement and compression causing a painful arc may occur. Superior translocation of the humeral head due to a more extensive rotator cuff defect where supraspinatus and infraspinatus are involved will predispose to this. • For the supraspinatus tendon, the Jobe test is more specific. • To achieve full elevation, the elbow is extended (a, b). Thus, the lever arm becomes larger and functional disturbances such as rotary cuff rupture become obvious, especially when involving the supraspinatus muscle. • The serratus anterior muscle is mainly responsible for arm elevation of 120–180°. 1. Painful arc between 120° and 180°: upper painful arc; suspicion for acromioclavicular joint involvement. 2. If suspecting involvement of the supraspinatus muscle, one may utilize the Jobe test for further differentiation. • The patient is sitting with both elbows flexed to 90°. • The examiner stands behind the patient and grasps the patient’s forearm proximal to the wrist in order to provide the required resistance force in the next step. • Isometric contraction of each muscle group is actively performed by the patient after specific instruction (as to slow speed, correct execution, and degree of force necessary) (a). • Test of external rotation strength against resistance can be isolated for the infraspinatus muscles so as to assess possibility of a tear in this muscle (a): – This is a more specific test for the infraspinatus muscle, in the plane of the scapula (abduction to 70°, arm flexed to 30°), with the elbow flexed to 90°. Isometric contraction in external rotation against resistance. • Starting from the same position as above, the patient’s active abductor strength is tested against resistance for weakness of rotator cuff. While the supraspinatus muscle is tested in this position, it is nonetheless a rather nonspecific test (b): – When further specific information is needed, then the evaluation is performed upon one limb at a time. – EMG studies have confirmed that immediately upon initiation of abduction there is motor activity in both the deltoid and supraspinatus muscles. 1. When there is pain with either external rotation (a) or abduction (b) and/or weakness, suspect tear or rupture of the infraspinatus tendon (a) and/or supraspinatus muscle (b), with the caveat that the bilateral test is rather nonspecific. 2. Neurogenic changes without inflammation may indicate a lesion of the suprascapular nerve. • The patient is sitting at the edge of the examination table. • The examiner stands behind the patient. • The patient is requested to extend both arms at the elbow and bring them forward so that they are in the same plane as the shoulder blade (30–40°) (a). • Patient is then requested to internally rotate the arms at the shoulder (maximally). • The examiner then places either hand distal to the patient’s elbow and requests the patient to actively abduct his arms against equal but opposite resistance (b). 1. The patient reports pain during the active abduction maneuver and/or may not be able to perform the requested abduction due to apparent muscle weakness. 2. Suspect lesion of the supraspinatus muscle. • The patient is sitting. • He is requested to flex the elbow and then elevate the arm following the plane of the scapula (anteverted to about 30–40°) until it is horizontal (a). • The examiner places one hand proximal to the elbow joint while providing resistance against the patient’s distal forearm proximal to the wrist. The patient is requested to externally rotate his forearm (b). The patient is unable to perform or has great difficulty in performing appropriate external rotation against resistance, either with or without pain. This may indicate weak-ness/involvement of the infraspinatus muscle. • The patient is sitting. The elbow is flexed to 90°. The shoulder is stabilized by the examiner placing his thumb and index finger over the distal clavicle and shoulder region proximal to the joint. • The examiner’s other hand takes hold of the patient’s distal forearm proximal to the wrist (a). • With the examiner applying specific resistance, the patient is requested to actively rotate his forearm internally (b). • Internal rotation equals function of anterior clavicular portion of deltoid, subscapularis, pectoralis major, latissimus dorsi, and teres major. • Resisting internal rotation provides more specific information on subscapularis muscle function. • Internal rotation is stronger than external rotation. Reductioninability to perform internal rotationmay point in the direction of a subsacpularis muscle involvement. • The patient is sitting with the elbow flexed to 90° and the forearm supinated. • The examiner performs fingertip palpation of the biceps tendon at the upper and bicipital groove (a). • Elbow flexion is resisted by the examiner placing the other hand at the distal end of the forearm proximal to the wrist (b). • Subsequently, the patient is requested to pronate the hand first, and then attempt to supinate the forearm against examiner-induced resistance (c). This is the Yergason test with the “palm-up sign,” which evaluates function of the biceps tendon. Irritation of the tendon is suspected if pain is evoked during internal rotation under the palpating finger (Lippman sign). Abnormal displacement of the tendon may indicate pathology. • The patient is sitting. The arm is abducted to 60°. The monitoring fingers palpate the head humeral (a). • The thumb attempts to push the head of the humerus in an anterior direction while the index and middle fingers maintain a strong grip on the coracoid. • The examiner then introduces passive elevation to the arm at the shoulder at 60° (a), then up to 90° (b), and finally to 120° (c). • This allows assessment of anterior instability in the shoulder joint. • This procedure can also be performed with the patient supine. 1. The patient reports an “uneasy” or “unstable” feeling while performing these specific maneuvers. He may indicate that he is “apprehensive” about performing these maneuvers since he has experienced instability in the past (known history of subluxation or overt dislocations). 2. When the patient is supine he may be less apprehensive and it may be more difficult to reproduce the snapping type of motion (visibly or audibly when the head of the humerus is moved beyond the anterior margin of the glenoid fossa). • The patient is supine, and the shoulder joint is beyond the examination table. • With one hand, the examiner stabilizes the joint by carefully compressing the clavicle and scapula against the examination table. • With his other hand, the examiner palpates the joint capsule anteriorly with his thumb while the fingers of the same hand stabilize the head posteriorly. • The shoulder is gently abducted and externally rotated. • From this position, the examiner introduces a translatory motion to the joint in the anterior direction (a) by pulling on the proximal arm. • Subsequently, the examiner introduces a posterior translatory motion by compressing the proximal arm towards the examination table (b). • In summary, this maneuver evaluates anteroposterior shoulder stability. 1. Restricted motion with pain is typically due to degenerative or underlying inflammatory changes. 2. Pathologically reduced anterior translatory/gliding motion is associated with reduction in shoulder extension and external rotation. 3. Pathologically reduced posterior translatory/gliding motion is associated with reduction in shoulder flexion and internal rotation. 4. Anterior instability is best detected when the arm is abducted and externally rotated. 5. Posterior instability is best detected when the arm is flexed and slightly internally rotated. 6. Inferior dislocation is best evaluated with the patient sitting. • The patient is sitting. • The examiner places one hand against the patient’s axilla with the thumb facing posteriorly and the fingers being placed flat over the anterior portion the chest. • With his other hand, the examiner takes hold of the patient’s proximal arm distal to the shoulder joint (a). • Through the hand placed at the proximal arm the examiner introduces a passive translatory gliding motion to the humeral head in the anterior direction (b). 1. In the presence of anterior instability, the head of the humerus is located beyond the glenoid labrum. 2. Hypermobility is demonstrated when there is greater than normal displacement (increased translatory motion). • The patient is sitting. • With the arm abducted to approximately 50°, the patient is requested to flex the elbow to 90° (a). • The examiner stands at the patient’s side and stabilizes the scapula and clavicle with one hand, while his other hand takes hold of the proximal arm, distal to the shoulder joint (b) and reaching upward into the axilla. • Starting from this position, the examiner introduces lateral traction by moving the proximal arm laterally (c). • Avoid angulation: that is, avoid excessive abduction. 1. Distraction of 5 mm is considered normal. 2. Both hypermobility and hypomobility (motion restriction) as well as motion-induced pain should be considered to be abnormal findings. 3. Pathologic changes, such as a tight capsule, are typically associated with a hard-elastic end-feel when performing this maneuver. 4. Often, patients who have known degenerative changes (e. g., omarthrosis) actually report a reduction in their symptoms during the performance of this maneuver. 5. Increased translatory motion with a soft end-feel is associated more with joint instability or hemarthrosis. • The patient is sitting upright. • With one hand, the examiner carefully takes hold of the patient’s proximal arm at the level of the shoulder joint (thumb anterior and fingers reaching around posteriorly reaching the axilla). • The patient’s forearm, which is flexed to 90° at the elbow, is supported by the examiner’s forearm. • The examiner then passively abducts the patient’s arm at the shoulder to approximately 45° (“neutral zone”) traction (a). • By applying a caudal glide using his hypothenar eminence, the examiner tests the translatory freedom of the head of the humeral head in an inferior direction (b). • A slight translatory motion (gliding) of a few millimeters is physiologically normal. • This maneuver is refined by the examiner’s right hand pushing in the inferior direction and the left hand pushing back (in the example depicted). 1. Crepitus and hard stop with pain indicate osteoarthritis. 2. Hard stop and decreased motion without pain indicate retraction and scarred glenoid capsule inferiorly. 3. Soft stop (end-feel) may be seen with hemarthrosis. Note: Pay attention to the subacromial bursa and supraspinatus tendon. Forceful grip may evoke pain, thus the examination should be performed carefully and gently. • The patient is sitting. • The examiner stands at the patient’s side. • With his elbow slightly flexed, the patient slightly abducts his arm. • The examiner fixates the glenoid fossa from anterior by placing one hand flat over the medial aspect of the axilla with extended fingers over the pectoral tendons. The tip of the thumb of the stabilizing hand may reach as far as the lateral border of the scapula. The patient’s arm then rests on the examiner’s forearm (a). • With the hypothenar eminence of his examining hand, the examiner introduces an anteriorly directed translatory force via the posterior component of the humeral head (b). 1. Scarring of the anterior portions of the joint capsule would result in a hard-elastic stop (end-feel). 2. Omarthrosis is typically associated with a hard stop. 3. Anterior instability is responsible for an increased translatory motion (e. g., increased gliding), and the examiner perceives the impression of a subluxation with a soft end-feel. 4. A soft stop is also found in hemarthrosis. • The patient is sitting. • The examiner stands at the patient’s side. • With his elbow flexed to 90°, the patient slightly abducts his arm. • With one hand placed flat over the scapula, the examiner fixates it posteriorly while with his fingers he fixates the clavicle. • With his other hand, the examiner takes hold of the patient’s arm proximally and as close as possible to the joint, by reaching up into the axilla (a). • From this position, the examiner introduces a translatory motion to the humeral head in a posterior direction (b). • In a variation of hand position, the examiner may want to introduce the posterior translatory motion by pushing his hypothenar eminence against the anterior aspect of the tuberosity. 1. Reduction of posteriorly directed translation is often associated with scarring of the capsule (its posterior portion), as well as lesions affecting the glenoid labrum (e. g., labral tears), and omarthritis. Often the patient is able to report his typical pain reproduction when translatory motion is introduced by the examiner. Posterior instability (less common than anterior instability). Crepitus may also be heard during the maneuver. 2. If there is posterior instability, then translatory motion is increased posteriorly. 3. If the shoulder is displaced posteriorly, virtually no posterior translatory motion is palpable or visible during the maneuver. 4. Soft end-feel may be associated with hemarthrosis. • The examiner stands behind the sitting patient. • Starting lateroinferiorly, the thumb of the examination hand is placed over the inferior margin of the middle third of the clavicle (a). • With additional pressure of the other hand that is placed flat over the hand directly on contact with the clavicle, a posteriorly directed translatory motion is introduced by the examiner (b). • Thus, superior gliding is achieved by the thenar eminence moving upward from under the medial clavicle (b). 1. Dysfunctions associated with the sternoclavicular joint, as well as structural changes (e. g., arthrosis), are typically associated with a hard stop (end-feel). 2. The patient may report pain that is reproduced with the introduction of this maneuver. Note: Consideration is usually given to the first rib following this procedure. 1. Identified by side-bending neck and monitoring first rib elevation. 2. Monitor first rib elevation during inspiration. 3. Palpate scaleni and monitor during inspiration. The scalenus medius is the strongest of the group. • The examiner stands behind the sitting patient. • The thumb of the examination hand palpates the clavicle close to its articulation with the sternum (a). • By placing the thumb of his other hand over the palpating thumb, the examiner is able to introduce an inferiorly and anteriorly directed force vector to this joint (b). • Note: One should be careful not to dig one’s fingertips in behind clavicle, nor should one squeeze the sternocleidomastoid muscle into bone. Place fingers behind the edge of the clavicle. • Alternative: Use the thenar across the medial aspect of clavicle, directing the gliding movement inferiorly across the joint. 1. Inability to translate the sternoclavicular joint would indicate a dysfunction associated with the joint in form of hypomobility. 2. Pain reproduced or induced with this maneuver is indicative of a lesion affecting the joint capsule. • The examiner stands behind the sitting patient. • While one hand stabilizes (fixates) the acromion with thumb and index finger, the examining hand is placed such that the examiner is able to examine the lateral end of the clavicle with his thumb (a). • After applying some downward and anterior pressure (approximately 10° of motion), the examiner introduces a translatory force (b). • Normal physiologic motion allows a translatory component of 2–3 mm in the intact acromioclavicular joint. 1. Arthrotic/arthritic changes in the acromioclavicular joint typically reduce the translatory motion component that can be introduced. If the degenerative process is advanced, translatory motion may be impossible altogether. 2. There may be localized or referred/projected pain along the incriminated clavicle. Note: Evaluate motion, end-feel, and motion-induced pain. Good fixation of the shoulder girdle is important for accurate information. Either the clavicle or the acromion may be fixed. The choice of the most appropriate treatment for the individual patient is based in part on patient preference, and on the specific examination findings elicited in the examination. • Pain: Acute or chronic. Pain is localized or may radiate to the lateral side of the patient’s arm. Pain can occur with motion and/or may be pronounced during rest. Occasionally, the pain may occur only at the extreme of movement (a). • Motion testing: Shoulder motion restriction with hard end-feel. Diminished translatory motion with hard-elastic end-feel. • Muscle testing: The descending portion of the trapezius muscle and the pectoralis major muscle are often shortened while the medial shoulder fixator muscles may be weak (a). • The patient is supine and close to the edge of the examination table. • The patient’s shoulder and thorax are stabilized, if necessary, with a belt. • The physician places one hand on the medial side of the patient’s arm close to the joint. The other hand is placed over the distal forearm providing additional fixation. • The present neutral position is determined in the shoulder joint (b). • Passive mobilization is introduced perpendicular to the treatment plane. • One should avoid any angular motion (b). • This technique is well suited for pain treatment, but not beyond the application of level I traction. • One should pay particular attention to the following: if the anterior portion of the capsule is irritated, hand placement close to the joint may cause pain. This can usually be prevented simply by placing the hand more distally. • Pain: Acute or chronic pain, localized or radiating to the lateral side of the arm. Pain can occur with motion or may already be pronounced during rest. The pain may occasionally occur only at the extreme (a). • Motion testing: Shoulder abduction and elevation are restricted, as may be internal and external rotation with hard end-feel. Diminished inferior translatory motion with hard-elastic end-feel. • Muscle testing: The descending portion of the trapezius muscle and the pectoralis major muscle are often (possibly simultaneously) shortened while the medial shoulder blade fixator muscles may be weak (a). • The patient is supine and close to the edge of the examination table. • The shoulder is fixated by one of the physician’s hands. • The physician places the other hand over the arm distal to the shoulder but proximal to the elbow (b). • The present neutral position of the shoulder joint is determined. • Passive inferior mobilization is introduced parallel to the plane of treatment (b). • If the inferior translatory motion is found to be restricted, all other shoulder motion components are adversely affected as well. • Thus, in the presence of restricted angular motion, this mobilization technique takes on a central importance. • Pain: Acute or chronic. The anterior capsule is frequently painful upon palpatory pressure. Pain may be present both with motion and with rest (a). • Motion testing: Internal rotation or elevation restriction with hard end-feel. Diminished posterior translatory motion with hard end-feel. • Muscle testing: The pectoralis major and the descending portion of the trapezius muscles are often shortened, while the medial shoulder fixator muscles are frequently weak (a). • The patient is supine and close to the edge of the examination table. • The shoulder blade is supported with a sandbag or wedge. • The physician grasps the patient’s flexed elbow with one hand while stabilizing the entire arm against his body. • The present neutral position of the shoulder joint is determined. • The physician’s other hand is placed flat over the anterior portion of the patient’s arm just distal to the shoulder joint. • Traction level I is carefully introduced and is maintained throughout the treatment. • Passive posterior mobilization parallel to the treatment plane is introduced (b). • Pain: Chronic or localized. The anterior capsule components are tender upon pressure. Pain may occur with motion and/or may be significant at rest (a). • Motion testing: External rotation and/or extension restriction with hard end-feel. Diminished anterior translatory motion with hard end-feel. • Muscle testing: Often the descending portion of the trapezius and the pectoralis major muscles are shortened, while the medial shoulder fixator muscles are often weak (a). • The patient is prone and close to the edge of the examination table. • A sandbag or wedge is placed under the patient’s coracoid process, which assists in the stabilization of the shoulder blade. • The physician places one hand over the distal portion of the patient’s arm. • The present neutral position is determined. • Often the arm lies in the same plane as the spine of the scapula. • The physician places his other hand over the posterior side of the patient’s arm close to the joint (b). • One should make sure that only the coracoid process is supported on the anterior side. The head of the humerus, in order to undergo anterior mobilization, should be free to move. • If the anterior support is not sufficient to stabilize the shoulder, a belt may be utilized in addition. • Traction level I should be maintained throughout the entire treatment procedure. • Passive anterior mobilization parallel to the treatment plane is introduced (b). • One must be careful not to introduce any additional angular motion components. • If there is pain during this procedure, one should first reevaluate the patient’s position and make sure that the present neutral position is correctly identified. • Pain: Pain with movement. The joint capsule is tender upon palpation (a). • Motion testing: Diminished posterior and/or inferior translatory motion with hard end-feel. • Muscle testing: The sternocleidomastoid and scalene muscles may be shortened (a). • The patient is supine. • For superior mobilization: the physician places the thenar eminence of one hand over the medial half of the clavicle. The other hand is placed on top of the mobilizing hand in order to provide additional support (force) (b). • For inferior mobilization: the medial clavicle is fixated superiorly with the physician’s thumb and index finger (c). • Mobilization of the medial clavicle portion in either the superior or inferior direction by the physician. • The superior mobilization procedure can be carried out synchronously with the patient’s exhalation. The pressure around the joint capsule should be minimal. • Pain: The pain is often chronic and localized; it can easily be provoked by palpatory pressure. The joint space is tender on palpation. Abduction movement of the arm may cause pain (a). • Motion testing: Diminished anteroinferior translatory motion of the clavicle. Abduction of the arm is restricted and painful, especially toward the extreme of motion (abduction to about 120–180°). • Muscle testing: The descending portion of the trapezius muscle may be shortened (a). • The patient is seated upright with the thoracic spine extended. • The physician stands behind the patient and fixates the patient’s clavicle with the palmar side of his forearm. • With his other hand, he fixates the patient’s head, while at the same time providing stabilization to the cervical spine (b). • Active mobilization is introduced by requesting the patient to lift his shoulder against the fixated clavicle. • The mobilization procedure is performed while the patient inhales (b). • In this maneuver, the acromion undergoes a superior translatory motion with respect to the clavicle. • If with this maneuver the patient reports pain in the cervical spine, the procedure should be terminated at once. One should then examine and, if necessary, treat the cervical spine. • Before proceeding to check the elbow itself, observe the entire patient: – Gait and arm-swing, absence of normal motion (e. g., when the patient enters the room) in the upper limbs. – His posture and the relationships of the upper limbs with respect to the trunk and overall body habitus (e. g., forward head posture, elevated shoulder, hiked pelvis). – Any readily visible structural asymmetries (e. g., scoliosis, prostheses). – Check for changes in skin color (erythema) and scars. – Note any presence of atrophy of the limb. – Signs of previous surgery, scars. • The formal inspection of the elbow itself may be best performed with the patient is sitting. • He is requested to actively flex his elbows to about 60°, then extend them, which is followed by supinating the forearms. The patient is viewed from the front (a) or the back to determine the angulation of the elbows. • In the resting, neutral position, the elbow is held in – Supination of about 5–10° and – Valgus between 10° and 15°. There is some variation in normal elbow valgus angulation between men and women, with values being slightly larger for men than women. 1. Exaggerated valgus position (e. g., “gunstock” deformity) 2. Exaggerated varus position (e. g., trauma, articular changes). 3. Restricted supination motion with forearm held in relative pronation. 4. Exaggerated flexion position (e. g., flexion contracture). • The patient is sitting. • The patient is requested to abduct the arm at the shoulder to 90° and then supinate the forearm. • In this position, the patient then actively extends (a) and flexes (b) his elbow. • Observe the degree and symmetry of motion on one side as compared to the other. • Look for hypermobility (e. g., laxity) or motion restriction. • Active extension to 0° is considered normal (according to the 0-Neutral method). • Note: During flexion, the patient should be able to touch the acromioclavicular joint (b). • The individual movements should be performed slowly. 1. Hypermobility. 2. Motion restriction. • The patient is sitting. • The examiner stands at the patient’s side and supports the patient’s elbow with one hand. • Passive elbow flexion (a) and extension (b) are slowly introduced to the motion barrier. • End-feel is evaluated. • Monitor joint behavior by fingertip pincer grip (palpation of joint line). 1. Motion restriction either with or without pain. Investigate for possibility of trauma history. 2. Motion-induced pain indicates a pathological situation. 3. Abrupt motion stop due to “joint mice” (osteochondrosis dissecans, chondromatosis). 4. When affected, elbow flexion is typically more frequently affected than extension. • The patient is sitting. • The patient is requested to slightly forward flex his arm and supinate his forearm. • The examiner guides the elbow to full extension. The distal end of the humerus is fixated by the examiner. • With his other hand placed proximal to the wrist, the examiner introduces passive elbow abduction (varus stress) (a) and adduction (valgus stress) (b) and gently stresses these positions at their extreme. • Valgus position of up to 5° is considered normal. • Varus and valgus stress testing can also be performed with the elbow flexed to no greater than 30° (olecranon “unlocked” from olecranon fossa). • Varus testing may best be performed with the shoulder being fully internally rotated. 1. Valgus greater than 5°. 2. Abnormal increase in either varus or valgus position due to laxity (hypermobility). • The patient is sitting. • The examiner is at the patient’s side. • With the arm close to his trunk, the patient is requested to flex his elbow to 90°, • Patient then moves the arm slowly through supination (a) and pronation (b) motions. • Subsequently, the examiner takes hold of the patient’s forearm so as to introduce motion to the elbow joint. The examiner’s other hand is placed at the humerus proximal to the elbow joint and, with fingers in a pincerlike grip (thumb–index finger), he monitors the radiohumeral joint motion while passively introducing elbow supination (c) and pronation (d). • The examiner evaluates radiohumeral motion with regard to symmetry, quantity, and quality of motion. • Normal, physiologic pronation and supination motion is between 80° and 90°. 1. Restricted pronation and/or supination may be due to dysfunction associated with the radiohumeral joint or the radioulnar joint. 2. The patient reports pain and/or paresthesias in the distal forearm when the following maneuver is performed. The forearm is held in pronation while the patient tries to supinate it against the resistance for approximately 30 seconds. This may lead to compression of the radial nerve as it passes through the supinator muscles. This procedure may then cause pain and/or paresthesias in the proximal forearm (supinator muscle). 3. Isometric pronation may provoke compression of the deep branch of the median nerve. This is less common and would involve the pronator teres muscle. • The patient is sitting. • The patient’s arm is abducted and the elbow is slightly flexed (up to 70°). • The examiner is at the patient’s side. • The examiner places one hand over the distal forearm proximal to the wrist. This hand will stabilize the forearm and will then introduce the pronation (a) and supination (b) motions. • With the thumb placed over the radius proximally and the fingers reaching around medially over the proximal forearm, the examiner carefully evaluates the passive motion at the radiohumeral joint for quality of motion (e. g., smoothness of motion) and end-feel, as well as overall range of motion and presence of any particular motion restrictions. 1. Motion loss at the radiohumeral joint. 2. Hard end-feel with or without crepitus may indicate underlying degenerative changes • The patient is supine. • The examiner, with one hand (hand 1) placed at the distal forearm proximal to the wrist, guides the elbow into the neutral position, with approximately 40° of shoulder abduction. • With his other hand (hand 2), the examiner gently but firmly fixates the distal one-third of the arm against the examination table. • For additional preparation and positioning the examiner introduces 30° flexion to the elbow (using hand 1 [a]). • From this position, the examiner introduces axial traction using body weight, especially at the humeroradial joint (b). • With the index finger of the stabilizing hand (hand 2), the examiner monitors the translatory motion possible and the presence of any motion-induced pain. • Look for a hard end feel. Traction motion may assist in diagnosing pathology at the humeroulnar joint by translation of the olecranon relative to the trochlea. • With slight pronation and change of pulling grip to mainly over the distal radius, some additional movement is obtained at the proximal radioulnar joint. Degenerative changes in the humeroradial joint typically cause a hard end-feel and motion-induced pain. • The patient is supine. • The patient’s arm is slightly abducted at the shoulder and slightly flexed at the elbow. The hand is in a position between pronation and supination. • With one hand, the examiner carefully fixates the patient’s ulna proximally as it rests on the examination table. • With his other hand, the examiner localizes the radial head and then makes good purchase between the thumb (lateral, on extensor surface of the elbow) and index finger (medial, on the flexor side of the elbow) in a pincerlike grip. • Starting from this position, the examiner introduces a translatory gliding motion in the anterior (radial) direction (a) followed by translatory motion in the posterior (ulnar) direction (b). 1. Pain and/or reduced translation motion may be due to osteoarthritis. 2. Motion restriction (hypomobility) or laxity (hypermobility). 3. Crepitus. 4. Chronic lateral epicondylitis may also be associated with findings of hypomobility. • The patient is sitting. • The examiner is standing at the patient’s side and abducts the patient’s arm at the shoulder to 40°. • In the next step, the examiner then fixates the patient’s hand in a flexed position and the forearm in a pronated position. By flexing the wrist, the extensors are placed on additional stretch. • The thumb of the other hand is placed of the extensor surface of the elbow, and the fingers reach around to the flexor side of the elbow. • The thumb now palpates the attachments of the wrist extensors at the lateral epicondyle and evaluates the area for tenderness, bogginess, and tissue abnormalities (e. g., hard, nodular-like changes). • From this position (a), the patient is requested to actively extend his wrist against equal but opposite resistance provided by the examiner (isometric contraction) (b). • Monitor radial head with pincer fingertip palpation. Isometric contraction of extensors (b). Gradually extend elbow, maintaining maximal wrist flexion (c). 1. Active isometric contraction should typically be painless. The radial head may undergo some minor rotation during this maneuver but there should be no restriction. 2. Pain elicited in the region of the lateral epicondyle with resisted dorsiflexion may help confirm the diagnosis of “tennis elbow” (lateral epicondylitis)
Shoulder Joint and Elbow, Hand, and Fingers
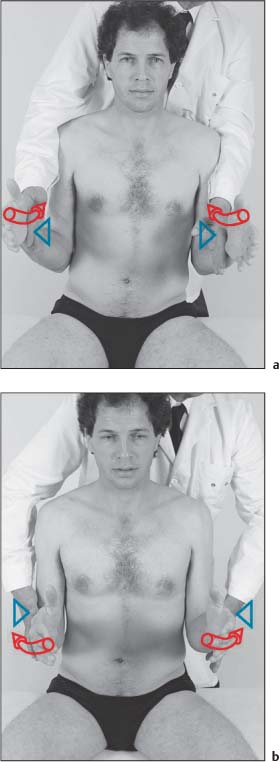
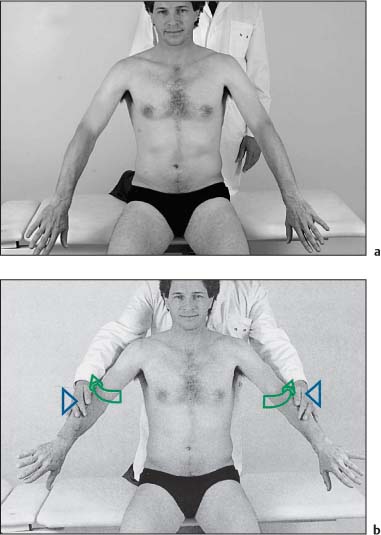
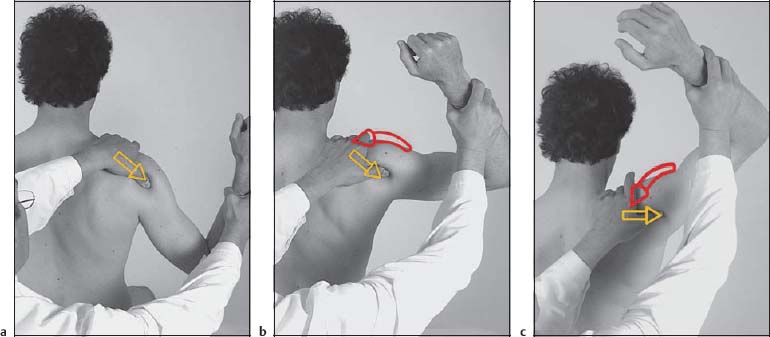
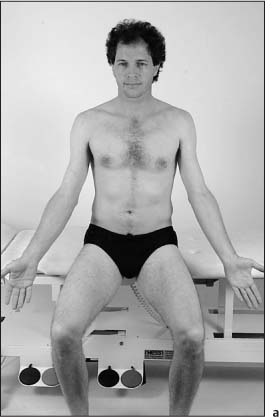
Evaluation: Functional Screening Examination to Give a Rough Evaluation of Normality or Pathology in the Upper Limb Within 1 Minute (Figs. I16.2a–h)
Examination Procedure
Positive Findings
Structural Examination and Functional Treatment of the Shoulder
Structural Examination of the Shoulder
Shoulder Joint
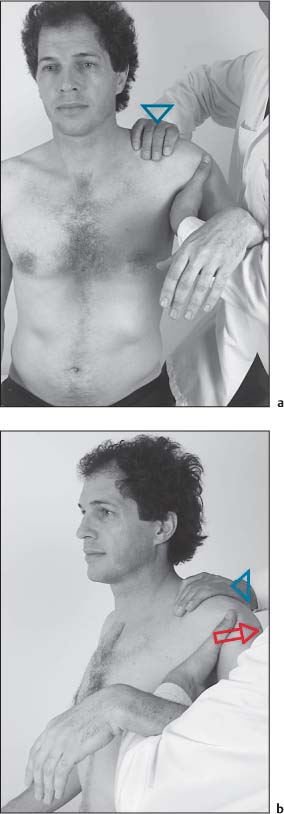
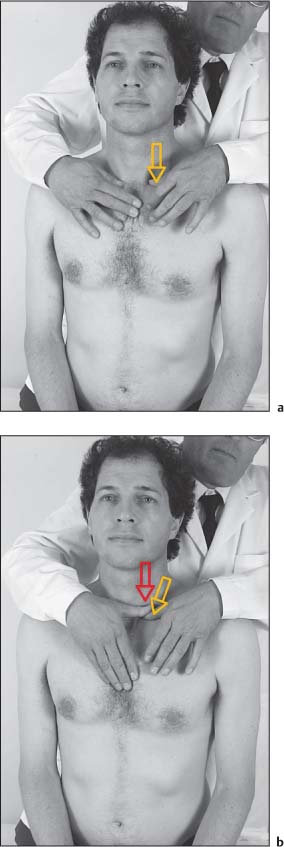
Evaluation: Shoulder Surface Anatomy and Bony Landmarks (Figs. I16.1a–d)
Examination Procedure
Evaluation: Shoulder Surface Anatomy and Bony Landmarks (Figs. I16.1e–j)
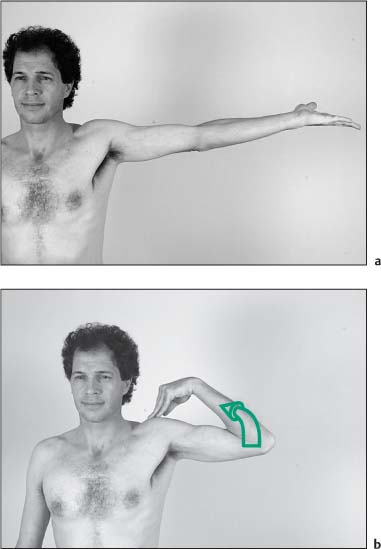
Evaluation: Active Motion Testing with Emphasis on Muscle Strength Assessment (Figs. I16.3a–d)
Examination Procedure
Positive Findings
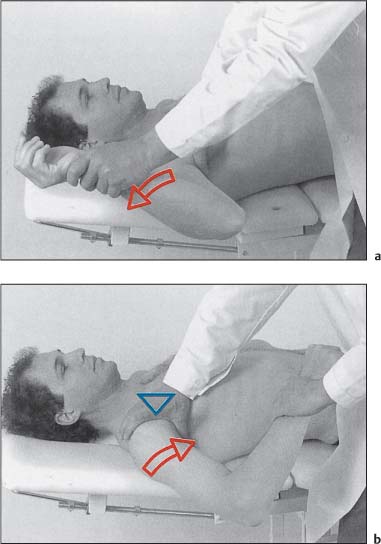
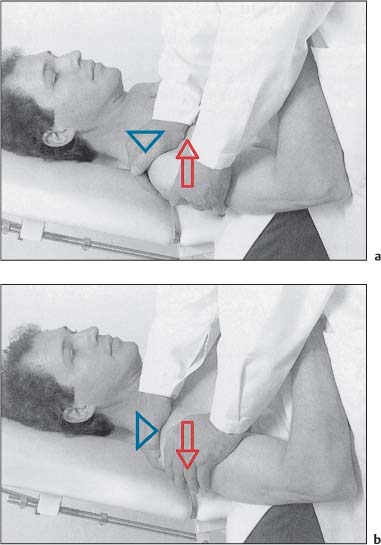
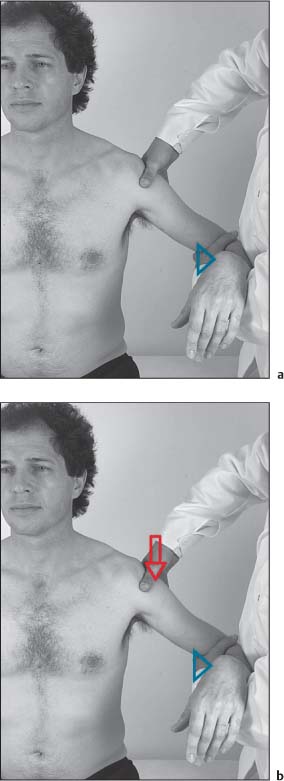
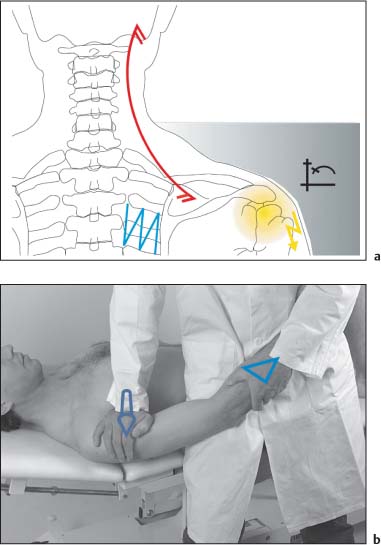
Evaluation: Passive Internal and External Rotation (Figs. I16.4a, b)
Examination Procedure
Notes:
Positive Findings
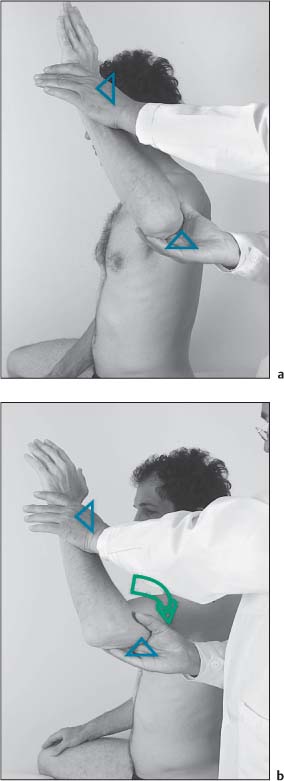
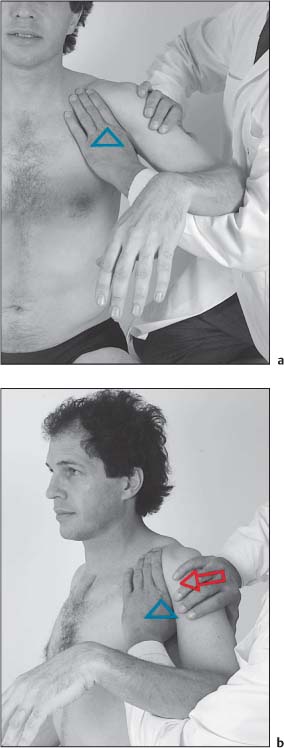
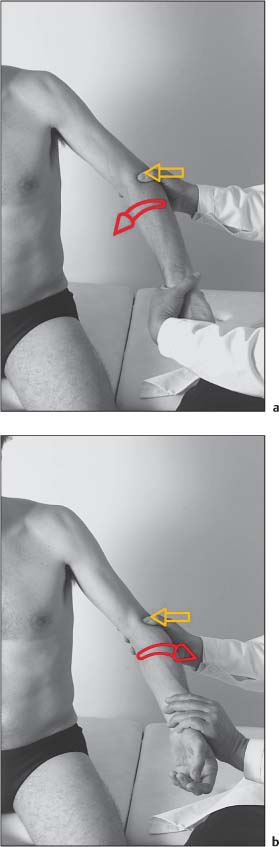
Evaluation: Passive Internal and External Rotation of Glenohumeral Joint Codman Test (Figs. I16.5a, b)
Examination Procedure
Positive Findings
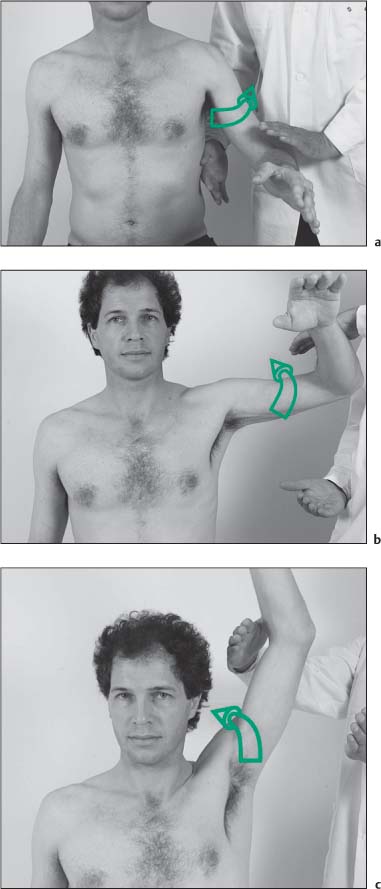
Evaluation: Painful Arc for Impingement Active Motion Testing, Painful Arc (0–120°) (Figs. I16.6a–c)
Examination Procedure
Positive Findings
Notes:
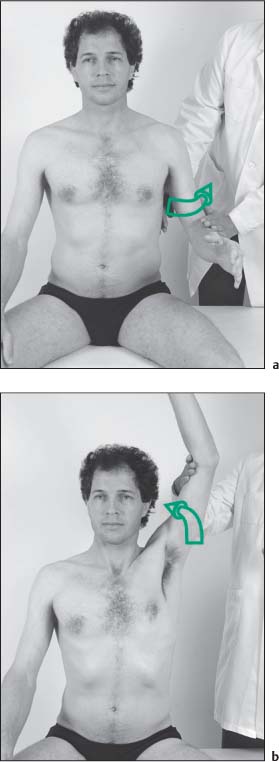
Evaluation: Active Motion Testing and Upper Painful Arc 120°–150° (180°) (Figs. I16.7a, b)
Examination Procedure
Positive Findings
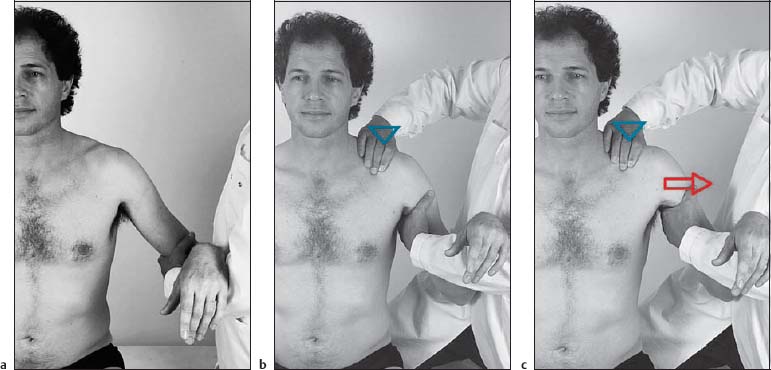
Evaluation: Global Shoulder Strength Test for Rotator Cuff (Figs. I16.8a, b)
Examination Procedure
Positive Findings
Evaluation: Active Abduction, Rotator Cuff Strength Test, including Supraspinatus Muscle Jobe Test (Figs. I16.9a, b)
Examination Procedure
Positive Findings
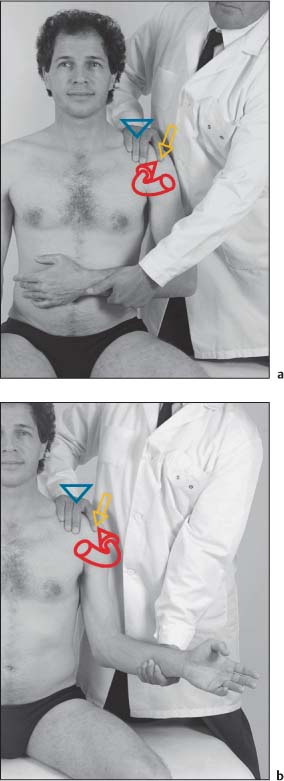
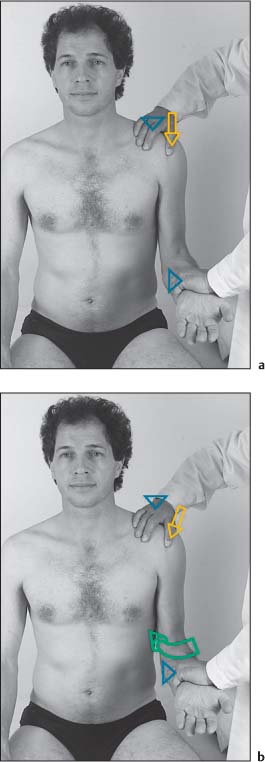
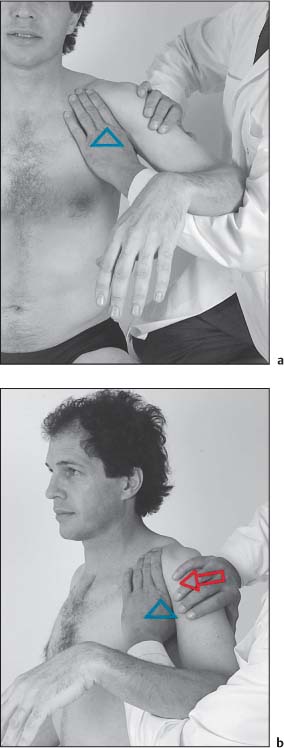
Evaluation: Active External Rotation, Strength Testing of the Rotator Cuff, Testing of Infraspinatus Muscle Strength (Figs. I16.10a, b)
Examination Procedure
Positive Findings
Evaluation: Active Motion/Strength Testing of Internal Rotation, Rotator Cuff Strength Test, Subscapularis Strength Test (Figs. I16.11a, b)
Examination Procedure
Positive Findings
Evaluation: Resisted Flexion and Supination at the Elbow while Palpating the Biceps Tendon (Figs. I16.12a–c)
Examination Procedure
Positive Findings

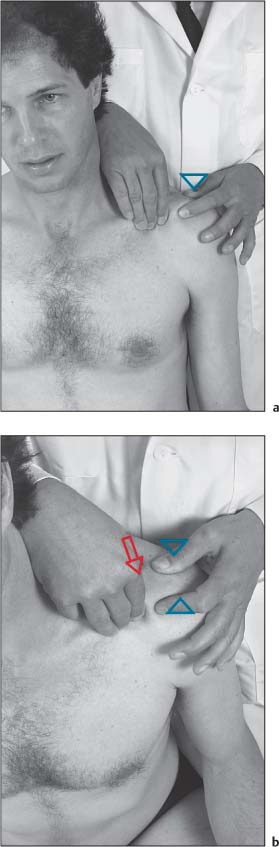
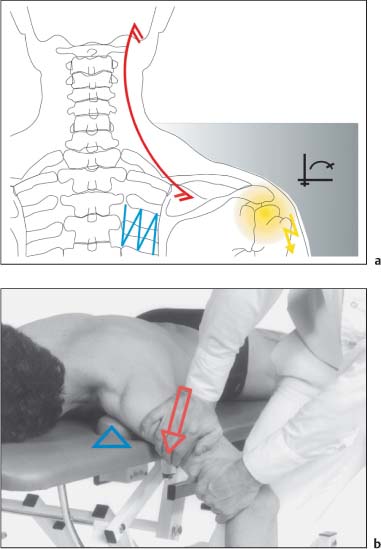
Evaluation: Instability Apprehension Test (Passive External Rotation Test) (Figs. I16.13a–c)
Examination Procedure
Positive Findings
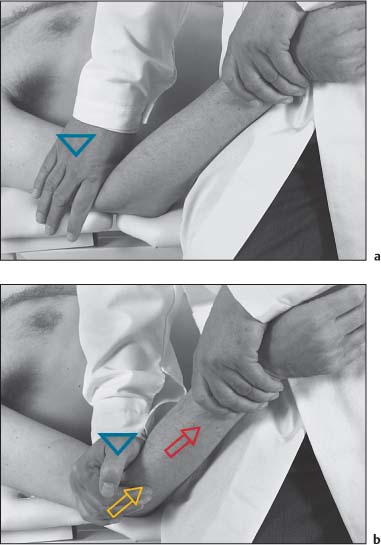
Evaluation: Glenohumeral Instability (Anteroposterior Direction) (Figs. I16.14a, b)
Examination Procedure
Positive Findings
Evaluation: Glenohumeral Anterior Instability Testing (Figs. I16.15a, b)
Examination Procedure
Positive Findings
Evaluation: Lateral Traction (Figs. I16.16a–c)
Examination Procedure
Positive Findings
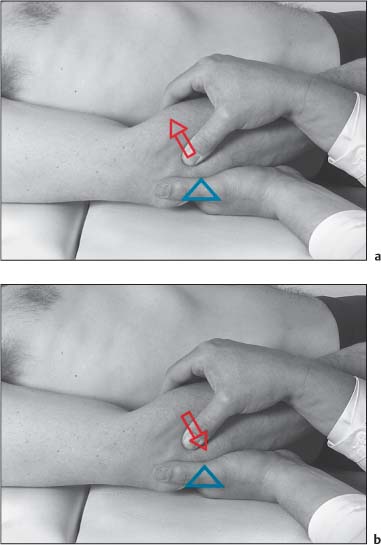
Evaluation: Translation in Inferior Direction (Glenohumeral Joint) (Figs. I16.17a, b)
Examination Procedure
Positive Findings
Evaluation: Translation in Anterior Direction (Glenohumeral Joint) (Figs. I16.18a, b)
Examination Procedure
Positive Findings
Evaluation: Translation in Posterior Direction (Glenohumeral Joint) (Figs. I16.19a, b)
Examination Procedure
Positive Findings
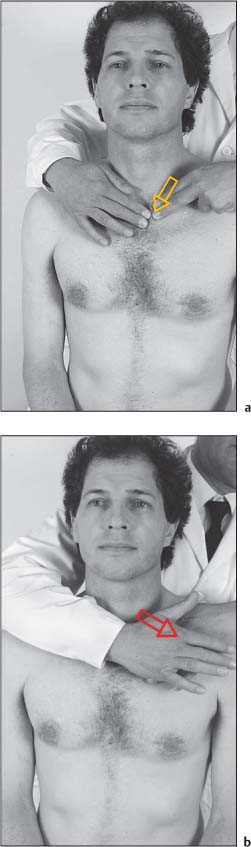
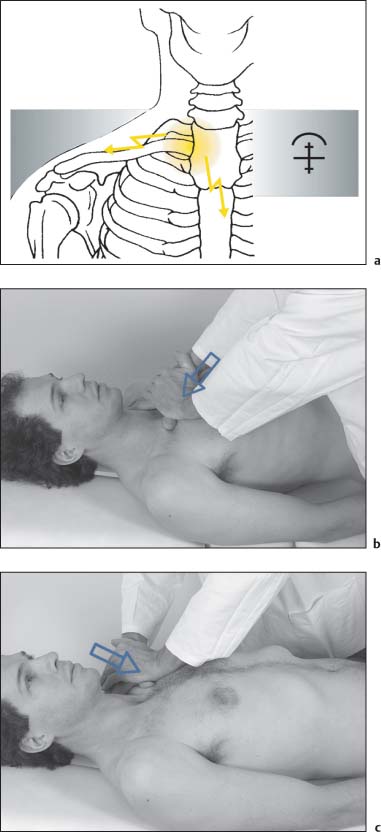
Evaluation: Posterior Translation of the Sternoclavicular Joint (Figs. I16.20a, b)
Examination Procedure
Positive Findings
Evaluation: Inferior-Anterior Translation of the Sternoclavicular Joint (Figs. I16.21a, b)
Examination Procedure
Positive Findings
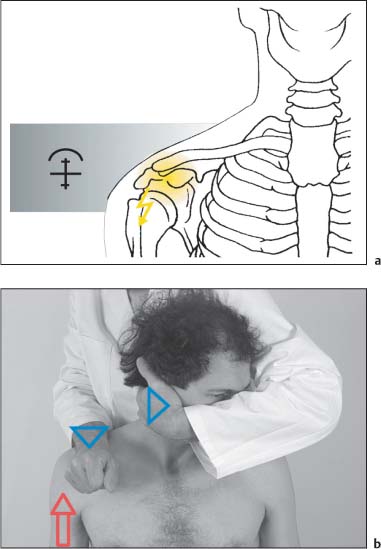
Evaluation: Translation of the Acromioclavicular Joint (Figs. I16.22a, b)
Examination Procedure
Positive Findings
Functional Treatment of the Shoulder
Shoulder Joint
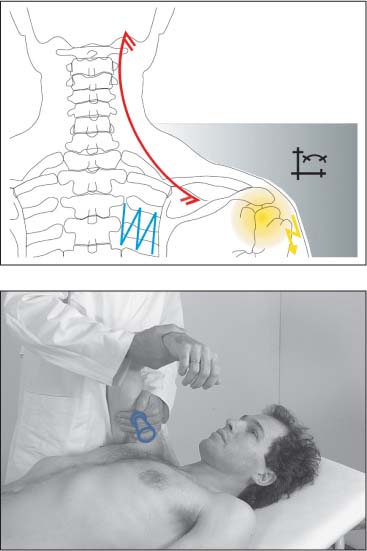
Mobilization without Impulse: Traction (Figs. I16.23a, b)
Indications
Patient Positioning and Set-up
Treatment Procedure
Comments
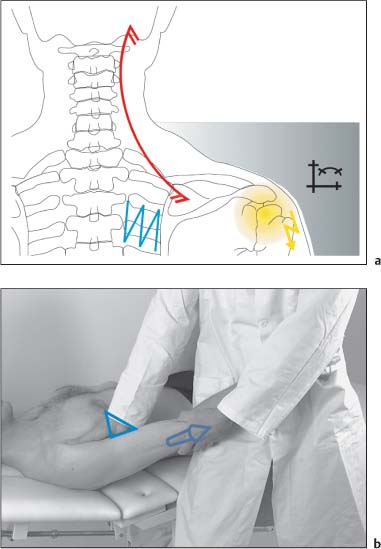
Mobilization without Impulse: Inferior Direction (Figs. I16.24a, b)
Indications
Patient Positioning and Set-up
Treatment Procedure
Comments
Mobilization without Impulse: Posterior Direction (Figs. I16.25a, b)
Indications
Patient Positioning and Set-up
Treatment Procedure
Mobilization without Impulse: Anterior Direction (Figs. I16.26a, b)
Indications
Patient Positioning and Set-up
Notes:
Treatment Procedure
Comments
Sternoclavicular Joint
Mobilization without Impulse: Superior and Inferior Direction (Figs. I16.27a–c)
Indications
Patient Positioning and Set-up
Treatment Procedure
Acromioclavicular Joint
NMT 1: Superior Direction (Figs. I16.28a, b)
Indications
Patient Positioning and Set-up
Treatment Procedure
Comments
Structural Examination and Functional Treatment of the Elbow
Structural Examination of the Elbow
Evaluation: Elbow Inspection (Fig. I16.29a)
Examination Procedure
Positive Findings
Evaluation: Active Elbow Flexion and Extension (Figs. I16.30a, b)
Examination Procedure
Positive Findings
Evaluation: Passive Elbow Flexion and Extension (Figs. I16.31a, b)
Examination Procedure
Positive Findings
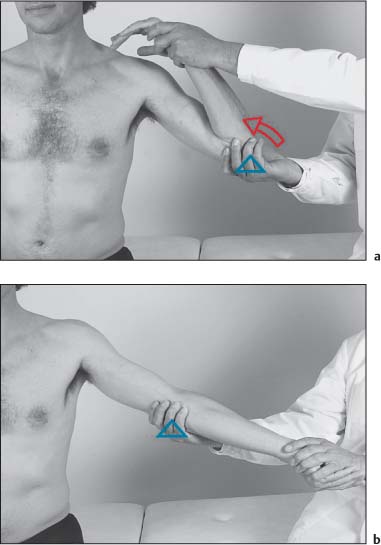
Evaluation: Varus and Valgus Stress to Elbow Joint (Figs. I16.32a, b)
Examination Procedure
Varus and Valgus Stress Test
Positive findings
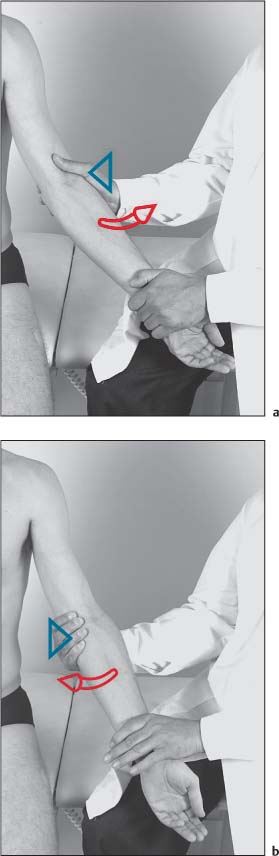
Evaluation: Active and Passive Pronation and Supination (Figs. I16.33a–d)
Examination Procedure
Positive Findings

Evaluation: Passive Pronation and Supination, End-Feel and Palpation of the Proximal Radioulnar and Humeroradial Joint (Figs. I16.34a, b)
Examination Procedure
Positive Findings
Evaluation: Axial Traction (Figs. I16.35a, b)
Examination Procedure
Notes:
Positive Findings
Evaluation: Translation of Proximal Radioulnar Joint (Figs. I16.36a, b)
Examination Procedure
Positive Findings
Evaluation: Isometric Contraction of Wrist Extensors against Resistance (Figs. I16.37a–c)
Examination Procedure
Positive Findings
Related posts:
 Evidence Base in Manual Medicine for the Treatment of Back Pain Syndromes: Background, Status, and Practice
 The Pharmacologic and Psychologic Treatment of Chronic Pain
 Nonradicular Pain: Spondylogenic and Myofascial Pain Syndromes
 Myofascial Trigger Point Treatment
 Imaging Studies of the Spine
 Structural and Functional Diagnosis and Treatment of the Spine, Ribs, Pelvis, and Sacroiliac Joint
Stay updated, free articles. Join our Telegram channel

Full access? Get Clinical Tree


