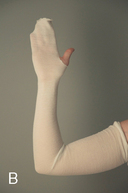
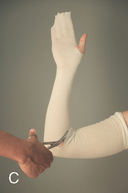
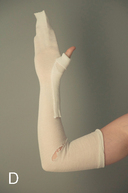
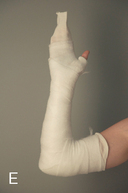
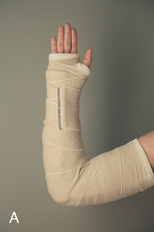
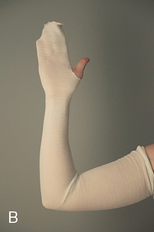
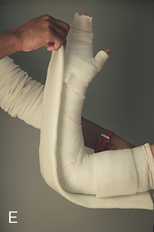
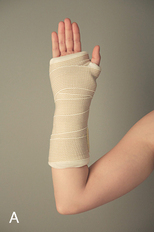
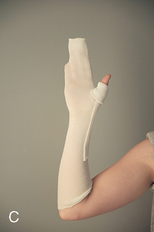
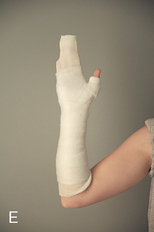
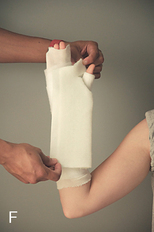
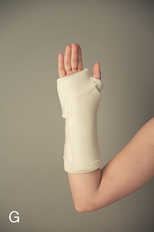
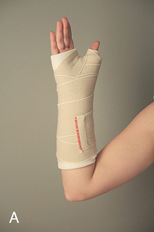
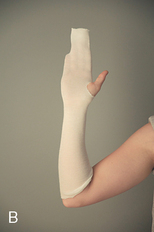
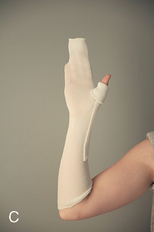
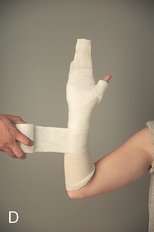
11 Splinting and casting • Pull just enough tension on the wrap so that it is taut but not so much that the material tears away. • The padding should be predominantly rolled from distal toward proximal. • Commonly, roll just enough padding to eliminate any residual shadow-effect (i.e., the padding should be relatively opaque versus the layers below, typically three layers thick) • Thoroughly wet the selected material with clean room-temperature water and squeeze out the excess water. A dry towel may be used to help absorb or damp dry the material as needed. • The warmer the water, the quicker the set time of the material; however, the heat released by the material also increases and this can be sufficient to cause skin burns or irritation. • If using plaster, keep in mind while measuring to fit the splint that plastic will shrink a bit when wet. • For the typical adult, a plaster splint will need to be between 10 and 15 layers thick for adequate stability. • Thoroughly wet the selected cast tape with clean room-temperature water and leave the material wet or lightly wring depending on time likely required for end application. • It is best to leave the material a bit saturated because any wringing will only quicken the set time of the material and care must be taken so that the material does not cure before the cast has finished being rolled in its entirety. • The warmer the water, the quicker the set time of the material as well, so follow the same guidelines. • Pay great care not to pull significant tension on the tape when wrapping the cast; simply unroll it onto the extremity to avoid compromising circulation. Upper extremity sugar tong (reverse) splint: Figure 11-1, A Figure 11-1. A, Upper extremity sugar tong (reverse) splint. B, Apply stockinette. C, Cut the stockinette and overlap at the antecubital fossa. D, Create a protective sleeve of padding over the thumb with the stockinette and fold over on itself. E, Apply casting padding. F, Apply splint and trim to fit. G, Cut slits in the splint at the elbow to create wings that overlap. H, Mold the wings around the elbow. I, Fold the ends of the stockinette back over the splint. J, Wrap elastic bandage over splint to secure in place. 1) With the patient’s arm flexed to approximately 90 degrees and their wrist at neutral, fit the 2-inch stockinette in length from just beyond the fingertips up to midway of the humerus. Cut a hole in the stockinette to adequately accommodate the thumb (Fig. 11-1, B). 2) At the antecubital fossa, cut a slit in the stockinette (epicondyle to epicondyle), and pull the proximal portion of the stockinette to overlap the distal portion (or vice versa) (Figs. 11-1, C and 11-1, D). 3) Begin wrapping the padding at the metacarpal heads (MCHs) and proceed proximally with a 50% overlay. Figure-of-eight wrap around the elbow and apply ample padding around the bony prominences of the epicondyles. Continue wrap up to the midhumerus, but keep about 2 fingerbreadths distal to the stockinette edge (Fig. 11-1, E). 4) Measure so that the selected splint material fits as a “U” around the elbow and along the dorsal and volar sides of the arm all the way to the MCHs, respectively (Fig. 11-1, F). 5) Apply the splint material beginning on the volar side at the palmar crease of the hand, proximally toward the elbow, around the elbow, and back to just distal to the MCHs on the dorsal side of the hand. Any excess material can be trimmed away or folded back on itself. 6) Pull the underlying stockinette and padding back over the splint at the distal and proximal ends, respectively (Fig. 11-1, I). This will protect and pad the patient from the edge of the splint at those areas. 7) Wrap the elastic bandage over the wet splint to just secure it in place. Wrap distal toward proximal; use a figure-of-eight wrap to cover around the elbow (Fig. 11-1, J). 8) The splint should be molded to maintain given reduction or with the wrist at neutral (functional) unless otherwise indicated. Figure 11-2. A, Upper extremity long arm posterior splint. B, Apply stockinette. C, Cut the stockinette and overlap at the antecubital fossa. D, Apply casting padding. E, Apply splint and trim to fit. F, Fold the ends of the stockinette back over the splint. Cut slits in the splint at the elbow to create wings that overlap to mold around the elbow. 1) With the patient’s arm flexed to approximately 90 degrees and their wrist at neutral, fit the 2-inch stockinette in length from just beyond the fingertips up to (and with some gather at) the axilla. Cut a hole in the stockinette to adequately accommodate the thumb (Fig. 11-2, B). 2) At the antecubital fossa, cut a slit in the stockinette (epicondyle to epicondyle) and pull the proximal portion of the stockinette to overlap the distal portion (or vice versa) (Fig. 11-2, C). 3) Begin wrapping the padding at the MCHs and proceed proximally with a 50% overlay. Figure-of-eight wrap at the elbow, and apply ample padding around the bony prominences of the epicondyles. Continue wrapping up to the axilla (Fig. 11-2, D). 4) Measure so that the selected splint material fits from the fifth MCH to the axilla. 5) Apply the splint material beginning on the ulnar side at the palmar crease along the fifth metacarpal of the hand, along the ulna, posteriorly along the elbow up just distal to the axilla. Any excess material can be trimmed away or folded back on itself (Fig. 11-2, E). 6) Pull the underlying stockinette and padding back over the splint at the distal and proximal ends, respectively. This will protect and pad the patient from the edge of the splint at those areas. 7) Wrap the elastic bandage over the wet splint to just secure it in place. Wrap distal toward proximal; use a figure-of-eight wrap to cover around the elbow. 8) The splint should be molded to maintain given reduction and with the wrist in a functional position unless otherwise indicated. Figure 11-3. A, Upper extremity volar short arm splint. B, Apply stockinette. C, Create a protective sleeve of padding over the thumb with the stockinette and fold over on itself. D, Apply casting padding. E, Apply casting padding. F, Apply splint and trim to fit. G, Fold the ends of the stockinette back over the splint. 1) With the patient’s wrist at neutral, fit the 2-inch stockinette in length from just beyond the fingertips up to the antecubital fossa. Cut a hole in the stockinette to adequately accommodate the thumb (Fig. 11-3, B). 2) Begin wrapping the padding at the MCHs and proceed proximally with a 50% overlay. Continue wrapping up to the antecubital fossa (Figs. 11-3, D and 11-3, E). 3) Measure so that the selected splint material fits in length from the MCHs to within about two to three fingerbreadths (about 2 inches) of the antecubital fossa. 4) Apply the splint material beginning on the volar side at the palmar crease of the hand, proximally toward the antecubital fossa. Any excess material can be trimmed away or folded back on itself (Fig. 11-3, F). 5) Pull the underlying stockinette and padding back over the splint at the distal and proximal ends, respectively. This will protect and pad the patient from the edge of the splint at those areas (Fig. 11-3,G). 6) Wrap the elastic bandage over the wet splint to secure it in place. Wrap distal toward proximal. 7) The splint should be molded as to counter the given injury or with the wrist at neutral unless otherwise indicated. Figure 11-4. A, Upper extremity thumb spica splint. B, Apply stockinette. C, Create a protective sleeve of padding over the thumb with the stockinette and fold over on itself. D, Apply casting padding. E, Apply casting padding. F, Apply splint and trim to fit. G, Fold the ends of the stockinette back over the splint. 1) With the patient’s wrist at neutral, fit the 2-inch stockinette in length from just beyond the fingertips up to the antecubital fossa. Cut a hole in the stockinette to adequately accommodate the thumb (Fig. 11-4, B). • Interphalangeal joint (IP) free = If leaving the distal phalanx free, the collar should be just proximal to the distal interphalangeal joint (DIP). • IP joint included = If enclosing the distal phalanx, the collar should approach the thumb tip. 2) Begin wrapping the padding at the MCHs and proceed proximally with a 50% overlay. Continue wrapping up to just distal to the antecubital fossa (Figs. 11-4, D and 11-4, E). 3) Measure so that the selected splint material fits in length from the MCHs to within about two to three fingerbreadths (about 2 inches) of the antecubital fossa. 4) Apply the splint material centered over the radial border of the thumb and forearm, beginning just proximal to the padded edge of stockinette (or cast/undercast padding) protecting the thumb proximally toward the antecubital fossa. Any excess material can be trimmed away or folded back on itself (Fig. 11-4, F). 5) Pull the underlying stockinette back just over the padding at the distal and proximal ends, respectively. This will protect and pad the patient from the edge of the cast at those areas (Fig. 11-4, G). 6) Wrap the elastic bandage over the wet splint to secure it in place. Wrap distal toward proximal. Figure 11-5. A, Upper extremity ulnar gutter splint. B, Apply stockinette. C, Create a protective sleeve of padding over the thumb with the stockinette and fold over on itself. D, Cut a slit in the stockinette between the long and ring fingers. E, Place some cast padding between the fingers to prevent skin maceration. F, Apply cast padding starting around the wrist and fingers. G, Continue cast padding proximally. H, Apply splint and trim to fit. 1) With the patient’s wrist at neutral, fit the 2-inch stockinette in length from about 1 inch beyond the fingertips up to the antecubital fossa. Cut a hole in the stockinette to adequately accommodate the thumb (Fig. 11-5, B). 2) At the distal end of the stockinette, cut a slit in the stockinette longitudinally toward the web space between the long and ring fingers (Fig. 11-5, D). 3) Trim or fold a few layers of cast/undercast padding to place between the length of the ring and small fingers to prevent skin maceration (Fig. 11-5, E). 4) Begin wrapping the padding just at the tips of the ring and small fingers and proceed proximally with a 50% overlay. Continue wrapping up to just distal to the antecubital fossa (Figs. 11-5, F and 11-5, G). 5) Measure so that the selected splint material fits from the tip of the ring finger to the antecubital fossa. 6) Apply the splint material beginning on the ulnar side of the small finger (distally equal to the ring ginger) forming a “gutter” along the fifth metacarpal and the ulna proceeding toward the antecubital fossa. Any excess material can be trimmed away or folded back on itself (Fig 11-5, H). 7) Pull the underlying stockinette and padding back over the splint at the distal and proximal ends, respectively. This will protect and pad the patient from the edge of the splint at those areas. 8) Wrap the elastic bandage over the wet splint to just secure it in place. Wrap distal toward proximal. 9) The splint should be molded at the fingers, hand, and wrist to maintain a given reduction or counter the given injury as indicated. Figure 11-6. A, Lower extremity sugar tong (ankle stirrup/U) splint. B, Apply stockinette and create a fold over the anterior ankle. C, Apply cast padding. D, Apply splint and trim to fit. E, Center the splint on the lateral and medial sides of the leg and care not to overlap the proximal ends. 1) With the patient’s ankle at neutral (ankle dorsiflexed to approximately 90 degrees), fit the 3-inch stockinette in length distally from the MTHs up to the patella and popliteal fossa. 2) At the ankle joint, cut a slit in the stockinette (malleolus to malleolus) and pull the proximal portion of the stockinette to overlap the distal portion (or vice versa) (Fig. 11-6, B). 3) Begin wrapping the padding just proximal to the MTHs and proceed proximally with a 50% overlay. Figure-of-eight wrap at the ankle/heel and apply ample padding around the bony prominences of the malleoli. Continue wrapping up to the tibial tuberosity (Fig. 11-6, C). 4) Measure so that the selected splint material fits as a “U” under the heel of the foot and up the ankle along the lateral and medial sides of the leg all the way to even with the level of the fibular head (Fig. 11-6, D). 5) Apply the splint material in the same manner used to measure above. Any excess material can be trimmed away or folded back on itself. 6) Pull the underlying stockinette and padding back over the splint at the distal and proximal ends, respectively. This will protect and pad the patient from the edge of the splint at those areas. 7) Wrap the elastic bandage over the wet splint to just secure it in place. Wrap distal toward proximal; use a figure-of-eight wrap to cover around the ankle and heel. 8) The splint should be molded with the ankle at neutral unless otherwise indicated. Figure 11-7. A, Lower extremity posterior leg splint. B, Apply stockinette and create a fold over the anterior ankle. C, Apply cast padding. D, Apply cast padding with ankle in neutral. E, Apply splint and trim to fit. F,
Pearls of splinting and casting
 The stockinette should fit the extremity without being too loose or tight.
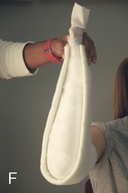
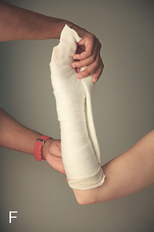
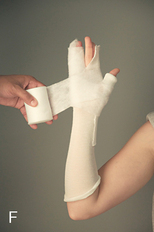
 Cast/undercast padding should be appropriate to the diameter and length of the extremity.
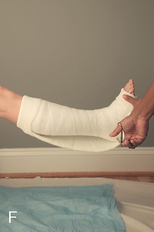
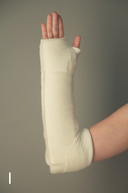
 An elastic bandage or wrap should be appropriate to the diameter and length of the extremity.
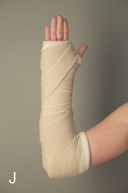
 When rolling the cast/undercast padding:
 When ready to apply the splint:
Splints


Application
 The 1-inch width stockinette may be used specifically for the thumb to create a protective sleeve of padding by folding suitable length over on itself three times.
 The 3-inch width padding works for wrapping the hand, wrist, and forearm, whereas the 4-inch width is suitable for wrapping from the forearm, elbow, and arm.
 Pay particular care to any material obstructing the thumb.
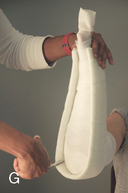
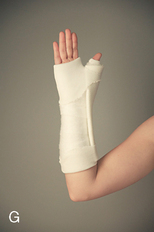
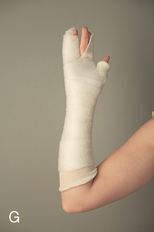
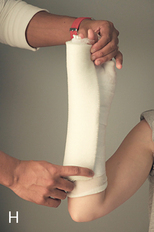
 At the elbow, you may cut slits (ulnar toward radial) partway through the splint on both the volar and dorsal aspects, and overlap the wings of the splint material on itself to allow for a better mold around the elbow (Figs. 11-1, G and 11-1, H).
Upper extremity long arm posterior splint: Figure 11-2, A


Application
 The 1-inch width stockinette may be used specifically for the thumb to create a protective sleeve of padding by folding suitable length over on itself three times.
 The 3-inch width padding works for wrapping the hand, wrist, and forearm, whereas the 4-inch width is suitable for wrapping from the forearm, elbow, and arm.
 Pay particular care to any material obstructing the axilla.
 At the elbow, you may cut partway through the splint on both the volar and dorsal aspects, and then overlap the wings of the splint material on itself to allow for a better mold around the elbow (Fig. 11-2, F).
Upper extremity volar short arm splint: Figure 11-3, A


Application
 If enclosing the fingers in the splint, place padding between each finger, respectively, to protect against skin maceration.
 The 1-inch width stockinette may be used specifically for the thumb to create a protective sleeve of padding by folding suitable length over on itself three times (Fig. 11-3, C).
 If enclosing the fingers in the splint, alternatively begin wrapping the padding at the distal phalanges.
Upper extremity thumb spica splint: Figure 11-4, A

Application
 The 1-inch width stockinette may be used specifically for the thumb to create a protective sleeve of padding by folding suitable length over on itself three times (Fig. 11-4, C):
 Pay particular care to any material that would otherwise make the splint circumferential about the thumb.
Upper extremity ulnar gutter splint: Figure 11-5, A


Application
 The 1-inch width stockinette may be used specifically for the thumb to create a protective sleeve of padding by folding suitable length over on itself three times (Fig. 11-5, C).
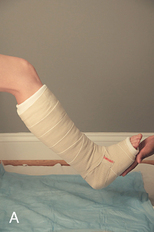
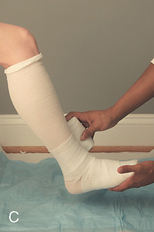
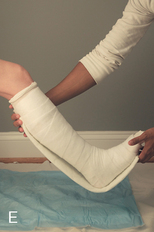
Lower extremity sugar tong (ankle-stirrup/u) splint: Figure 11-6, A
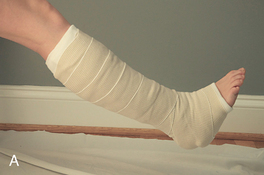


Application
 The 4-inch width padding works for wrapping the midfoot and ankle, whereas the 6-inch width is suitable for wrapping from the ankle up to the tibial tuberosity.
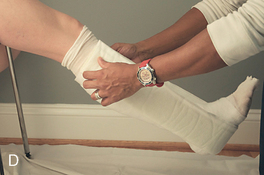
 Pay particular care to any material obstructing the motion of the knee.
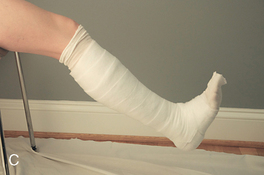
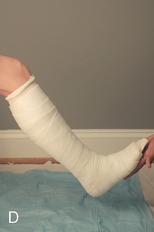
 Center the splint on the lateral and medial sides of the leg and take care not to overlap the proximal ends (Fig. 11-6, E).
Lower extremity posterior leg splint: Figure 11-7, A

Related posts:
![]()
Stay updated, free articles. Join our Telegram channel

Full access? Get Clinical Tree


Splinting and casting


