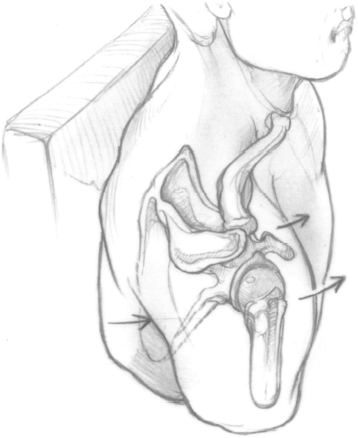
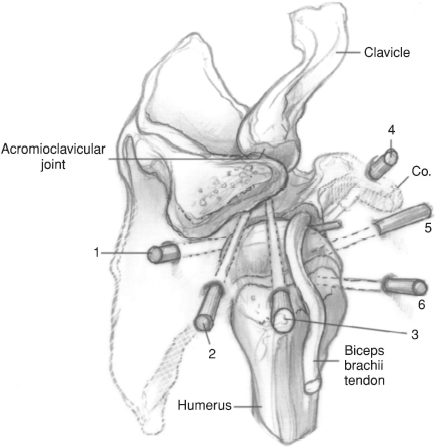
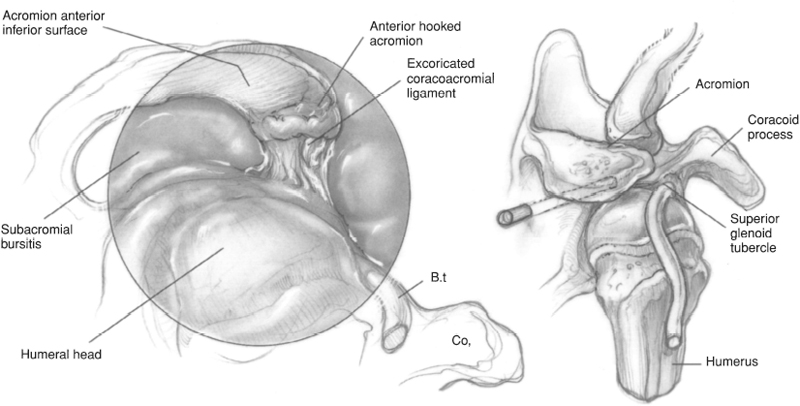
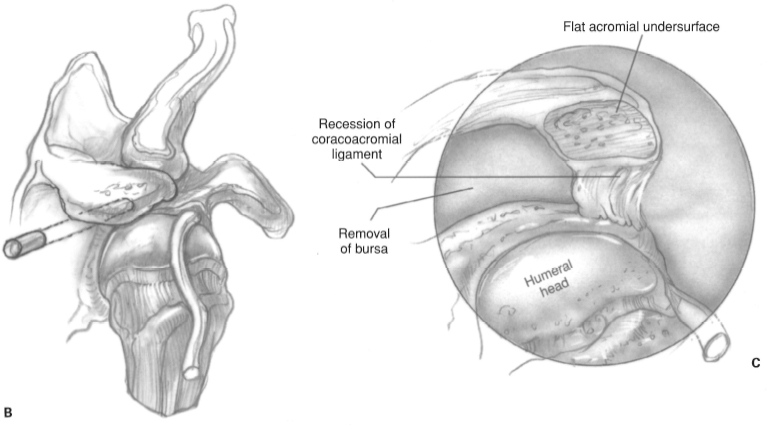
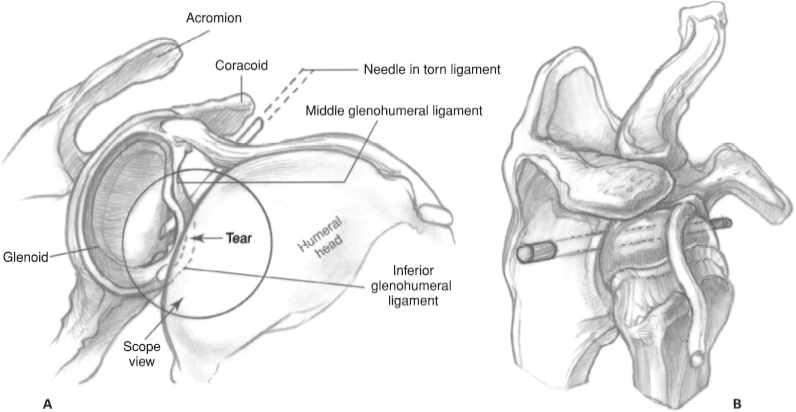
CHAPTER 4 Daniel D. Buss and John R. Green III 1. Loose body 2. Foreign body 3. Labral tear 4. Impingement syndrome 5. Instability 6. Acromioclavicular arthritis 7. Infection 8. Diagnostic dilemma 1. Acute adjacent soft tissue injury resulting in risk of neurovascular compromise from fluid extravasation (relative) 1. Shoulder radiographs including true anteroposterior (Grashe), outlet or “Y,” and axillary views; Stryker-notch view is also obtained for patients with instability symptoms. 2. Consider magnetic resonance imaging (MRI) to confirm diagnoses. 3. Document preoperative neurovascular examination of upper extremity. 1. Beach chair position on full-body beanbag. a. Keep head midline with neck in neutral or slightly flexed position. b. Protract the scapula, which exposes the medial border of the scapula. Drape the shoulder free from the medial border of the scapula posteriorly to the midline of the clavicle anteriorly (Fig. 4–1). 2. Alternatively, consider using the modified lateral decubitus position which aligns the glenoid surface horizontal. The arm is slightly forward flexed and abducted 50 degrees with 10 to 15 lb of longitudinal suspension applied from a traction tower. 3. All pressure points should be padded, particularly the peroneal nerve. 4. The procedure can be performed with general and/or scalene block anesthesia. 5. Routine arthroscopy equipment is required for diagnostic arthroscopy. Additional specialized instrumentation is necessary for each operative procedure. Open shoulder instrumentation should be available. 1. Perform a physical examination under anesthesia to assess shoulder stability and range of motion. Figure 4–1 Patient position. Superior view of the shoulder in the beach chair position before draping. Note the exposure and scapular protraction. Figure 4–2 Portals and vectors. Closeup superior view of shoulder demonstrating portal placement in relation to bony landmarks. 1 — posterior portal, 2—lateral portal, 3-superolateral portal, 4—anterior superior portal, 5—anterior inferior portal, 6—5 o’clock portal. Figure 4–3 (A) Arthroscopic view of subacromial space demonstrating anterior hooked acromion, excoriated coracoacromial ligament, and subacromial bursitis. Figure 4–3 (Continued) (B) Arthroscopic view of vector into subacromial space. (C) Arthroscopic view of subacromial space after decompression. Note the flattening of the undersurface of the acromion, recession of the coracoacromial ligament, and removal of the subacromial bursa. Figure 4–4 (A) Arthroscopic view of Bankart lesion. (B) Arthroscopic view of vector into glenohumeral joint. 2. Drawing landmarks on the skin can help facilitate accurate portal placement. 3. Routine intravenous antibiotics should be administered prior to incision. 4. Confirm placement of the posterior portal with an 18-gauge 3½-in spinal needle. Distend the gleno-humeral joint with 20 cc of 0.5% bupivicaine with epinephrine. 5. Infiltrate the portal sites with 0.5% bupivicaine with epinephrine. 6. Consider relative hypotensive anesthesia because this decreases intraoperative bleeding, thereby permitting lower fluid pressures which helps minimize fluid extravasation. 1. Avoid chondral injury by using blunt obturators to enter the joint under careful control. Do not plunge! 2. Avoid inadvertent rotator cuff tendon tears during posterior portal placement by internal rotation of the humerus. 3. Minimize risk of neurovascular injury by placing the anterior portal lateral to the coracoid and keeping the humerus adducted when creating anterior portals. 1. Use a sling with a 6-in elastic bandage wrapped around the body. The elastic bandage can be removed when the scalene block has worn off. 2. After arthroscopic shoulder decompression, the sling is removed after 2 days, and early active, active-assisted, and passive range-of-motion exercises are begun. In addition, isotonic rotator cuff strengthening and scapular stabilization exercises are also begun. The goal is full, active, pain-free range of motion 4 weeks after surgery. 3. After an arthroscopic Bankart repair, the sling is worn for 4 weeks. During this time, elbow range-of-motion exercises, squeezing a tennis ball for grip, co-contracture of the biceps and triceps, and pendulum exercises are instituted. At 4 weeks, isometric rotator cuff strengthening and active, active-assisted, and passive range-of-motion exercises are begun. External rotation is limited to 20 degrees until 6 weeks after surgery. At 6 weeks, the patient begins isotonic strengthening exercises. Heavy lifting and throwing programs are deferred until 4 months after surgery. 1. Position the patient supine on the table. Place blankets or pillows under the patient’s thighs. Flex the waist approximately 35 degrees, the knees approximately 40 degrees, and the back approximately 40 degrees. 2. With the head and neck in neutral position, contour the beanbag around the patient and deflate the bag. 3. Position the patient so the operative shoulder is pulled to the bed’s edge to allow adequate access. Secure the patient to the bed. 4. Prepare and drape the limb in the hospital’s standard sterile fashion. 5. Draw the bony landmarks, including the acromion, clavicle, spine of the scapula, and coracoid tip, on the skin. 6. Place the posterior portal in the “soft spot” between the infraspinatus, teres minor, and edge of deltoid. This is located 2 to 3 cm inferior and 1 to 2 cm medial to the posterolateral corner of the acromion. Localize the plane of the glenoid with an 18-gauge spinal needle. Enter the joint using a blunt obturator (Fig. 4–2). 7. Establish intra-articular orientation with the arthro-scope looking straight inferior (the light cord facing straight up) by viewing the biceps tendon’s insertion into the superior labrum and the plane of the glenoid. The inflow is through the arthroscope sheath. 8. Insert the arthroscope deeper into the shoulder to visualize the subscapularis tendon. 9. Rotate the arthroscope medially to view the subscapularis recess. 10. Rotate the arthroscope laterally to follow the subscapularis tendon. Visualize the undersurface of the biceps tendon, the superior glenohumeral ligament crossing between the subscapularis tendon and the long head of the biceps tendon, and the transverse ligament securing the biceps tendon in the bicipital groove.
Shoulder Arthroscopy
Indications
Contraindications
Preoperative Preparation
Special Instruments, Position, and Anesthesia
Tips and Pearls
What To Avoid
Postoperative Care Issues
Operative Technique
Diagnostic arthroscopy—posterior portal
Related posts:


Stay updated, free articles. Join our Telegram channel

Full access? Get Clinical Tree


