Removal of Well-fixed Components
Erik N. Hansen
William J. Hozack
Matthew S. Austin
Case Example
A 59-year-old man presented to our clinic approximately 2 years following a primary left total hip arthroplasty with a metal-on-metal articulation complaining of activity-related thigh pain. Infection workup, including baseline ESR and CRP were 12 mm/hr (normal <15 mm/hr) and 0.6 mg/L (normal <0.8 mg/L), and a hip aspiration was notable for 1,226 synovial white blood cell count with 44% neutrophils. To further workup an adverse reaction to metal debris, we obtained serum cobalt and chromium levels, which were 4.3 and 3.3 ppb respectively. A metal subtraction MRI demonstrated a fluid collection with preservation of the abductor musculature. Radiographs demonstrated a cementless metal-on-metal total hip arthroplasty (Fig. 107.1). The femoral component had radiolucencies in Gruen zones 1, 2, 6, and
7, with some bony remodeling distally concerning for aseptic loosening. The acetabular component appeared to be radiographically well fixed. Based on his constellation of symptoms and failure of nonoperative measures, we elected to revise his total hip arthroplasty for adverse reaction to metal debris.
7, with some bony remodeling distally concerning for aseptic loosening. The acetabular component appeared to be radiographically well fixed. Based on his constellation of symptoms and failure of nonoperative measures, we elected to revise his total hip arthroplasty for adverse reaction to metal debris.
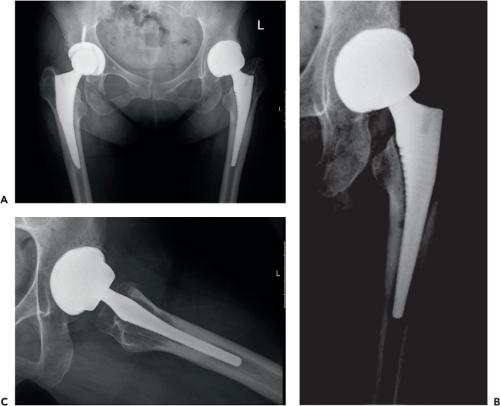 Figure 107.1. Preoperative images, including (A) AP pelvis, (B) AP hip, and (C) frog lateral hip of a patient with a painful left, large head metal-on-metal total hip arthroplasty. Radiolucencies are noted around the stem in Gruen zones 1, 2, 6, and 7, with distal bony remodeling, which are concerning for aseptic loosening of the component. |
Introduction
The safe and efficient removal of well-fixed components during revision hip surgery is a fundamental element contributing to the ultimate success of the operation. The manner in which this particular portion of the operation is executed directly affects the reconstructive portion of the procedure. Failure to carefully plan for and execute component removal can lead to iatrogenic bone loss, potentially compromising initial and long-term implant fixation. Spending a few minutes of additional time and care during this portion of the procedure can save considerable time and effort during the reconstructive portion of the procedure. Therefore, a systematic, step-wise approach to removing well-fixed hip implants is of paramount importance.
Revision hip arthroplasty can be organized into five major steps (1) preoperative planning, (2) exposure, (3) removal of components (and cement), (4) reconstruction, and (5) closure. This chapter will focus on the technical aspects of removing well-fixed hip arthroplasty components and cement. We will begin by defining the indications for removing a well-fixed implant and describe clinical situations in which alternatives to removing well-fixed implants should be considered. The instrumentation necessary to successfully perform implant removal will then be reviewed. Finally, we will detail techniques to remove both well-fixed cemented and cementless acetabular and femoral components.
Indications/Contraindications
Indications for Removal of Well-Fixed Components
It is important to understand the indications for removing well-fixed components, as unnecessary removal can lead to significant morbidity that may compromise the eventual outcome of the reconstruction. The following are indications for removing well-fixed components:
Deep periprosthetic joint infection (PJI)—the standard-of-care for chronic PJI in North America is two-stage exchange arthroplasty, which entails complete removal of all components (and cement if present), placement of an antibiotic-laden cement spacer, and a prolonged course of microbe-specific intravenous antibiotics.
Aseptic loosening—failure of osseointegration or mechanical loosening of previously osseointegrated components can occur at any of the following interfaces: cement–bone, cement–prosthesis, or bone–prosthesis. An uncemented component that is not osseointegrated, although not mechanically stable, may be quite challenging to remove. Similarly, a cemented component that is loose may also present technical difficulties. This is especially true in situations involving a broken stem or with well-interdigitated and extensive cement mantles.
Malposition of components—minor degrees of malposition, in modular implants, can occasionally be corrected using alternative liners (oblique, elevated rim, offset) or by changing the proximal portion of a modular femoral stem to correct version. However, most cases of component malposition should be addressed with revision of the component.
Damage to the components—on the acetabular side, “wear through” of the polyethylene (PE) by the femoral head may result in damage to the shell, which could lead to back-side wear of the new liner. On the femoral side, a significantly damaged morse taper is an indication for revising the femoral component, as motion associated with a compromised taper can lead to fretting and corrosion.
Instability of the hip—instability of the hip may be due to component malposition, leading to the need for component removal. Well-positioned, well-fixed components may also need to be revised when instability persists despite modification to the bearing couple. In these cases, additional offset and length can be achieved by revising to a different femoral component design.
Additional indications for removing a well-fixed component include PE wear in a nonmodular acetabular component, PE wear in an implant with a poor clinical track record (i.e., deficient locking mechanism), and the occasional need to remove a femoral prosthesis to provide adequate exposure of the acetabulum.
Alternatives to Removing a Well-Fixed Implant
There are no absolute contraindications to removing well-fixed components, however certain clinical situations exist in which alternatives to removing the components should be considered. Removing a well-fixed implant is time consuming, requires significant effort, and can cause significant morbidity to the patient. Morbidity is not only measured in the degree of bony and soft tissue damage, but also has systemic manifestations (e.g., increased blood loss and anesthetic time). In some situations, alternatives to removing the well-fixed implant should be entertained. Specifically, in the elderly, low-demand patient, the theoretical benefit of removing well-fixed components may be outweighed by the potential for increased morbidity. The following techniques are alternatives to removal of a well-fixed implant.
Alternatives to Removing a Well-Fixed Acetabular Component
Modular Bearing (Head-Liner) Exchange
A significant proportion of components used over the last two decades has been modular. The implant manufacturers stock a variety of liners (standard, face changing, elevated rim, offset, and constrained) that permit exchange of the previous bearing surface with a new one. Femoral heads are available in various head sizes, materials, and neck lengths. An isolated head-liner exchange is an option for patients with well-fixed, well-positioned modular components with a good track record and intact locking mechanism, although a new liner can also be cemented into
a well-fixed shell. A liner exchange may also be a reasonable option for the patient who has mildly malpositioned, well-fixed components and either bearing wear or instability. Additionally, the improved wear properties of highly cross-linked PE may allow for the use of larger femoral heads and consequently thinner PE to address instability. Furthermore, revising to a face changing or elevated rim liner, increasing offset with the use of an increased offset liner, and/or increasing the neck length along with an increase in head size can successfully treat instability in appropriate clinical scenarios.
a well-fixed shell. A liner exchange may also be a reasonable option for the patient who has mildly malpositioned, well-fixed components and either bearing wear or instability. Additionally, the improved wear properties of highly cross-linked PE may allow for the use of larger femoral heads and consequently thinner PE to address instability. Furthermore, revising to a face changing or elevated rim liner, increasing offset with the use of an increased offset liner, and/or increasing the neck length along with an increase in head size can successfully treat instability in appropriate clinical scenarios.
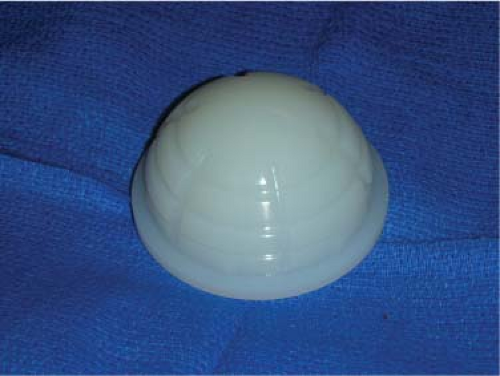 Figure 107.2. Representative image of manufactured cemented polyethylene liner. Notice the circumferential backside grooves to optimize fixation at the cement–liner interface. (Image courtesy of Craig J. Della Valle, MD.) |
Cementing a liner—exchange of a modular PE insert may not be ideal in certain situations. This may be due to an improper/damaged locking mechanism, interior shell damage, or an older generation implant in which a replacement cross-linked PE liner is not available. Cementing a PE liner is a reasonable option as long as there is a minimum of a 2-mm cement mantle between the acetabular shell’s inner diameter and the PE liner’s outer diameter (1). Moreover, cementing in a liner can allow for correction of mild degrees of component malposition. Liners intended for use in cemented situations have circumferential backside grooves to optimize fixation at the cement–liner interface (Fig. 107.2). Liners that were not intended for cemented use can be scored on the backside in a spider-web fashion with a burr (2,3). Shells without screw holes should be optimized for cementation by roughening the surface with a metal cutting burr.
Alternatives to Removing a Well-Fixed Femoral Component
Cement-to-cement technique—removing well-fixed cement in the femur can not only take considerable time, but may result in cortical perforation in up to 5% of cases and hence avoidance of cement removal is appealing (4). An alternative method where the existing cement mantle is well preserved and the cement–bone interface solidly interdigitated is to recement another smaller femoral component into the existing cement mantle (Fig. 107.3) (5,6,7). The success of this technique requires removal of the prior implant without damaging the cement mantle and preparing the cement mantle with a high-speed burr and/or ultrasonic tools to optimize the mantle for the new femoral component. Another useful technique, the so-called “tap-in, tap-out” method has been described. This
entails removing a polished, tapered cemented stem to improve acetabular exposure and reinserting the stem into the same cement mantle (8).
entails removing a polished, tapered cemented stem to improve acetabular exposure and reinserting the stem into the same cement mantle (8).
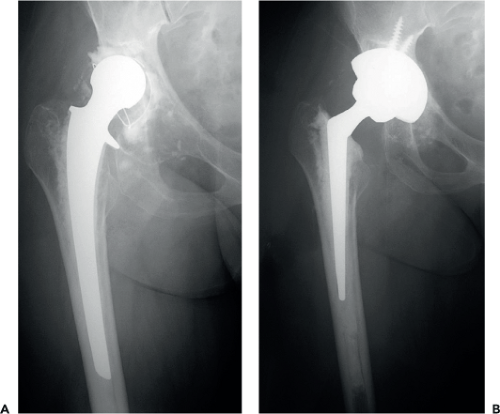 Figure 107.3. Radiographs demonstrating the technique of “tap in, tap out.” A: Preoperative x-ray of a patient with a loose cemented cup in the setting of a well-cemented femoral stem. In this case, it was decided to “tap out” the prior cemented stem, leave the well-fixed cement mantle, and “tap in” or recement in a smaller cemented stem. B: Postoperative x-ray of the same patient with a smaller cemented femoral stem and revision to a cementless acetabular component. (Images courtesy of Craig J. Della Valle, MD.) |
Revision Instrumentation
The key to managing the instrumentation demands of revision total hip arthroplasty is simplification. The operating room team and surgical processing department must not only prepare the instrumentation needed for implant removal but also the instrumentation necessary for exposure, the reconstructive portion of the procedure, and closure. Unnecessary instruments and trays complicate and clutter the operating room environment and every effort must be made to streamline the process.
Standard Tools
The majority of revision hip arthroplasty cases can be successfully performed with a limited number of hand tools. The hand tools can be consolidated to one specific tray that contains all of the instruments needed for removal of both cemented and cementless hip implants. This set includes femoral osteotomes, reverse hook curettes, curved acetabular osteotomes, and cup removal devices (Fig. 107.4). Instruments that are not as commonly utilized are placed in separate trays. For example, cementless cup explant systems, broken screw removal instruments, and universal screwdriver sets are placed in separate trays for use only as necessary. Therefore, this reduces the inventory needed and simplifies set-up.
Power Tools
In addition to the standard hand tools, it is necessary to have pneumatic, high-speed, low torque power instrumentation for revision surgeries. Various tips, including burrs and metal cutting wheels should be available. Furthermore, saws with a variety of blade options are necessary.
Implant-specific Tools
An important element of preoperative planning in revision surgery involves identifying the in situ implants via prior operative reports or implant stickers. This knowledge can often greatly facilitate removal. In situations in which only one component is being revised, it is critically important to know the manufacturer and model of the component to be retained to allow for modular exchange (e.g., the correct stem–neck taper or size and locking mechanism of PE liner). The implant companies often have proprietary devices to facilitate the extraction of their implants, such as screw-in acetabular and femoral inserters or screwdrivers to remove acetabular screws. When these devices are not available, it is always helpful to have a universal stem extractor, device to grasp the cup, universal screwdriver set, and broken screw removal set ready for use.
Ultrasonic Tools
Ultrasonic technology has been used successfully in revision hip arthroplasty to remove well-fixed cement. The technology relies on converting electrical energy to concentrated mechanical energy as the ultrasonic transducer resonates. Importantly, the ultrasonic tools provide differential auditory and tactile feedback when cortical bone, as opposed to cement, is in contact with the tip. Acrylic bone cement has a high capacity for energy absorption and low thermal conductivity, thus contact with the ultrasonic tool converts it to a gum-like consistency, facilitating its removal. Furthermore, the thermal effects of ultrasonic energy are not detrimental to the strength of the host bone (9). A series of interchangeable tips can be attached to the hand piece, allowing great versatility.
The osteotome tip can be used to disrupt the cement–bone interface in a more controlled fashion than standard metal osteotomes. The different size discs can be used to cannulate a distal cement plug, and the plug puller can be used in conjunction with a back slapper to remove distal cement plugs.
The osteotome tip can be used to disrupt the cement–bone interface in a more controlled fashion than standard metal osteotomes. The different size discs can be used to cannulate a distal cement plug, and the plug puller can be used in conjunction with a back slapper to remove distal cement plugs.
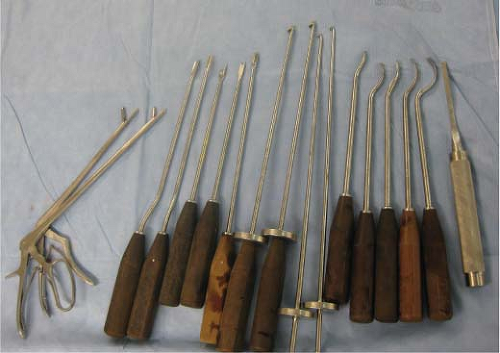 Figure 107.4. Standard revision hand instruments used for removal of both well-fixed cemented and cementless hip implants. Depicted from left to right: pituitary rongeurs, various osteotomes (including the “T,” “V,” and “X” variant), reverse curettes, acetabular gouges/osteotomes, and narrow straight osteotome. |
Lighting
Some surgeons find external light sources provide additional visualization. Headlamps, lighted acetabular retractors, and handheld light sources can be used to improve exposure during both component/cement removal and subsequent reconstruction.
Surgical Technique
Modular Femoral Heads
Following exposure, regardless of the revision plan, the first step is to remove the modular femoral head. Care must be taken to disengage the head from the neck without damaging the morse taper. This can be accomplished by placing a femoral head impactor on the inferior aspect of the head and delivering a swift blow with a mallet, taking care not to damage the taper in the process. Alternatively, specific tools are available for femoral head removal (Fig. 107.5). This step is usually quite simple, however there are rare occasions when it is difficult to remove the femoral head, such as with an intact constrained liner. In these instances it may be necessary to disimpact the femoral head from the stem prior to dislocation, leaving the head within the acetabulum, and then dislocating the trunnion.
Modular Acetabular Liner
Removal of the modular liner is often a straightforward process. However, there are some key steps that must be addressed. It is of paramount importance to achieve complete, circumferential exposure of the acetabular component. Often, soft tissue or bony overgrowth will be evident along the perimeter of the acetabular shell. While it is tempting to immediately remove the liner, it is important to first remove obscuring tissue and identify the bone–implant interface circumferentially. This eases extraction of the liner, removes sources of impingement, allows for more accurate assessment of component position, facilitates shell revision if necessary, and simplifies insertion of a new liner by avoiding damage to the locking mechanism.
 Figure 107.5. Various ultrasonic device tips used for cement removal. (Image courtesy of Craig J. Della Valle, MD.) |
Liners fall into one of two categories: soft (PE) and hard (ceramic or metal), and the technique for removing the two types is distinct. PE liners are held in place by a proprietary locking mechanism. For some companies this takes the form of aligning tabs on the PE with cutouts on the periphery of the acetabular shell, while others use an inset locking ring around the inner edge of the cup. Hard-on-hard bearings rely on a taper to provide an interference fit with the acetabular component. It is important for the surgeon to be familiar with the details of each company’s mechanism and be able to recognize a damaged locking mechanism.
There are multiple techniques to remove a modular PE liner from the acetabular shell. Simply wedging a curved osteotome between the liner–shell interface and levering the liner out works well in most cases, but this may result in damage to the locking mechanism. Another effective technique involves using the threads of a screw to lever the liner out. This is accomplished by drilling a hole in the PE liner and using a special threaded extractor. As the screw threads emerge from the back of the liner, they will abut the metal shell and force the liner out. A modification of this technique relies on an acetabular fixation screw placed at the periphery of the liner instead of a special device (Fig. 107.6). In some cases, specific liner removal tools may be available stressing once again the importance of preoperative identification of the implants to facilitate their removal.
Removing a metal or ceramic liner from the acetabular component relies on the creation of a vibratory effect to disengage integrity of the taper. Many companies have proprietary tools that may disengage the edges of the liner, but the same effect can be achieved using a tamp circumferentially around the acetabular component until the liner separates from the shell.
Cementless Acetabular Components
Removal of well-fixed cementless acetabular components requires great care, patience, and good surgical technique. Iatrogenic bone loss, in addition to pre-existing bone defects, can compromise the outcome of the reconstruction. Although tools have been created to facilitate removal, there is no substitute for good preoperative planning and meticulous technique. Furthermore, unique differences in implant design (e.g., resurfacing components, spiked shells) have required modified techniques for implant removal.
The first step in removing a well-fixed acetabular component is to obtain adequate exposure. This necessitates a circumferential view of the component–bone interface. Frequently, the interface is obscured with soft tissue or bone that should be removed with a combination of a 2-mm pencil-tip high-speed burr and osteotomes. Once exposured, the liner and any screws
are removed. While many companies utilize the same hex head screw design, some companies do not; therefore, it is imperative to have the appropriate screwdriver available. If the screw is stripped or fractured, a broken screw set should be readily available (Fig. 107.7). Alternatively, a metal carbide-tip burr can be used to burr off the screw head to allow for passage of osteotomes around the shell. Next, the implant–bone interface is disrupted with either a series of narrow curved acetabular osteotomes (Fig. 107.8) or an explant system (Fig. 107.9).
are removed. While many companies utilize the same hex head screw design, some companies do not; therefore, it is imperative to have the appropriate screwdriver available. If the screw is stripped or fractured, a broken screw set should be readily available (Fig. 107.7). Alternatively, a metal carbide-tip burr can be used to burr off the screw head to allow for passage of osteotomes around the shell. Next, the implant–bone interface is disrupted with either a series of narrow curved acetabular osteotomes (Fig. 107.8) or an explant system (Fig. 107.9).
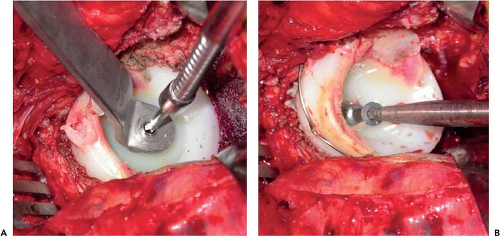 Figure 107.6. Image of the technique to atraumatically remove the modular polyethylene liner from the acetabular shell. In contrast to using an osteotome to lever on the cup, this technique (A) uses a flexible drill and (B) an acetabular screw to disengage the polyethylene insert. (Images courtesy of Craig J. Della Valle, MD.) |
The osteotome technique involves introducing a series of curved acetabular osteotomes around the perimeter of the cup at the thicker bone near the ilium, ischium, and pubis. The initial osteotome should have the shortest blade with the most acute curvature, and as the interface is progressively loosened, longer less curved osteotomes are used. It is extremely important to ensure that the osteotome is hugging the edge of the implant, to avoid inadvertently straying into the surrounding bone.
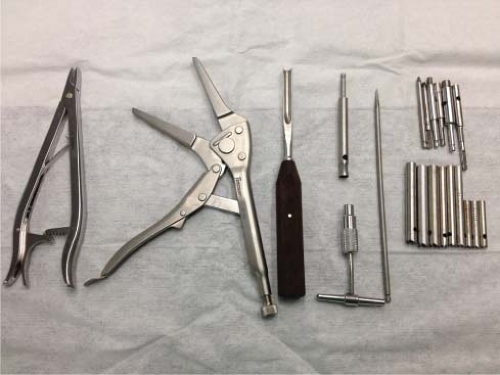 Figure 107.7. The broken screw removal set utilized at the author’s institution. This includes various graspers, awls, and trephines. |
An explant system is a useful tool to remove the acetabular component while minimizing bone loss as the blades utilized are specifically sized to the implant that is being removed. A trial or the just explanted liner is placed into the acetabular
shell. The explant system is assembled based on the femoral head that articulates with the liner and on the outer diameter of the shell. The ball of the system is reduced into the liner within the shell. Initially, the short blade is used to separate the component from the peripheral rim of bone in a circumferential manner and then the technique is repeated with the longer blade. Mitchell et al. (10


shell. The explant system is assembled based on the femoral head that articulates with the liner and on the outer diameter of the shell. The ball of the system is reduced into the liner within the shell. Initially, the short blade is used to separate the component from the peripheral rim of bone in a circumferential manner and then the technique is repeated with the longer blade. Mitchell et al. (10
Related posts:


Stay updated, free articles. Join our Telegram channel
Full access? Get Clinical Tree
