Reduction Techniques for Cervical Fractures and Dislocations
Adam M. Pearson
Alexander R. Vaccaro
BACKGROUND
Cervical spine fractures are seen in approximately 5% of trauma patients being evaluated at level I trauma centers.
Dislocations and displaced fractures require reduction and frequently surgical stabilization.
This chapter focuses on the cervical fractures that often require reduction and the closed and open techniques used to manage them.
GENERAL PRINCIPLES OF CLOSED REDUCTION
Traction
Application of longitudinal traction assists in the reduction of cervical spine fractures through ligamentotaxis and the ability to apply rotational moments to the cervical spine.
Traction can be performed urgently in the emergency room.
Successful reduction requires an understanding of the biomechanics of both injury and reduction.
Traction is contraindicated in extension distraction injuries and type IIA hangman’s fractures (see later section).
Placement of a towel roll between the scapulae can help to raise the head off the bed and allow for better control of the flexion or extension moment.
Low weight (10 pounds) should initially be placed in order to ensure that there is no craniocervical instability or unsuspected distraction.
Weight is generally added in 10-pound increments with lateral radiographs obtained every 10 to 15 minutes after adding weight in order to allow for the viscoelastic tissues to creep and for the muscles to fatigue. Serial neurologic examinations should also be performed and documented with each addition of weight.
If not successful, open reduction in the operating room is generally indicated.
 FIG 1 • A,B. Gardner-Wells tongs are to be placed with pins approximately 1 cm above the pinna in line with the external auditory meatus, below the equator of the skull. Anterior halo pins are placed over the lateral third of the eyebrow in order to avoid the supraorbital and supratrochlear nerves, whereas posterior pin sites are posterior to the pinna, below the equator of the skull. |
Gardner-Wells Tongs
Available in stainless steel and titanium. Stainless steel tongs offer the advantage of being able to safely use more weight, whereas titanium tongs are magnetic resonance imaging (MRI) compatible yet are limited in the amount of weight they can safely support (no more than 50 pounds).6
Imaging of the skull (plain films or computed tomography [CT] scan) should be obtained prior to pin placement to ensure there are no skull fractures.
Pin placement is extremely important. The pins should generally be placed 1 cm above the pinna, in line with the external auditory meatus and below the equator of the skull (FIG 1). Placement more anteriorly results in an extension moment, whereas placement more posteriorly results in a flexion moment (sometimes desirable for facet dislocations).
The pin sites should be prepped with Betadine. Because these pins are temporary, the hair does not need to be shaved. Lidocaine is injected subcutaneously and subperiosteally at the planned pin sites.
Pins should be tightened until the indicator protrudes at least 1 mm, which corresponds to 30 pounds of compression at the pin site. Undertightened pins can disengage and cause scalp lacerations. Do not overtighten pins, as penetration of the inner table of the skull can occur.
Gardner-Wells tongs are temporary devices used for reduction. Use of halo ring traction should be considered if a halo is to be used for definitive management, although the amount of weight that can be applied to a halo ring is also less than
what can be added to stainless steel Gardner-Wells tongs. We generally prefer to perform a reduction using Gardner-Wells tongs and then convert to a halo if surgery is going to be delayed, and the patient needs to be stabilized in the interim.
Halo Vest Application
Most halo vest systems are now MRI compatible.
Proper application of the ring is essential to prevent nerve injury, skin problems, and provide a method of immobilization with long-term durability.
At least two providers familiar with halo application are required.
The first step is to size the vest and the ring using the manufacturer’s instructions. The vest should extend down to the level of the xiphoid and be snug but allow access to the skin. The ring should fit as close to the skull as possible without contacting the skin at any point.
The patient can be logrolled to place the posterior portion of the vest.
One person then holds the halo ring in place, ensuring that it does not contact the ears or the head, is symmetrically and appropriately aligned, and is below the equator of the skull.
Another person then plans the pin placement (see FIG 1). The two anterior pins are generally placed 1 cm cranial to the lateral third of the orbital rim to avoid the supraorbital and supratrochlear nerves. The pins can be placed into the eyebrow in patients concerned about scar cosmesis. The posterior pins are generally placed 1 cm above the helix of the ear, posterior to the external auditory meatus, and below the equator of the skull.
If the halo is going to remain in place for an extended period, the posterior pin sites should be shaved prior to starting the procedure. The pin sites should be prepped with Betadine, and lidocaine should be injected subcutaneously and subperiosteally.
While one person holds the ring in place (various devices such as suction cups and blunt pins can be used to assist with this), the other person screws the pins in until they all just contact the skin. Opposing pins should then be tightened simultaneously, going back and forth between the two pairs. The pins should be tightened to 8-inch pounds using either a torque-limiting breakaway applicator or a torque wrench.
The halo ring can then be attached to traction using the appropriate metal bail or to the uprights of the halo vest. The head should be positioned appropriately, and radiographs should be obtained to determine if the alignment is appropriate.
Pins should be retightened to 8-inch pounds in 24 to 48 hours.
Loose pins can be retightened once and should then be replaced through another hole if they loosen again.
Meticulous pin site care is required, although pin site infection can still occur. If infection is present but the pin is still tight, it can be treated with local care and oral antibiotics. If the pin loosens in the presence of infection, it should be replaced.
Bivector Traction
Bivector traction allows for simultaneous control of longitudinal traction and a flexion moment using a specially designed traction apparatus on a RotoRest bed (FIG 2).
The patient is positioned on a RotoRest bed with the head pad removed and shoulder roll in place to allow for freedom of motion of the head in the sagittal plane.
Longitudinal traction is applied to the ring using an S-clip and anterior traction is applied via a cord attached to both of the pins. The two forces should initially be at 90 degrees to each other and can then be fine-tuned as needed.
Application of weight to the anterior pulley allows flexion to be “dialed-in” without having to change the position of the longitudinal traction, which can be difficult when heavy weight has been applied.
Bivector traction is indicated for most cervical spine reductions as it allows for more precise control of the traction vector than a single vector traction setup.
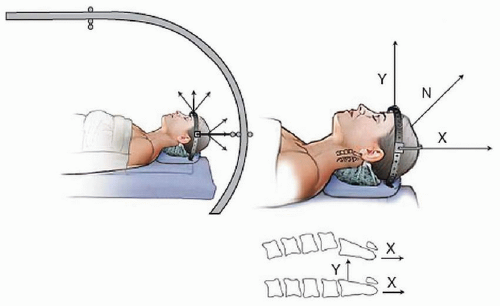 FIG 2 • Bivector traction with Gardner-Wells tongs. Two cables are used in order to adjust anterior and superior traction individually in order to affect a reduction. |
ODONTOID FRACTURES
DEFINITION
Fracture through the odontoid process that can be located from the tip of the dens to its base.
Odontoid fractures are very common, accounting for 10% to 20% of all cervical fractures.19
ANATOMY
Two ossification centers fuse in utero, separating the dens ossification center from the primary ossification center of the C2 vertebral body.31 These two ossification centers are separated by the dentocentral synchondrosis, which fuses by age 7 years. Another secondary ossification center, the ossiculum terminale, forms at the tip of the dens around age 9 years and fuses by age 13 years.
There is a rich vascular supply around the dens originating from the vertebral arteries and ascending pharyngeal artery. Although it was thought that type II dens fractures were predisposed to nonunion due to the presence of a watershed area at the base of the dens, this has been shown to be untrue.20
The transverse atlantal ligament runs posterior to dens and connects to the posterior aspect of the anterior C1 ring bilaterally, preventing anterior translation of C1 on C2. The alar ligaments run from the tip of the dens to the skull base and restrict axial rotation. The weak apical ligament connects the tip of the dens to the occiput (FIG 3).
The C2 nerve root exits posterior to the C1-C2 joint in contrast to nerve roots below this level, which exit anterior to the facet joints. This puts the C2 nerve root at risk during posterior C1-C2 fusions.
Fifty percent of axial rotation of the cervical spine occurs at C1-C2.
A fracture of the dens results in atlantoaxial instability.
 FIG 3 • Ligamentous anatomy of the upper cervical spine. |
CLASSIFICATION
Type I fractures are avulsions of the apical portion of dens and generally represents a stable fracture with a high union rate.23 Occipital cervical dissociation should be suspected and ruled out.
Type II fractures involve the base of the odontoid and do not extend into the C2 body. These are generally considered unstable and are associated with a nonunion rate of at least 32% with nonoperative treatment.10
Type III fractures extend into the vertebral body of C2. These are relatively stable fractures that have a union rate of 85% to 90% with nonoperative treatment.23
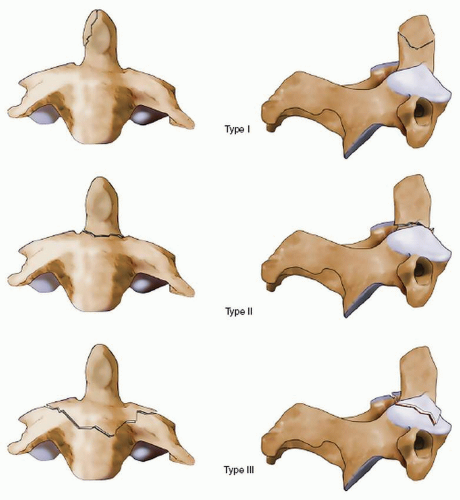 FIG 4 • Anderson and D’Alonzo classification of odontoid fractures. Type I involves the apex, type II involves the base of the dens, and type III enters the body of C2. |
PATIENT PRESENTATION
Studies of traffic fatalities suggest that high-energy dens fractures could be associated with a mortality rate of up to 40%.9 The mortality rate in low-energy trauma is much lower.
The vast majority of patients who survive the initial injury present neurologically intact, although a wide variety of neurologic deficits associated with odontoid fractures have been described.2
Delayed presentation is common, and patients frequently present with neck pain and may have varying degrees of myelopathy. Respiratory depression and death have been reported.15
IMAGING
Plain films including an open mouth view of the odontoid should be obtained. However, nondisplaced dens fractures are frequently missed on plain films.4
CT scan with thin cuts and sagittal and coronal reformations is the study of choice to detect and characterize odontoid fractures.
MRI is indicated in patients with neurologic deficit and can be useful to assess the ligaments of the upper cervical spine.
CLOSED REDUCTION AND TREATMENT
Gardner-Wells tongs are applied and bivector traction is used to reduce displaced odontoid fractures.35 If definitive treatment in a halo vest is planned, reduction can be performed with a halo ring. Although single vector traction can be used for the reduction of odontoid fractures, bivector traction allows for more precise control of the traction vector.
In posteriorly displaced fractures, there is a risk of respiratory compromise during the reduction maneuver that typically requires flexion of the neck. This is most likely due to compression of the airways by the retropharyngeal hematoma, although others have suggested that it is due to the displaced odontoid compressing the respiratory pathways that run in the anterolateral portion of the upper spinal cord.11,33 As such, nasotracheal intubation of these patients prior to reduction is recommended.
A relatively low amount of weight is generally required (20 to 30 pounds), and serial plain x-rays or fluoroscopy should be used with bivector traction to fine-tune the reduction.
Types I and III fractures rarely need reduction and can be managed with a halo vest or cervical collar. It has been recommended that type II fractures, particularly in elderly patients who cannot tolerate a halo vest, should be treated surgically.26
 FIG 5 • Fixation techniques for odontoid fractures. A. Anterior lag screw. B. Transarticular fusion. C. Harms fusion. |
SURGICAL TREATMENT
Indicated for elderly patients with type II fractures and for failure to hold reduction or nonunion in younger patients.
Options include odontoid screw, transarticular C1-C2 fusion, and Harms posterior C1-C2 fusion (FIG 5). Posterior C1-C2 wiring is an older technique that also had acceptable
results, although a lower fusion rate than transarticular fixation.13 Anterior screw fixation allows for some preservation of C1-C2 rotation, although it is associated with a higher rate of technical problems and nonunions compared to posterior C1-C2 fusion.43
OUTCOMES
In type II fractures, union rates are approximately 51% with collar treatment, 65% with halo vest orthosis, 82% with odontoid screw fixation, and 93% with posterior C1-C2 fusion.21
In type III fractures, collar immobilization results in a union rate of approximately 92% compared to 95% with halo vest orthosis.21
COMPLICATIONS
In patients older than 70 years old, inpatient mortality can be as high as 35%.30
In patients older than 65 years old treated with a halo vest orthosis, mortality can be as high as 42%, primarily due to pneumonia and cardiac arrest.37
Operative treatment of dens fractures in the elderly is also associated with high mortality rates of 40% with anterior screw fixation and 22% for posterior C1-C2 fusion.17,30
Anterior screw fixation can result in nonunion and screw cut out, particularly in elderly, osteoporotic bone.3
Posterior screw placement at C1 and C2 can result in vascular injury to the vertebral or internal carotid arteries.22
PEARLS AND PITFALLS
|
TRAUMATIC SPONDYLOLISTHESIS OF THE AXIS (“HANGMAN’S FRACTURE”)
DEFINITION
Fracture through the C2 pars interarticularis. A similar lesion is seen in judicial hangings, although the mechanisms and outcomes are obviously quite different.Related posts:

Stay updated, free articles. Join our Telegram channel

Full access? Get Clinical Tree


