Fig. 21.1
Once the operative site has been prepared and draped, we mark the incision site, just before application of the final transparent adhesive drape
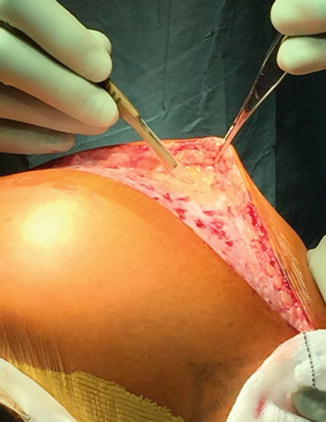
Fig. 21.2
The full length of the marked skin incision is used. Skin flaps have been created within the subfascial plane to preserve the vascular dermal plexus as well as the integrity of skin and soft tissues that are being gently retracted
21.3 Deep Exposure
The joint is exposed through a medial parapatellar arthrotomy (Fig. 21.3). It has the advantages of allowing lateral translation of the patella and minimising injury to the medial lymphatic and saphenous nerve branches [13]. However patients must be informed that their risk of postoperative numbness around the distal aspect of the incision is much greater during revision surgery [29, 30]. If a lateral peripatellar arthrotomy was used in the failed primary TKA, the surgeon must consider reusing this approach: a medial arthrotomy increases the risk of patellar osteonecrosis if used in such a case.
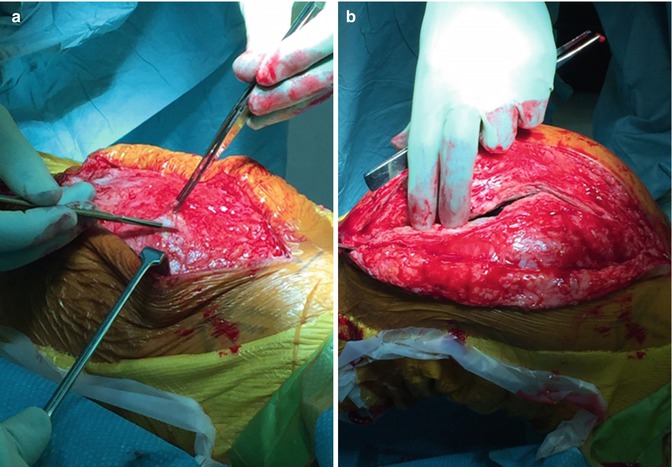
Fig. 21.3
A standard medial parapatellar arthrotomy is used and preferred in exposing a revision TKA (a, b)
The synovium and fat pad are excised alongside fibrous adhesions in the suprapatellar area enhancing visibility and exposure. The knee is brought into extension to examine the medial and lateral gutters for adhesions and scar tissue which are also excised. Care must be taken to avoid damage to the collateral ligaments when excising scar tissue over the epicondyles. Finally, adhesions over the proximal aspect of the tibia deep and proximal to the patellar tendon are released to expose the anterolateral aspect of the tibia.
A liberal medial retinacular release from the tibia is performed to provide sufficient slack to mobilise the patella and gain access to the femoral and tibial components (Fig. 21.4). A patellar inversion technique is performed by externally rotating the tibia whilst flexing the knee until anterior subluxation of the proximal tibia ensues [31, 32]. It avoids patellar eversion which increases the risk of patellar tendon avulsion in revision surgery. A lateral retinacular release can be utilised to aid patellar mobilisation if severely restricted by adhesions; however, this is associated with an increased risk of wound complications [7]. If there is danger of patellar tendon avulsion, a pin or clip on the medial side of the patellar tendon insertion can provide supplementary security.
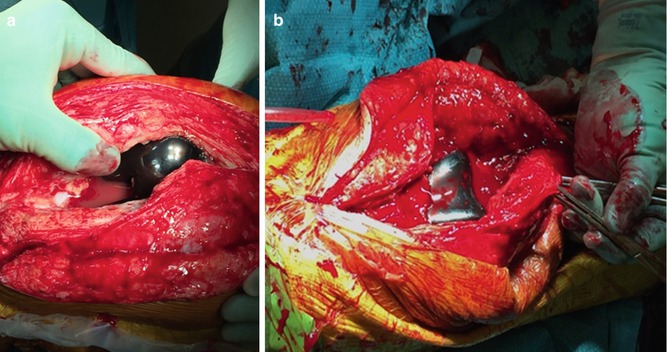
Fig. 21.4
A generous skin incision and meticulous debridement of adhesions are essential to mobilise the patella and gain access to the femoral and tibial components (a, b)
21.4 Extensile Exposures
Patellar tendon avulsion during primary or revision TKA surgery is a devastating complication. Failed TKAs complicated by severe stiffness, infection, trauma, varus/valgus deformity and flexion/extension contractures make exposure difficult and increase risk of avulsion of the patellar tendon. Additional techniques are invaluable and provide the surgeon with means to protect the integrity of the patellar tendon insertion whilst facilitating the revision procedure. The quadriceps snip, quadricepsplasty and tibial tubercle osteotomy (TTO) are techniques employed in exposing a very stiff knee. It is advantageous to use the medial parapatellar arthrotomy as proximally it can be converted to a quadriceps snip or modified V-Y quadricepsplasty and distally can be incorporated into a TTO. Femoral peel and medial epicondylar osteotomy remain options in the most severe of cases, but are seldom used due to problems of instability and associated complications.
21.4.1 Quadriceps Snip
This technique is indicated when exposure remains difficult despite debridement of the medial and lateral gutters and performing a liberal medial retinacular release from the tibia. The standard medial parapatellar arthrotomy is extended proximally to the apex of the rectus femoris tendon, before extending proximally and laterally at a 45° angle into the fibres of the vastus lateralis. The quadriceps snip allows for good exposure making use of the patellar inversion technique. The arthrotomy and proximal extension are closed in a routine manner with no postoperative restrictions.
Garvin et al. used this technique to assist in surgical exposure in 16 patients [33]. At mean follow-up of 30 months, Cybex testing revealed no significant difference in quadriceps strength compared to the contralateral knee that had been replaced. Good or excellent results were obtained in 10 patients who underwent revision TKA. Barrack et al. also reported no clinical difference in their patients having a quadriceps snip (31 patients) versus standard medial parapatellar arthrotomy (63 patients) at median follow-up of 30 months [34].
21.4.2 Modified V-Y Quadricepsplasty
Coonse and Adams originally described a V-shaped turndown of the entire distal quadriceps to provide exposure to the anterior knee [35]. Insall modified this procedure to involve a standard medial parapatellar arthrotomy and fashioning a second incision at the apex of the arthrotomy extending distally and laterally at 45° angle, along the vastus lateralis tendon, until reaching the anterior fibres of the iliotibial band at the tibia. This creates an inverted V-shaped extensor flap which is reflected distally and laterally granting access to the joint [36]. The extensor mechanism may be lengthened at the apex of the ‘v’ to facilitate a standard closure creating a Y shape. Postoperative instructions may include the use of a brace, restricted ROM and partial weight bearing for 6 weeks [37].
The modified V-Y quadricepsplasty delivers excellent exposure and protects the integrity of the patellar tendon, but it is frequently associated with postoperative extensor lag [34, 38, 39]. Scott and Sikiski utilised this procedure on 7 patients and reported transient extensor lag in 4 patients and permanent extensor lags of 10°, 15° and 30° in 3 patients [38]. Trousdale et al. utilised the same technique in 9 revision TKAs and 5 primary TKAs [39]. Biomechanical testing revealed that the extensor mechanism was weaker in the V-Y quadricepsplasty group but not to a significant degree, when compared to patients who underwent only a standard medial parapatellar arthrotomy. They concluded that patients receiving a V-Y quadricepsplasty could expect a near normal active extension and moderate weakness in extension.
Barack et al. reported on a series of 123 revision TKAs comparing patients who had undergone a standard medial parapatellar arthrotomy (63) with a quadriceps snip (31) to V-Y quadricepsplasty (14) and tibial tubercle osteotomy (15) [34]. They concluded that there was no disadvantage in terms of clinical score, ROM, patellofemoral symptoms and patient satisfaction when combining the medial parapatellar arthrotomy with a quadriceps snip. If exposure remains limited the V-Y quadricepsplasty and tibial tubercle osteotomy are additional extensile approaches the surgeon can explore. Barrack et al. reported that the V-Y quadricepsplasty group suffered a greater degree of extension lag compared to the tibial tubercle osteotomy group, with 21 % of patients having an extension lag greater than 100 % [34]. We prefer TTO in exposing the complex revision knee due as this is associated with a lower risk of postoperative extension lag.
21.4.3 Tibial Tubercle Osteotomy
TTO was first described in 1983 by Dolin [40] and later modified and popularised by Whiteside [41] and Whiteside and Ohl [42]. This technique remains invaluable in providing access to the tibial canal when faced with difficult tibial tray or cement removal. The medial arthrotomy is extended distally 12–20 cm below the joint line (Fig. 21.5). The periosteum is incised 1 cm medial to the tibial tubercle for a length of 6–10 cm in length, using an oscillating saw, cutting from medial to lateral. The lateral cortex is osteotomised but not exposed, leaving the lateral periosteum and musculature attached to the osteotomised segment as a hinge to be everted and displaced laterally. At the proximal end of the osteotomy, a step cut is fashioned with a thin osteotome to provide additional resistance of proximal migration of the bone fragment after fixation. The distal end of the osteotomy is tapered to minimise any stress riser effect in the tibial metaphysis. The osteotomy is opened by two osteotomes. We repair the bone fragment with 16-gauge wires passed through the intact medial tibia and around the tubercle fragment, although this may also be achieved with screws, staples and cables (Fig. 21.6) [43, 44]. The medial parapatellar arthrotomy is closed in the standard manner. We advocate touch weight bearing postoperatively for approximately 6 weeks with no restrictions on ROM. This, of course, is dependent on the stability of fixation, use of bone grafting and any complications sustained intraoperatively.

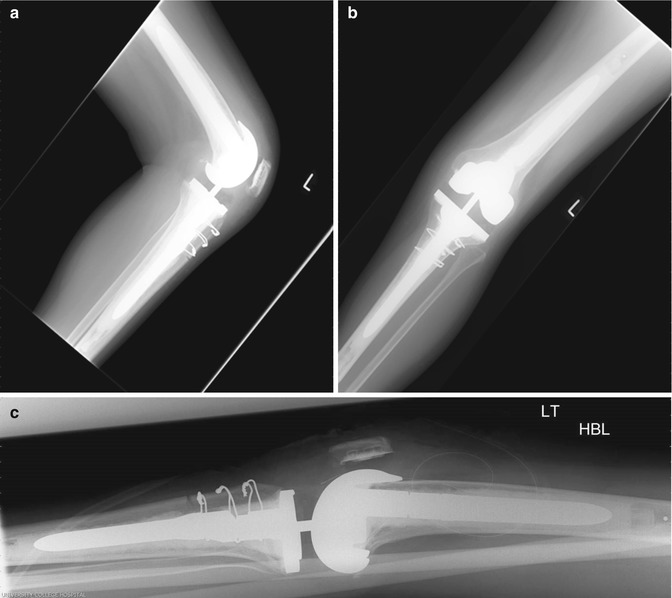
Fig. 21.5
We used a tibial tubercle osteotomy to provide additional exposure during a complex revision TKA procedure. The well-fixed tibial component was eventually removed without resorting to metal cutting devices (a, b)
Fig. 21.6
We used 16 gauge wires to fix the osteotomised segment as demonstrated in these radiographs taken 2 months post-revision TKA procedure in the same patient. There is evidence of callus formation (a–c)
TTO has a lower incidence of postoperative extensor lag and quadriceps weakness than the modified V-Y quadricepsplasty as reported by Barrack et al. [34]. Young et al. performed revision TKA with TTO in 40 patients and demonstrated no extensor lag in 25 % of patients, and 81 % of extensor lags had resolved within 12 months [45]. Whiteside and Ohl used this technique in 71 patients and reported mean postoperative flexion of 97° with no significant complications or nonunions [42]. Whiteside used this technique on a further 136 complex primary and revision TKAs and reported no nonunions or compromise in quadriceps function [41]. Favourable results were also demonstrated by Mendes et al. who utilised TTO in 64 patients undergoing revision TKA [46]. They reported no incidence of patellar tendon avulsion or patellofemoral complications. However serious complications have been reported including removal of painful wires or screws, displacement of the osteotomised tubercle, nonunion, persistent anterior knee pain, patellar tendon disruption and tibial shaft fractures [34, 41–48].
21.4.4 Femoral Peel
Windsor and Insall introduced this technique in 1988 to expose the severely ankylosed knee by releasing all the soft tissues subperiosteally from the distal end of the femur, essentially skeletonising the distal femur [49]. This approach compromises knee stability and should be only considered if the extent of scarring still restricts knee flexion despite invoking a quadriceps snip or TTO. Lahav and Hofmann performed revision TKAs in 97 patients using this technique [50]. At mean follow-up of 39 months, there was no patient-reported disruption of the extensor mechanism or decreased ability to extend the operative knee. Nonetheless serious complications using this technique have been reported including intraoperative vascular injury, postoperative tibiofemoral dislocation, periprosthetic fracture, patellar tendon rupture, deep infection and wound complications [51].
21.4.5 Medial Epicondylar Osteotomy
This technique was originally described by Engh as a method to improve surgical exposure and correct varus deformity [52]. The medial epicondylar osteotomy consists of detaching a 1 cm thick wafer of bone with the tissues superior to the medial epicondyle raised as a flap. This permits patellar eversion and access to the knee joint by externally rotating the tibia. The osteotomised bone fragment can be reattached with sutures, staples or screws.
21.5 Implant Removal
Implant removal is an important early step necessary in virtually all revision TKA procedures [53]. Preoperative planning is essential and allows the surgeon to anticipate potential difficulties and organise contingency plans. It is imperative that the operating surgeon identifies which implants are in situ, if fixation is cemented or biological, if prostheses are loose or well fixed and if implant-specific removal tools are available. If doubt remains, an opinion or tertiary referral to a high-volume arthroplasty centre should be sought [54, 55]. Surgeons operating at such centres will have increased familiarity and experience undertaking complex revision cases.
Implants are removed in a specific sequence to provide greater exposure for the next operative step. This sequence begins with tibial polyethylene insert removal, which is also the easiest to access, followed by femoral component removal, followed by tibial component removal and finally patellar component removal if required. The femoral component is given priority over the tibial component during extraction because access to the distal femur is achieved more easily, and also the femoral posterior condyles cause obstruction to axial disimpaction of the tibial component. The primary goal in implant removal is to achieve extraction with minimal bone loss and without compromising skin, soft tissues and extensor mechanism.
21.5.1 Tibial Polyethylene Insert Removal
The majority of modular tibial polyethylene inserts are disengaged from the underlying tibial tray using a narrow curved osteotome. In certain cases implant-specific tools may be required to remove any locking screws or pins that have secured the insert to the tibial tray. Non-modular tibial inserts are more arduous to remove. They must be cut into fragments using an osteotome or oscillating saw and removed fragment by fragment. Removal achieves greater collateral laxity and exposure, improving access to the tibial component and posterior aspects of the femur.
21.5.2 Femoral Component Removal
Good operative exposure is vital in removing both femoral and tibial components. Lateral patellar subluxation is usually enough to provide adequate visualisation of the lateral aspect of the femoral component without compromising the patellar tendon insertion site. Femoral components that are loose can be disimpacted with little effort using a punch against the anterior flange of the implant. Removing well-fixed cemented or uncemented implants without causing significant bone loss is challenging. The implant-cement interface (for cemented implants) or implant-bone interface (for uncemented implants) must be cut as close as possible to the implant to preserve the underlying bone. This is achieved by hand instruments (i.e. osteotomes, Gigli saw), power instruments (i.e. power saws, power burrs, metal cutting instruments) and ultrasonic instruments.
Oscillating saws and osteotomes are best suited to cut free the femoral component. They are placed at the implant-cement interface minimising unnecessary bone loss. The implant-cement interface is divided systematically at the medial and lateral sides of the implant. This reduces likelihood of the cutting instruments deviating away from the target interface and creating excess bone loss. The interface of the anterior condyles and distal chamfer is more readily accessible and therefore loosened first before attempting to access the more technically challenging posterior chamfer and condyles. Special angled osteotomes, a thin saw and Gigli saw are available to aid access here. Gigli saws have a tendency to wander away from the implant and cause excessive bone loss or break and have therefore diminished in popularity. Once the femoral component has been sufficiently loosened, it can be tapped out with a punch or mallet directed against the anterior flange. An implant-specific instrument that attaches to the femoral component is sometimes necessary to allow disimpaction with a slap hammer. Femoral component lug pegs very rarely cause resistance to component removal and do not need to be divided separately.
If there is significant resistance to implant removal, it is essential to reassess all interfaces to ensure adequate division before reattempting disimpaction. Use of excessive force when the interfaces have not been adequately divided only serves to increase the risk of periprosthetic fracture and bone loss. Very rarely the femoral component is so well fixed that successful bone-sparing removal would only be achieved by either cutting away the femoral condylar segment with high-speed metal cutting instruments or proceeding with an anterior cortical femoral window. This decision is very much dependent on the availability of metal cutting instruments and surgeon experience. Once the femoral component has been detached, residual cement is removed.
Related posts:
 Aetiology of Patient Dissatisfaction Following Total Knee Arthroplasty
 Technological Aids in Total Knee Arthroplasty: Navigation, Patient-Specific Instrumentation, and Robotics
 Prosthetic Kinematics: Cruciate Retaining Versus Posterior Stabilized Versus Medial Pivot
 Longevity: Characteristics of a Well-Functioning, Long-Lasting Total Knee Arthroplasty
 Periprosthetic Fractures
 Revision Total Knee Arthroplasty: Surgical Technique in Dealing with Extensor Mechanism Failure
Stay updated, free articles. Join our Telegram channel

Full access? Get Clinical Tree


