Primary Total Knee Arthroplasty Surgical Technique
I have tried to make the surgical technique of primary total knee arthroplasty (TKA) as generic as possible. Obviously, TKA systems will vary in terms of instrumentation and nuances of surgical technique. Some differences will also exist between posterior cruciate ligament (PCL) retention and substitution.
Positioning of the Patient
TKA is always performed with the patient in the supine position. The operating table should be level. The rare exception occurs when TKA is being performed below a fused or ankylosed hip.1 In this case, the table is in the level position for the exposure and closure. During the arthroplasty, the patient is placed in Trendelenburg position and the foot of the table is dropped; the uninvolved leg is supported on a separate stool or table.
I usually expose the knee in flexion, especially in obese patients or if a tourniquet is not used. An exception might be the knee with a prior incision, especially a curvilinear one, in which skin flaps need to be elevated. I close the knee in extension except for placement of the most proximal sutures in the quadriceps mechanism, which is facilitated by a flexed knee and a proximal self-retaining retractor.
Placement of the Footrest
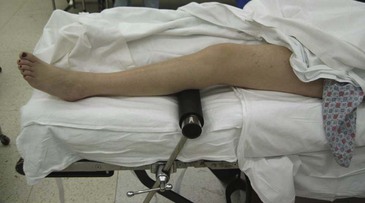
I prefer a commercially available cylindrical footrest that supports the knee in flexion during the arthroplasty. If this is not available, a satisfactory substitute is a towel or blanket rolled into a cylinder and taped into position. The optimal level for placement of this support is at the fattest part of the patient’s calf (Figure 3-1). This supports the knee in maximal flexion after satisfactory exposure has been achieved. The level for this support therefore is independent of the preoperative range of motion but reflects the flexion that will be achieved once the quadriceps mechanism is everted and the knee is mobilized.
Sterile Preparation of the Leg
Any shaving of hair around the area of the planned incision is done just before sterile preparation of the leg. I draw the knee incision with an indelible marking pen before the skin preparation. Any prior incisions are outlined and incorporated, if appropriate. The incision is drawn with the knee flexed 90 degrees to account for the fact that the skin is translated laterally about 1 cm from extension to flexion because the tibia internally rotates.2 If the patient desires to kneel after surgery and the incision is drawn in extension, he or she will most likely kneel on the incision atop the tibial tubercle, causing discomfort. I include the foot in the preparation and then hold the foot with a sterile towel as the remainder of the leg is prepped. An impervious stockinette is then rolled from the foot to the level of the thigh tourniquet. An extremity sheet completes the draping. The stockinette is incised vertically to expose the drawn skin incision and the operating surgeon’s initials to positively identify the patient and complete the mandated time out. Finally, a betadine-impregnated plastic drape is used to seal the surgical site.
The Tourniquet
I use a tourniquet for all TKAs, with essentially two exceptions. The first is in the obese patient, especially one with a short thigh. A tourniquet is often ineffective in these patients and compromises the proximal extent of the surgical field.
The second exception is in a patient with known peripheral vascular disease and absent pulses confirmed by Doppler examination. These patients always have a consultation with a vascular surgeon preoperatively. Even if bypass surgery has been successful, I do not use a tourniquet. The incision and initial exposure are made with the knee in flexion, which minimizes bleeding and allows the vessels to be coagulated as they are encountered.
The tourniquet pressure is 250 mm Hg in most cases. Occasionally, pressure as high as 325 mm Hg is necessary to avoid a venous tourniquet effect. Maximum tourniquet time is 90 minutes, with a 10-minute interval before reinflation is performed. I elevate the limb for 30 seconds before inflation of the tourniquet. I prefer not to exsanguinate the limb with an elastic bandage (Esmarch bandage) so that some blood remains in the superficial veins and they are easier to identify.
The first dose of prophylactic antibiotics is given at least 10 minutes before tourniquet inflation (see Chapter 13). Recently, many surgeons (including me) are using the tourniquet for only a few minutes during initial exposure and reinflate it for approximately 10 minutes for cementing.
The Incision
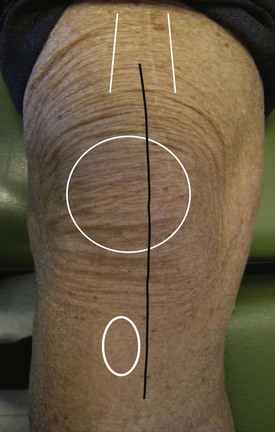
As mentioned earlier, the incision is drawn with the knee flexed before the surgical preparation. A standard incision is straight, vertical, and approximately 15 cm long. It is centered proximally over the shaft of the femur, in its midportion over the midthird of the patella and distally just medial to the tibial tubercle (Figure 3-2). There is a trend toward making shorter incisions, and this can be done by lessening the proximal half of the skin incision. If the initial exposure and closure are done with the knee in flexion, the proximal quadriceps can be accessed through a shorter skin incision.
Skin incisions must be modified in the presence of prior incisions about the knee (see Chapter 14). I prefer to avoid elevating large skin flaps and creating dead space. The subcutaneous dissection heads directly toward the landmarks for a medial parapatellar arthrotomy. Elevation of skin over the dorsal surface of the patella only is the amount sufficient to safely apply a holding clamp for cementing the patellar component.
Medial Parapatellar Arthrotomy
I prefer a medial parapatellar arthrotomy for all primary knees. In the past 40 years, I have had experience with three alternative approaches to the knee: subvastus, midvastus, and lateral parapatellar. I certainly do not object to their use in selected patients. Each, however, has potential disadvantages. For example, the subvastus and midvastus approaches can be difficult in short, obese, and muscular individuals. If a medial advancement is necessary at the time of closure, it may be difficult to achieve with these approaches. The lateral approach for valgus knees may prevent the surgeon from safely everting the patella medially. It also may be difficult to seal the arthrotomy from the subcutaneous space just beneath the skin incision with this approach.
The medial parapatellar approach can be used in virtually every case regardless of the preoperative deformity and range of motion. The three essential landmarks are the proximal medial border of the quadriceps tendon, a point halfway between the medialis insertion and the superior medial pole of the patella, and the medial border of the tubercle.
Two or three millimeters of the medial border of the quadriceps tendon is preserved proximally. At the superior pole of the patella, a soft tissue cuff is preserved to facilitate closure. At the tibial tubercle, a medial soft tissue cuff is carefully preserved for closure to the medial border of the patellar tendon. I mark the medial and lateral edges of the arthrotomy at the level of the superior pole of the patella to facilitate an anatomic closure at the end of the procedure (Figure 3-3).
At the joint line, the arthrotomy severs the anterior horn of the medial meniscus. This facilitates eversion of the medial capsular tissue with the remaining meniscus attached for safe dissection of a subperiosteal anteromedial flap. Careful preservation of this flap permits a secure distal closure at the end of the procedure. It also allows for the possibility of a side-to-side repair to the patellar tendon should the tendon’s insertion be compromised (see Chapter 14).
The initial lateral dissection involves defining the infrapatellar bursa to the level of the patellar tendon insertion. A no. 10 blade is slid upside down into the bursa and tangential to the anterolateral tibial cortex. The scalpel is then passed coronally in this plane, severing the coronary ligament and anterior horn of the lateral meniscus. In almost every case, the patella is then easily and safely everted. If eversion is difficult, I do not hesitate to perform a proximal release, as discussed in Chapter 7. In morbidly obese patients or ankylosed knees, the clamp used to cement the patellar component can be used to grip the patella securely and facilitate eversion.3
Completing the Exposure
Before preparation of the bones is initiated, certain measures are taken to maximize exposure and mobilize the knee.
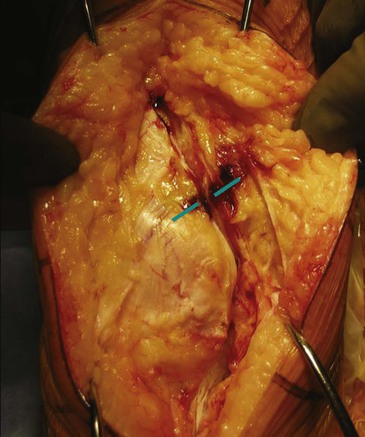
First, the patellofemoral ligament is released (Figure 3-4). This is accomplished by putting a Z-retractor into the lateral compartment to tension this ligament. A curved hemostat is passed beneath its leading anterior edge, and a cutting cautery severs its fibers. This further mobilizes the patella and improves the exposure to the lateral compartment. Care must be taken to avoid inadvertently injuring the quadriceps tendon or placing the clamp so deeply as to involve the popliteus tendon or lateral collateral ligament.
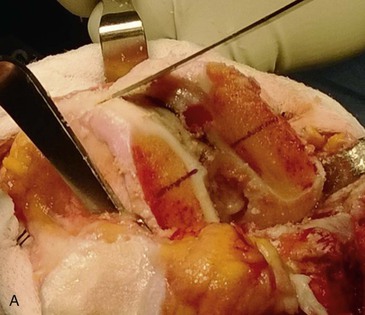
Next, the Z-retractor is placed medially, and the anterior horn of the medial meniscus is excised. This gains access to the plane between the deep medial collateral ligament and the superior border of the medial tibial plateau. A curved, 1-cm osteotome is inserted into this plane and tapped posteriorly until it dissects its way into the semimembranous bursa (Figure 3-5). The anterior cruciate ligament, if intact, is completely sacrificed. The tibia can then be delivered in front of the femur by hyperflexing the knee, pulling the tibia forward, and externally rotating it.

Before removing the lateral meniscus, a scalpel is used to create a 1- to 2-cm slit just peripheral to the lateral meniscus at the junction between its anterior and middle thirds. Through this slit a bent Hohmann retractor is placed, which will be used throughout the operation for lateral exposure.
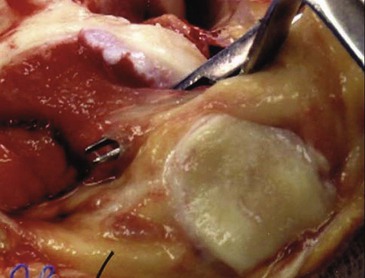
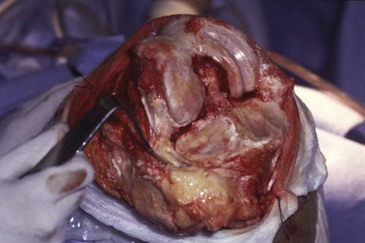
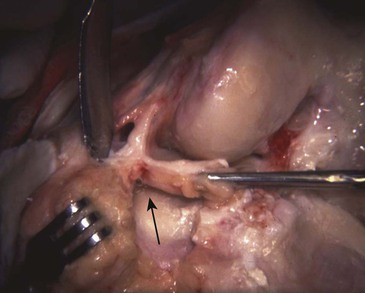
The lateral compartment is now well exposed (Figure 3-6). The entire lateral meniscus is removed with sharp dissection; I find it is easiest to start at the posterior horn and then return to the anterior horn and midsubstance until the resection is complete. The lateral inferior genicular artery will be encountered just peripheral to the meniscus during this dissection. The open lumen of both artery and vein are usually easily visualized in the posterior lateral corner of the knee and are coagulated to minimize postoperative bleeding (Figure 3-7). Finally, the fat pad is dissected off the anterior proximal portion of the lateral tibial plateau to allow eventual placement of the tibial cutting jig. A small amount of the fat pad can be removed, if necessary, for better exposure.
Preparation of the Femur
Either the femur or the tibia can be prepared first for TKA. I prefer femur first in primary surgeries because after femoral resection has been completed, the tibial exposure is facilitated. In revision surgery, however, I always prepare the tibia first. In a primary procedure, the amount of femoral and tibial bone resection and the alignment angles are independent of each other if the surgeon’s goal is to perform measured resections based on thickness of components and maintenance of the joint line. The only bone cuts that are dependent on one another are those that determine the rotational alignment of the femoral component. Surgeons performing tibia-first procedures create flexion gap symmetry by using spacer blocks. Surgeons using femur-first procedures can establish flexion gap symmetry by relating the femoral component rotation to an external tibial alignment device.
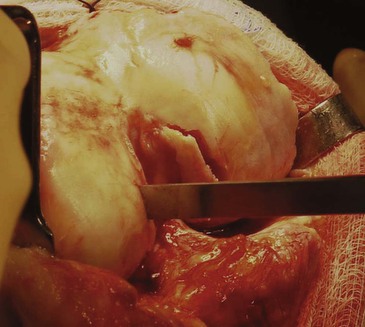
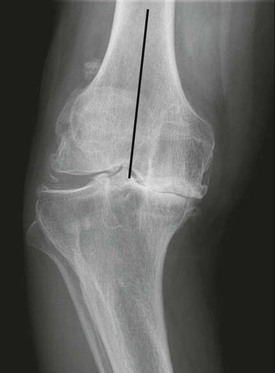
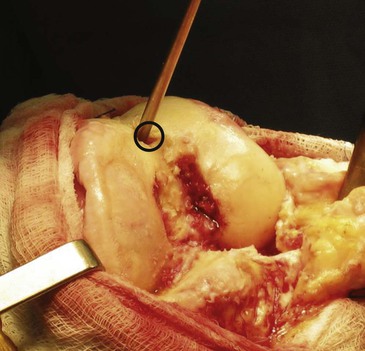
To prepare the femur, it is important to first define the anatomy of the intercondylar notch and expose and define the PCL origin. Intercondylar osteophytes are removed with a  -inch osteotome and dissected free of the PCL (Figure 3-8). The medullary canal of the femur is entered approximately 1 cm above the origin of the PCL and a few millimeters medial to the true center of the intercondylar notch (Figure 3-9). One way to define this is to draw the Whiteside line down the deepest part of the trochlear sulcus and mark the entry point 1 cm above the top of the intercondylar notch and 1 or 2 mm medial to the Whiteside line. The preoperative anteroposterior radiograph of the femur will also help locate the entry point for the intramedullary alignment rod. This can be done by passing a line down the center of the shaft of the femur and seeing where it exits in the intercondylar notch (Figure 3-10). As noted, it is usually several millimeters medial to the true center. If the canal were to be entered in the true center of the notch, the valgus angle chosen would be effectively increased by several degrees. I think this is the most common reason surgeons inadvertently place the femoral component in too much valgus. They enter the canal in the true center of the notch and use a 7-degree valgus bushing. The actual angle of the distal femoral resection becomes 9 or 10 degrees of valgus.
Once the entry point is chosen, I prefer to use a small gouge to initiate the hole and allow the drill to subsequently precisely enter into the chosen spot. The drill hole should be larger than the diameter of the intramedullary alignment rod. I use a  -inch drill and a
  -inch-diameter alignment rod. Some surgeons aspirate the fatty marrow from the distal femur and irrigate the canal. I have not found this to be necessary as long as the intramedullary alignment rod is smaller than the entry hole, fluted, and introduced slowly and gently. If difficulty is encountered introducing the rod, the entry hole should be enlarged. On rare occasions when the rod fails to pass easily, I have found it helpful to first introduce an undersized rod to define the orientation of the canal. This method may reveal that the entry hole must be enlarged into one of four quadrants to allow easy passage (Figure 3-11).
Distal Femoral Resection
The decision then must be made about the amount of distal resection and the desired valgus angle. I think many technique brochures are misleading concerning the amount of distal resection. They often recommend removing an amount of bone that is equivalent to the thickness of the metallic distal femoral condyle of the prosthesis. They should clarify that the amount of resection also should include the thickness of cartilage that was once present. Otherwise, the distal femoral resection will be approximately 2 mm more than a true “anatomic” amount. This would slightly elevate the joint line and possibly set up a knee that is looser in extension than in flexion (see Chapter 1).
In a PCL-preserving technique, the goal should be to restore the femoral joint line as precisely as possible and avoid a knee that is tighter in flexion than in extension. Erring toward underresecting the distal femoral condyle will achieve this goal. If, after initial preparation of both the femur and tibia, the knee is tighter in extension than in flexion, the distal femur can be revisited for another 2 mm of resection. This is quick and simple to accomplish. Excessive distal femoral resection is better tolerated in a PCL-substituting technique. Removing the PCL enlarges the flexion gap and allows the thicker polyethylene required to stabilize the knee in flexion also to be tolerated in extension.
In the presence of a preoperative flexion contracture, more than an anatomic amount of the distal condyle is resected to aid in correction of the contracture (see Chapter 8).
The Valgus Angle
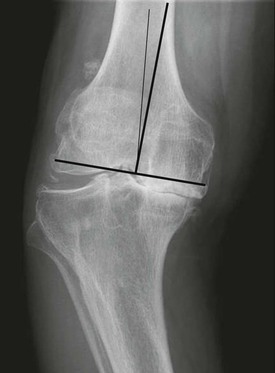
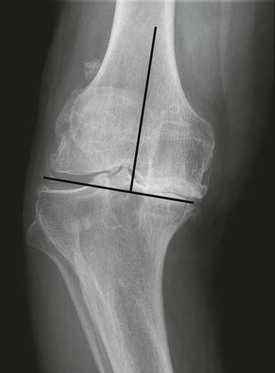
The valgus angle chosen for the distal resection depends on preoperative templating and certain clinical factors. The goal in the majority of knee arthroplasties is to restore the mechanical axis to neutral. This is most efficiently achieved by creating a neutral mechanical axis at the distal femur and a neutral mechanical axis at the proximal tibia. To determine this angle, a long anteroposterior radiograph from the hip to the knee is taken in neutral rotation. A line is drawn from the center of the hip to the center of the knee. A perpendicular is then made at the knee to this line (Figure 3-12). Finally, the angle formed by this line and a line of the center of the shaft of the femur can be measured. Usually the angle is between 5 and 7 degrees (Figure 3-13).

Another advantage of this preoperative templating is to show the relative amounts of resection of the medial and lateral distal femoral condyles. Unless there is some sort of osteotomy, fracture, or dysplastic deformity, the amount of resection usually is slightly more medial than lateral. The line formed at the joint for a neutral mechanical axis will often be at the level of eburnated bone medially and intact cartilage laterally, or roughly 2 mm away from the actual bone of the distal lateral condyle (Figure 3-14). This information is useful when the distal cutting guide is applied and confirms what is shown on the preoperative templated radiograph. In severe valgus knees (see Chapter 5), this discrepancy can be quite considerable (see Figure 5-8).
A few exceptions exist to attempting to accurately restore a neutral femoral mechanical axis. They all involve leaving the knee in slight (1 or 2 degrees) mechanical varus alignment. The reason would be to decrease stress on the medial collateral ligament. The most common situation involves correction of a severe valgus deformity with an attenuated medial collateral ligament. By overcorrecting the alignment into a degree or two of mechanical varus, stress is taken off the medial side of the knee. Similarly, if inadvertent injury to the medial collateral ligament occurs, some residual varus mechanical alignment will protect any surgical repair of the ligament (see Chapter 14).
Residual varus mechanical alignment used to be discouraged in the routine primary knee, but is preferred for cosmetic purposes over residual mechanical valgus alignment in the obese patient with excessive medial soft tissues. Clinically, these patients appear to be in much more anatomic valgus than that represented by their radiographic alignment. If a neutral mechanical axis is chosen for these patients, they should be forewarned of the apparent valgus appearance of the limb. In addition, it is also easier to achieve symmetric extension balancing if the surgeon accepts slight mechanical varus. I now cut most varus knees in 4 degrees of valgus to facilitate ligament balance (see Chapter 4).
Sizing the Femur
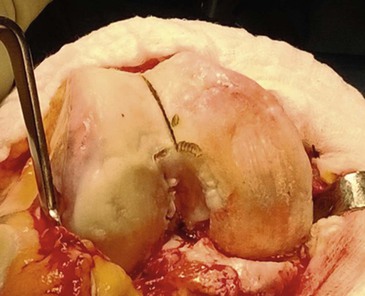
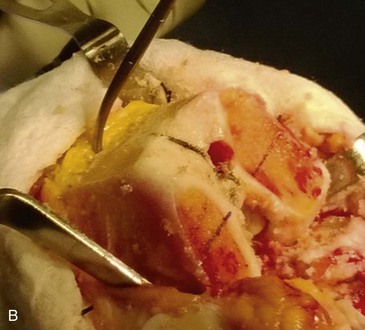
I prefer to size the femur from posterior upward. This is the most reliable method to restore the joint line in flexion, balance the PCL, and minimize the chance for midflexion laxity. Two skids slide under the posterior condyles, and a moveable stylus measures the anteroposterior dimension of the femur based on the anterior cortex just superior to the trochlea. The anterior femoral cortex can sometimes be difficult to define. To facilitate this, I now make a preliminary conservative trochlear resection perpendicular to the Whiteside line (Figure 3-15).
If the sizing measurement shows a dimension at a half size or larger, I use the larger size. An exception to this rule would be a patient with poor preoperative flexion where an attempt is made to make the prosthetic trochlea as flush with the anterior cortex as possible to increase quadriceps excursion. Another exception would be the patient (usually female) whose mediolateral dimension is proportionally smaller than the anteroposterior dimension. Using the larger size would cause too much mediolateral overhang; thus the smaller size is chosen (see Chapter 14).
For half sizes and smaller, I choose the smaller size. The two options that allow downsizing without notching the anterior cortex are to make the distal femoral resection in a few degrees of flexion or to size the femur from anterior downward. See Chapter 14 for the techniques and consequences of using these two methods. Many of the newer prosthetic systems offer a large inventory of anteroposterior and mediolateral dimensions that allow more precise sizing but at the cost of a very large, cumbersome inventory.
Determining the Rotational Alignment of the Femoral Component
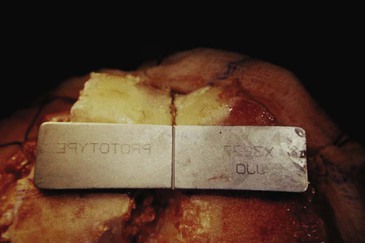
After the femoral component has been sized, its proper rotational alignment must be determined. As discussed in Chapters 6 and 14, at least four methods are popularly used to determine femoral component rotation.4 These include perpendicular to the Whiteside line (the trans-sulcus axis) (Figure 3-16), the transepicondylar axis (Figure 3-17), 3 degrees of external rotation off the posterior condyles (Figure 3-18), and rotational alignment that yields flexion gap symmetry (Figure 3-19, A and B). During surgery, I assess all four methods, but my primary consideration is flexion gap symmetry.5 The sizing guide I use provides for the placement of pinholes for the subsequent cutting guides that can automatically build in 3 degrees of external rotation (see Figure 3-18). I use these to set my preliminary rotation and then add more external rotation as needed to achieve a rectangular flexion gap, the technique known as gap balancing. This method is used by surgeons who want to establish a balanced rectangular flexion gap for optimal knee stability and kinematic function. In varus knees, the extension gap is balanced first by the appropriate medial release. In most valgus knees (that can be balanced without lateral collateral ligament release), prior extension balancing is not required. After extension balancing, the knee is placed in 90 degrees of flexion and some form of tensiometer is applied to the medial and lateral compartments. The femoral component is then rotated into flexion gap symmetry. Laminar spreaders can be used for this purpose (Figure 3-20). A laminar spreader will open up the medial gap a finite amount, regardless of the tension applied, unless the anterior aspect of this ligament is abnormal or injured. It must be remembered, however, that that lateral compartment is more pliable in flexion than the medial compartment. For this reason, it is probably helpful to use a calibrated spreader on the lateral side even though the exact amount of tension to apply has not been established. I have used 20 lb of tension over the past 10 years with good results. When using this method, well over 90% of knees end up in 5 degrees of external rotation relative to the posterior femoral condylar line. Two exceptions to this exist. One occurs in the severe valgus knee with a hypoplastic posterior lateral femoral condyle in which 7 or 8 degrees may be indicated (see Figure 3-20). The second is seen in the severe varus knee in which the medial posterior femoral condyle is hyperplastic, and as much as 7 degrees may be required to restore a rectangular gap.
Related posts:
 Flexion Contracture Associated with Total Knee Arthroplasty
 Total Knee Arthroplasty in Rheumatoid Arthritis
 Sepsis and Total Knee Arthroplasty
 Patellofemoral Complications Associated with Total Knee Arthroplasty
 Staying Out and Getting Out of Trouble During Total Knee Arthroplasty
 Posterior Cruciate Ligament Retention Versus Substitution
Stay updated, free articles. Join our Telegram channel

Full access? Get Clinical Tree


