Sterile Instruments/Equipment
- Headlight
- Tourniquet if desired
- Femoral distractor
- Large and small pointed bone reduction clamps (Weber clamps)
- Dental picks and Freer elevators
- Implants: anatomically contoured distal tibial periarticular plates, locked and/or nonlocked; medial and lateral
- Small fragment plates and screws
- Periarticular plates
- Mini-fragment screws and mini-fragment plates (2.0/2.4 mm) depending on fracture requirements
- Small fragment plates and screws
- K-wires and wire driver/drill
Surgical Approaches (Fig. 21-1)
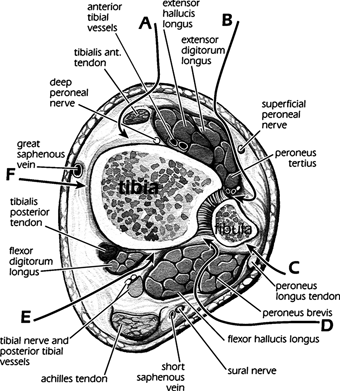
Figure 21-1. Cross-sectional schematic showing the intervals for common approaches to pilon fractures. A, Anteromedial. B, Anterolateral. C, Posterolateral (fibula). D, Posterolateral (tibia). E, Posteromedial. F, Medial. (From Howard JL, Agel J, Barei DP, et al. A prospective study evaluating incision placement and wound healing for tibial plafond fractures. J Orthop Trauma. 2008;22:299–305. With permission.)
- Positioning
- Supine on a radiolucent table.
- Bring patient to the foot end of the table.
- Place small bump under the ipsilateral hip and torso.
- Place pneumatic tourniquet on the ipsilateral thigh if desired.
- Elevate the leg on soft ramp cushion to facilitate lateral radiographs and apply exclusionary drape lower limb (Fig. 21-2).
- Supine on a radiolucent table.
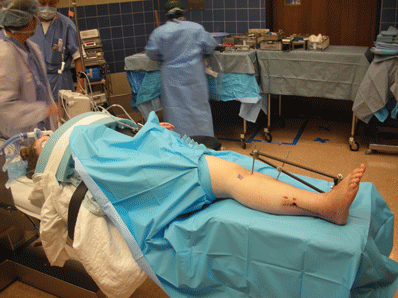
Figure 21-2. Supine patient positioning for anteromedial or anterolateral approach to a pilon fracture.
![]()
- Incision starts proximally, 1 cm lateral to tibial crest.
- Curves medially, approximately 60 to 80 degrees at joint line.
- Continues to a point 1 cm distal to medial malleolus (Fig. 21-3).
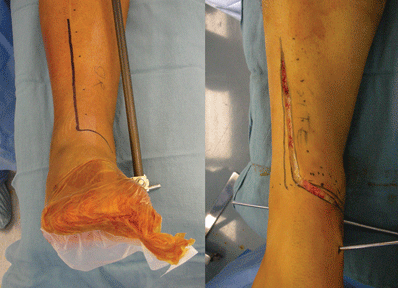
Figure 21-3. Incision for an extensile anteromedial approach for pilon fractures.
- Superficial dissection to fascia, sweep subcutaneous tissue off fascia, working medially, just to margin of the tibial crest (Fig. 21-4).
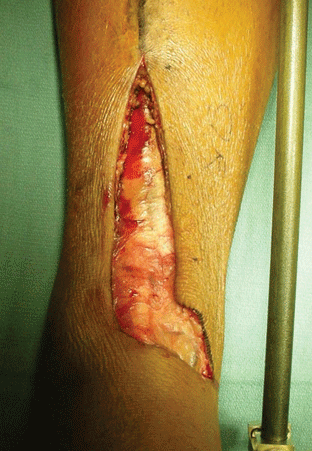
Figure 21-4. Superficial dissection of an anteromedial approach to the level of the fascia.
![]()
- Make full thickness incision in fascia and periosteum just medial to anterior tibialis tendon and elevate with soft tissue flap.
- Take care not to violate the tendon sheath, which is elevated extraperiosteally or with periosteum at fracture site (Fig. 21-5).

Figure 21-5. A full thickness flap is elevated just medial to the anterior tibialis tendon that allows for anatomic closure.
- Alternatively, elevate the subcutaneous layer off the periosteum medially, and make a separate “window” incision in periosteum, as needed.
- This results in less periosteal stripping but leaves a thinner subcutaneous flap and perhaps should be avoided in poor hosts (smokers, elderly, compromised vascularity, etc.).
- Avoid the greater saphenous nerve and vein medially in the distal limb of the incision. Retract vein medially, if necessary.
- Make arthrotomy over dominant anterior (sagittal) fracture line.
- Use a laminar spreader in the metaphyseal fracture line, if necessary, to expose the metaphyseal and articular surface.
- Take care not to injure or comminute cortical interdigitations, especially in patients with brittle bone or osteopenia (Fig. 21-6).

Figure 21-6. Depending on the fracture pattern, the fracture gap may be distracted for access to the articular fragments.
![]()
- Deep closure is critical.
- Reapproximate soft tissue edges of full thickness flaps using absorbable braided suture.
- Place all sutures and clamps provisionally.
- After all are in place, use sutures to mobilize retracted soft tissues “en mass.” Then tie each suture sequentially.
- Skin is closed with Allgower-Donati stitches using 3-0 Nylon sutures (Fig. 21-7).
- Reapproximate soft tissue edges of full thickness flaps using absorbable braided suture.
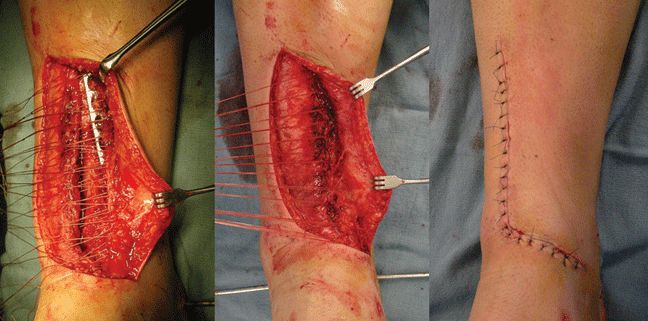
Figure 21-7. The full thickness deep layer is closed with interrupted absorbable suture, and clamped prior to tissue mobilization and knot tying. This allows distribution of tissue tension, ensuring a watertight closure and minimizing tissue tearing. Interrupted Allgöwer-Donati sutures are placed to minimize the skin edge hypoxia.
Anterolateral Approach
- Positioning
- Supine on a radiolucent table.
- Bring patient to the end of the table.
- Place small bump under the ipsilateral hip and torso.
- Place pneumatic tourniquet on the ipsilateral thigh if desired.
- Elevate the leg on soft ramp cushion to facilitate lateral radiographs.
- Supine on a radiolucent table.
- Incision is longitudinal, 2 to 4 cm lateral to tibial crest proximally approximately half way between the tibia and fibula; distally it is in line with the fourth ray of the foot.
- The proximal extension of the incision is usually limited to approximately 7 cm above the joint line due to the orientation and origin of the crossing anterior compartment muscles.
- The proximal screws in the plate can be inserted percutaneously after assessing the location of the superficial peroneal nerve. With percutaneous placement of proximal screws in the plate, the deep peroneal nerve and vascular structures are at risk and should be avoided during drill and screw insertions.
- At the level of the ankle joint, the incision is centered over the mortise.
- Extends distally in line with the fourth metatarsal over the talar dome and proximal neck, if necessary (Fig. 21-8).
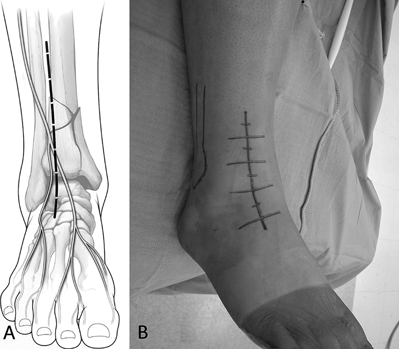
Figure 21-8. A: This schematic demonstrates the location of the anterolateral surgical incision. The incision is typically placed in line with the fourth metatarsal and centered at the ankle joint. The proximal extension is usually limited by the origin of the anterior compartment musculature. B: A typical incision location and length. This allows for the exposure of the articular surface for reduction and placement of plates at the distal tibial metaphysis. Proximal plate placement and fixation typically requires an additional approach more proximally or, more frequently, multiple small incisions for lateral to medial screw placement. Distally, the talar neck may be exposed to allow for the placement of a pin in the talus and for distraction across the ankle joint. (From Nork SE, Barei DP, Gardner MJ, et al. Anterolateral approach for pilon fractures. Tech Foot Ankle Surg. 2009;8(2):53–59. With permission.)
![]()
- Identify superficial peroneal nerve in superficial dissection (Fig. 21-9).

Figure 21-9. With an anterolateral approach, the superficial peroneal nerve must be identified superficial to the fascia. (From Nork SE, Barei DP, Gardner MJ, et al. Anterolateral approach for pilon fractures. Tech Foot Ankle Surg. 2009;8(2):53–59. With permission.)
![]()
- Retract the anterior compartment medially with its deep peritenon and tenosynovium, to expose the joint capsule.
- It is easiest to start laterally at the tubercle of Chaput (Fig. 21-10).
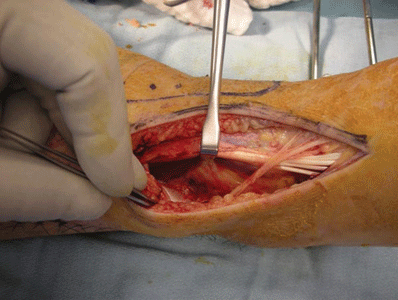
Figure 21-10. The anterior compartment is retracted medially. Try to keep the anterior compartment tendons surrounded with their peritenon.
![]()
- Find the sagittal fracture plane and incise the periosteum vertically from the metaphysis to the joint, if not already disrupted by the injury.
- “T” the joint capsule tangentially to the distal tibial, leaving a rim or capsular tissue (“coronary ligament”) (Fig. 21-11).
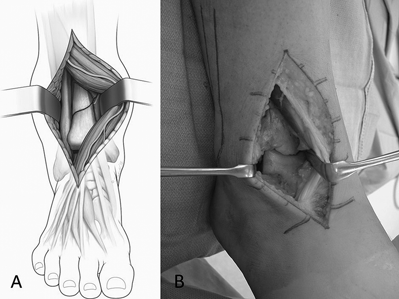
Figure 21-11. A: The deep dissection allows for the exposure of the distal tibial metaphysis after medial retraction of the entire anterior compartment. B: After an arthrotomy of the ankle joint, the distal tibia and the talar neck are exposed. The anterior tibiofibular ligaments are left attached to the anterolateral articular segment. (From Nork SE, Barei DP, Gardner MJ, et al. Anterolateral approach for pilon fractures. Tech Foot Ankle Surg. 2009;8(2):53–59. With permission.)
![]()
- If possible, protect the lateral anterior malleolar artery (a branch of the perforating artery, which in turn is a branch of the peroneal artery) which lays transversely on the ankle capsule and anastamoses with the anterior tibial artery.
Posteromedial Approach
- Positioning
- Supine or prone on a radiolucent table.
- If prone, allow sufficient space between the dorsum of foot and table for ankle dorsiflexion.
- Bring patient to the foot end of the table.
- If prone, consider moving patient a bit distal to the foot end of the table, so as to facilitate ankle dorsiflexion.
- Place pneumatic tourniquet on the ipsilateral thigh if desired.
- Elevate the leg on soft ramp cushion to facilitate lateral radiographs.
- Consider a bump under the contralateral hip to externally rotate the affected leg, improving access for reduction and hardware placement.
- Supine or prone on a radiolucent table.
- Difficult to visualize the joint (unless a distractor is used); most helpful for extraarticular cortical reductions.
- Incision is centered between the Achilles tendon and the posteromedial tibial border, over PT/FDL/FHL tendons of posterior compartments.
- Several intervals or “windows” can be chosen to approach the fracture for reduction and fixation: between the tibia, the posterior tibialis, the flexor digitorum longus, the posterior tibial neurovascular bundle, and the flexor hallucis longus.
- One or more windows may be used depending on the location of the fracture line(s) and desired implant placement and screw orientation (Fig. 21-12).
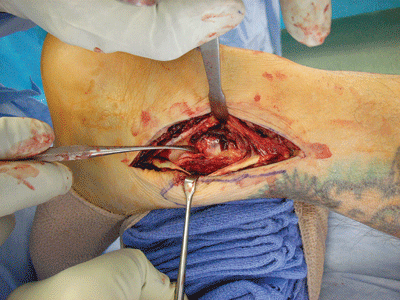
Figure 21-12. Posteromedial approach to a left ankle in the prone position. The posterior tibialis tendon is retracted anteriorly and the flexor digitorum longus and neurovascular bundle are retracted posteriorly for access to the posteromedial distal tibia.
Posterolateral Approach
- Positioning.
- Semilateral or prone
- Lateral allows for simultaneous anterior exposure with adequate hip rotation.
- If prone, see above for positioning tips (see also Fig. 21-12).
- Lateral allows for simultaneous anterior exposure with adequate hip rotation.
- Bring patient to the foot end of the table.
- Place pneumatic tourniquet on the ipsilateral thigh if desired.
- Elevate the leg on soft ramp cushion to facilitate lateral radiographs.
- Semilateral or prone
- Difficult to visualize joint (unless a distractor is used); most helpful for cortical reductions.
- Incision is centered between the Achilles tendon and the posterior fibular border, if no prior fibular incision.
- Protect sural nerve crossing from middle of leg to lateral retromalleolar region distally.
- Interval is between FHL and peroneal tendons.
- Dissect lateral to medial to expose posterior tibia.
- Femoral distractor within incision to the calcaneus can help restore length.
Reduction and Implant Techniques
- To obtain intraoperative distraction of the articular surface, a small Schanz pin (4.0-mm pin, predrill with 2.5-mm bit) can be placed in the talar body/neck for a distractor.
- The threaded distractor rod should be placed posteriorly and the talar pin should be placed just distal to the articular surface in the talar body/neck.
- This configuration allows for slight plantarflexion of the talus as well as axial distraction across the tibiotalar joint.
- This improves visualization of the articular surface, and does not distract through the subtalar joint.
- If an anterolateral approach is used, the pin can be placed within the surgical wound.
- The entry point in the talar body/neck is exposed by incising the fascia of the extensor digitorum brevis and elevating the muscle belly (Figs. 21-13 and 21-14).
- The threaded distractor rod should be placed posteriorly and the talar pin should be placed just distal to the articular surface in the talar body/neck.
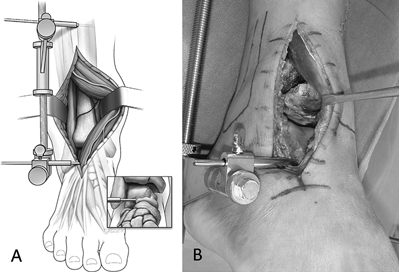
Figure 21-13. A: After the placement of a small femoral distractor from the tibia to the talar neck/body junction, the joint is distracted. This allows for complete visualization of the entire articular surface of the distal tibia. B
Related posts:


Stay updated, free articles. Join our Telegram channel

Full access? Get Clinical Tree


