Injuries
Jason M. Evans
Michael J. Gardner
Milton L. Chip Routt

Sterile Instruments/Equipment
- Large and small pointed bone reduction clamps (Weber clamps)
- Assorted pelvic reduction clamps
- Universal manipulator (femoral distractor)
- Hand-held plate bender
- Implants
- Extra-long 3.5-mm screws
- Extra-long 4.5-mm screws
- Extra-long 7.0-mm cannulated screws, partially and fully threaded
- 5.0- and 4.0-mm Schanz pins
- 3.5-mm pelvic reconstruction plates
- Extra-long 3.5-mm screws
- K-wires and wire driver/drill
Patient Positioning
For additional details see the chapter (1)
- Supine position
- Radiolucent table.
- Use a clean sheet, folded into thirds, as a patient pelvic lifting and positioning device.
- Assure that the folded sheet is wide enough to be positioned under the patient from the low lumbar level to the upper third of the thigh when placed transversely across the table.
- This folded sheet remains beneath the patient and should be without any wrinkles that could cause skin injury.
- Assure that the folded sheet is wide enough to be positioned under the patient from the low lumbar level to the upper third of the thigh when placed transversely across the table.
- Once on the OR table, the folded sheet is then used to suspend the patient’s pelvis from the table several inches.
- A bump consisting of two folded and stacked OR blankets, again folded into thirds, is placed posterior to the patient’s pelvis and centered on the dorsal sacral area extending distally to the proximal thigh.
- This double-stacked blanket bump elevates the supine patient from the table to allow iliosacral screws to be inserted easily without interference from the OR table.
- A bump consisting of two folded and stacked OR blankets, again folded into thirds, is placed posterior to the patient’s pelvis and centered on the dorsal sacral area extending distally to the proximal thigh.
- Avoid patient tilting on the bump.
- An obliquely oriented patient frustrates and complicates accurate imaging during the surgery.
- If traction is desired, an apparatus can be fashioned out of a pipe bender to be affixed to the end of the operating table.
- This can be draped into the sterile field using an impervious stockinette.
- Thorough patient prep is essential, since multiply injured patients routinely have had insufficient in-hospital hygiene.
- Take time to remove dirt and debris prior to the sterile preparation.
- Shave the perineal hair and cleanse the skin and genitals with isopropyl alcohol or similar antiseptic agent.
- Isolate the perineum as necessary from the planned operative field with plastic adhesive drapes.
- Utilize Mastisol or other skin adherent prior to applying the isolation drapes in order to create a secure seal that may otherwise be violated during the prep.
- These should be placed posteriorly enough to allow unobstructed access to the iliosacral screw starting point, but not be stuck to the OR table or folded on itself allowing a puddle of prep solution to form.
- Drape widely, including the entire abdomen from the xyphoid process to the penis in men to allow for placement of retrograde superior ramus screw, if necessary.
- Prepare and drape both flanks for iliosacral screws, even if the preoperative plan only calls for unilateral insertion.
- Take time to remove dirt and debris prior to the sterile preparation.
- This positioning and draping allows access to perform iliosacral screw insertions, open reduction of sacroiliac joint dislocations through an anterior approach, symphyseal and anterior ring open procedures, acetabular fractures through an ilioinguinal approach, and femoral head fixation using the Smith-Petersen exposure.
- A Pfannensteil approach is used for symphyseal disruptions.
- Avoid placing the incision in the intertriginous area of a pannus as this can be fungal infected and a difficult area for successful wound healing.
- Incision is approximately 2 cm cranial to the palpable superior aspect of the symphysis.
- Visualization of the superior ramus is enhanced by incomplete anteromedial elevation of the rectus abdominus insertion from the anterior aspect of the pubis without a tenotomy.
- Use an appropriate sized malleable retractor for retraction of the bladder and avoid deep placement of the retractor.
- Avoid placing the incision in the intertriginous area of a pannus as this can be fungal infected and a difficult area for successful wound healing.
- Radiolucent table.
- Prone position
- Radiolucent table.
- Double rolled OR blankets used for chest rolls.
- Position each arm such that the shoulders are slightly forward flexed and slightly abducted, and the elbows are flexed with forearms supported and the ulnar nerve unencumbered (Fig. 10-1).
- Special articulated arm supports make this physiological positioning easy.
- Radiolucent table.

Figure 10-1. The prone positioning process is done sequentially and carefully. The face and neck are positioned anatomically and without pressure points. If a cervical collar is indicated for the patient, it is removed once prone and sand bags are applied during surgery. A cervical collar left on with the patient in the prone position risks chin necrosis. The chest rolls suspend the abdomen allowing normal anesthetic ventilation routines. The sheets are smoothed to avoid wrinkles and potential skin injury. The shoulders are slightly abducted, forward flexed, and internally rotated. The elbows are also slightly flexed and placed on padded articulated forearm supports. Blue foam can be used as padding but the solid side should be exposed to the extremity (as seen on the left patient) rather than the “egg crate” side (as seen on the right side patient) to avoid pressure points. If the upper extremity has been splinted due to injury, the upper extremity positioning is adjusted accordingly, or in some situations the splint is removed during surgery if the reduction is stable without a splint while under anesthesia. The splint is reapplied after surgery and radiographs assure no changes. The male patient’s genitals should hang freely. The urinary catheter tubing is located anterior to the uninjured thigh-hip region and padded to avoid skin problems. The catheter-drainage tubing junction should be accessible for irrigation if necessary. The uninjured lower extremity is slightly flexed at the hip due to the chest roll suspension, and the knee is flexed slightly while the leg-ankle-foot are supported on a pillow. The uninjured limb is padded anteriorly and taped securely. A sequential compression device may be applied but the air hoses should be located remote from the bone or nerve prominent areas.
![]()
- A rolled egg crate foam pad under the anterior aspect of the shoulders prevents excessive shoulder sag and keeps the arm from abutting the OR table.
- Thoroughly shave, then cleanse with isopropyl alcohol, and then isolate the perineum with plastic adhesive drapes prior to prepping.
- Mastisol or other skin adherent seals the barrier drapes well, but avoid overapplication of the adherent onto the operative field.
- A laparotomy drape with a plastic bag is used, with the operative leg placed through the opening, and scissors are used to enlarge the opening to provide access for the posterior approach.
- This is again sealed with iodine-impregnated adhesive strips after marking the proposed incision.
Reduction and Implant Techniques
- Circumferential pelvic antishock sheeting (CPAS)
- Quickly decreases the pelvic volume and stabilizes the bony pelvis and the hematoma.
- A hospital sheet is folded into thirds centered between the iliac crests and greater trochanters secured with towel clamps (Fig. 10-2).
- Quickly decreases the pelvic volume and stabilizes the bony pelvis and the hematoma.
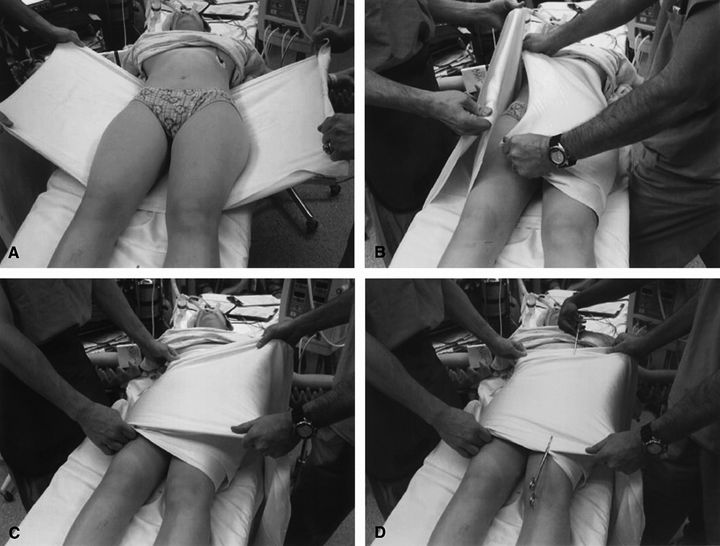
Figure 10-2. Circumferential pelvic antishock sheeting is applied in this patient. The patient’s clothing should be removed before application. The sheet is positioned beneath the patient’s pelvis smoothly (A). The ends of the sheet are crossed in an overlapping manner anteriorly (B) and are pulled taut (C). Clamps secure the smooth and snug sheet (D). (From Routt MLCR, Falicov A, Woodhouse E, et al. J Orthop Trauma. 2002;16:45–48. With permission.)
![]()
- Portals can be cut into the sheet for vascular access, or placement of external fixator pins or percutaneous screws (Fig. 10-3).
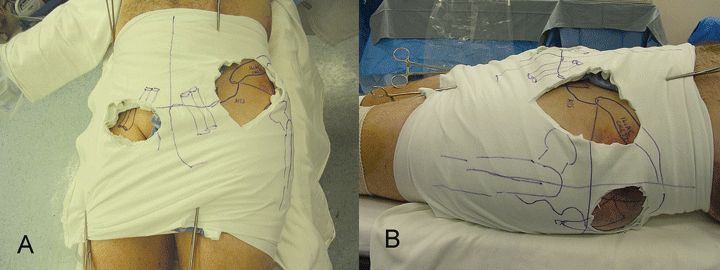
Figure 10-3. Anterior view of the femoral vascular and anterior external fixation pin working portals (A), and lateral view demonstrating the iliosacral and antegrade ramus screw portals (B). Working portals cut in the CPAS do not diminish the sheet function, yet allow pelvic angiography, simple anterior pelvic external frame application, or percutaneous screw fixation to proceed while the sheet maintains the reduction. (Adapted from Gardner MJ, Osgood G, Molnar R, et al. Percutaneous pelvic fixation using working portals in a circumferential pelvic antishock sheet. J Orthop Trauma. 2009;23:668\u2013674. With permission.)
![]()
- Pubic symphyseal plating
- The skin, local soft tissues, and rectus abdominus muscles assist in the reduction of the symphysis widening by providing a leverage point for Hohmann retractors.
- The points of the retractors are placed just lateral to each pubic tubercle and posterior to the rectus insertions.
- Alternatively, pointed reduction clamps may be used to reduce the pubic symphysis (Fig. 10-4).
- The points of the retractors are placed just lateral to each pubic tubercle and posterior to the rectus insertions.
- The skin, local soft tissues, and rectus abdominus muscles assist in the reduction of the symphysis widening by providing a leverage point for Hohmann retractors.
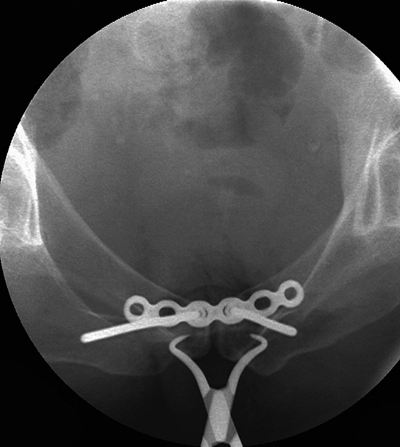
Figure 10-4. A small reduction clamp was applied to the pubic tubercles bilaterally to maintain the symphyseal reduction while the plate was attached. Clamp application into the obturator foramen is essentially never necessary although historically advocated.
![]()
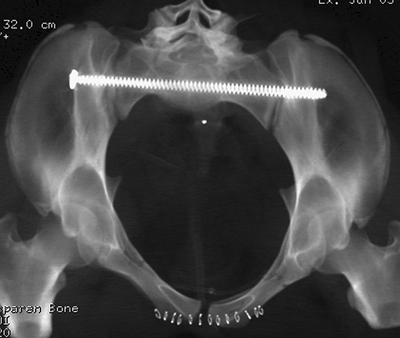
- A straight six to eight hole 3.5-mm reconstruction plate is easily contoured to fit well and provides reliable symphyseal fixation.
- Place a slight prebend in the center and again just medial to both peripheral holes so that the peripheral screws can be directed toward the inferomedial symphyseal areas. This improves fixation by allowing triangulation of implants and allows for longer screws (Fig. 10-5).
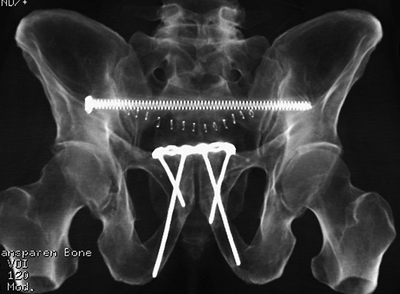
Figure 10-5. Long central hole medullary screws are bilaterally directed toward the ischium to improve fixation. The peripheral screws are directed toward the inferomedial symphyseal arcuate areas to triangulate each side of the symphyseal fixation construct.
![]()
- The plate can be used to assist with the reduction of slight residual symphyseal widening.
- Predrill a hole on each ramus adjacent to the subchondral surface with the screw aimed slightly away from the midline.
- Elevate the cartilage cap for direct visualization of the subchondral surface to ensure precise screw positioning.
- Place the screws through the central two holes and sequentially tighten them, alternating from one to the other.
- As the screw heads are tightened and contact the plate, the plate functions to reduce the disrupted symphysis.
- Be cognizant when using this technique that small inaccuracies in predrilled hole locations near the midline are magnified at the ends of the plate, potentially leading to a plate being off of the bone laterally.
- Predrill a hole on each ramus adjacent to the subchondral surface with the screw aimed slightly away from the midline.
- Transsymphyseal screws through the plate are used when routine screw placement fails due to poor bone quality, fracture comminution, or other issues (Fig. 10-6).
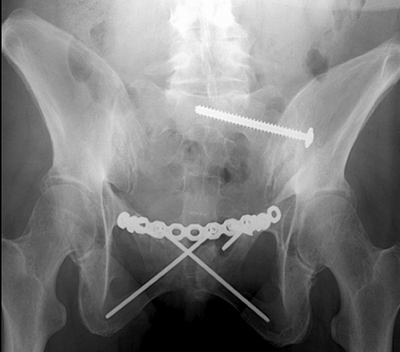
Figure 10-6. This patient was injured in an equestrian accident and had routine symphyseal plating. Three days after surgery, the routine plate fixation failed and was revised successfully to this construct using an anteriorly located and longer symphyseal plate with transsymphyseal screw fixation.
![]()
- Transsymphyseal retrograde ramus screws can be used to stabilize disruptions of the symphysis when it is desirable to have as little exposed surface implants as possible, such as in treatment of open pelvic disruptions (Fig. 10-7).
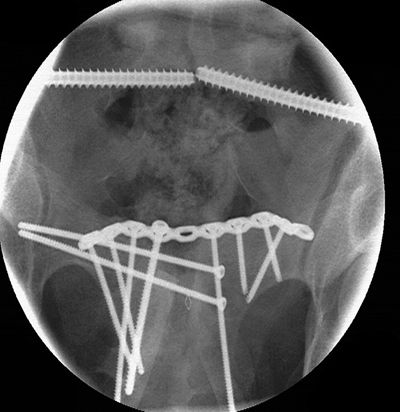
Figure 10-7. This patient developed early routine symphyseal plate fixation failure due to a deep anterior pelvic infection. The failed implants were removed, the wound was debrided, and the symphysis reduced and stabilized using this plating technique with supplemental transsymphyseal medullary ramus screws.
![]()
- Heavy, nonabsorbable suture may also be used to stabilize the symphysis in children or in open fractures to minimize the foreign body load.
- This is not as biomechanically sound and should be augmented with posterior fixation in most cases (Fig. 10-8).
Related posts:


Stay updated, free articles. Join our Telegram channel

Full access? Get Clinical Tree


