Fig. 11.1
(a) The patient is positioned in a beach chair position. Anatomic landmarks and portals are drawn. (b) The posterior portal is placed more superiorly and an accessory posteroinferior portal (circled) is also drawn; however, this is localized with a spinal needle under direct visualization
Debridement Technique
Standard posterior, lateral, and anterior portals are used and a standard diagnostic arthroscopy is performed. The posterior portal is typically positioned more superiorly to allow improved visualization for debridement (Fig. 11.1b). A 4.0-mm arthroscopic shaver is used to debride the labrum and the cartilage lesion to stable vertical walls. A curette is use as needed to create stable walls. A posteroinferior accessory portal is used to access the axillary pouch, remove loose bodies, and debride inferior humeral bone spur (Figs. 11.2 and 11.3a). A subacromial decompression, distal clavicle excision, and biceps tenodesis are performed as indicated.
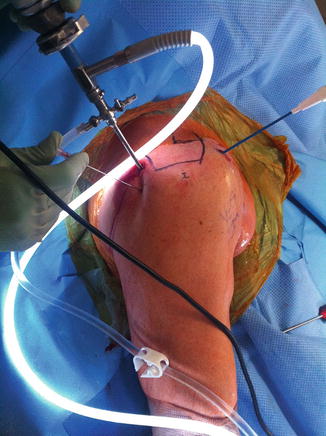
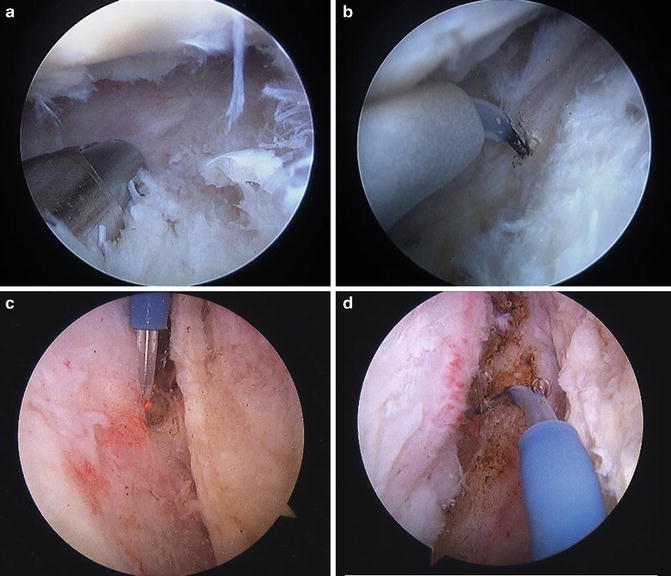
Fig. 11.2
The arthroscope is in the posterior portal and a spinal needle is used to localize the accessory posteroinferior portal in the axillary pouch. This allows access for debridement in the axillary pouch and inferior capsular release
Fig. 11.3
(a) The shaver is introduced through the posteroinferior portal into the axillary pouch to remove loose bodies. (b) The hooked electrocautery probe is introduced through the posteroinferior portal to perform inferior capsular release. Release is performed at the capsulolabral junction and the probe is angled toward the glenoid neck. (c) The probe is introduced through the anterior portal and anterior capsular release is performed at the capsulolabral junction. The rotator interval is also released. Care is taken not to damage the subscapularis. (d) The scope is placed through the anterior portal and the probe through the posterior portal to perform posterior capsular release. This is connected with the inferior capsular release
Capsular Release Technique
Examination under anesthesia is performed to assess for loss of motion in forward elevation, abduction, internal rotation and external rotation with the arm at the side, and internal and external rotation with the arm in 90° abduction. Standard posterior and anterosuperior portals are established with an anterior working cannula. A standard diagnostic arthroscopy is performed. A posteroinferior portal is then established under direct visualization to allow access to axillary pouch and inferior capsule (Fig. 11.2). A spinal needle is used to localize this portal. A hooked electrocautery probe is introduced through the posteroinferior portal and the inferior capsular release is performed under direct visualization (Fig. 11.3b). The arm is placed in abduction to increase the distance of the axillary nerve away from the glenoid and thus away from the area of release. The capsular release is performed just off the capsulolabral junction with the hook aimed at the glenoid neck. Care must be taken not to injure the axillary nerve and adherence close to the labrum will minimize this risk. Anterior capsular release is then performed through the anterosuperior portal (Fig. 11.3c). A combination of a shaver and electrocautery device is used to release the rotator interval to the coracoid. Care must be taken not to damage the coracoacromial ligament. The anterior capsule is then released at the capsulolabral junction to connect with the inferior capsular release. Care must be taken not to damage the subscapularis.
A switching stick is then introduced into the anterior portal under direct visualization and another through the posterior portal. The scope is switched to the anterosuperior portal and the working cannula is placed in the posterior portal. A combination of electrocautery device and shaver is then used to perform the posterior capsular release just off the capsulolabral junction (Fig. 11.3d). The release is started at the posterior extension of the inferior capsular release and extended superiorly at the capsulolabral junction. Care must be taken not to inadvertently injure the posterior rotator cuff. Following extensive release of the capsule, the arthroscope is taken out and the shoulder is manipulated in all directions.
Microfracture Technique
If there are isolated cartilage defects, then a microfracture of the defect is indicated. After a standard diagnostic arthroscopy is performed, the arm should be positioned to allow optimal access to the lesion. A mechanical arm holder is very helpful to hold the arm with the lesion rotated into optimal position. Accessory portals can be used in addition to standard anterior and posterior portals as needed to achieve optimal trajectory to access the lesion. A combination of an arthroscopic shaver and curette is used to debride unstable flaps and create stable vertical walls (Fig. 11.4a, b). The calcified cartilage layer should be removed with a curette. This layer is thinner in the shoulder than it is in the knee, so care must be taken to not remove subchondral bone. A sharp microfracture awl is then used to penetrate the subchondral bone as perpendicular as possible to a depth of 3–4 mm (Fig. 11.5a). This is started in the periphery of the lesion, and they should be spaced approximately 3 mm apart. It is critical that the pump or inflow is turned off and bleeding is confirmed from the subchondral bone (Fig. 11.5b).
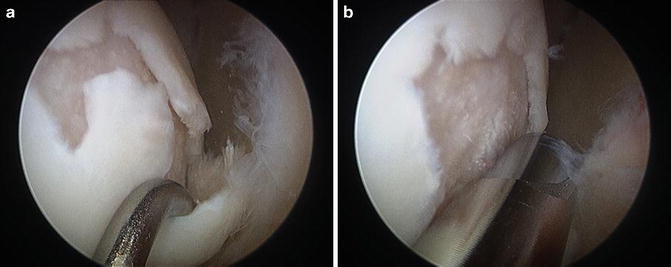
Fig. 11.4


Arthroscopic view through the posterior portal. (a) Grade IV lesion with unstable cartilage flaps is demonstrated with a probe. (b) A combination of a 4.0-mm arthroscopic shaver and curettes is used to debride the unstable cartilage flaps
Related posts:


Stay updated, free articles. Join our Telegram channel
Full access? Get Clinical Tree
