Positioning
Michael L. Brennan
Lisa A. Taitsman
- The goal of positioning a patient for surgery is to allow the surgeon unrestricted access to the extremity (surgical site) for the surgical procedure and for imaging.
- Prolonged soft tissue pressure and shear forces from improper positioning may compromise quality of care and patient safety, resulting in tissue injuries such as circulatory embarrassment, perioperative pressure ulcers, and neurological injury, even in routine surgical procedures.
Upper Extremity
ORIF Clavicle, Proximal Humerus, Humeral Shaft
- Supine on reversed radiolucent cantilever table.
- Standard beach chair positioning is an alternative.
- Patient brought as proximal and lateral on the table as possible, with head at the top corner of the table, ipsilateral to operative extremity (Figs. 1-1 and 1-2).
- Neck should be slightly extended and head turned slightly away from operative extremity and secured with tape over a forehead towel.
- Small folded towel beneath the ipsilateral scapula if needed.

Figure 1-1. Supine positioning for upper extremity procedure, C-arm from the head of the bed.
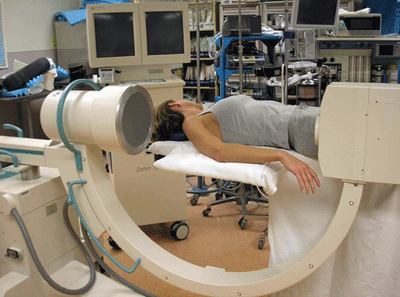
Figure 1-2. C-arm position for axillary lateral imaging.
![]()
- C-arm from the top of the table, parallel to the long axis of the bed; permits axillary lateral image of humerus in addition to standard imaging of the shoulder girdle.
- Radiolucent (e.g., Plexiglas) arm board placed under the mattress pad with sufficient board protruding to support the arm.
- Add height to radiolucent Plexiglas arm support with blankets (secure with tape) to match table-pad height.
- Upper extremity is draped free.
- Wide prep and drape to contralateral side of midline (Figs. 1-3 and 1-4).
- Include the sternal notch in field.
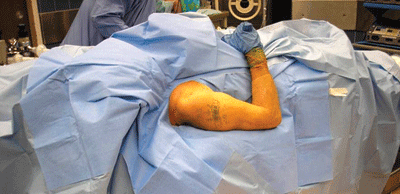
Figure 1-3. Supine positioning for upper extremity procedure after prepping and draping.
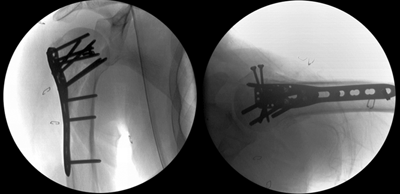
Figure 1-4. AP and axillary fluoroscopic imaging in supine position.
IM Nail Humerus (Supine)
- Radiolucent reversed cantilever or fully radiolucent table such that the patient’s head/upper extremities are placed at the cantilevered end.
- Small bump (folded towel) beneath the scapula.
- C-arm from the opposite side of the table (use fluoroscope that goes 45 degrees beyond vertical (“over the top”), and 90 degrees in the other direction).
- Uninjured arm adducted along side the body so that it does not impede the C-arm moving parallel to the long axis of table/arm.
- Plexiglas arm board with stacked blankets to match table pad height.
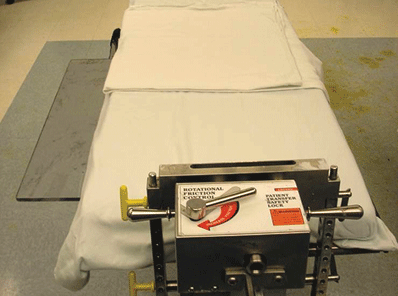
Figure 1-5. Radiolucent flat top table with Plexiglas arm support.
Figure 1-6. Radiolucent flat top table with Plexiglas arm support.
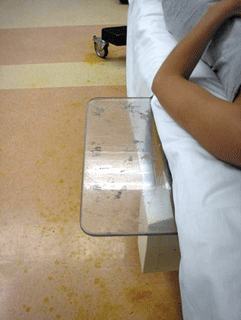
Figure 1-7. Plexiglas board to support injured upper extremity.
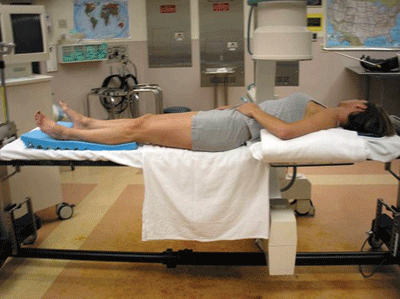
Figure 1-8. Supine position with upper extremity on blanket bolster and Plexiglas arm support.
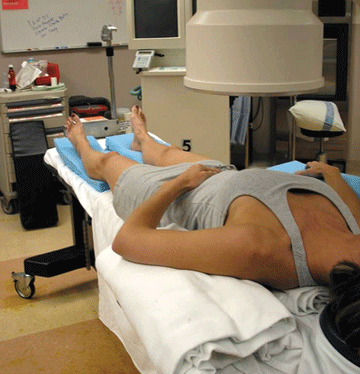
Figure 1-9. Supine position with upper extremity on blanket bolster Plexiglas arm support, view from patient’s head.
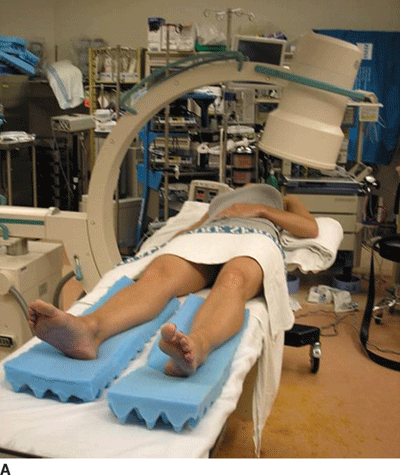
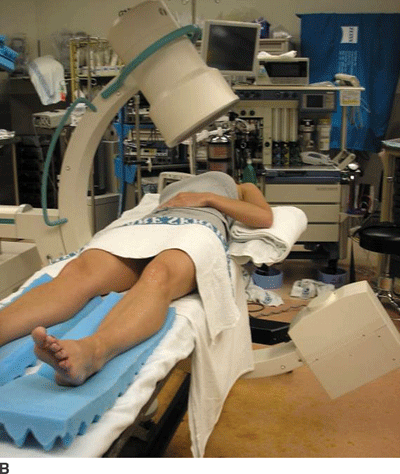
Figure 1-10. Position of C-arm for lateral (A) and AP (B) images (less than orthogonal planes are shown).
![]()
- With arm adducted, internally rotated 40 to 60 degrees, and C-arm rolled back 30 to 60 degrees; AP of proximal humerus—a Grashey’s AP image is preferred (Figs. 1-10B and 1-11).
- With arm adducted, internally rotated 40 to 60 degrees, and C-arm over the top 30 to 60 degrees; scapular “Y” lateral of proximal humerus is obtained (Figs. 1-10A and 1-12).
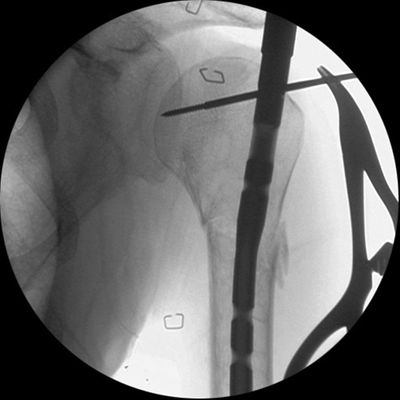
Figure 1-11. Intraoperative AP image of humerus.
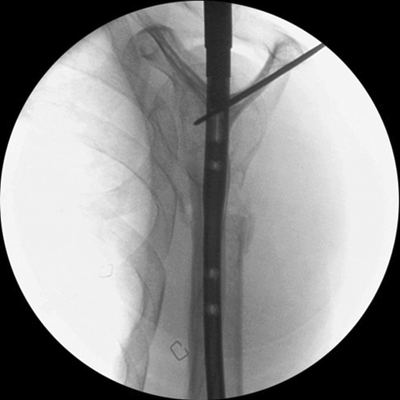
Figure 1-12. Intraoperative scapula “Y” lateral image of humerus.
![]()
- The C-arm should rotate in an arc of 90 degrees between the AP image and scapula “Y” lateral image to confirm orthogonal views.
ORIF Humeral Shaft: Anterolateral or Lateral Approach
- Supine.
- Radiolucent OR table.
- Small bump (folded hand towel) beneath the ipsilateral scapula.
- C-arm from opposite side (use C-arm fluoroscope that goes 45 degrees “over the top”).
- Uninjured arm adducted to side of body.
- Radiolucent arm table or Plexiglas arm board with blankets to match the table pad height.
- Arm internally rotated 40 to 60 degrees and C-arm over the top 30 to 60 degrees for lateral view.
- Arm internally rotated 40 to 60 degrees and C-arm back 30 to 60 degrees for AP view.
- The C-arm should rotate in an arc of 90 degrees between the AP image and scapula “Y” lateral image to confirm orthogonal views.
ORIF Humeral Shaft (Posterior Approach), Elbow Fractures (Lateral Decubitus Position)
- Radiolucent cantilever table reversed.
- C-arm from the head (parallel to the long axis of the table).
- Bean bag that stops at the axilla (so the down arm is free from the bean bag).
- Rolled blankets may be used as torso supports in the front and back instead of a bean bag.
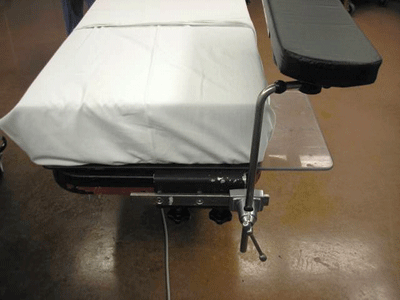
- Plexiglas arm-board for the down arm, protruding only approximately 6 inches (Fig. 1-13).
- C-arm from the head (parallel to the long axis of the table).
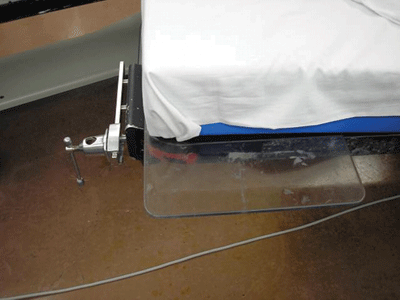
Figure 1-13. Plexiglas arm board for the uninjured arm, attachment to bed for radiolucent arm board for the injured arm.
![]()
- Down arm should be at maximum 90 degree shoulder abduction and 90 degree elbow flexion.
- Place a towel bolster or support to prevent excessive humeral external rotation (~70 to 80 degrees).
- Radiolucent arm board on long post (used for prone positioning) attached to rail at the top of the table, in line with the table axis for injured arm (Figs. 1-14–1-20).
Related posts:


Stay updated, free articles. Join our Telegram channel

Full access? Get Clinical Tree


