Chapter 95 Osteotomy for the Arthritic Knee
A European Perspective

Osteotomy: General Principles and Indications
Before the introduction of unicompartmental* and total knee arthroplasty into clinical medicine,22,26,73 an osteotomy of the knee was the treatment of choice for gonarthrosis.16,20,40,57 It has a long past, dating back to the 19th century.90 Today, however, an osteotomy is considered technically difficult for many surgeons and demanding for the patient. Nevertheless, osteotomies remain an important treatment option for arthritis of the knee in our daily practice because they authorize a return to a high level of activities, including sports, and can delay the need for a total knee prosthesis in young and active patients.
Why an Osteotomy?
The surgical management of gonarthrosis includes three types of interventions—osteotomies, unicompartmental arthroplasty (UKA), and total knee arthroplasty (TKA). Considering the improvement of the outcome of total22,26,73 and unicompartmental12,44,65 knee arthroplasties reported in recent years, the legitimate question arises about the necessity of osteotomies. The final choice of interventions will largely depend on the history of the patient, functional complaints, motivations, clinical examination, and radiologic findings.
Patient Expectations
Concept of Functional Envelope Applied to Gonarthrosis
The x axis shown in Figure 95-1 represents the frequency of the applied forces or load and the y axis represents the intensity of the applied forces or load.23 The surface under the curve defines the functional envelope of the knee. The upper limit thus defines the threshold above which a clinical reaction may be observed (e.g., discomfort, pain, swelling, stress fracture). The definition of the functional envelope remains a theoretical concept, with a large variation among individuals and over time. It remains difficult to determine the individual upper and lower thresholds.
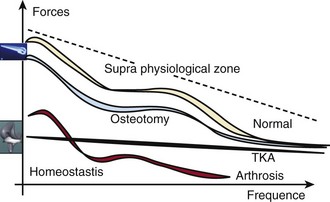
Figure 95-1 Functional envelope according to Dye.
(From Dye SF: The knee as a biologic transmission with an envelope of function: a theory. Clin Orthop Relat Res [325]:10–18, 1996.)
These considerations must be taken into account:
If the patient applies excessive force, above the threshold, the risk for failure is increased.
Functional Results of an Osteotomy
The survival rate is 70% at 10 years33 and the infection rate is less than 0.5%.
Radiologic Workup
Stress x-rays in varus and valgus will illustrate articular laxity and reducibility of the deformity. Measurement of the constitutional varus is the epiphyseal axis as defined by Levigne47—a line connecting the middle of the tibial joint line and the middle of the line connecting the tibial epiphesis. This axis forms a constant angle of 90 ± 2 degrees to the lateral tibial plateau (Fig. 95-2). The constitutional deformity of the tibia is defined as the angle between the epiphyseal and tibial mechanical axes (Fig. 95-3).
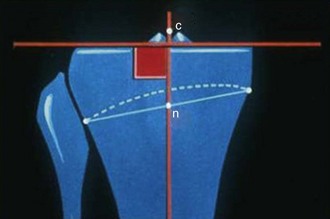
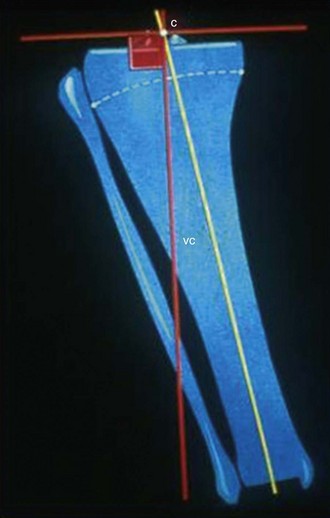
Figure 95-3 Constitutional deformity of the tibia—defined as angle between epiphyseal axis and tibial mechanical axis.
(Adapted from Levigne CH: Interêt de l’axe épiphysaire dans l’arthrose. In Neyret P, Dejour H [eds]: Journées Lyonnaises de chirurgie du genou, Lyon,1991, Hôpital de Lyon Sud, pp 127–141.)
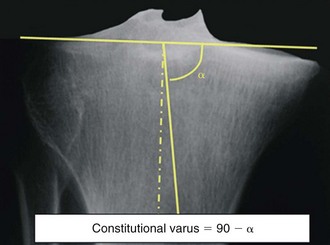
Sometimes, it is difficult to determine the middle of the tibial joint line and where to perform the measurement. Therefore, we prefer to determine the level of the original tibial plateau by the line tangent to the normal contralateral tibial plateau. Subsequently, the mechanical tibal axis is drawn. The angle between both axes is the angle α. The constitutional varus is defined by the complementary angle 90α (Fig. 95-4).
Indications
Physical Indications
Radiologic Indications
Factors Influencing Choice of Osteotomy
Type of Arthritis
Medial Gonarthritis
Some factors support an osteotomy:
Opening Wedge Osteotomy
There are many advantages in comparison with a closing wedge osteotomy: a more accurate correction; no peroneal nerve injury (palsy); and can be combined with an ACL reconstruction through the same incision.72 The disadvantages are that a graft is needed (e.g., bone graft, ceramic), the consolidation may be longer (8 to 10 weeks), and the tensioning of the extensor system (and, to a lesser degree, the medial collateral ligament and medial tendinous structures). We prefer an opening wedge high tibial osteotomy for the younger patient with preosteoarthritis or limited osteoarthritis.
Lateral Gonarthrosis
Opening Wedge Distal Femoral Osteotomy
Because the origin of the valgus knee is situated in the distal femur, an osteotomy of the distal femur seems logical. Nevertheless, we have to understand that a correction by osteotomy is only obtained in the frontal plane, in extension (Fig. 95-5). The anatomy and alignment are not changed in flexion and thus a valgus knee will persist in flexion after a distal femoral osteotomy. Therefore, the indication for a distal femoral osteotomy is a valgus knee in extension (Fig. 95-6). We currently believe that the classification of the valgus knee according to the origin of the deformations is not yet well understood and that the deformities at a level of the diaphysis are still not yet included. A distal femoral osteotomy requires a rigid fixation and is associated with more blood loss and a high risk for arthrofibrosis.
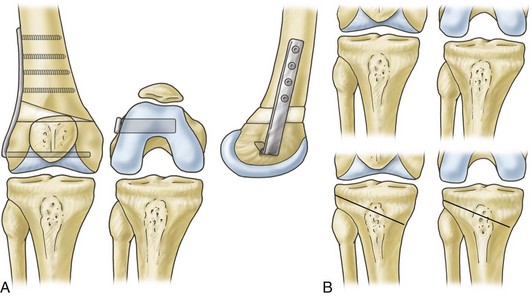
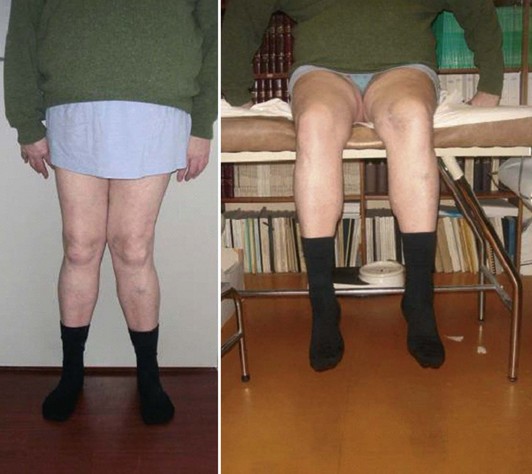
Figure 95-6 Typical indication for a distal femoral osteotomy—valgus knee in extension and no valgus in flexion.
High Tibial Osteotomy
The main reasons for failure are the following:
Lateral Closing Wedge High Tibial Osteotomy
Osteotomy of the Neck of the Fibula
Closing Wedge Osteotomy of the Tibia
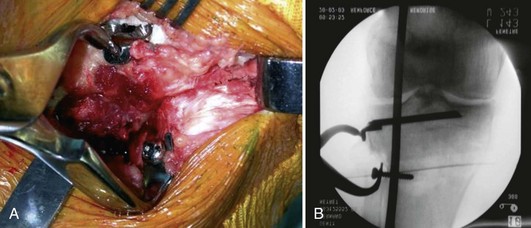
We then introduce the blade reamer over the second guide pin. The length of the blade should be 1 cm shorter than the total width of the tibia. The box preparation guide is introduced over the guide pin and impacted. Four 6-mm diameter drill holes are made. The HTO blade is introduced and impacted into the box (Fig. 95-7).
An angled cutting guide (6, 8, or 10 degrees) is introduced in the distal cut of the osteotomy and the proximal cut is now made using this angle. The cutting guide should be introduced and impacted on the medial cortex. An oscillating saw is used. The bone wedge is removed (Fig. 95-8).
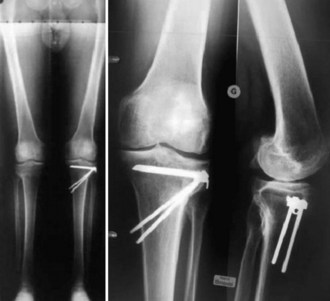
The medial cortex is weakened with a 3.2-mm drill. A provisional unicortical screw is positioned distally from the osteotomy. This will be used as support for the reduction clamp. The wedge is closed with the reduction clamp (Fig. 95-9). Using a long metal bar positioned on the center of the femur head and in the middle of the ankle joint, the mechanical femorotibial axis is evaluated. The metal bar should pass just laterally to the lateral tibial spine (Fig. 95-10). The osteotomy is fixed with two bicortical long screws that are introduced through the blade into the distal tibia. The muscle insertions are now closed over a drain. The skin is closed with separate sutures.
Other fixation devices and guiding jigs are available, such as the swan neck blade plate,21,50 classic blade plates,43,64 and staples.6,17,30,87,93 One study has shown the biomechanical superiority of plate fixation for proximal tibial osteotomy.28 There is no advantage in using staples as a means of fixation because the plates and blade plates that are now available are more stable and do not carry additional risks of complications.
Medial Opening Wedge High Tibial Osteotomy
Patient Preparation and Skin Incision
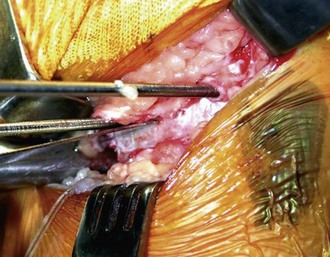
The patient is placed in a supine position. A tourniquet is applied. An extremity sheet is used for the knee and a small square field is applied on the ipsilateral iliac crest. A small cushion is positioned underneath the buttocks to obtain a better exposure of the iliac crest. An 8-cm-long horizontal anteromedial skin incision is made, starting anteriorly just proximally to the tibial tubercle. The pes anserinus tendons are retracted. The superficial medial collateral ligament is incised at the level of the osteotomy (Fig. 95-11). The posterior surface of the tibia is exposed using a large periostal elevator.

Procedure
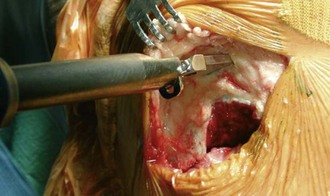
An imaging identifier control is now performed to evaluate the correct position of the guide pins. The direction can be adjusted, if necessary (Fig. 95-12). Using an oscillating saw, the tibial cut is made underneath these guide pins, but always staying in contact with them (Fig. 95-13). First, the center of the tibia is cut, followed by the anterior and posterior cortex. The cuts are completed using an osteotome, especially on the anterior cortex, where the patellar tendon is in danger.

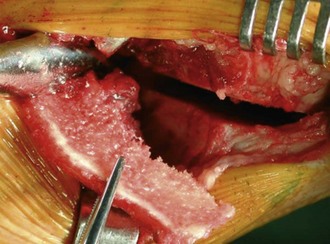
Subsequently, a Lambotte osteotome (thickness, 2 mm, corresponding with approximately 2 degrees of angular correction) is introduced into the osteotomy. A second osteotome is now introduced below the first. To open up the osteotomy gently, several more osteotomes are introduced between the first two (Fig. 95-14).
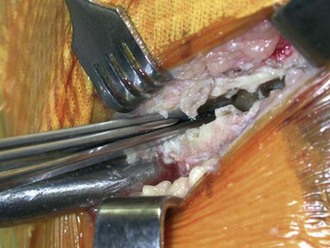
Figure 95-14 Progressive and controlled opening up of the osteotomy with several osteotomes introduced between the first two.
Related posts:
 Articular Cartilage: Biology, Biomechanics, and Healing Response
Advanced Technologies in Performing Total Knee Arthroplasty: Roundtable Discussion
In Vivo Mechanics and Vibration of the Knee Joint
Secondary, Spontaneous, and Postarthroscopy Osteonecrosis of the Knee: Diagnosis and Management
Advances in Mechanical Compression Devices
Articular Cartilage Injury and Adult OCD: Treatment Options and Decision Making
Articular Cartilage: Biology, Biomechanics, and Healing Response
Advanced Technologies in Performing Total Knee Arthroplasty: Roundtable Discussion
In Vivo Mechanics and Vibration of the Knee Joint
Secondary, Spontaneous, and Postarthroscopy Osteonecrosis of the Knee: Diagnosis and Management
Advances in Mechanical Compression Devices
Articular Cartilage Injury and Adult OCD: Treatment Options and Decision Making
Stay updated, free articles. Join our Telegram channel

Full access? Get Clinical Tree


