14
Osteochondral Autograft Transfer (OATS/Mosaicplasty)
Osteochondral autografts were originally described by several authors.1,2 These early reports described the use of a single osteochondral autograft, with success at follow-up ranging from 6 months to 10 years.1,3,4 Matsusue et al5 reported excellent results 3 years after arthroscopic transplantation of multiple osteochondral fragments, harvested from the same knee, to a chondral lesion in a patient with anterior cruciate ligament (ACL) deficiency. This was one of the first reports of the use of multiple fragments. Outer-bridge,3 in 1995, published the results of transplantation of osteochondral fragments of the patella to the femoral condyle, with relief of symptoms and survival of hyaline cartilage up to 9 years. Together, these results suggested that osteochondral autografts could provide a durable repair of articular cartilage lesions.
Independently, Hangody et al6 and Bobic7 published their results with the use of standardized tubular instruments for the harvesting of cylindrical osteochondral autografts from relatively non-weight-bearing areas of the knee. Their early promising results have been duplicated by other groups working in North America and Europe,8–10 and indications have been expanded to other areas of the body as well.11
 Description of Osteochondral Autografting
Osteochondral autograft transfer (OATS), or “mosaicplasty,” involves the harvesting of cylindrical osteochondral plugs from relatively non-weight-bearing areas of the knee (such as the intercondylar notch or the femoral periphery of the patellofemoral joint) to areas of symptomatic full-thickness cartilage or osteochondral injury (Figs. 14–1, 14–2, 14–3, 14–4, and 14–5). These plugs are placed to fill in the majority (60–80%) of the defect with intact osteochondral tissue, with the remaining defect to be eventually filled in with fibrocartilaginous repair tissue.12 Variations exist in the size of plugs used (both in diameter and depth), methods of harvest, methods of graft site preparation, and density of plugs used to fill an area.6,7 One of the authors (J.L.K.) prefers to use fewer, larger (6–9 mm) plugs to completely fill a defect,13 whereas another (L.H.) prefers multiple, smaller plugs.14 Harvesting and grafting may be conducted either through a small arthrotomy or arthroscopically, although it is strongly recommended that such grafting be done through an incision early in the learning curve or for large lesions. It is of vital importance that both harvesting and implantation of plugs be conducted at 90 degrees to the articular cartilage to ensure maximum surface congruity, and this remains one of the most technically demanding aspects of the procedure.15
 Indications and Patient Selection
We emphasize that this technique is limited to patients with a relatively well-defined articular cartilage or osteochondral lesion, without significant degeneration of the joint. The maximum lesion size typically recommended is up to 2 cm in diameter (J.L.K.) or 4 cm (L.H.), although in certain salvage situations lesions up to 9 cm2 have been grafted. The patient must be willing to limit weight bearing for a period of 3 to 6 weeks, because early weight bearing has been associated with subsidence in some animal models12 and case reports.15,16 Patients older than 50 years or with thin cartilage are also contraindicated. Any malalignment or instability should be corrected prior to or concurrently with the grafting procedure to create the most favorable biomechanical environment.
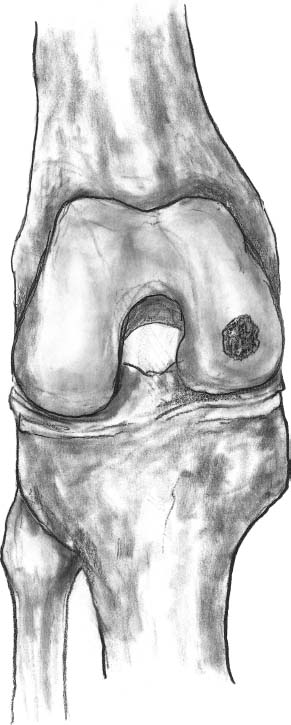
FIGURE 14–1 The initial assessment of the lesion is done arthroscopically and the size of the lesion is measured.
 Preoperative Evaluation
A careful history and physical examination often identify the activities that trigger discomfort. Areas of articular cartilage damage on the distal femoral condyles may be tender on physical examination, especially when the knee is flexed. Patellofemoral pathology and symptoms may be reproducibly elicited at a specific angle of knee flexion, suggesting a particular area of trochlear damage. Full-length standing (hip to ankle) films of the lower extremity are obtained to evaluate for malalignment. Magnetic resonance imaging (MRI) or previous arthroscopy photos, if available, are reviewed to help determine the size and location of the lesion, and assess for concurrent pathology.
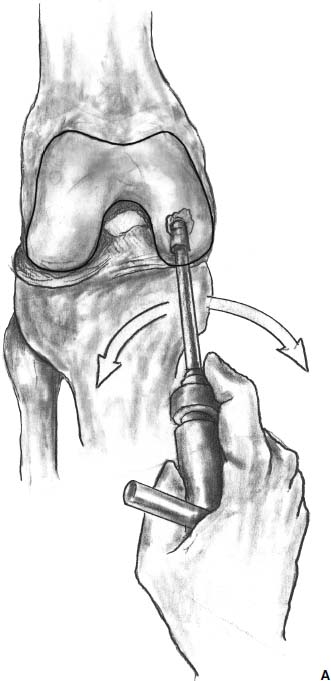
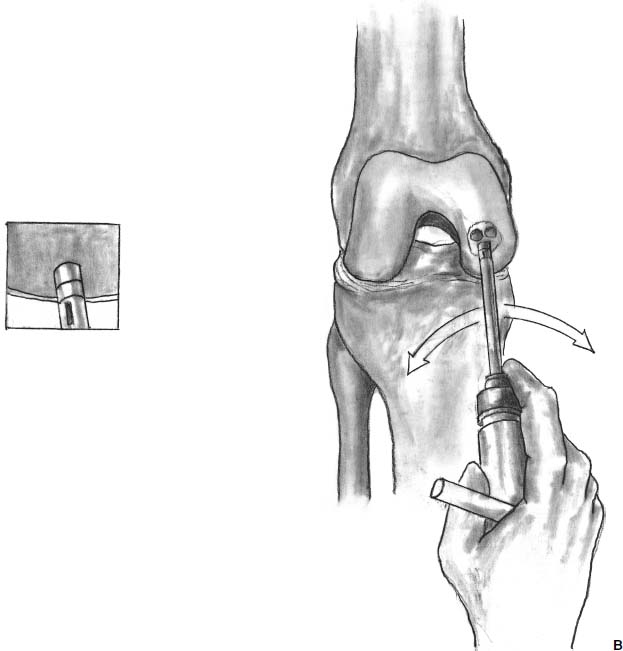
FIGURE 14–2 (A) Once the appropriate site is determined, the recipient harvester is introduced at a 90-degree angle with the joint surface. (B) Bone plugs are removed.
 Patient Positioning
Patient and portal positioning are critical using this technique. Preoperative evaluation of the location of the defect allows for appropriate portal position. If the defect is located on the posterior aspect of the femoral condyle, a significant amount of knee flexion (up to 120 degrees) may be necessary to achieve perpendicular positioning of the instrumentation. An assistant or leg holder may be useful to stabilize the hyperflexed knee.
 Arthroscopic Technique
Portal Placement
Perpendicular access to the lesion and harvest sites is critical for proper insertion of the grafts. Viewing and working portals should be carefully positioned. An 18-gauge spinal needle or l.2-mm Kirschner wire (K-wire) is initially used to determine the appropriate portal sites. Moving the standard portals centrally closer to the patellar tendon allows a more perpendicular path to the inward curve of the femoral condyles. Note that in certain cases a transligamentous portal may be necessary.
Defect Preparation and Templating
The defect site is measured and templated for grafting. Using various circular sizers of known diameters, the appropriate number and location of plugs for a particular defect can be determined. Delaminated or unstable articular cartilage can be sharply removed at a right angle with a full radius resector, a sharp curette, or an arthroscopic scalpel. During this stage, the ability to achieve appropriate perpendicular graft orientation should also be verified. If the defect cannot be filled completely with a plug, preparation of the defect bed is conducted to promote fibrocartilage grouting of the defect site. The base of the lesion is lightly abraded to remove the calcified cartilage layer, and the uncovered area can be treated with microfracture.

FIGURE 14–3 The donor harvester is inserted perpendicular to the joint surface and the osteochondral plugs are extracted.
It can be difficult to appropriately visualize the orientation of the grafting/harvesting tools, particularly in the anterior aspect of the knee when flexion pulls the fat pad against the condyles. Nevertheless, the 180-degree visualization of circumferential marks on the instrumentation can and must be achieved to ensure perpendicular harvesting of the graft. Equal laser marks on the tubular harvesting chisel at the 12, 6, and 9 or 3 o’clock positions indicate a nearly perpendicular graft. Visualization can be aided by the partial resection of the fat pad, the use of traction sutures or a fat pad retractor, retraction with small probes or spinal needles, or threaded/lipped clear cannulas. “Past-pointing” of instruments tends to also retract the capsular soft tissue when pulled back to the appropriate position.
Defects up to 9 mm in diameter can often be filled using a single plug. Larger defects can be filled with multiple plugs, achieving a 70 to 80% fill rate with identical sized plugs. The use of variable size plugs can increase the fill rate from 90 to 100%. Marking the base of the defect with the sharp-edged guide helps to optimize coverage and determine the number and the sizes of grafts needed. Finally, the depth of the defect should be measured with the dilator.
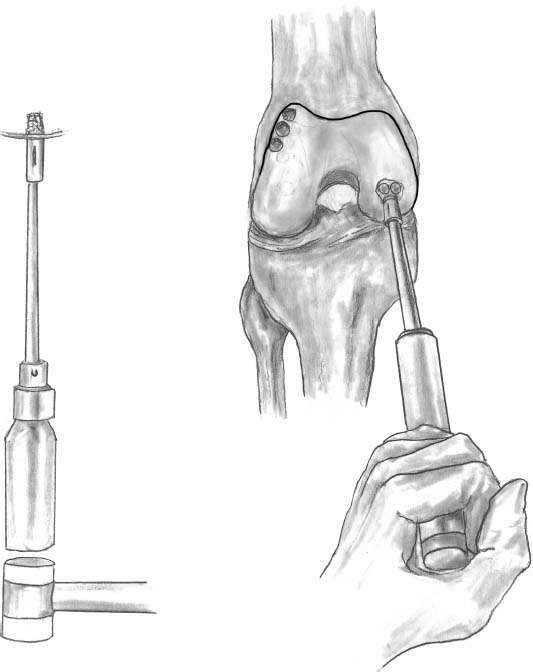
FIGURE 14–4 The plugs are then transferred to the recipient site and are introduced through a tube with a mallet.
Graft Harvest
Several locations have been recommended for graft harvest. Arthroscopically accessible harvest sites include the periphery of the medial and lateral femoral condyles at the level of the patellofemoral joint above the sulcus terminalis, and the notch area. Notch area grafts can have less desirable features, such as concave surfaces and underlying bone, which is less elastic. Note that it is easier to access the medial patellofemoral periphery than the lateral technically.
Optimal view for graft harvest is obtained by introducing the arthroscope through the standard contralateral portal. With the knee in extension, the standard ipsilateral portal can be used to provide perpendicular access to the donor site. Knee extension eases access to the most superior donor plug. Additional portals should be made if the desired perpendicular access cannot be achieved from the existing one. A spinal needle or a K-wire can be used to determine the location of the additional harvesting portals. Gradual knee flexion allows sequential graft harvesting extending from the upper to the lower portions of the periphery of the femoral condyle.
After the necessary portals have been established, the proper size tube chisel, with the appropriate harvesting tamp, is introduced. Once the harvest site is clearly identified the chisel is placed perpendicular to the articular surface and is hammered to the appropriate depth. Laser markings on the harvesting chisels guide this step. Various systems have varying depth of cores, but the minimum length should be enough to ensure sufficient stability. In treating osteochondral defects where little surrounding bone is available, longer plugs are needed. Increasing flexion of the knee allows the use of inferior harvesting sites. In some systems, the graft is removed from the harvesting tube and placed in a saline-soaked sponge; in others the graft remains in the chisel until implanted. The length of the plug and the articular surface height of the graft at the 12, 3, 6, and 9 o’clock positions are determined and recorded. The donor tunnels typically fill with cancellous bone in 4 weeks and the surface fibrocartilage is formed after 8 to 10 weeks.
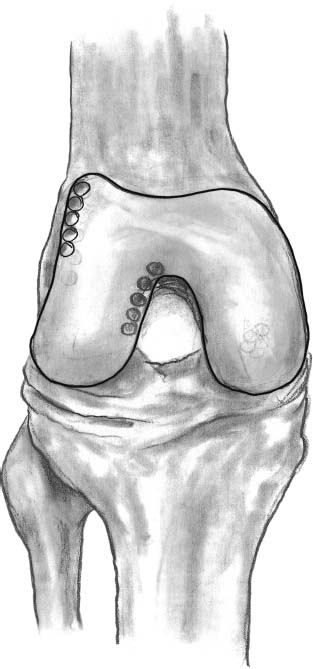
FIGURE 14–5 Acceptable donor sites include the lateral edge of the lateral femoral condyle, and the medial edge of lateral femoral condyle by the trochlea.
In case of technical difficulties or during the learning curve, the grafts can also be harvested through a mini-arthrotomy, 1.5 to 2 cm long.
Implantation of the Grafts
Knee flexion allows perpendicular access to the recipient site, and appropriate distention of the joint establishes enough space for the implantation. The recipient site can be drilled, or recipient site plugs can be harvested for implantation into the donor site. Again, it is critical to establish that the socket orientation is perpendicular to the articular surface. This can be confirmed by viewing from different angles with the arthroscope. The socket is then dilated appropriately to the measured depth of the harvested donor site plug. If there are small differences in depth at the edges of the socket, the graft should be appropriately oriented to minimize step-offs with the surrounding cartilage.
The graft is then delivered into the prepared socket, by the use of either a tamp or a screw applying pressure. Typically, the graft is allowed to protrude slightly from the surrounding cartilaginous articular surface, and final adjustments are made with a slightly oversize tamp to ensure that the graft is flush with the surface. Several studies15,17,18 indicate that it is preferable for the graft to be slightly countersunk rather than proud. The same steps are repeated in the subsequent implantations. To achieve a good fill rate, the subsequent grafts should be inserted immediately adjacent to the previously placed grafts. Step-by-step graft implantation has several advantages. Although dilation of the actual recipient hole allows easier graft insertion, by lowering the insertion force on the hyaline cartilage cap, dilation of the adjacent hole impacts the surrounding bone back against the previously implanted grafts, resulting in a very safe press fit fixation.
When the entire recipient site is covered, a functional test is performed to check the congruency of the implanted area. Grafts that are implanted in a contact manner produce a convex, smooth articular surface, which allows the initiation of an accelerated rehabilitation protocol. During portal closure, a suction drain may be inserted into the joint. An elastic bandage lessens postoperative bleeding from the donor sites.
 Open Mosaicplasty
Mini-arthrotomy using a 3- to 4-cm-long medial or lateral parapatellar sagittal incision may be necessary if an arthroscopic approach is not possible (Figs. 14–6 and 14–7). The extended anteromedial approach may be required for reconstruction of trochlear, patellar, and tibial defects. The implantation technique is identical to the arthroscopic procedure described above. Mosaicplasty in other sites (talus, femoral or humeral head, humeral capitellum) requires special open approaches and arthroscopic graft harvesting from the knee.
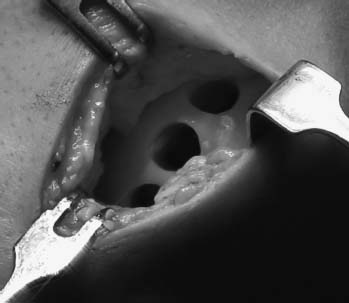
FIGURE 14–6 Mini-parapatellar arthrotomy may be used.
 Postoperative Protocol
The osteochondral plug graft should be viewed as a fracture site and appropriate union should be achieved prior to excessive load. One of us (J.L.K.) recommends touch-down weight bearing only for 6 weeks for lesions on the weight-bearing surface of the femoral condyles, unless the lesion is small and the surrounding surface is supportive. The other senior author (L.H.) recommends 2 to 3 weeks non-weight bearing and 2 to 3 weeks of partial loading (30–40 kg). A detailed rehabilitation protocol has been developed based on 10 years of clinical experience (Table 14–1).
Weight bearing in extension is allowed for patellofemoral lesions. Continuous passive motion (CPM) is used to encourage the appropriate fill of the donor sites and the remodeling of the nonfilled areas of the graft site. Following healing of the bone, progressive weight bearing and functional activity is initiated. Healing and remodeling probably continue for at least 1 year postoperatively, particularly if incomplete fill of the defect is achieved.
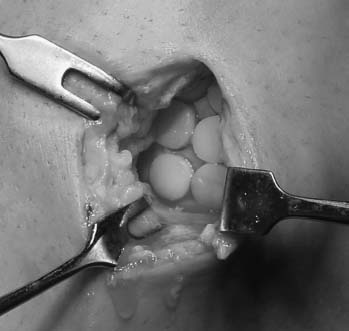
FIGURE 14–7 Multiple plugs have been used to fill a defect.
Biomechanics of Osteochondral Transfers
Koh et al15,18–20 have investigated the initial biomechanical parameters of osteochondral grafting under different conditions, such as a single matched plug, multiple plugs, and the result of incongruous grafting (graft-host surface mismatch). Using a porcine knee model, full-thickness articular cartilage defects were created and Fuji pressure-sensitive film was used to measure pressures and contact area profiles of the femoral condyle. Knees were tested with (1) intact cartilage, (2) articular cartilage defect, and (3) defect grafted with either a single or three plugs. Indentation testing of the plugs before and after transplantation demonstrated no change in stiffness. Significant increases (22%) in maximum force were seen in specimens with a full-thickness articular cartilage defect over intact specimens. The maximum pressure significantly decreased to normal levels when the defect was treated with either single or multiple grafts (Table 14–2).
Contact pressure distribution changed from an ellipse in intact to a donut in defect specimens, and returned to an ellipse after grafting. Typical false-color digitized pressure scans for single and multiple plug grafts are demonstrated in Fig. 14–8.
Smaller size plugs theoretically may be able to fill irregular defects with possibly less donor site morbidity. However, they are more fragile, have lower pullout strength, are more technically difficult to harvest and insert, and in one animal model failed in >10% of grafts.21 Larger diameter grafts have increased graft stability. If improperly harvested, there may be a minimal increased articular cartilage step-off (<0.145 mm with 8 mm versus 4-mm diameter plug, Bartz et al22); but the overall congruity and contact pressure is better with fewer plugs for a circular defect.
| Activity | Time from surgery | |
|---|---|---|
| Ambulationb | ||
| Two-crutch ambulation, non-weight bearing | Immediate | |
| Two-crutch ambulation, partial loading (30–40 Kg) | 2–4 weeks | |
| Discontinue crutches, full weight-bearing | 4–5 weeks | |
| Functional exercises | ||
| Form walking, gait evaluation | 4–5 weeks | |
| Step-up | 4–5 weeks | |
| Step-down | 5–6 weeks | |
| Range of motion | ||
| Early range of motion encouraged | ||
| Continuous passive motion (CPM) in case of extended lesions 2–4 cm2 (in painless range) | Immediate (first week) | |
| Full extension, flexion as tolerated | Immediate | |
| Stationary bicycle | 3 weeks | |
| Strength return | ||
| Quadriceps | ||
| Open chain exercises, leg raises | Immediate | |
| Concentric contraction to full extension | 1 week (or earlier if tolerated) | |
| Concentric contraction against resistance | 2 weeks | |
| Isometric exercises in different angles | Immediate | |
| Excentric exercises against resistance | 3–4 weeks | |
| Hamstrings | ||
| Isometric exercises in different angles | Immediate | |
| Concentric and excentric strengthening | 1–2 weeks | |
| Against resistance | 3–4 weeks | |
| Closed-chain exercisesc | ||
| Pushing a soft rubber ball with foot | Immediate | |
| Closed-chain exercises with half weight bearing | 2–3 weeks | |
| With full weight bearing | 5–6 weeks | |
| Stationary bicycle with resistance | 2–4 weeks (if 90-degree knee flexion achieved) | |
| Stairmaster | 6–8 weeks | |
| Proprioception return | ||
| Balance exercises standing on both feet | 5–6 weeks | |
| Standing on one foot (hard ground) | 6–8 weeks | |
| Standing on one foot (trampoline or aerostep) | 8–10 weeks | |
| Return to activity | ||
| Jogging | 10 weeks |


