Fig. 3.1
Coronal T2 MRI showing SLAP tear in a 14 year old male [Courtesy of Dr. James L. Carey MD, MPH]
Special Considerations
The rising incidence of superior labrum repairs as a trend has made selection of the appropriate surgical candidate equally as important as repairing the tear itself. Aside from patients with a history of trauma, most true SLAP tears are found in the dominant arm of overhead athletes who are under 40 years of age [2]. Beyond the age of 40, natural degeneration of the labrum occurs and operating in this setting may not have a beneficial effect [10]. This trend of minimizing surgical intervention for isolated SLAP tears may apply to even younger patients as well [11].
In addition to identifying proper surgical candidates, the surgeon must be aware of anatomic variations that can mimic detachment of the labrum on imaging studies and during arthroscopy. Variants , such as a meniscoid-type labrum, sublabral foramen (Fig. 3.2), or a cord-like middle glenohumeral ligament (Buford complex) [12], can often be confused for labral pathology. The surgeon must be familiar with these variations in order to avoid performing unnecessary interventions that may cause further disability.
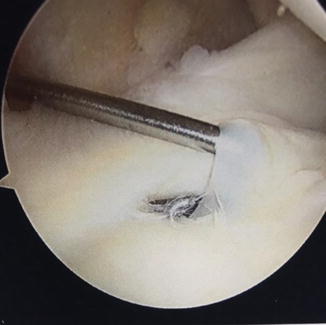
Fig. 3.2
Sublabral foramen
Access to Pathology
Advancement in arthroscopic techniques and technologies has contributed significantly to the innovations made in the treatment of glenoid labrum pathology [13]. During arthroscopy, the patient may be positioned in either the lateral decubitus or beach-chair position to facilitate access. Each position offers a combination of advantages, disadvantages, and relative risks although the senior author prefers the lateral decubitus position for overall access.
The lateral decubitus position was the initially described technique for arthroscopic access to the glenohumeral joint. With the patient secured laterally, the arm can be positioned in space with variable degrees of traction and abduction via the assistance of a series of pulleys and weights. This technique facilitates access to the periphery of the glenohumeral joint without requiring an assistant to position the arm. It must be kept in mind that when utilizing traction, transient neuropraxias have been described as a complication in up to 10 % of patients in some series [14].
The beach-chair position was first described in 1988 by Skyhar in an attempt to avoid neuropathies that had been described with the lateral decubitus positioning. The patient is placed supine on an adjustable table allowing for flexion of the hips and knees and erection of the thorax [15]. Additional proposed advantages of this position include decreased surgical time, decreased risk to neurovascular structures during portal placement, and easier conversion to open procedures [16, 17]. A disadvantage of this position is the combination of the physiologic challenges to the maintenance of cerebral perfusion pressure by positioning the head above the heart combined with anesthetic-induced impedance of the sympathetic nervous system [18]. Hypotensive anesthesia has been described as a safe and effective method for minimizing blood loss during orthopedic procedures. An advantage this technique provides to arthroscopic shoulder surgery is to allow for a more bloodless surgical field optimizing visualization [19]. Additionally, arthroscopic pump pressure may be adjusted to minimize bleeding in the surgical field, but care must be taken to avoid fluid extravasation into the adjacent soft tissues which can occur with excessive pump pressure [20, 21].
Additional techniques to enhance arthroscopic visualization within the glenohumeral joint include the addition of epinephrine to the arthroscopic fluid, the utilization of electrocautery devices, and the 70° arthroscope for alternative viewing angles [22, 23].
There are a multitude of arthroscopic portal options about the shoulder. The underlying principles of the location and utilization of these include knowledge of and protection of the surrounding neurovascular structures at risk, most notably the axillary nerve, the suprascapular nerve and artery, and cephalic vein [24]. We will focus our discussion on the most relevant arthroscopic portals. The posterior portal is the safest and most commonly used portal to provide visualization of the entire joint. It is located 2–3 cm inferior to and 1–2 cm medial to the posterolateral acromion [25]. Locating it slightly lower and more lateral may provide a better trajectory for visualization for labral repairs. The anterior central portal is an essential anterior working portal in almost all arthroscopic procedures. It is located within the rotator interval, 1–2 cm inferomedial to the anterolateral acromion (Fig. 3.3). Inside-out as well as outside-in techniques have been described for the safe creation of this portal [26]. The anterolateral portal can provide an advantageous trajectory for anchor placement for SLAP repair as well as enhancing visualization of posterior lesions. This portal is made at the anterolateral corner of the acromion, entering the joint just anterior to the biceps tendon. Using a spinal needle, this portal is created with an outside-in technique. The trocar is then angulated toward the superior glenoid passing anterior to the biceps tendon. Instrumentation introduced through this portal is often combined with visualization through an anteroinferior portal, which can be formed via inside-out technique by pushing a switching stick through the anterior capsule just superior to the upper border of the subscapularis tendon. To accomplish this, the camera itself should first be driven forward from the posterior portal to the desired location along the anterior capsule until it is slightly distended. The camera is then removed, while the trocar is carefully held in place against the capsule. The switching stick is then introduced through the trocar to create the inside-out portal over the switching stick. The camera is then reintroduced through the trocar in the posterior portal. This combination of portals allows for ease of surgical triangulation [27]. Neviaser’s portal can be created in the soft spot between the clavicle, acromion, and scapular spine. This portal provides access to the most superior aspect of the glenoid. It is important to respect the proximity of the suprascapular nerve and artery during the creation of this portal, as they are located only 3 cm medial to the supraglenoid tubercle [28, 29]. The portal of Wilmington is located 1 cm anterior and 1 cm lateral to the posterolateral edge of the acromion, passing medial to the musculotendinous junction of the rotator cuff in a vector directed toward the coracoid tip. This portal is very useful in posterior superior SLAP repairs, as it allows for anchors to be placed at a 45° angle to the glenoid surface [30].
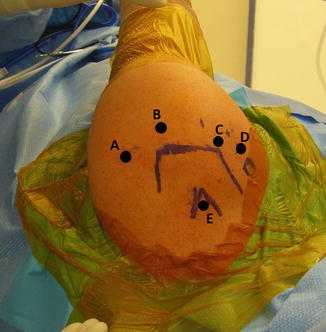
Fig. 3.3
Arthroscopic portal placement in a left shoulder. (A) Posterior portal. (B) Portal of Wilmington. (C) Anterolateral portal. (D) Anterior central portal. (E) Neviaser’s portal
Obtaining quality access to the pathology through meticulous surgical planning and execution of arthroscopic techniques with care taken to respect the surrounding relevant anatomy is a critical element necessary for treatment of labral pathology.
Treatment : Keys to Success
Surgical intervention is indicated in patients who have failed nonoperative methods of treatment. Successful labral repair is largely dependent upon recognition of the type of lesion and the proper choice of treatment. Actual repair of the labrum (versus debridement or biceps tenotomy) is indicated with certain types of labral pathology (e.g., type II SLAP). The remainder of this section will focus on technical tips and pearls regarding this approach.
The initial approach to superior labral repair should begin with a diagnostic arthroscopy of the shoulder. The joint should be accessed initially through the posterior portal. Normal anatomic structures should be identified and assessed, along with inspection of the labrum. Peel-back and drive-through signs can be used as additional methods of evaluating the integrity of the labrum. An anterior portal should be established to allow for placement of a probe to fully investigate the labrum and attempt to displace the biceps root from its normal attachment. Again, only true labral separation accompanied by fissuring of the chondro-labral junction will qualify for a true type 2 lesion.
Once the diagnosis of labral pathology has been confirmed and repair is indicated, the next step is to mobilize the tissue and prepare the glenoid rim for reattachment. The goal is to free up the tissue so the labrum can be repaired in a relatively tension-free manner. An elevating tool can be used to liberate the tissues, but care must be taken not to actually cut the labrum, which can greatly complicate the procedure. The senior author prefers to prepare the glenoid from a contralateral portal. For example, a type 2 posterior SLAP tear will be accessed by viewing from the anterolateral portal and working from the straight anterior portal. A rasp, shaver, or thermal device can be used to prepare the glenoid bone and create a bleeding surface to enhance the biologic healing of the torn labrum. The use of a burr is discouraged as loss of bone material increases instability. Some surgeons advocate preparation up onto the articular surface to allow for more of a bumper effect, especially in cases of instability [31]. Recent studies by Yamamoto et al. have challenged this notion, however, stating that anchor fixation on the glenoid face does not increase the translational force as compared to placement on the glenoid rim [32].
Once the tissue is mobilized and the glenoid rim prepared, stabilization of the labrum can commence. Various methods of labrum repair exist and the senior author prefers absorbable knotted fixation for several reasons (Fig. 3.4). First, the superior labrum has a large degree of native mobility and should not be over-constrained (Fig. 3.5). Secondly rigid knots and even knotless fixation composed of newer generation suture and tapes have been implicated in causing chondral injury (Fig. 3.6). Lastly, knotted (absorbable) implants can better restore labral height which will translate to better inherent stability. Depending on the location of the lesion, additional portals or angles of approach may be needed. The ability to place suture and suture anchors percutaneously allows greater freedom that is not limited by cannula location. As mentioned before, a spinal needle is useful for establishing proper trajectory. Anchors should be placed at approximately a 45° angle to the glenoid surface to allow for sufficient bony purchase and to avoid inadvertently penetrating the articular surface. If utilizing a trans-rotator cuff portal (posterior and superior), it is wise to avoid placing a large cannula and, instead, simply insert the anchor percutaneously. Neviaser’s portal may be very helpful for suture passage. The steep angle afforded by this location allows for a spinal needle to be placed directly through the cuff and capsule and underneath the superior labrum itself. Suture or wire can then be shuttled through in the appropriate site for a repair. There are many different options for suture passage instrumentation as well. Suture lassos, soft tissue penetrators, and suture shuttling devices are all options for labral repair and can be used based upon the individual surgeon’s needs and preferences. The senior author prefers Neviaser’s portal for posterior superior labral repairs since it is minimally invasive and facilitates suture passage proximal to the anchor. Proximal passage encourages the labral tissue to sit more firmly applied to the glenoid. Regardless, respect to the soft tissues and achieving the angle that works best remain the basic guiding principles. If arthroscopic knots are to be used, they should be placed away from the articular surface and against the soft tissue side of the repair to avoid abrasion of the chondral surface (Fig. 3.7). This can be achieved by making the peripheral suture limb the post when tying to ensure the knot faces away from the articular cartilage. A sliding knot or a series of half-hitches can be used depending upon the surgeon’s preference (Figs. 3.8, 3.9 and 3.10).
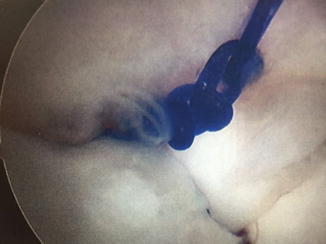
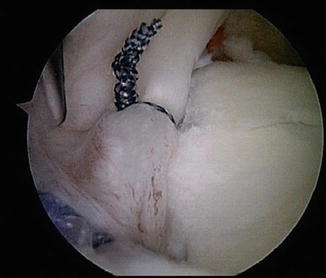
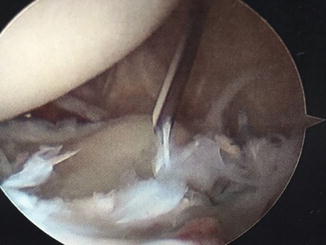

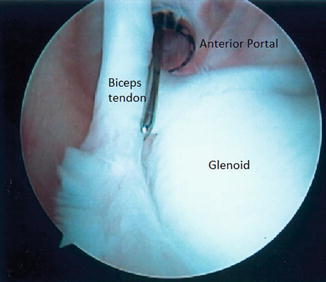
Fig. 3.4
PDS suture knot
Fig. 3.5
Example of an over-constrained biceps (“hogtied biceps”)
Fig. 3.6
Damage from rigid knots
Fig. 3.7
Arthroscopic images showing percutaneous anchor placement (a) and fixation demonstrating absorbable knots away from articular surface (b)
Fig. 3.8


View of the glenohumeral joint from the posterior portal (lateral decubitus position) [Courtesy of Dr. James L. Carey MD, MPH]
Related posts:


Stay updated, free articles. Join our Telegram channel
Full access? Get Clinical Tree
