Impaction Grafting of the Femur
Donald W. Howie
Margaret A. McGee
Lucian B. Solomon
Case Presentation
A 43-year-old male underwent a two-stage revision to treat an infected right total hip arthroplasty (THA). At the first-stage revision, the femoral component and cement were removed through a transfemoral approach, after which the osteotomy was stabilized with three cables and a temporary implant system, using a long stem coated with high-dose antibiotic cement, was inserted (Fig. 122.1A,B). Femoral reconstruction at the second-stage exchange was planned using impaction grafting of the femur.
Indications and Contraindications
In both human and animal studies, femoral impaction bone grafting has been shown to reconstitute bone (1,2,3,4,5,6). Bone graft incorporation is preceded by vascular tissue invasion and partial to complete osteoclastic resorption of the graft. De novo and appositional new bone formed onto existing bone surfaces creates a new bone framework that remodels to mature trabecular bone (Fig. 122.2).
Femoral impaction bone grafting aims to both preserve and restore bone for effective stem fixation at femoral stem revision. Femoral impaction bone grafting and a cemented collarless polished taper stem are indicated in a number of situations. It is ideal for young and middle-aged patients with cavitatory bone loss and who are likely to undergo further revision surgery in their lifetime.
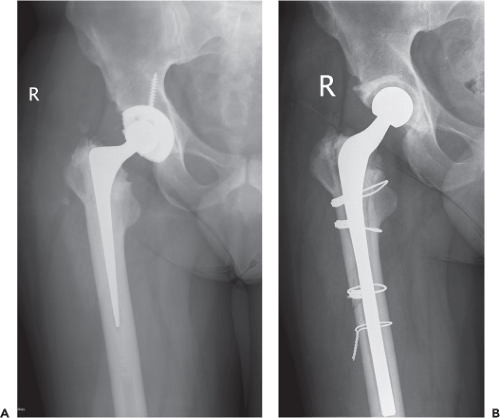 Figure 122.1. Anteroposterior hip radiographs showing (A) a right THA, implanted 5 years previously and (B) a temporary hip spacer implanted at first-stage revision for infection. |
The advantage of femoral impaction bone grafting is that it allows the use of a standard length stem in many cases, thus avoiding the need for long stems in young and middle-aged patients. This has the additional benefit of preserving the diaphyseal bone should subsequent total knee replacement
or further revision surgery be required in the future. Also, femoral impaction grafting is a simple solution to revision of a cemented stem in which there is considerable cement distal to the stem because this does not usually need removal, the distal cement being retained as a plug for impaction grafting.
or further revision surgery be required in the future. Also, femoral impaction grafting is a simple solution to revision of a cemented stem in which there is considerable cement distal to the stem because this does not usually need removal, the distal cement being retained as a plug for impaction grafting.
 Figure 122.2. Photomicrograph of a transverse section of a sheep femur taken at the distal level of a cemented stem implanted 14 weeks earlier with femoral impaction bone grafting. The bone graft (BG) has been incorporated into new bone (NB), continuous with the cortex (C) and which is at early stages of remodeling into a mature trabecular bone construct. Stain: toluidine blue, 20× magnification. |
Femoral impaction bone grafting is also used in special circumstances including where there is a very sclerotic femoral canal and therefore we are frequently using impaction bone grafting at the second stage of a two-stage revision for treatment of an infected hip replacement. Femoral impaction grafting can be used in the presence of proximal segmental defects, the defect being reconstructed with mesh before impaction grafting.
However, circumferential severe proximal cortical femoral bone deficiency does not provide a supporting rim of bone to contain the bone graft by mesh and this is an indication for modular cementless fixation. In hips with comminuted or difficult periprosthetic fractures and associated bone deficiency, cementless distal fixation is a useful option but when distal fixation cannot be achieved, femoral impaction grafting with a long stem and additional plate and mesh support is an alternative. Because of the increased operating time and cost of femoral impaction grafting, it is not usually used in elderly patients with lower activity demands and we use cemented long stem without impaction grafting and in patients over 70, have reported survival to the endpoint loosening of the cemented long collarless polished taper stem of 100% at 14 years (7).
The early experience with femoral impaction bone grafting at cemented femoral stem revision was variable including reports of an unacceptably high rate of complications, and in particular gross subsidence, leading to rerevision and periprosthetic fracture (8,9,10,11,12,13). However, we (13) and others (14,15,16,17,18,19,20,21,22,23) have more recently reported good mid- to long-term results using improved techniques and appropriate stem design.
The technique of femoral impaction bone grafting described has evolved over more than 15 years with the aim of improving early implant stability and bone graft incorporation. This evolution includes better instrumentation through the design of modular tamps, which provide a more user-friendly and effective method of packing the allograft distally and proximally. The modular system allows the surgeon first to concentrate on reconstruction of the distal femur, then to establish leg length, and finally to separately address proximal impaction and mesh reconstruction, if required.
The rationale for using a cemented collarless polished taper stem in the primary and cement-alone revision scenarios also applies in femoral impaction bone grafting when a stable impacted bone bed supports the cemented stem. These stems, which have more than 30 years of clinical use in primary THA, have thus been the stem of choice for revision surgeons using impaction grafting techniques. The combination of a collarless prosthesis with a highly polished surface and double taper wedge allows the prosthesis to slightly subside within the cement mantle to achieve a strong, self-locking construct (24). The self-limiting subsidence also acts to transmit compressive load to the implant bed which is purported to aid in bone remodeling and fixation.
Over the years, the collarless polished taper long-stem options have also expanded and instruments are provided for use in impaction grafting. The method of graft preparation has also been refined to improve its properties, and may include removal of fat by washing, size profiling of the bone particles, and the use of nonirradiated bone graft (25,26,27,28,29).
Surgical Technique for Femoral Impaction Bone Grafting
Clinical and Radiographic Assessment
Preoperative Planning
Clinical Examination and Evaluation
The preoperative examination is thorough and in particular includes measurement of true leg-length discrepancy, a Trendelenburg test, assessment of power of hip abduction, and flexion and palpation of the glutei to ensure the muscles are functioning. Preoperative patient- and doctor-derived evaluation of pain and function are important for measuring therapeutic effectiveness.
Radiographic Examination
Preoperative radiographic evaluation of the femoral component and femur is undertaken using an anteroposterior pelvis view, an anteroposterior hip and lateral/oblique hip views showing the length of the femur to the supracondylar region. For patients with acetabular bone deficiency, obturator and iliac oblique views may be helpful.
Templating
Preoperative templating of the femur must be undertaken to provide an understanding of the bony anatomy and cortical and cancellous bone deficiencies (Fig. 122.3). This will allow planning for reconstruction such as the use of bone mesh for containment of proximal or distal cortical defects, the need for strut allografts and to estimate the extent of bone grafting, and thus the amount of donor bone likely required. The requirements may have to be modified
intraoperatively, particularly if femoral perforation or fracture occurs with preparation, but will provide a base for planning.
intraoperatively, particularly if femoral perforation or fracture occurs with preparation, but will provide a base for planning.
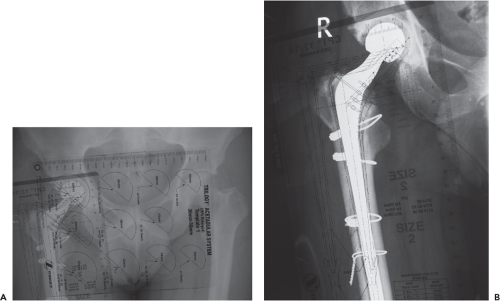 Figure 122.3. Preoperative templating of (A) the cup and, (B) the stem, in preparation for femoral impaction bone grafting. |
Templating is required to plan the stem size, length, and offset options and optimal depth of insertion to maintain leg length. The site of placement of the distal bone plug can be determined and the likelihood of using an existing bone pedestal or retained distal cement as a plug can be confirmed. Templating is also necessary to determine the possible centers of rotation of the reconstruction and predict limb lengths based on the hip center, the height of the calcar and lesser trochanter, in conjunction with clinical measurement and preoperative radiographic evaluation. Templating is used to determine the appropriate relationship between the height of the tip of the trochanter or another lateral landmark and the center of the femoral head.
The important points on the radiographs include (i) the existing center of rotation of the failed hip arthroplasty, (ii) the location of the anatomic center of rotation of the hip, based on the contralateral hip, preoperative views of the failed hip, or using the teardrop and Kohler lines for reference, (iii) the offset of the failed hip arthroplasty, (iv) the normal offset, (v) the level of the calcar and, (vi) the height of the tip of the greater trochanter, or other lateral landmark, in relation to the center of the femoral head. In addition, assess any acetabular and femoral bone deficiencies, angular or rotational deformities of the femur, and all other factors related to the failed implant.
Acetabular templating is first undertaken to determine the likely center of rotation of the hip. Femoral templating is then undertaken, first to determine optimum femoral stem size and length, as well as position of the stem. Delineate areas of major osteolysis, stress risers, femoral perforations, and points of angulation or malrotation, all of which influence the size and length of the stem required. Then, select the template that best fits the proximal femur, leaving room for bone graft and cement. The outline of the prosthesis is indicated by a solid line and the outline of the cement mantle created by the rasp is indicated by a dashed line on the template. Align the femoral template so that it is centered in the diaphysis and then move the template so that the center of the femoral head and the osteotomy line are appropriately positioned to restore the planned amount of leg length. While aligning the femoral template in the canal, the presence of incongruities or an excessive bow or angulation in the AP or lateral planes will become evident.
After indicating the planned center of rotation on the radiograph and the proper position of the femoral component, determine the optimal head position and stem offset. The long stems allow versatility in the choice of neck height and hip center. When templating, and intraoperatively, aim to achieve leg length without using longer heads that have a skirt.
Approach and Removal of the Femoral Component
The patient is positioned for routine hip surgery. Extensive exposure is recommended, especially in difficult revision cases. We routinely use the posterior approach. An approach using trochanteric osteotomy is not advised before impaction
grafting because it removes the lateral support for grafting and for attaching medial mesh. If more extensive exposure of the femoral canal is required to remove the femoral components we perform an extended transfemoral approach. In such cases we usually use a long stem and reduce the osteotomies, holding them with cables before impaction grafting.
grafting because it removes the lateral support for grafting and for attaching medial mesh. If more extensive exposure of the femoral canal is required to remove the femoral components we perform an extended transfemoral approach. In such cases we usually use a long stem and reduce the osteotomies, holding them with cables before impaction grafting.
Obtain a baseline leg-length measurement after exposing the joint and before dislocating the hip. While there are several methods to measure leg length, our preferred method is to place one pin in the iliac wing and a cautery mark or a pin in the greater trochanter. With the leg in the neutral position, the distance between the two reference points is measured. It is important that the measurement be taken with the leg in the neutral position so the position can be easily and accurately reproduced after the new implant has been inserted. Leave the proximal pin in place, but remove the trochanteric pin, if used, and mark the pin site with electrocautery so it can be replaced for remeasurement. Carefully dislocate the hip and remove the femoral component, bone cement, and residual membranes and cleanse the femoral canal. Implant the acetabular component, noting the new center of hip rotation.
Preparation of Bone Graft
Fresh-frozen, nonirradiated femoral heads, from which morselized bone chips are prepared, are required. We usually have at least three femoral heads available, although more may be needed in cases with severe bone loss. The allograft bone should be obtained only from a recognized bone bank and it is helpful if the supply is local should more be needed intraoperatively. A sterile bone mill is used to create bone chips from the femoral heads intraoperatively, if this has not been prepared preoperatively. We use the Noviomagus bone mill (Spierings Medische, Nijmegen, The Netherlands) (Fig. 122.4).
Soft tissues are first removed from the femoral heads. Articular cartilage is conservatively removed while preserving subchondral bone. The ideal size of bone chips ranges from less than 1 mm up to 4 mm maximum diameter for intramedullary impaction. Approximately half a femoral head should be divided with a saw into 5 × 5 × 5 mm and 5 × 5 × 10 mm cancellous cubes for final packing into the proximal femur at the osteotomy level (Fig. 122.4).
To remove fatty marrow, the technique is to wash the bone chips several times in saline heated to 45°C, and then strained over a 200-μm strainer or a pack. Antibiotic powder is added if indicated. It is advisable to have additional allograft material available in case it is needed intraoperatively.
Femoral Impaction Grafting Instruments
We routinely use a cemented collarless polished taper stem for femoral impaction bone grafting and have available the primary hip, revision hip, and impaction grafting instrument sets.
The impaction grafting set includes the following:
Distal femoral packers, which are cannulated larger diameter rods used initially to pack the distal allograft area (Fig. 122.5A).
Corers, which are designed to remove excessive graft or cylindrical plugs of graft up to 7 cm long. These are used for complicated cases and when longer stems are indicated (Fig. 122.5B).
Modular tamps for primary standard length stems and for long and extra-long stems (Fig. 122.5C). Each tamp assembly consists of a proximal tamp, a distal tamp (Fig. 122.5D), and a locking screw or locking rod. The proximal tamp is fixed to the distal tamp with the locking screw or locking
rod. The tamp assembly is initially used as a monoblock tamp. While the locking screw and locking rod perform the same function, the locking rod is longer to facilitate its application and tightening when access to the proximal tamp is difficult.
 Figure 122.4. A: Bone graft preparation using a bone mill. B: Fine chips 2 to 3 mm (left dish), coarse chips 3 to 4 mm (middle dish), and cancellous cubes 5 × 5 × 5 mm and 5 × 5 × 10 mm (right dish) are used. |
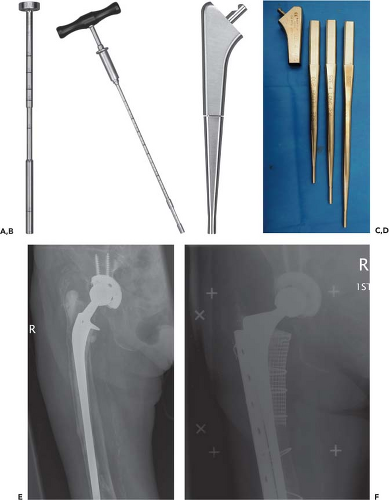 Figure 122.5. Key instrumentation includes (A) a distal packer (courtesy of Zimmer Pty Ltd.); (B) corer with T-handle (courtesy of Zimmer Pty Ltd.); and (C) a modular tamp (courtesy of Zimmer Pty Ltd.) that enhance as well as simplify, the technique. A long-length tamp (D)
Get Clinical Tree app for offline access
Related posts:Stay updated, free articles. Join our Telegram channel
Full access? Get Clinical Tree


|
