Fractures

Sterile Instruments/Equipment
- Impervious stockinette and 4 inch elastic bandage wrap for forearm and hand
- 1/4% Marcaine with epinephrine for arm incision, if desired
- Sterile tourniquet for distal diaphyseal fractures, if desired
- Vessel loop for gentle retraction of radial nerve
- Articulated tensioner for transverse fractures
- Variety of bone reduction clamps, including large and small pointed bone reduction clamps (“Weber clamps”)
- Extra Mayo stand cover or adhesive plastic bag to collect irrigation fluids
- Implants
- 4.5-mm broad or narrow compression plates, depending on the humeral size
- Anatomically contoured humeral plates
- 3.5-mm compression plates for smaller stature individuals
- Small (3.5-mm) and mini-fragment (2.0/2.4/2.7-mm) screws for lagging butterfly fragments
- 4.5-mm broad or narrow compression plates, depending on the humeral size
- K-wires and wire driver/drill
Surgical Approaches
Modified posterior approach to the humeral shaft
- Prone position
- Patient is positioned at the cantilever end of a radiolucent table.
- Use a Wilson frame or blanket rolls to prevent abdominal compression.
- Alternatively, place two smooth double-blanket rolls or gelatin rolls longitudinally on each side of the torso, separated enough to accommodate the patient’s abdomen and breasts.
- Rolls should extend from the level of inferior axillary fold to anterior superior ilium.
- Consider placing a transverse roll across the pelvis in patients with large abdomen, to decrease abdominal pressure and optimize respiration.
- Rolls should extend from the level of inferior axillary fold to anterior superior ilium.
- The affected upper extremity should be positioned with the shoulder abducted approximately 90 degrees and draped over a radiolucent arm board with the forearm hanging freely.
- To prevent edema of the dependent forearm, place the operative forearm and hand in a stockinette and overwrap with an elastic bandage.
- The unaffected upper extremity should be positioned with the shoulder either adducted at the side of the patient’s body, or abducted <90 degrees and comfortably externally rotated (<70 degrees) to protect the brachial plexus and ulnar nerve.
- Build up the padding height of the arm board so that the arm rests at the level of the torso.
- The elbow, forearm, and hand should be well padded on an arm board with attention given to protection of the ulnar nerve.
- Build up the padding height of the arm board so that the arm rests at the level of the torso.
- Place padding under the knees and a pillow under the distal legs to prevent pressure on the toes.
- Lateral decubitus position
- Drape the affected arm over a radiolucent arm board anchored to the head of the table above the patient’s head and oriented longitudinally to the table’s axis.
- Bean bag with gel pad or similar lateral positioning device; high chest roll to protect axilla.
- Plexiglas table extension.
- Inserted so that it protrudes 6 inches from the edge of the bed, under cushion to support down arm.
- Position and protect the arm with blankets and foam.
- Inserted so that it protrudes 6 inches from the edge of the bed, under cushion to support down arm.
- Position down arm with elbow flexed to 90 degrees, with forearm and hand in “natural” position, and with shoulder forward flexed just enough so that down elbow does not interfere with affected humeral imaging (Fig. 5-1).
- Drape the affected arm over a radiolucent arm board anchored to the head of the table above the patient’s head and oriented longitudinally to the table’s axis.
- Patient is positioned at the cantilever end of a radiolucent table.
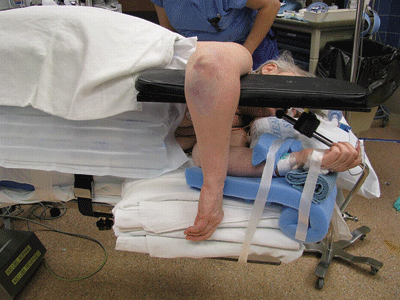
Figure 5-1. Lateral positioning for plate fixation of a humeral shaft fracture.
![]()
- For both lateral and prone positioning, rotate the OR table (usually 90 degrees) such that the affected extremity is maximally accessible by surgeons and fluoroscopy.
- Fluoroscopy comes in from head of patient; AP and lateral imaging are accomplished by 90 degrees rotation of the C-arm without rotation of extremity.
Technique
- Make a longitudinal incision in the midline of the dorsal aspect of the arm.
- Subcutaneous injection of 1:10,000 epinephrine, prior to the incision will help control bleeding of this vascular layer.
- Curve incision slightly radially for distal extension beyond the olecranon process.
- Access the distal diaphyseal and supracondylar regions of the humerus through the lateral paratricipital posterior approach.1
- Dissect full-thickness skin/subcutaneous flap directly to the deep posterior compartment (triceps) fascia and then laterally to the intermuscular septum.
- Identify the radial nerve as it penetrates the lateral intermuscular septum, approximately 10 cm proximal to the lateral epicondyle.
- Follow the radial nerve course proximally and obliquely.
- Distal to the nerve, release the lateral triceps border and anconeus from intermuscular septum and lateral epicondyle, if distal exposure is required.
- Identify the course of the radial nerve, and decompress if displaced or dislocated with respect to the fractured humerus.
- Dissect full-thickness skin/subcutaneous flap directly to the deep posterior compartment (triceps) fascia and then laterally to the intermuscular septum.
- Access proximal shaft and metadiaphyseal region posteriorly by splitting the long and lateral heads of the triceps proximally (Fig. 5-2).
- Radial nerve is deep and distal to their confluence, generally near the medial border of the humeral shaft at this level.
- Take care to avoid injury to the axillary nerve and posterior humeral circumflex vessels if a limited dorsal deltoid release is necessary.
- Radial nerve is deep and distal to their confluence, generally near the medial border of the humeral shaft at this level.
- Subcutaneous injection of 1:10,000 epinephrine, prior to the incision will help control bleeding of this vascular layer.

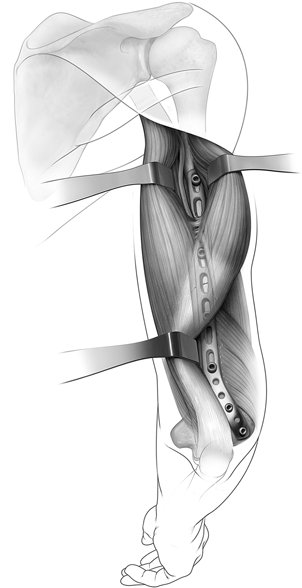
Figure 5-2. Using a modified posterior approach, the triceps can be reflected up to the level of the radial nerve and the fracture. To avoid additional dissection to the proximal extent of the plate, the interval between the long and lateral triceps heads can be developed proximally. At this proximal tendon confluence, the radial nerve is usually adjacent to the medial edge of the plate and humerus.
![]()
- Alternatively, continue reflecting triceps from lateral to medial proximally for full extension of modified posterior (Gerwin) approach.
Anterolateral approach to the humeral shaft
- Supine position.
- Place small one-blanket bump beneath the patient’s affected shoulder, posterior thoracic wall, and pelvis.
- Position the endotracheal tube to the side opposite the fractured extremity, and position the patient’s head facing anteriorly or away from the affected extremity.
- Secure the head to the table with foam and tape.
Related posts:

Stay updated, free articles. Join our Telegram channel
- Place small one-blanket bump beneath the patient’s affected shoulder, posterior thoracic wall, and pelvis.


Full access? Get Clinical Tree


