Chapter 1. How to avoid injuries in the first place
THREE SIMPLE RULES
Apart from receiving a blow or falling, the vast majority of aches and pains could be avoided if only we looked after ourselves properly. We tend to do too much too soon, such as gardening at the first glimpse of spring, or playing a sport without stretching or adequate training. With a little thought and effort, we can go a long way to prevent injuries.
1. Be fit for the task!
Even if you are generally in good shape, you still need to be fit for the rigors of your particular task. Methodical exercise rather than violent, sudden efforts should be used to build up the correct balance of flexibility, strength and endurance. In sports, a good coaching book will set out the exercises required.
2. Warm-up and warm-down thoroughly!
Even if your body is not highly tuned and superfit, it performs better when warm, just like a car engine. Warming up requires more than a few seconds of flapping your arms. Stretching eases out the stiffness in the muscles and joints. We show you some stretches below, but these do not prevent injury. Note that after an injury, the scar tissue tends to shorten the muscles and tendons, so stretching these out again is important. Fairly vigorous exercise warms up the heart muscle, making it more efficient. A good way to warm-up is to mimic the exercises that you perform in your specific sport. Take a minimum of 5 minutes for these. When you warm-down after exercise, allow at least 5 minutes of stretching to prevent stiff, sore muscles the next day. Stretching also helps to increase your general fitness.
3. Use the right equipment and technique!
Your body is different in shape and size from anyone else’s, so the design of a running shoe or the weight of a racket head, the position of a car seat or computer keyboard must suit you individually. Technique is just as important. If your technique is faulty, that can cause an injury, whether you are paddling a kayak or lifting a bag of shopping. In sports, training a certain way might suit one person’s body shape and produce a gold medal. However, if those methods produce injuries in you, use other techniques that don’t! Always go at your own pace.
If there is one lesson to be learned, it is that millions of injuries are caused by sudden, unaccustomed exercise or by training too hard for a sports event. These are often referred to as overuse injuries and occur when one part of the body has been asked to do too much. Think of that spring gardening session, with 2 or 3 hours spent bending, stretching and pulling, without getting the muscles into shape. After all, no one would go out and run a 4-hour marathon without some preparation.
STRETCHING EXERCISES
Whether you are a postal worker or a marathon runner, a truck driver or a tennis star, stretching exercises help to keep your muscles supple and toned for the rest of your life. Stretching exercises can be used at any time of the day or night as part of an effort to keep fit, or for warming up before training and competition. Stretching can be carried out anywhere at any time: a few moments in the office, between ironing and bedmaking, while waiting for the bus. In addition to stretching muscles, tendons and scarred ligaments, there is evidence that proper stretching actually builds strength.
However, stretching does not prevent injuries. If you have torn a muscle or tendon, the scar, as it heals, pulls the two ends closer together, shortening the muscle. Then, when you use the muscle again, it might not have sufficient stretch/elasticity and will tear once again, So, after an injury it is important to keep on doing the stretching exercises.
Throughout the book, certain exercises will be recommended as being particularly beneficial in aiding recovery. The numbers will refer to the stretching exercises illustrated below.
Although ‘bouncing’ into a stretch might improve strength in the normal tendon, this energetic approach does not help the muscles, especially after injury. So, always relax through the tension in each exercise and ease in gently. When you reach the point where you feel a pull, even a slight pain in your muscle, breathe out, relax and hold the stretch there for 10–20 seconds. Gradually you will become more and more limber. Ballistic stretching (gently swinging the leg forward and up to waist height or higher) encourages an active stretch, mimicking natural joint movements. This works particularly well for the hamstring muscle.
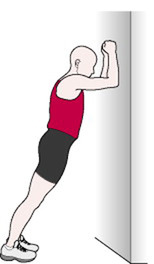 |
1. Stretches calf muscles; helps some Achilles tendon pains
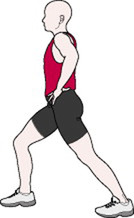 |
2. Stretches calf muscle where no wall is available; also helps some Achilles tendon problems
Keep your feet comfortably apart, your trunk upright and your upper body weight over your rear leg. To be effective, your rear foot must point straight forward. Move your front foot slowly forward. When you feel a pull in the calf of your rear leg, breathe out and hold the stretch for 10–20 seconds. Repeat at least twice. Repeat with opposite foot forward.
Then, to stretch different calf muscles in the front leg, move your weight onto your front leg, keep your front foot flat on the ground and squat, bending your ankle and knee. Try not to push into the toes and fore foot, as this will stop the full stretch. If you do have a wall, you can try this exercise by pushing your knee to touch the wall.
3. Stretches shoulder and upper back muscles; useful for swimmers, racket sports players, etc
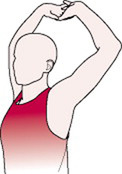 |
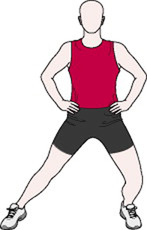 |
4. Stretches muscle on inside of groin. This is vital for quick side-to-side movements and fast acceleration
Stand with your feet wide apart, hands on hips, trunk upright. By bending your right leg, put your weight over your straight left leg. Do not lean forward. When a pull is felt in the groin of the straight leg, breathe out and hold for 10–20 seconds. Increase the stretch by leaning further over your straight leg. Keep your bottom in. Repeat at least twice. Then repeat exercise to the other side.
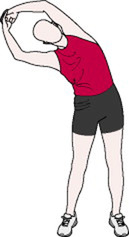 |
5. Helps side-to-side mobility
Stand comfortably; clasp your hands at full stretch above your head. Keeping your trunk upright, lean sideways. Don’t lean forward! When you feel a pull down your side, breathe out and hold for 10–20 seconds. Repeat exercise at least twice. Then repeat exercise to the other side.
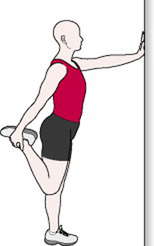 |
6. Stretches important quadriceps muscles on the front of your thigh
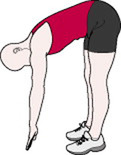 |
7. Stretches the injury-prone hamstring muscle at the back of the thigh
Stand upright with your feet wide apart and your hands on hips. Push your bottom back, then pivot forward from hips, with your back straight and chest thrusting forward. Then drop your hands well in front of your feet. When the pull is felt at back of your knees, breathe out and hold for 10–20 seconds. As flexibility increases, move your feet closer together. Repeat at least twice.
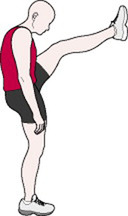 |
8. Stretches hamstrings
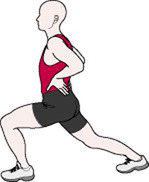 |
9. Stretches calf muscles, quad muscles and hips
With hands on hips, move into the lunge position, with both feet pointing forward. Keep your trunk upright. Drop your weight towards your bent front leg. When a pull is felt on front of the thigh of your rear leg, breathe out, hold for 10–20 seconds. Repeat at least twice. Repeat with opposite leg.
SOME SENSIBLE TIPS
The A–Z of tips tells you how to prevent potential hazards at home and in the workplace. However, injuries do happen. So, we start with two essen tials that you should always have to hand – or at least know where to find in a hurry. They are: some ice and a first-aid kit.
RICE
RICE is an easy way to remember the simplest and most effective remedy for a host of injuries. Yet many serious sportsmen and sportswomen – let alone recreational athletes – disregard this valuable advice.
RICE stands for Rest, Ice, Compression and Elevation. Follow the steps outlined below to reduce swelling and restrict the spread of bruising, both of which slow down the healing process. As soon as possible after sustaining an injury, apply ice and bandages and raise the injured part. Then you can still enjoy post-game socializing, knowing that you are doing something positive to heal your injury.
Sometimes the word PRICE is used: the P stands for Protect the injury.
REST
Do not work through the pain. Rest the injury as soon as possible. The first 6 hours are the most vital. Most injuries require 48 hours rest before mobilization starts. If you try to move the injured part too soon, the scar tissue tends to thicken. However, if you don’t start moving it after 48 hours, then the muscle shortens and a joint stiffens.
 WARNING
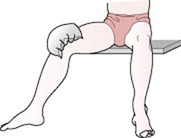
Ice may be colder than 0 °C/32 °F and must never be put directly onto the skin, as this causes an ice burn. Wrap the ice in a cloth, tea towel, etc., or put the ice in water first, to make ‘wet ice’. When it melts, it will be at 0 °C and not cause a burn.
 WARNING
Do not leave the ice on the skin for more than 10 minutes, as this could cause nerve damage (neuropraxia).
ICE
 |
COMPRESSION
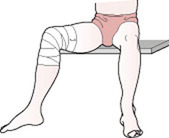
To control swelling, bandage injured area firmly, but not so tightly as to be uncomfortable. Always be prepared to adjust tightness as necessary. Combined ice/compression kits are available from specialty sports shops and pharmacies, as are chemical coolants.
 |
ELEVATION
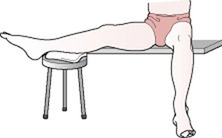
Allow blood to flow towards heart by raising injured area, even if you are in the office. Rest a leg on a chair, for example. This reduces pressure of fluid on injured area.
 |
YOUR INJURY KIT
Stage 1: home
• Box of different-sized sticking plasters
• Sterile gauze pads (clean, ironed handkerchief will do) 4 × 4 inches/10 × 10 cm
• Gauze bandages
• Box of bandages of various sizes
• Plastic bags for ice (or package of frozen peas, which are an ideal shape for applying to injuries) or ice pack kept in freezer
• Scissors, for general use
• This book and a first-aid book
Stage 2: workplace
• Safety pins
• Sling
• Scissors with 2-inch/5-cm blades, for medical use
• Needle
• Cotton wool
• Antiseptic fluid/wipes
• Tweezers
• Rubber bands
• NSAIDs or non-aspirin painkiller
• Adhesive tape
• Portable razor
• Butterfly bandage or adhesive plaster sutures
• Eyebath and eyewash
• Thermometer
• Antacid tablets
Stage 3: recreation
• Strapping tape and/or brace
• Underwrap
• Tincture of benzoin compound to stop tape hurting skin
• Aerosol coolant spray
• Plastic or ‘second skin’ product for blisters
• Fluid replacement drink
• Nail clippers
• Petroleum jelly
• Baby oil/oil of wintergreen/massage cream
• Orthopaedic felt for padding
• Elastic knee/ankle/elbow support
• Foot powder
• Anti-inflammatory drugs (NSAIDs)
Stage 4: serious sports events (for use by qualified medical staff)
• Fracture boards or blow-up splints
• Scoop stretcher
• Oxygen and mask, Ambu bag (also known as BVM, Bag Valve Mask)
• Suture kit
• Superglue
• Cervical collar
• Emergency resuscitation equipment
• Defibrillator
• Emergency drug cupboard (checked by doctor to ensure present and up to date)
• Authorized receptacle to dispose of bloodied equipment
A–Z OF TIPS
< div class='tao-gold-member'>
Only gold members can continue reading. Log In or Register to continue
Stay updated, free articles. Join our Telegram channel

Full access? Get Clinical Tree


