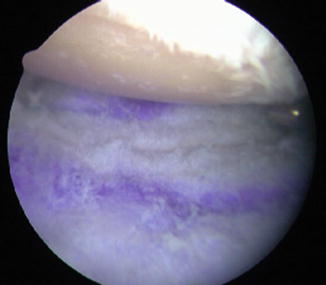
Fig. 13.1
This image shows the arthroscopic view through a posterior portal of the glenohumeral joint in a right shoulder. The patient is in the lateral decubitus position with the humeral head at the top of the image and the glenoid at the bottom of the image. Note the complete loss of cartilage on the glenoid and humeral head with a concentric glenohumeral joint. An 8.5 mm cannula has been placed in the anterior-inferior portal just above the subscapularis [Published with permission of © Michael J. O’Brien 2015]
The arthroscope is then placed in the anterior-superior viewing portal; this allows full visualization of the glenohumeral joint in both anterior and posterior compartments (Fig. 13.2). An 8.5 mm cannula is placed in the anterior-inferior portal. The larger cannula is necessary here to allow for later graft passage. A 5 mm cannula is placed in the posterior portal. Hypertrophic synovium can be resected with the shaver and all degenerative fraying of the labrum, rotator cuff, and biceps is debrided. Loose bodies can be removed when identified. If significant stiffness is present, a complete capsular release just off the labrum is performed.
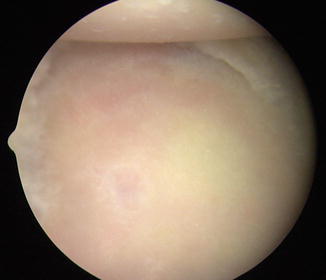
Fig. 13.2
This image of the same right shoulder viewed through the anterior-superior portal again demonstrates complete loss of articular cartilage on the humeral head and glenoid with a concentric glenohumeral joint. The anterior-superior viewing portal allows full access to both anterior and posterior compartments of the joint [Published with permission of © Michael J. O’Brien 2015]
A flat, concentric surface must be created for placement of the graft. A motorized burr is introduced through the posterior portal while viewing from the anterior-superior portal, and the glenoid face is burred to a smooth uniform surface (Fig. 13.3). Occasionally, it may be necessary to alternate the burr between the anterior and posterior portals so that the entire glenoid surface can be burred smooth and flat. Bony ridges can be removed and limited biconcavity can be planed to a flat surface. It is important to remove any residual cartilage.
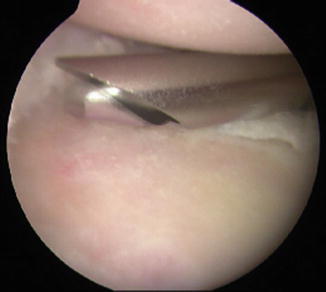
Fig. 13.3
A motorized burr introduced through the posterior portal allows the surgeon to burr the glenoid to a smooth, flat surface, removing all remnants of articular cartilage. The arthroscope is in the anterior-superior viewing portal [Published with permission of © Michael J. O’Brien 2015]
Next, a microfracture of the glenoid face is performed. This can be accomplished most readily with Steadman microfracture awls. It is important to penetrate deep enough with the microfracture to allow the release of marrow contents (Fig. 13.4). The marrow cells help the biologic interposition graft heal to the native glenoid.
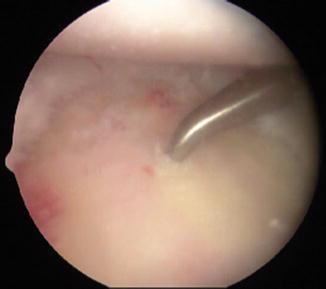
Fig. 13.4
A Steadman awl introduced through the posterior portal is used to perform a microfracture to the entire glenoid face. It is important to penetrate deep enough with the awl to allow the release of marrow contents into the joint [Published with permission of © Michael J. O’Brien 2015]
One single-loaded, bioabsorbable suture anchor is then placed anteroinferiorly and one anterosuperiorly, and the posterior labrum, which is usually hypertrophic, is used for posterior-inferior and posterior-superior sutures (Fig. 13.5). These are typically placed at 1, 4, 8, and 11 o’clock with respect to the glenoid face. Alternatively, if inadequate posterior labral tissue is deficient, suture anchors may be placed posteriorly as well. The anterior anchors may be placed through the anterior-inferior cannula. The posterior anchors are usually placed percutaneously using a small posterolateral portal. As each anchor is placed, the sutures are retrieved without tangling and maintained in a separate “quadrant” of the cannula. Suture management is paramount for the remainder of the procedure. Using a hemostat, each suture can be secured to the drapes in the corresponding position inside the shoulder joint (Fig. 13.6). The sutures should be secured under tension. A grasper may be run down and up the sutures individually to confirm the absence of any tangles.
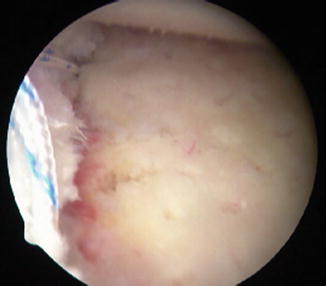
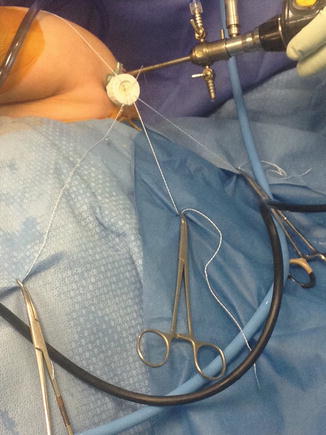
Fig. 13.5
This view from the anterior-superior portal shows the glenoid after microfracture and placement of two single-loaded suture anchors. The anterior-superior anchor is placed at the 1 o’clock position and the anterior-inferior anchor placed at the 4 o’clock position [Published with permission of © Michael J. O’Brien 2015]
Fig. 13.6
This external photograph of a right shoulder in the lateral decubitus position demonstrates how the sutures can be secured to the drapes using hemostats to keep the sutures in the correct “quadrants” of the glenohumeral joint. The sutures are secured under tension to prevent tangles. Suture management and attention to detail are paramount for successful graft passage into the shoulder joint [Published with permission of © Michael J. O’Brien 2015]
At this stage, the interposition graft can be prepared. At our institution, the surgeons currently prefer to use human acellular dermal matrix. Two common techniques can be used to measure the dimensions of the native glenoid. A calibrated probe can be placed across the face of the glenoid from the posterior portal. The anterior-posterior width is measured at the widest portion of the glenoid. The authors’ preferred technique is to directly measure the glenoid width with a free suture (Fig. 13.7). A knot is tied in a free suture, and then the suture is placed through the anterior cannula across the face of the glenoid and out the posterior cannula. An assistant holds the suture taught so the tied knot lies at the posterior glenoid rim. A suture grasper is placed through the anterior cannula, and the free suture is secured with the grasper at the anterior glenoid rim. The suture is removed from the anterior cannula with the grasper in place. The glenoid width is then measured between the tip of the grasper and the tied knot.
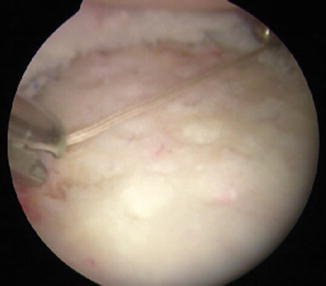
Fig. 13.7
The anterior-posterior width is measured using a free suture at the widest portion of the glenoid. The length of suture can be measured with a ruler on the back table, and the graft dimensions calculated using a 3:2 ratio of height to width [Published with permission of © Michael J. O’Brien 2015]
The average glenoid dimension has a 3:2 ratio of height to width. The width measurement is used to calculate the height from superior to inferior. The graft is marked on the back table, and an oval is drawn onto the graft to match the native glenoid. The appropriate size graft is then cut out of the human dermal matrix with scissors (Fig. 13.8). It is important to mark the subcutaneous side of the graft, which should be placed against the native glenoid bone. The dermal side should face upward.
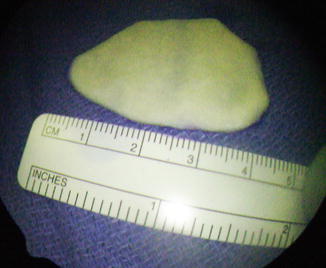
Fig. 13.8
Once the glenoid dimensions have been calculated, the dimensions are drawn onto the graft, and an oval-shaped graft is cut to approximate the shape of the native glenoid [Published with permission of © Michael J. O’Brien 2015]
Using a free needle, one limb of each suture is passed through the graft corresponding with the anchor location on the glenoid. A mulberry knot or short-tailed interference knot (STIK) as described by Wong [16] can be tied and pulled to sit flush against the graft (Fig. 13.9). Suture management is essential to avoid crossing or twisting of the sutures.
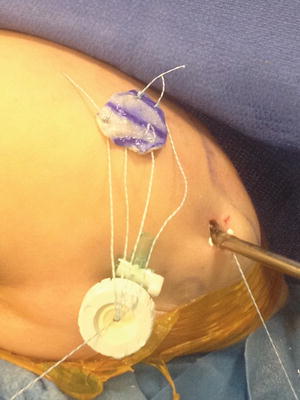
Fig. 13.9
This photograph shows the prepared graft prior to passage into the glenohumeral joint. Using a free needle, one limb of each suture is placed through the graft corresponding to the suture location in the glenoid. A mulberry knot or STIK can be tied and pulled flush with the graft to facilitate passing the graft into the joint [Published with permission of © Michael J. O’Brien 2015]
The graft is now ready for passage into the shoulder joint. The graft is rolled up and placed into the anterior-inferior cannula. A large 8.5 mm cannula is necessary to allow passage of the graft into the shoulder joint. The posterior-inferior suture is passed down the cannula and retrieved under the posterior-inferior labrum. The posterior-superior stitch is passed the same way and retrieved under the posterior-superior labrum. These two sutures are gently tensioned to pull the graft into the joint. An assistant holds the posterior sutures tight while the anterior sutures are individually tensioned. Carefully pulling on all four sutures will lay the graft flat on the glenoid. A probe can be used to assist with the position of the graft, ensuring it is flush with glenoid (Fig. 13.10). Next, the four individual sutures are tied sequentially. We tie the anterior-inferior suture first and then the anterior-superior stitch. When a STIK has been used, the posterior sutures can be retrieved through the posterior cannula and each suture sequentially tied. Alternatively, the posterior sutures may be tied to each other on the outside of the posterior labrum. The compression of the humeral head on the glenoid will hold the graft flush against the glenoid. The microfracture allows the marrow contents from the glenoid to pool between the glenoid and graft, facilitating healing of the graft to the bony glenoid.