Chapter 4 Exercises for core stabilization and efficient movement
HEAD AND CERVICAL SPINE ALIGNMENT
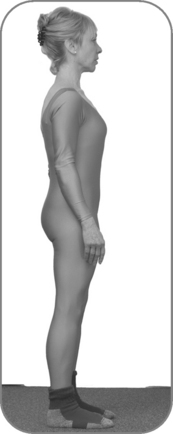
Head and cervical spine alignment in standing and sitting
Viewed from side
 The normal cervical and thoracic spinal curves are intact with the head balancing on top of the spine (Fig. 4.1).


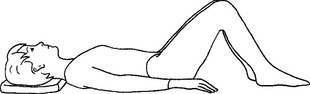
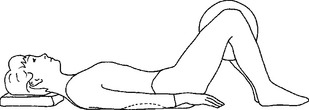
Head and cervical spine alignment in supine
Viewed from side
 The head may rest on the floor or suitable supports to maintain the normal cervical and thoracic curves (Fig. 4.2).

General points
The position should feel comfortable with the neck muscles appearing relaxed. It may be necessary to try a variety of supports (e.g. neck or small pillow, rolled towel) to achieve correct resting alignment. These may need adjusting as exercises progress – for example, head supports can restrict spine movement when progressing from small pelvic tilts to full pelvic curls. The use of head supports for an individual should be continuously reviewed as spine mobility and overall posture improve.
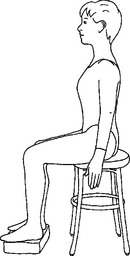
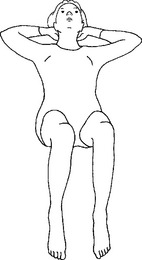
PECTORAL GIRDLE AND SCAPULAR ALIGNMENT IN STANDING AND SITTING
Viewed from side
 The normal thoracic curve is intact so that the ribcage is balanced over the pelvis and lower limbs (Fig. 4.3).


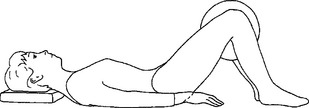
NEUTRAL SPINE IN STANDING, SITTING AND SUPINE
The pelvis is in neutral and the normal spinal curves are intact but not exaggerated (Figs 4.4 & 4.5).


IMPRINTED SPINE (RELAXED BACK POSITION)
When the body is supine the pelvis is positioned with a posterior tilt to eliminate the normal lumbar curve. Using the ASIS and pubis as landmarks, the pubis is positioned at a higher level than the ASIS (Fig. 4.7).
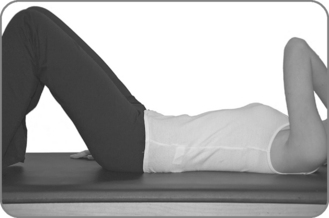
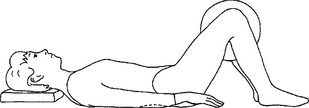
SUPINE POSITION: NEUTRAL LUMBAR SPINE AND PELVIS
Body position
Lying on the back with the hips and knees flexed approximately 90 degrees and the hips neutral in rotation. The heels are aligned with the axes of the hip joints. The normal spinal curves are intact (Fig. 4.8).


Common problems


See Table 4.1 for Teaching points.
Table 4.1 Teaching points – Supine position: neutral lumbar spine and pelvis
| Focus on | Examples of verbal/visual cues |
|---|---|
| Creating a correctly aligned and relaxed, comfortable position | |
| Achieving a neutral spine and pelvis | Trace your fingers along a triangle formed between the pubic bones and the hip bones. The triangle is to lie parallel with the floor |
| Imagine a small space under the lower back – just enough to allow a glimmer of light to shine through | |
| Imagine the pelvis as a bowl of water and the surface of the water is absolutely level and still |
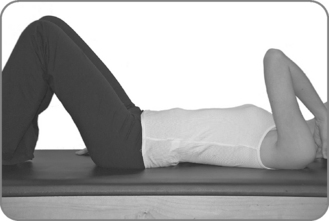
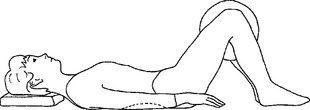
SUPINE POSITION: IMPRINTED LUMBAR SPINE
Body position
Lying on the back with the hips and knees flexed approximately 90 degrees and the hips neutral in rotation (Fig. 4.10). The heels are aligned with the axes of the hip joints. The pelvis is in a slight posterior tilt with the lumbar spine flattened.


Common problems
 Using the legs to push the back to the floor: Cue to maintain relaxed hamstring and gluteal muscles.

See Table 4.2 for Teaching points.
Table 4.2 Teaching points – Supine position: imprinted spine
| Focus on | Examples of verbal/visual cues |
|---|---|
| Creating a correctly aligned and relaxed, comfortable position | |
| Using abdominal muscle activation and relaxation of the lower back muscles to create the posterior pelvic tilt | Imagine the pelvis as bowl of water. Using the pelvic floor muscles and lower abdominal muscles, tilt the bowl to spill one drop of water towards your navel Keep the lower back muscles relaxed and the abdominal muscles gently working to maintain this position Trace your fingers around the edges of the triangle to see if the pubic bone is higher than the hip bones |
PRONE POSITION
Body position
Lying prone, preferably on a mat or a raised bed that enables the ankles to relax as the feet drop over the edge (Fig. 4.11). The arms are bent with the elbows pointing to the side, and the hands resting one on top of the other to make a support for the forehead. The spine is lengthened and the limbs are symmetrically aligned. The abdominal muscles are drawn gently towards the spine, supporting the natural lumbar curve and the groins are soft and lengthened.


Common problems
 An exaggerated lumbar lordosis: For students with poor abdominal muscle control or tight hip flexors it may be helpful to place a small pillow under the body to support and lengthen the lumbar spine.

See Table 4.3 for Teaching points.
Table 4.3 Teaching points – Prone position
| Focus on | Examples of verbal/visual cues |
|---|---|
| Correct spine alignment | Centre yourself on the mat |
| Creating a comfortable rest position for the student | Use supports appropriately |
| Lengthening through the groins | Lift the right leg slightly, stretch through the groin and reach the right leg out of the hip then return it to the mat |
| Sufficient abdominal muscle engagement to support the lumbar spine |
SIDE LYING POSITION FOR EXERCISING THE UPPER LEG
Body position
Side lying with the lower leg flexed approximately 90 degrees at the hip and knee (Fig. 4.12). The upper leg extends in line with the body or slightly in front of the hips (with no more than 10 degrees of flexion) and rests on the floor or a support at about hip height. The lower arm reaches along the floor in line with the shoulder and the upper hand is placed on the floor in front of the body or on the upper hip to help keep the side of the body lengthened. (Alternatively, the upper arm may be supported by placing it on yoga blocks, a pillow or small soft ball, or magic circle.) The head rests on the extended lower arm or on a suitable support to establish correct head, neck and thoracic spine alignment.

Observable features
Viewed from front
 The head and cervical spine are aligned with the thoracic and lumbar spine to achieve whole body symmetry.


Common problems
 Extension of the cervical, thoracic or lumbar spine and subsequent loss of the correct relationship between the ribs and the pelvis: Place the student against a wall or other back support; cue for stronger abdominal muscle control.


See Table 4.4 for Teaching points.
Table 4.4 Teaching points – Side lying position for exercising the upper leg
| Focus on | Examples of verbal/visual cues |
|---|---|
| Comfort | |
| Good pectoral girdle alignment and stability | Imagine the shoulder blades sliding down the back into rear hip pockets on the opposite sides |
| Alignment and length of the spine and lower limbs | |
| The optimum position for torso stability and effective upper limb movement | Imagine the body stretched between two panes of glass that might shatter if the body leans forwards or backwards |
SIDE LYING POSITION FOR EXERCISING THE LOWER LEG
Body position
Side lying with the upper leg in approximately 90 degrees of hip and knee flexion, the knee resting on a support at about hip height (Fig. 4.13). The lower leg is extended in line with the body or slightly in front of the hips (with no more than 10 degrees of hip flexion). Both knees face directly forward. The lower arm reaches along the floor in line with the shoulder and the upper hand is placed on the floor in front of the body or on the upper hip to help keep the side of the body lengthened. (Alternatively, the upper arm may be supported by placing it on yoga blocks, a pillow or small soft ball, or magic circle.) The head rests on the extended lower arm or on a suitable support to establish correct head, neck and thoracic spine alignment.

Observable features
Viewed from front
 The head and cervical spine are aligned with the thoracic and lumbar spine to achieve whole body symmetry.


Common problems
 Extension of the cervical, thoracic or lumbar spine and subsequent loss of the correct relationship between the ribs and the pelvis: Place the student against a wall or other back support; cue for stronger abdominal muscle control.


See Table 4.5 for Teaching points.
Table 4.5 Teaching points – Side lying position for exercising the lower leg
| Focus on | Examples of visual/verbal cues |
|---|---|
| Comfort | |
| Good pectoral girdle alignment and stability | Imagine the shoulder blades sliding down the back into rear hip pockets on the opposite sides |
| Alignment and length of the spine and lower limbs | |
| The optimum position for torso stability and effective lower limb movement | Imagine the body stretched between two panes of glass that might shatter if the body leans forwards or backwards |
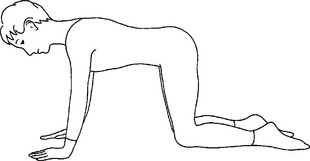
QUADRIPED POSITION
Body position
Four-point kneeling with the hips and knees flexed 90 degrees and the knees approximately hip distance apart (Fig. 4.14). The hips are neutral in rotation and the limbs are parallel and aligned so that the top of the feet face to the floor. The hands are in line with or just in front of the glenohumeral joints (if the arms are comparatively long). The glenohumeral joints are in slight lateral rotation and the arms are extended with the elbows softened to prevent hyperextension of the elbow joint. The little fingers press lightly into the floor to assist engagement of the pectoral girdle stabilizing muscles. The normal spinal curves are intact, with the back of the neck lengthened and the crown of the head reaching forward. The gaze is between the thumbs.


Common problems
 Extension of the cervical, thoracic or lumbar spine and subsequent loss of the correct relationship between the head, neck, ribs and pelvis: Cue to lengthen through the back of the neck and to imagine holding a soft peach between the chin and the sternum; use the hands to direct the ribs to ‘funnel down towards the pelvis’; cue to reach the crown of the head and the ‘sitting bones’ in opposite directions; trace the fingers along the spine to promote space between each vertebra.


 Should the contour of the paraspinal muscles be asymmetric, there could be a postural rotation of the lumbar vertebrae or uneven rotation in the hip joints. The latter is confirmed by asking the subject to rock back onto the heels. If lumbar spine rotation increases further as the subject reaches their end range of hip flexion motion, asymmetry of hip joint mobility is likely.
See Table 4.6 for Teaching points.
Table 4.6 Teaching points – Quadriped position
| Focus on | Examples of visual/verbal cues |
|---|---|
| Achieving a well-balanced position with the body weight distributed between the hands and the lower limbs | Keep the bottom in contact with the heels and curl the body, reaching the arms as far forward as possible along the floor Spread the fingers, push the hands into the floor and simultaneously slide the shoulder blades down the back Maintain shoulder girdle stability to draw the crown of the head forwards until you are supported over your hands and knees |
| Good pectoral girdle alignment and stability | |
| Alignment and length of the spine and lower limbs |
CONTROLLED BREATHING
Aim
Target muscles
| Inspiration | Expiration |
|---|---|
| Diaphragm | Transversus thoracis |
| Intercostals | Subcostals |
| Levatores costarum | Serratus posterior inferior |
| Serratus posterior superior | External obliques |
| Internal obliques | |
| Transversus abdominis | |
| Latissimus dorsi |
Principles derived from Joseph Pilates’ original tenets
Sequence 1 – Relaxed breathing
Body position
Supine with 90 degrees of hip and knee flexion. The pelvis is slightly tilted posteriorly so as to flatten the lumbar spine and allow the back muscles to relax. The head is supported sufficiently to allow the superficial neck muscles to relax. The eyes are closed or the gaze is unfocused with the eyes looking directly forwards (Fig. 4.15A).

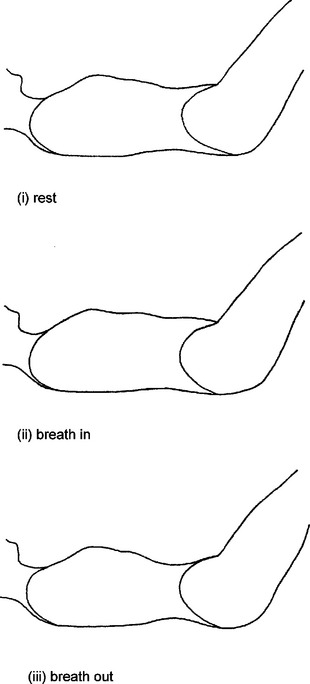
Breathing actively
Breathing out – increase pelvic floor activation and tighten the lower fibres of transversus abdominis as exhalation begins. Maintain this gentle contraction to assist the ascent of the diaphragm as the lungs continue to recoil and achieve a full deep exhalation. At the end of the breathing cycle the back muscles are fully relaxed so the sternum can drop down and back towards the spine to achieve the correct relationship between the upper and lower torso. This then allows each of the trunk muscles to achieve their optimum length.
Progression
Common problems
 Breathing more into the upper lobes of the lungs: If the breathing patterns demonstrate a pronounced displacement of the sternum rather than the lower ribs, the lungs are not fully expanding. On breathing in, place the hands lightly over or a tie a dynaband around the chest approximately at the level of the seventh to twelfth ribs and encourage the student to direct the breath more into the lower lobes. On breathing out, use the hands or a dynaband to slightly compress the ribs so as to squeeze air from the lungs.


Sequence 4 – Controlled breathing to assist spine stabilization and mobilization as required
See Table 4.7 for Teaching points.
Table 4.7 Teaching points – Controlled breathing
| Focus on | Examples of verbal/visual cues |
|---|---|
| Correct head and spine alignment without neck tension | |
| Correct pectoral girdle and lower limb alignment | Spread the collarbones apart and imagine the shoulder blades as skis sliding diagonally down and across the back |
| Relaxing the body throughout | |
| An efficient breathing cycle: inspiration | On ‘breathing in’: |
| An efficient breathing cycle: expiration | On ‘breathing out’, imagine: – the shoulder blades sliding down across the back and sense the weight of the body dropping into the floor |
| An efficient breathing cycle: more active expiration | On ‘breathing out’, draw the lower abdominal muscles further back towards the spine |
EXERCISE LIST
Supine lower abdominal muscle strengthening (Exercises BCS1–5)
| BCS1 | Pelvic floor muscle toning |
| BCS2 | Lower abdominal muscle activation |
| BCS3 | Hip rolls |
| BCS4 | Leg slides |
| BCS5 | Thigh arcs |
Prone posterior hip muscle strengthening (Exercises BCS6–8)
| BCS6 | Gluteal squeezes |
| BCS7 | Gluteal strengthener with flexed knee |
| BCS8 | Hamstring curls |
Side lying posterior hip muscle strengthening (Exercises BCS9–12)
| BCS9 | The oyster |
| BCS10 | Upper leg lifts |
| BCS11 | Lower leg lifts |
| BCS12 | Body lengthening |
Spine, hip and shoulder stabilization and mobilization – quadriped series (Exercises BCS13–19)
| BCS13 | Head nodding |
| BCS14 | Head turning |
| BCS15 | Rocking |
| BCS16 | Arm lifts |
| BCS17 | Leg lifts |
| BCS18 | Arm and leg lifts |
| BCS19 | Cat |
Supine spine mobilization (Exercises SSM20–22)
| SSM20 | Pelvic tilt |
| SSM21 | Pelvic curls |
| SSM22 | Pelvic curls with arm lifts |
| SAS23 | Sit ups series |
| SAS24 | Sit ups with twist series |
Prone spine mobilization (Exercises PSM25–26)
| PSM25 | Cobra |
| PSM26 | Arrow |
Side lying spine mobilization (Exercise SLM27)
| SLM27 | Chest opener with spine twist |
Knee strengthening (Exercise KS28)
| KS28 | Quadriceps strengthening |
Related posts:
Stay updated, free articles. Join our Telegram channel

Full access? Get Clinical Tree


