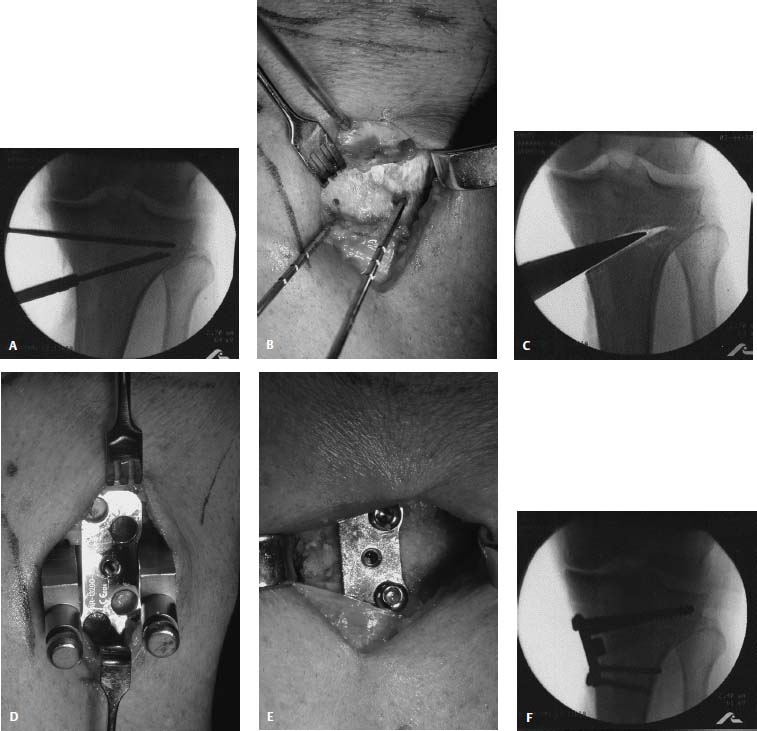
22 Historically, osteotomies about the knee have been performed to treat osteoarthritis or to correct a deformity in joint alignment. Early reports from Europe in the late 1950s, as well as Coventry’s reports in North America in the 1960s, popularized both varus and valgus realignment osteotomies of the proximal tibia. Increased varus or valgus alignment has been shown to be associated with increased contact pressures in the knee.1 Excessive pressure can lead to the breakdown of cartilage within the affected compartment. By redistributing the mechanical forces across the knee, a corrective osteotomy can potentially slow the progression of cartilage degeneration, provide pain relief, allow for return to sport or heavy labor, increase the life span of the joint, and delay the need for arthroplasty. The prevalence of osteotomies for medial or lateral gonarthrosis has steadily decreased with the improved longevity and increased popularity of total or unicompartmental knee arthroplasty. The historic success rate of high tibial osteotomies for medial gonarthrosis in a meta-analysis of previously unpublished data are 76% at 5 years and 63% at 10 years,2 whereas total knee arthroplasty is successful in up to 93% of patients at 10 years.3 Yet, total knee arthroplasty requires activity modification and has a finite life span that may be incompatible with the needs of the young active patient. With other good treatment options available for the arthritic knee, the indications for osteotomy have narrowed. The ideal patient has been described as a thin, active individual in the fifth or sixth decade of life with localized, activity-related, unicompartmental knee pain, and with at least 90 degrees of flexion and less than 10 to 15 degrees of flexion contracture.4 They are best indicated in patients with only Ahlback I to II changes,5 and should be overcorrected by 2 to 3 degrees to obtain lasting results.6 As the basic science and technology of cartilage restoration and meniscal transplantation have evolved, new indications for osteotomy of the proximal tibia, distal femur, and tibial tubercle have emerged. Physiologic genu varum or valgum is well tolerated in the knee with healthy cartilage. However, physiologic varus alignment in a knee with a medial compartment chondral or osteochondral defect creates a situation where excessive force is transmitted through the injured compartment. The same is true for a physiologic valgus aligned knee with a lateral compartment problem. Overload of the compartment undergoing cartilage repair is likely to lead to an unsatisfactory result. An osteotomy that maintains a level joint line and unloads the affected compartment prior to, or at the time of, meniscal allograft or articular cartilage restoration will enhance the success of the procedure. Alignment has traditionally been evaluated with both anatomic and mechanical axis measurements. The anatomic axis measures the tibiofemoral angle from standing anteroposterior (AP) radiographs using several centered points on the shafts of each bone. Normative data have shown the average tibiofemoral angle to be 5 to 7 degrees of valgus.7 Height affects this angle, with taller individuals likely to be 5 degrees, medium tall individuals 7 degrees, and shorter individuals more likely to be up to 9 degrees.8 Correspondingly, many generalize that men have a tibiofemoral axis of 6 degrees and women an axis of 7 degrees. The mechanical axis of the knee is the angle formed by lines connecting the center of the femoral head and the center of the tibiotalar joint to the center of the knee. Normative data show the axis ranges between 0 and 2.3 degrees of varus, with an average of 1.2 degrees.7 Normal alignment results in ~60% of the load being transmitted through the medial compartment during weight bearing. The mechanical axis is measured on a full-length radiograph. The mechanical axis of the leg, which is often referred to as the “weight-bearing line,” is derived from a line connecting the center of the femoral head to the center of the tibiotalar joint. Many believe the weight-bearing line more accurately defines load transmission forces across the knee joint. Malalignment can come from extraarticular or intraarticular sources. Intraarticular causes such as cartilage loss and ligamentous laxity are of particular concern in the young adult athlete with gonarthralgia. This population may have physiologic varus or valgus that would otherwise be perfectly acceptable. Fortunately, this means that adjunctive osteotomies for these patients are usually of mild or moderate magnitude and only in one plane. A standard set of radiographs is helpful for preoperative planning. Many medical offices are not set up to obtain full-length films, so several combinations of the following radiographs are sufficient. If possible, obtain five different radiographs: (1) bilateral AP weight bearing in full extension, (2) bilateral posteroanterior (PA) weight bearing at 45 degrees flexion, and (3) lateral, (4) skyline, and (5) full-length standing of both lower extremities. It is important to remember that supine views may underestimate the correction required. Single-leg films may overestimate or underestimate the correction because of the soft tissue laxity not requiring bony correction, as well as malrotation of the extremity on the film. Once the radiographs have been completed, measuring the alignment can help determine the appropriate location and magnitude of the osteotomy. Measure the mechanical axis and weight-bearing line from the fulllength radiograph, and the anatomic axis from the weight-bearing AP in full extension. In knees with significant tibial or femoral deformity, consider measuring the individual articular angles of the tibia and femur. The joint congruency angles and posterior tibial slope may also be helpful, especially in regard to anterior cruciate ligament (ACL) and posterior cruciate ligament (PCL) reconstructions. The goal of osteotomy is to transfer the weight-bearing force to the healthy compartment of the knee. Several methods can be used to determine the appropriate angular correction to achieve this redistribution of forces. The general principle is to determine the desired postoperative anatomic axis, mechanical axis, or the location of the weight-bearing line, and calculate the angular correction necessary to achieve it. The optimal postoperative frontal/coronal plane alignment to unload the medial compartment should be 8 to 10 degrees of anatomic axis valgus,6 3 to 5 degrees of mechanical axis valgus, or a weight-bearing line passing through 62 to 66% of the tibial width (medial to lateral).9 To unload the lateral compartment, postoperative alignment should place the weight-bearing line at slightly less than 50% of the tibial width, producing neutral anatomic alignment (6 degrees of mechanical axis varus).10,11 Studies have shown good results with correction of up to 3 to 4 degrees of anatomic axis varus,12 and as little as 4 degrees of mechanical axis varus.13 The weight-bearing line method divides the tibial plateau from 0 to 100% (medial to lateral) to determine the desired intersection of the mechanical axis through the knee joint. The weight-bearing line should not be corrected to greater than 75% of the tibial width (6 degrees of mechanical axis valgus) because it may result in medial lift-off. Noyes uses this technique, selecting 62% as the point on the joint line. An alternate technique for a high tibial osteotomy, described by Dugdale and Noyes,9 uses a line drawn from the center of the femoral head to the 62% coordinate on the plateau. The radiograph is then cut through the osteotomy site, leaving the hinge intact, and the distal tibia is rotated until the weight-bearing line passes through the 62% coordinate. The correction angle is the lateral overlap for lateral closing wedge osteotomy or the medial gap for medial opening wedge osteotomy. The wedge height is calculated after correction for magnification of the radiograph if the operative technique does not utilize a jig that can be set at a particular angle. This angle or wedge height is the same for an opening or closing wedge osteotomy of the tibia or femur. Miniaci et al14 recommend using the weight-bearing line a different way, incorporating multiple lines. Line 1 connects the center of the femoral head to a point 60 to 70% of the tibial width. This line is continued beyond the knee joint for the length of the tibia. Line 2 connects the apex of the proposed osteotomy of the tibia to the center of the tibiotalar joint. Line 3 connects the apex to the point on line 1 where the ankle will intersect with the proposed long axis (line 1) when the osteotomy is performed. The angle formed between lines 2 and 3 corresponds to the angle of correction at the proximal tibia. The rule of thumb method, described by Bauer et al,15 estimates that for each millimeter of height, roughly 1 degree of angular correction will result. This method is accurate only when the actual width of the tibial flare is 56 mm and the radiographic magnification has been corrected. Typically, this method leads to undercorrection (due to the fact that the mean tibial width in women is 70 mm and in men is 80 mm). A trigonometric method for determining the wedge height can be done, using the following equation: y = x tan(θ), where y is the wedge height, x is the actual width of the tibia at the level of the planned osteotomy (2 cm below the joint line), and θ is the desired angle of correction.16 On a standing radiograph, attenuated ligaments or osseous defects can cause an overestimation of the magnitude of correction necessary. For a high tibial osteotomy, each millimeter of lateral tibiofemoral joint separation causes approximately 1 degree of varus angular deformity. Excessive deformity from soft tissue laxity is accounted for by comparing the amount of lateral joint space opening in millimeters on the standing AP radiograph with the contralateral knee and subtracting the difference from the calculated angular correction (1 degree/mm) to avoid overcorrection.7 Software programs, such as Osteotomy Analysis Simulation Software (OASIS), (Zona Japan, Inc.,) are also available to assist in preoperative planning and produce several options for correction. The magnitude and direction of the coronal plane malalignment may dictate the location of the osteotomy or suggest the use of a particular technique. For mild or moderate corrections of varus, most valgus-producing osteotomies to augment cartilage restoration are best performed on the proximal tibia. Rarely are valgus producing osteotomies performed on the distal femur. For small degrees of valgus deformity (i.e., less than 12 degrees), proximal tibia varus osteotomies may be performed, but most varus producing osteotomies are preferentially performed on the distal femur. Based on historic results, osteotomies for correcting valgus deformities that exceed 12 degrees should be limited to supracondylar femoral osteotomy to avoid unacceptable joint line obliquity (>10 degrees).17 Indications and Contraindications Indications for a proximal tibial osteotomy include varus standing alignment associated with any of the following: medial compartment arthrosis in a stable or unstable knee, medial arthralgia with associated medial meniscus deficiency, and medial articular chondral or osteochondral lesions requiring repair or reconstruction. Proximal tibial osteotomies are traditionally reserved for younger patients, although older patients with high activity levels may also be candidates. Contraindications include inflammatory arthritides, varus deformity greater than 15 degrees, flexion contracture greater than 10 to 15 degrees, lateral subluxation, significant patellofemoral symptoms that are not going to be addressed, excessive weight, unrealistic expectations, lack of tibial bone stock, and lateral compartment problems such as articular lesions or previous meniscectomy. The resulting valgus alignment may be cosmetically unacceptable to some patients and should be discussed prior to osteotomy. Patient Selection In 1979 Coventry18 identified risk factors for failure that included undercorrection and an overweight patient. Patients with both risk factors had failure rates of 60% at 3 years and 80% at 9 years. Berman et al4 identified factors that lead to increase success rates, including patient age less than 60, 90 degrees of knee motion, stability, and isolated unicompartmental involvement. The patient’s history should be consistent with symptoms of localized pain in the medial compartment. The extremity should be examined for range of motion, fixed deformity, and stability. Literature Review of Long-Term Results and Complications The use of tibial osteotomies to correct genu varum from rickets was first reported by Sir Robert Jones (as reported by Wardle19). Jackson and Waugh20 later published their results of tibial osteotomies distal to the tuberosity for the treatment of osteoarthritis secondary to varus and valgus knee alignment. In 1965, Coventry21 described closing wedge osteotomies performed proximal to the tibial tuberosity for both varus (lateral approach) and valgus (medial approach) deformities. Coventry’s technique was advantageous in that healing rates improved (osteotomy through cancellous bone) and the osteotomy was near the deformity. Furthermore, his use of staple fixation avoided the need for prolonged cast immobilization. There have been several modifications to Coventry’s technique that have shown good results, including inferomedial excision of fibular head [maintaining lateral collateral ligament (LCL) attachment], use of an osteotomy jig, rigid fixation with a buttress plate, and early motion. Results of high tibial osteotomy for medial compartment arthrosis have been best when the anatomic axis is corrected to 8 to 10 degrees of anatomic valgus6 or when the weight-bearing line passes through the lateral plateau at 62 to 66% of the width of the plateau.9 The reported recurrence rate of the deformity is 8% if the malalignment is undercorrected and 1% if it is overcorrected.18 As noted above, a meta-analysis of proximal tibial osteotomies for varus gonarthrosis yields a success rate is 76% good or excellent results at 5 years and 63% at 10 years.2 Complications of Closing Wedge High Tibial Osteotomies The overall complication rate from a meta-analysis of closing wedge osteotomies is 29%, with only 7% of those complications considered major.2 Improper correction (more commonly undercorrection than overcorrection) is the most commonly reported complication. Patients with undercorrection generally have less pain relief, a lower satisfaction rate, and a higher reoperation rate. Infection has been reported in 5.1% of patients (6.3% if external fixation group is included), but only 1.6% of the patients required more than simple wound care. Peroneal nerve palsy was reported in 3.4% of patients, with only 0.55% having permanent impairment. An especially high risk of injury to the branch of the peroneal nerve to the extensor hallucis longus (between 7 and 15 cm distal to the head of the fibula) is associated with fibular osteotomies.22 Delayed or nonunion was found in 2.9% of patients and were often related to technical errors such as loosening the medial hinge, inadequate immobilization, hardware failure, and poor placement of the osteotomy. Several intrinsic factors were also found to increase the risk of nonunion, including diabetes mellitus, infection, and obesity. Persistent instability (<5%), deep venous thrombosis/pulmonary embolism (DVT/PE) (4.6%), arterial injury (0.3%), and medial shift of the distal fragment (3.2%) have occurred.2 In very few studies, compartment syndrome, avascular necrosis of the proximal segment, joint stiffness, and difficulty with conversion to total knee arthroplasty have been reported.16,23 The risk of patella infra is decreased with the use of an osteotomy guide, rigid fixation, and early motion.24,25 Complications of Opening Wedge High Tibial Osteotomies Potential complications of the opening wedge technique include inadequate or overcorrection of alignment, arthrofibrosis, patella infra, loss of correction over time, tibial plateau fracture, and arterial injury. The risk of peroneal nerve injury and compartment syndrome should be much less, as the lateral side is not violated. The risk of delayed union or nonunion may be higher than the closing wedge technique, as there is no compression at the osteotomy site. Bone grafting increases the likelihood of healing, but if autogenous graft is used it has its own morbidity. Few studies report the results and complications of opening wedge proximal tibial osteotomies without concomitant procedures such as ACL reconstruction, meniscal allograft, or posterolateral corner injuries. Noyes26 recently noted a 5% complication rate with staged high tibial osteotomy followed by ACL reconstruction. All of the osteotomies had autogenous iliac crest bone grafting. All of the osteotomies healed, and there were no infections, or cases of arthrofibrosis. Three percent lost correction and 3% had a delayed union, which healed with a bone stimulator. Sterett27 described his results with an opening wedge Puddu plate. Complications included delayed union, 17%; broken hardware, 12%; revision, 12%; infection, 9%; nonunion, 6%; and loss of correction, 4%. The study also reported on a distraction technique, which had complications of pin site infection, 46%; loss of correction, 6%; delayed union, 3%; and revision, 3%. Tibial Opening Wedge: Medial Instrumentation and Implants Standard plates and screws can be used for opening-wedge proximal tibial osteotomies, but osteotomy systems are available that provide specialized plates with a block (“tooth”) that sits inside the osteotomy opening, providing strength and reliable angular correction. These plates are now available in stainless steel and titanium. The titanium plate from Arthrex (Naples, FL) locks the screws to the plate for stronger fixation while maintaining a lightweight, low-profile design. The block on the plate is available in sizes from 3 to 17.5 mm in stainless steel, and 5 to 17.5 mm in titanium. The tibial plates are also available with an anterior/posterior slope built into the block. The systems use either a wedge, which, as it is inserted more deeply, increases the angle of the osteotomy, or an osteotome jack, which can be opened to the correct height and angle. Bone graft may be autologous, allogenic, or a combination of the two grafts. Autogenous cortical struts or cancellous graft can be obtained from the ipsilateral iliac crest at the time of surgery. Preshaped allograft wedges with cortical bone are available and can be easily inserted around the tines of the opening-wedge systems. Graft substitute putty with added bone morphogenic proteins can alternatively be used to fill the space and speed bone formation, but it offers no structural support. Preparation The patient is placed supine on a radiolucent table and a tourniquet is placed high on the thigh. Fluoroscopy is used to confirm that the center of the femoral head, knee, and talar dome are visible. An electrocardiogram marker is placed on the skin over the center of the femoral head and can be used as a palpable and radiographic landmark when evaluating alignment once the patient has been draped. A standard knee arthroscopy is performed to confirm isolated unicompartmental (medial) involvement. At this point the osteotomy portion is performed under tourniquet control. Authors’ Preferred Surgical Technique A 5- to 6-cm longitudinal incision is made, beginning 2 cm distal to the medial joint line, and medial to the tibial tubercle. The knee is placed in a relaxed figure-four position and blunt dissection is performed over the capsule, patellar tendon, and pes anserinus. Just distal the joint line, an incision is made sharply along the medial border of the patellar tendon through the fascia and capsule down to bone. A Z-retractor is placed deep to the patellar tendon so that its insertion into the tibial tubercle can be visualized and protected. An incision is made near the upper border of the sartorius in line with its fibers. The semitendinosis and gracilis tendons are retracted distally, exposing the medial tibia. Using fluoroscopy, a 3-mm guide pin is placed 1 to 1.5 cm distal to the joint and parallel to the joint line, from medial to lateral (maintaining the mid-anterior/posterior position) and advanced to within 1 cm of the lateral cortex (Fig. 22–1A). A guide system (Arthrex, Naples, FL) is applied to the 3-mm guide pin, and two distal pins (2.4 mm) are placed and advanced so that the cut will be just proximal to the patellar tendon enthesis (Fig. 22–1A). The guide system and the 3 mm guide pin are removed. The medial collateral ligament (MCL) is incised obliquely at the osteotomy site, and the periosteum is elevated 1 cm proximally and distally (Fig. 22–1B). A hand-held retractor is placed posteriorly to protect the neurovascular structures. The cutting guide is placed on the two distal pins and a headed, central holding pin is placed through the cannulation of the guide to fix the cutting guide. The distal pins are broken off at their serrations and an oscillating saw is used to cut the medial, anterior, and posterior cortex with fluoroscopic assistance. Osteotomes are used to finish the cut to the tip of the first guide pin, being certain to leave the lateral cortex intact. An opening wedge device is inserted to the appropriate depth (determines amount of correction) as decided during preoperative planning (Fig. 22–1C). This is performed slowly to allow for plastic deformation of the bone. Alternatively, an osteotome jack may be slowly opened to the desired wedge height. The two tines of the wedge are left in place, and the handle is removed (Fig. 22–1D). The selected plate is placed between the wedge tines to the same measurement as the opening wedge device (Fig. 22–1D). The position of the plate anterior to posterior and the selection of a straight or sloped block can affect the desired posterior slope. Alignment is checked with an alignment rod or an electrocautery cord with fluoroscopy. The weight-bearing line should cross the tibial plateau 62 to 66% of the way from medial to lateral. The plate is then secured with two 6.5-mm partially threaded cancellous screws proximally and 4.5-mm cortical screws distally (Fig. 22–1E). If the titanium plate is used, there is an additional guide to ensure the screws lock into the plate. Optiform (Exactech, Gainesville, FL) bone graft substitute is packed into the osteotomy gap. Alignment and screw placement are confirmed with fluoroscopy (Fig. 22–1F). The MCL and sartorius fibers are repaired and a Hemovac drain is placed prior to skin closure. Closing Wedge: Lateral Instrumentation and Implants Coventry’s21 original technique used one or two stepped staples placed on the lateral side to compress the osteotomy site. This implant negated the need for prolonged cast immobilization. More recently, standard AO plating techniques with compression across the osteotomy site have been utilized for secure fixation with L- or T-shaped plates. New guide systems are also available. External fixators using fine wires (Ilizarov technique) or uniplanar fixators with larger pins have also been advocated because they allow for postoperative modifications of the angular correction, but they are cumbersome for the patient and have the potential for pin loosening and pin tract infections. Surgical Technique Preparation and arthroscopy are performed the same as in the opening wedge osteotomy. A lateral L-shaped skin incision is made anterior to the fibular head. The fascia of the anterior compartment is exposed and an incision is made along the anterolateral crest of tibia, leaving a 5-mm cuff of fascia for closure, and extending into the iliotibial band in line with its fibers. The muscle is elevated off the anterolateral tibia, and the posterior iliotibial tract fibers are elevated from Gerdy’s tubercle. The peroneal nerve may be identified by palpation only or by careful dissection, but must be protected throughout the procedure. FIGURE 22–1 (A) A 3-mm guide pin is placed 1 to 1.5 cm distal to and parallel to the joint line, from medial to lateral and advanced to within 1 cm of the lateral cortex. Two distal pins (2.4 mm) are placed and advanced so that the cut will be just proximal to the patellar tendon enthesis. P, parallel guide pin; O, distal oblique pins. (B) The medial collateral ligament (MCL) is incised obliquely at the osteotomy site and the periosteum is elevated 1 cm proximally and distally. (C) An opening wedge device is inserted to the appropriate depth. (D) The two tines of the wedge are left in place, and the selected plate is placed between the wedge tines. (E) The plate is then secured with screws, and bone graft is packed into the osteotomy gap. (F) Final fluoroscopic view after correction, fixation, and bone grafting. There are several options for addressing the fibula. The proximal tibiofibular joint may be excised or disrupted, a fibular osteotomy may be performed more distally, or the fibular head may be excised. We prefer to disrupt the joint but preserve the fibular head. The proximal tibiofibular joint is exposed, and the anterior capsule is excised using a curved osteotome directed posteromedially to disrupt the articulation and mobilize the fibula. Next, the proximal tibia is exposed subperiosteally from the tibial tubercle to the posterolateral cortex for the osteotomy. A Z-shaped retractor is placed through the tibiofibular joint, directly against the posterior cortex of the tibia, to protect the posterior soft tissues and the peroneal nerve. A second Z-shaped retractor is placed underneath the lateral edge of the patellar tendon to protect the tendon from the saw blade. A laterally based wedge is removed to correspond to a predetermined wedge height using a cutting guide or by cutting between pins that are placed free hand at a set distance. Up to two thirds of the wedge is cut with an oscillating saw, and then the most medial bone is removed with a curette, rongeur, or osteotome to decrease the complication risk of intraarticular fracture. Fluoroscopy is used to confirm adequate removal of bone medially to ensure the wedge will close. The defect is closed by applying a gentle, valgus stress. The medial cortex integrity and alignment are confirmed with fluoroscopy. The compression plate (preferred) or staple fixation is completed, applying compression across the osteotomy site. A portion of the bone removed may be placed around the osteotomy site. An alignment rod or electrocautery cord along the weight-bearing line is used to confirm the final alignment. The wound is closed over a drain in layers with interrupted sutures. Other Proximal Tibial Osteotomies Dome Osteotomy The dome osteotomy of the tibia was first reported on by Jackson and Waugh.20 It is advocated for correction of large deformities, due to its main advantage of unrestricted correction. The position of the tibial tubercle in relation to the joint line is unaffected. Because most high tibial osteotomies performed for chondral lesions or meniscal deficiency do not have significant underlying varus deformities, this type of correction is rarely needed. Internal fixation is generally not required. An external fixator facilitates postoperative adjustment of alignment and early weight bearing, but runs the risk of a pin tract infection, scarring of the extensor mechanism, and intraarticular fracture, and is cumbersome to the patient. A recent study with 6-year follow-up comparing rigid internal fixation with a dome osteotomy and Ilizarov fixation reported better results for Hospital for Special Surgery scores, lower extremity alignment, and prevention of arthritis with the later technique.28 Medial Hemicallotasis Schwartsman29 has reported on the use of a circular external fixator (Ilizarov technique) with percutaneous osteotomy. He suggests that osteotomy below the tubercle decreases the likelihood of patella infera and decreased proximal tibial bone stock, both of which are believed to complicate subsequent total knee arthroplasty. This technique also allows for immediate weight bearing. A unilateral frame may also be employed. Disadvantages of this technique include large fixation devices, poor patient acceptance, pin loosening, and pin tract infection. Indications and Contraindications Varus-producing distal femoral osteotomies are indicated for situations involving symptomatic lateral gonarthrosis with or without anterior instability, lateral compartment arthralgia after meniscectomy, and valgus alignment with a concomitant cartilage restoration procedure or articular or meniscal transplant. Contraindications include inflammatory arthritides, decreased range of motion, flexion contracture, and varus instability. Patient Selection Patient selection criteria are the same as for tibial osteotomies, except that patients should have lateral pathology on physical exam, radiographic studies, and at the time of arthroscopy. Literature Review of Long-Term Results and Complications There are only a few reports on the long-term results of distal femoral osteotomy, and most are for only closing-wedge techniques. The results have generally been good. McDermott et al10 reported a 92% success rate at 4 years. Healy et al30 reported 83% good or excellent results at 4 years and stated that osteotomies for osteoarthritis performed better than for rheumatoid arthritis or patients with decreased range of motion. Edgerton et al31 reported a 71% success rate, while noting that overcorrection and undercorrection were associated with worse results and residual pain. Aglietti and Menchetti32 reported a 9-year follow-up study in which 77% of patients had a good or excellent outcome, with an average correction to 6 degrees of anatomic valgus. Terry and Cimino12 reported a series of both opening- and closing-wedge osteotomies in which the patients had a 60% decrease in pain and a 69% increase in functional activity. Most reports suggest obtaining at least neutral mechanical axis alignment. Some techniques suggest aiming for 4 degrees of mechanical axis varus. McDermott et al10 recommends a 0-degree anatomic axis (6 degrees of mechanical axis varus), but they found no difference between the final clinical result and the alignment attained. Morrey and Edgerton11 recommend a weight-bearing line that is just medial to the midportion of the tibial plateau. Staple fixation for distal femoral osteotomies has been largely abandoned because it has shown a high complication rate with up to a 25% nonunion rate, a 21% rate of fixation failure, as well as inadequate correction and subsequent decreased range of motion.31 Studies on plate fixation of the femur have shown that a locked buttress plate is stronger than a standard plate or blade plate fixation.33 With the exception of peroneal nerve injury (which has not been a reported problem), complications with rigid fixation at the femur are essentially the same as for proximal tibial osteotomies, which include delayed union or nonunion, infection, arthrofibrosis, and under- or over-correction. Conversions to total knee replacement have been acceptable after distal femoral osteotomy. McDermott et al’s10 study had one loss of fixation (4%), one pulmonary embolus (4%), and one patient with arthrofibrosis that required manipulation (4%). Matthews et al34 study of 10 knees treated with a closing-wedge osteotomy had a 57% complication rate, with 48% requiring manipulation, 19% delayed/nonunion, 10% infection, and a 5% fixation failure. Better results were seen with rigid fixation than with staple fixation. Patella infera does not appear to be a problem after distal femoral osteotomy.25 Unlike a valgus-producing osteotomy, a varus-producing osteotomy generally leads to a significant cosmetic improvement. Closing Wedge: Medial Instrumentation and Implants Medial staples, T-shaped plate and screws, a blade plate or condylar screw/plate, intramedullary nails, or external fixation can be used depending on technique. The osteotomy can be performed from either medial or lateral, with the wedge height based on the medial side. A well-known technique is cutting a medial wedge from the lateral side and applying a 95-degree blade plate from lateral, as would be done for fracture fixation. The main mechanical disadvantage of this technique is the loss of the tension band effect on the opposite site of the plate. The mechanical stress of all the varus/valgus forces and the flexion/extension forces is relying fully on the grip of the plate in the cancellous bone of the femoral condyles. A more stable construct is achieved by taking a two-thirds wedge from the medial supracondylar area, leaving the lateral cortex intact, and closing the osteotomy with a 90-degree blade plate on the medial side, creating compression and intrinsic stability. Surgical Technique The patient is positioned supine on the operating table and a tourniquet is applied. If the leg is too short, use a sterile tourniquet. The leg is prepped and draped free to allow knee movement during the procedure. A bump is placed under the knee to allow easy access to the medial side of the knee. Arthroscopy should confirm appropriate indications. An incision 10 to 15 cm long is made straight medially or anteromedially (modified total knee incision) from the medial condyle proximally. The fascia of the vastus medialis muscle is identified and incised. The muscle is elevated anteriorly. Care is taken to avoid injury to the large medial neurovascular structures. The femur is exposed and the muscle is held anteriorly with a Hohmann retractor. Blunt dissection is performed posteriorly, and another retractor is placed directly on bone to protect the neurovascular structures. Guidewires may be placed at the joint line and at the upper aspect of the trochlea to delineate the inclination of the patellofemoral joint so as to help avoid penetration of the chisel into the joint. A seating chisel is set up to the appropriate angle of correction (i.e., 80 degrees for a 10-degree correction). The insertion point is in the anterior part of the medial condyle. In the frontal plane, the chisel is running just proximal to the intercondylar notch, directed slightly downward. This direction is controlled by the flange of the seating chisel and thus is not normally parallel to the joint space. With the seating chisel in place, the wedge is cut from the femur. The first cut is made 2 to 2.5 cm proximal to the chisel with an oscillating saw. The cut is usually parallel to the chisel and should stop two thirds to three quarters of the way across the femur, leaving the lateral cortex intact. A second cut is made proximally, based on the wedge height determined from the preoperative planning. The two cuts should meet at the apex. The wedge of bone is removed with curettes or a small osteotome. The seating chisel is exchanged for a 90-degree, four-hole plate that has been contoured to fit the femur. There are usually several options for offset to ensure that the plate fits well along the femoral shaft. The lateral remaining bridge of bone is then weakened using a 2-mm drill. The osteotomy is closed and held in place with a Verbrugge clamp. The plate is fixed proximally with bicortical screws. Alignment is checked using an alignment rod or electrocautery cord and fluoroscopy. Alternatively, a 95-degree blade plate can be inserted parallel to the joint line, and the wedge is cut with the distal cut parallel to the plate and the proximal cut the predetermined height above that cut, angled to intersect the first cut two thirds to three quarters of the way across the femur. When the wedge is closed down and impacted, the joint line should be level. Opening Wedge: Lateral Instrumentation and Implants Manufacturers make specially designed T-shaped plates with a spacer block (“tooth”) to hold the position of the osteotomy and prevent a later collapse of the bone. These plates come with systems that help to ensure that the correct wedge height and angle of correction are achieved. These plates are currently available only in stainless steel, but they should be available soon as a titanium locking plate as well. The block ranges from 5 to 17.5 mm in height. Alternatively, standard AO plates, locking plates, angled blade plates, or an external fixator could be used. Authors’ Preferred Surgical Technique Preparation is the same as for a closing-wedge distal femoral osteotomy. A 6-cm longitudinal incision is made along the distal lateral femoral metaphyseal-diaphyseal region. The iliotibial band is identified and incised in line with its fibers. The vastus lateralis is retracted superior and medially. Blunt dissection posterior to the femoral shaft is performed, and a retractor is placed to protect neurovascular structures. Avoid exposure of, or injury to, the lateral collateral ligament. Under fluoroscopic guidance, a 3-mm guide pin is placed parallel to the joint line, superior to the trochlea, aiming toward the origin of the medial collateral ligament. The pin is drilled into the medial cortex. The osteotomy guide assembly (Arthrex, Naples, FL) is placed on the pin to the laser mark and the parallel guide sleeve is attached proximally. If a biplanar osteotomy is needed, the parallel guide can be adjusted for flexion or extension. Select the appropriate angle of correction based on the preoperative planning. Two 2.4-mm guide pins are individually drilled obliquely under fluoroscopic control to intersect the transverse pin 10 mm from the medial cortex of the distal femur. The pins are serrated and are shortened so that they will not hinder the process of the osteotomy. The transverse pin and guide assembly are then removed. A cutting guide is placed over the oblique pins and is secured to the femur with a headed pin. With retractors protecting structures anterior and posterior to the femur, an oscillating saw is positioned superior to the guide pins and under fluoroscopic guidance is used to cut the cortex of the lateral, anterior, and posterior femur. The osteotomy is completed with osteotomes to the apex of the guide pins. The medial cortex is not violated. The guide pins are then removed. A wedge with premarked depths to correspond with the desired wedge height and angle of correction is then carefully inserted into the osteotomy with a mallet while an assistant places gentle varus stress on the leg. Advance the wedge slowly to allow for plastic deformation. Alternatively, small drill holes may be used at the medial cortex. Confirm placement and integrity of the medial cortex with fluoroscopy. A leg alignment rod or electrocautery cord should be used to confirm that the desired amount of correction has been achieved. The T-shaped plate with an appropriate-sized block is placed and alignment is again confirmed. If the patient is very small, the opening wedge tibial plate may be used instead. The plate is fixed distally with three 6.5-mm partially threaded screws and proximally with four 4.5-mm fully threaded cortical screws. Bone graft from autologous and/or allogeneic sources is inserted into the defect anterior and posterior to the plate’s position. Struts provide structural support, which may be advantageous for femoral osteotomies. The wound is closed over a drain in layers and a sterile dressing is placed. Medial Closing Wedge Proximal Tibial Osteotomy For small corrections (less than 12 degrees) some surgeons prefer a medial closing wedge osteotomy. Chambat et al35 found that a medial closing wedge does increase joint line obliquity, but has a more positive effect in flexion than a distal femoral osteotomy, which is most efficient in decreasing lateral compartment stress in extension. External rotation of the epiphysis during a distal femoral osteotomy can correct the joint obliquity seen with distal femoral osteotomies at 90 degrees of flexion, if that is a concern. The closing-wedge medial osteotomy should not be used for large corrections, as the results have been very poor. Shoji and Insall36 showed that the tibial osteotomy results were far worse for valgus disease than varus disease. They reported that the optimal position was 5 degrees of valgus and that overcorrection was bad. Knees with >15 degrees of medial tilting (joint line obliquity) did poorly. Coventry37 described a 77% success rate, but recommended use of supracondylar femoral osteotomy for varus angulation in excess of 12 degrees or if the tilt that resulted would exceed 10 degrees. He recommended correction beyond the normal 5 to 7 degrees of anatomic valgus to a 0-degree anatomic axis. Complications include fracture of the proximal fragment, DVT, and peroneal nerve palsy. Late complications of recurrent valgus deformity due to MCL laxity and loss of initially good correction during casting occurred. Postoperative Rehabilitation Protocols Tibial and Femoral Opening-Wedge Osteotomies After surgery, the leg is placed in a locked brace in full extension. If the additional procedures require early motion, passive range of motion up to 90 degrees is started that day using a continuous passive motion (CPM) device. Quadriceps sets, isometrics, and straight leg raises are started on postoperative day 1. The patient should remain touch-down weight bearing for 4 weeks. Weight-bearing status may progress to partial weight bearing from 4 to 8 weeks. Postoperative radiographs are obtained at 8 weeks to assess the bony healing and alignment. If abundant callous is present at the osteotomy site, the patient may progress to full weight bearing. Long leg films should be obtained at 6 months to verify the final alignment. Tibial and Femoral Closing-Wedge Osteotomies Many surgeons use the same rehabilitation protocols for both closing wedge and opening wedge osteotomies. In theory, it may be safe to begin early partial weight bearing after a closing wedge osteotomy as long as the far cortex of the osteotomy remains intact. Opening-Versus Closing-Wedge Osteotomies Closing-wedge osteotomies have been the gold standard to which all osteotomy results are compared. New techniques and osteotomy guide systems have made opening-wedge osteotomies easier to perform with high accuracy. The theoretical advantages of an opening-wedge over a closing-wedge osteotomy are a single saw/osteotomy cut, a smaller incision with minimal soft tissue disruption, a higher degree of precision, maintenance of normal anatomy and bone stock, ability to adjust correction intraoperatively, and predictable correction in both the coronal and sagittal planes. With specific regard to tibial osteotomies, the avoidance of proximal tibiofemoral disruption or fibular osteotomy greatly reduces the risk of peroneal nerve injury. Also, in patients with lateral ligamentous laxity, as is often seen in patients with posterolateral corner injuries, an opening-wedge tibial osteotomy allows for physiologic surgical repair of reconstruction. Disadvantages of opening-wedge osteotomies are that the procedure requires bone grafting (which adds harvest morbidity if autograft is used), a theoretically higher risk of nonunion, and a longer period of restricted weight bearing in the initial postoperative period. FIGURE 22–2 (A) A large grade III chondral defect of the femoral trochlea. (B) A “quarter”-size grade IV defect of the medial femoral condyle. The patient is a 40-year-old, healthy, white male police officer who presented with a history of an injury to his right knee while attempting to take down a suspect. He described a twisting type injury in which his legs became entangled with the suspect’s, followed by an impact to the ground. He developed an effusion over the ensuing 24 hours. His initial treatment with physical therapy was unsuccessful. He had ongoing recurrent sharp pain in the knee, predominantly anterior and medial, which became very limiting. He had some subjective feelings of instability, with no frank giving way. He had no mechanical locking. He had pain with prolonged sitting, as well as ascending and descending stairs. He had no history of previous knee injury. Magnetic resonance imaging (MRI) showed no evidence of meniscal tear or ligamentous injury. The hyaline cartilage surfaces did not show any obvious defects. He underwent arthroscopy 3 months after his injury by the referring physician. He was reported to have a large grade III chondral defect of the femoral trochlea and a “quarter”-size grade IV defect of the medial femoral condyle (Fig. 22–2). Both of these defects were treated with a radiofrequency device. There were no meniscal tears and the cruciate ligaments were intact. Despite surgery and physical therapy, his symptoms continued and he was referred for further treatment. On physical exam, he stood 6’0” tall, weighing 205 pounds, with a level pelvis. He had apparent physiologic genu valgum, but bilateral tibial varum. His knees ranged from 0 to 135 degrees bilaterally. Patellar quadrant glide was 1.0 medially and laterally and his patella tracked normally. He had a minimal effusion. The knee was stable to varus and valgus stress testing at 0 and 30 degrees of flexion. Anterior and posterior drawer were negative at 20 and 70 degrees. He had tenderness over the anterior, medial joint line and over the medial femoral condyle. He had mild tenderness over the retropatellar surface and trochlea both medially and laterally. McMurray testing was negative. Radiographs were obtained including AP standing, PA standing, both lower extremity standing, lateral, and Merchant views. He had an anatomic axis of 2 degrees of varus bilaterally on the standing AP views. His mechanical axis angle was 6 degrees of varus. His weight-bearing line crossed the tibia at 39% of the tibial width from medial to lateral. He had a Wyberg type III patella with no frank tilt or shift. His Merchant angle was 0 degrees on the right and 6 degrees medial on the other leg. He had mild disuse osteopenia at the patellofemoral articulation, noted on the Merchant and lateral views. His Insall-Salvati ratio was 0.92 bilaterally. Operative options were reviewed with the patient. Given his ongoing discomfort it was felt to be worthwhile to reevaluate his knee arthroscopically. If he were found to have further problems with his chondral surface, the recommendation would be for cartilage biopsy for an autologous chondrocyte implantation. It was also recommended that he undergo an opening-wedge proximal tibial osteotomy to off-load his medial femoral condyle, due to his relative varus alignment. He had some mild patella baja, which was still within the range of normal, but if the proximal tibial osteotomy affected the patellar height, he may need a Fulkerson osteotomy at the time of his autologous chondrocyte implantation. If, at the time of surgery, his lateral compartment is not intact, he would not be a good candidate for either proximal tibial osteotomy or autologous chondrocyte implantation. If the medial femoral defect was not suitable for cartilage restoration, but the lateral compartment was intact, a high tibial osteotomy could still be performed, giving him a 76% chance for good shortterm success and a 63% chance for good long-term success. If he was not a candidate for osteotomy or cartilage restoration his options would be limited to continued treatment with rest, ice, elevation, antiinflammatory medication, injections of viscosupplementation or corticosteroids, and subsequent total knee arthroplasty when his symptoms did not respond to treatment.
Corrective Osteotomies Around the Knee
 Alignment
 Preoperative Planning
 Valgus-Producing Osteotomies Proximal Tibial Osteotomies
 Varus-Producing Osteotomies: Distal Femoral Osteotomies
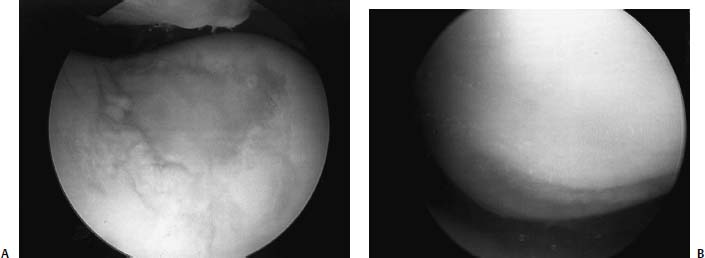
 Case Example
| Preoperative anatomic axis | 2 degrees anatomic varus | Standing anteroposterior (AP) | ||
| Preoperative mechanical axis | 6 degrees mechanical varus | Long leg standing AP | ||
| Preoperative weight-bearing line | 39% | Long leg standing AP | ||
| Radiographic magnification | 10% | All films | ||
| Tibial width at joint line | 86 mm | 77.4 mm after correction | ||
| Tibial width 2 cm distal along line of osteotomy | 70 mm | 63 mm after correction |
Preoperative Planning for Opening-Wedge Proximal Tibial Osteotomy
The information in Table 22–1 was then used to calculate the necessary angle of correction and corresponding wedge height for the opening wedge proximal tibial osteotomy using the methods described in the preoperative planning section (Table 22–2).
Based on the above calculations, a 10-degree opening-wedge proximal tibial osteotomy was to be performed to achieve a goal of 8 degrees of anatomic valgus alignment, which should place his weight-bearing line to ,62% of the distance from medial to lateral on his tibial plateau (Fig. 22–3). The rule-of-thumb method often underestimates the wedge height, as it is based on a tibial width of 56 mm. The trigonometric calculation is usually more accurate. We planned to choose between a 10- or 11-mm Arthrex osteotomy plate at the time of surgery, based on intraoperative fluoroscopic evaluation of the patient’s weight-bearing line.
The patient was taken back to surgery 7 months after his initial injury. At arthroscopy he was found to have no chondromalacic changes on the medial or lateral side of the patella. He had a 3 X 2 cm2 chondral defect of the trochlea with some fibrous repair at the base and stable surrounding edges. The medial femoral condyle defect was 2 X1.5 cm2 and down into, but not through, the deep zone with friable tissue (Fig. 22–4). The medial and lateral menisci and the cruciate ligaments were intact.
| Method | Angle Correction | Wedge Height | ||
|---|---|---|---|---|
| Coventry: | AA: θ = 8 – (-2) = 10 degrees | |||
| θ = 10 AAplan – AApre | MA: θ = 3 – (-6) = 9 degrees | |||
| θ = 10 MAplan – MApre | ||||
| WBL (Dugdale): angle | θ = 10 degrees | |||
| formed connecting center of | ||||
| femoral head, center of | ||||
| talus and center of knee | ||||
| WBL (Noyes): cut | θ = 10 degrees | |||
| radiograph at osteotomy site | ||||
| and rotate until WBL | ||||
| crosses at 62% | ||||
| WBL (Miniaci): 3 lines | θ = 10 degrees | |||
| Rule of thumb: 1 degree of | Goal: θ = 10 degrees | 10 mm | ||
| angular correction = 1 mm | ||||
| wedge height | ||||
| Trigonometric: y = xtan(·), | Goal: θ = 10 degrees | 11 mm | ||
| where y = wedge height, x = | ||||
| tibial width at 2 cm distal to | ||||
| joint line, and· = chosen | ||||
| angle of correction |
WBL, weight-bearing line; AA, anatomic axis; MA, mechanical axis.
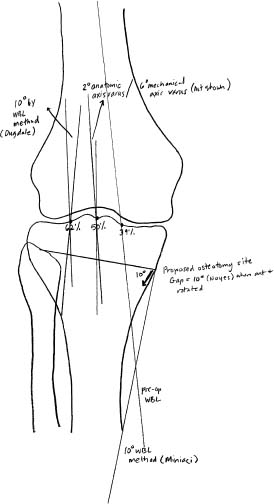
FIGURE 22–3 A 10-degree opening-wedge proximal tibial osteotomy was to be performed to achieve a goal of 8 degrees of anatomic valgus alignment, which should place the patient’s weight-bearing line to -62% of the distance from medial to lateral on his tibial plateau.
Based on these findings the patient was felt to be a candidate for autologous chondrocyte implantation. A chondral biopsy (300 mg) was taken from the medial edge of the lateral femoral condyle in the notch, and a 10-mm wedge height opening-wedge proximal tibial osteotomy was performed. Intraoperatively the alignment correction was checked with fluoroscopy to ensure the new weight-bearing line passed about 60 to 65% of the way across the tibial plateau. Optiform (Exactech, Gainesville, FL) was used for bone grafting. A femoral nerve block was used for postoperative pain control, along with oral narcotics.
Postoperatively, the patient was placed in a brace locked in extension. He started using a CPM machine that afternoon, and began quadriceps sets, isometrics, and straight leg raises the next day. He began formal physical therapy 1 week after surgery. He remained touch-down weight bearing for 4 weeks, at which time his motion was from 2 to 115 degrees of flexion. He slowly progressed to partial weight bearing over the next 4 weeks. At 8 weeks, his motion had improved to 2 to 130 degrees of flexion and his radiographs showed interval healing of his osteotomy. He was allowed to be weight bearing as tolerated, and he returned to light duty work. At 12 weeks, he had regained full motion and had healed his osteotomy. Repeat radiographs at 5 months showed his anatomic axis to be 8 degrees of valgus, his mechanical axis was 5 degrees of valgus, his weight-bearing line crossed at 66%, and his patellar height was unchanged from his preoperative measurements (Fig. 22–5). He recently underwent autologous chondrocyte implantation for the trochlear and medial femoral condylar lesions, 1 year from his initial injury, and is progressing well.
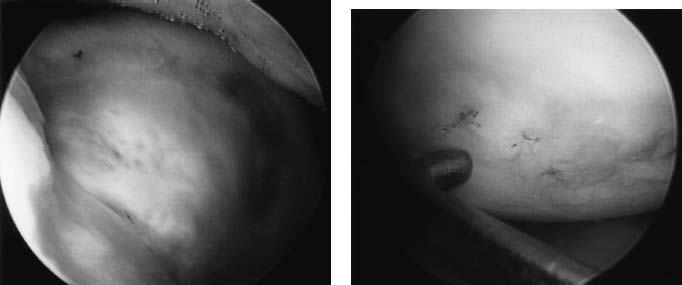
FIGURE 22–4 (A) On repeat arthroscopy, there was a 3 x 2 cm2 chondral defect of the trochlea with fibrous repair at the base and stable surrounding edges. (B) The medial femoral condyle defect was 2 x 1.5 cm2 and filled with friable tissue.

FIGURE 22–5 (A) Preoperative radiograph. (B) Postoperative radiograph at 5 months showing that the patient’s anatomic axis was 8 degrees of valgus, his mechanical axis was 5 degrees of valgus, and his weight-bearing line crossed at 66%.
REFERENCES
1. Tetsworth K, Paley D. Malalignment and degenerative arthropathy. Orthop Clin North Am 1994;25:367–377
2. Adamson GJ, Tibone JE. Results and complications of high tibial osteotomy for varus gonarthrosis: a review of the literature. (Unpublished meta-analysis)
3. Font-Rodriguez DE, Scuderi GR, Insall JN. Survivorship of cemented total knee arthroplasty. Clin Orthop 1997;345:79–86
4. Berman AT, Bosacco SJ, Lorsjmer S, et al. Factors influencing long-term results in high tibial osteotomy. Clin Orthop 1991;272: 192–198
5. Aglietti P, Rinonapoli E, Stringa G, Taviani A. Tibial osteotomy for the varus osteoarthritic knee. Clin Orthop 1983;176:239–251
6. Coventry MB, Ilstrup DM, Wallrichs SL. Proximal tibial osteotomy: a critical long term study of eighty-seven cases. J Bone Joint Surg Am 1993;75:196–201
7. Brown GA, Amendola A. Radiographic evaluation and preoperative planning for high tibial osteotomies. Op Tech Sports Med 2000;18:2–14
8. Muller W, Kentsch A, Schafer N. The elastic high tibia valgus osteotomy in the varus deformity. Op Tech Sports Med 2000;18: 19–26
9. Dugdale TW, Noyes FR, Styer D. Preoperative planning for high tibial osteotomy: the effect of lateral tibiofemoral separation and tibiofemoral length. Clin Orthop 1992;274:248–264
10. McDermott AG, Finklestein JA, Farine I, et al. Distal femoral varus osteotomy for valgus deformity of the knee. J Bone Joint Surg 1988;70A:110–116
11. Morrey BF, Edgerton BC. Distal femoral osteotomy for lateral gonarthrosis. Instr Course Lect 1992;41:77–85
12. Terry GC, Cimino PM. Distal femoral osteotomy for valgus deformity of the knee. Orthopedics 1992;15:1283–1290
13. Phillips MJ, Krackow KA. Distal femoral varus osteotomy: indications and surgical technique. Instr Course Lect 1999;48:125–129
14. Miniaci A, Ballmer FT, Ballmer PM, Jakob RP. Proximal tibial osteotomy: a new fixation device. Clin Orthop 1989;246:250–259
15. Bauer GC, Insall J, Koshino T. Tibial osteotomy in gonarthrosis. J Bone Joint Surg 1969;51A:1545–1563
16. Hanssen AD. Osteotomy about the knee: American perspective. In: Insall JN, Scott WN, ed. Surgery of the Knee, 3rd ed. Philadelphia: Churchill Livingstone, 2001:1447–1464
17. Coventry MB. Proximal tibial varus osteotomy for osteoarthritis of the lateral compartment of the knee. J Bone Joint Surg 1987;69A: 32–38
18. Coventry MB. Upper tibial osteotomy for gonarthrosis. The evolution of the operation in the last 18 years and long-term results. Orthop Clin North Am 1979;10:191–210
19. Wardle E. Osteotomy of the tibia and fibula. Surg Gynecol Obstet 1962;126:61–64
20. Jackson JP, Waugh W. Tibial osteotomy for osteoarthritis of the knee. J Bone Joint Surg 1961;43B:746–751
21. Coventry MB. Osteotomy of the upper portion of the tibia for degenerative arthritis of the knee. J Bone Joint Surg 1965;47A: 984–990
22. Kirgis A, Albrecht S. Palsy of the deep peroneal nerve after proximal tibial osteotomy. An anatomical study. J Bone Joint Surg 1992;74A:1180–1185
23. Phillips MJ, Krackow KA. High tibial osteotomy and distal femoral osteotomy for valgus and varus deformity around the knee. Instr Course Lect 1998;47:429–436
24. Billings A, Scott DF, Camargo MP, Hofmann AA. High tibial osteotomy with a calibrated osteotomy guide, rigid internal fixation and early motion. Long-term follow-up. J Bone Joint Surg Am 2000;82A:70–79
25. Closkey RF, Windsor RE. Alterations in patella after high tibial or distal femoral osteotomy. Clin Orthop 2001;389:51–56
26. Noyes FR. Cruciate reconstruction and osteotomy. Presented at the American Orthopaedic Society for Sports Medicine Specialty Day, San Francisco, CA. 2004
27. Sterett WI. Posterior tibial slope following medial opening wedge proximal tibial osteotomy for varus arthrosis of the knee. Annual Meeting, American Orthopaedics Society for Sports Medicine, San Diego, CA, 2003
28. Sen C, Kacaoglu M, Eralp L. The advantages of circular external fixation used in high tibial osteotomy. Knee Surg Sports Traumatol Arthrosc 2003;11:139–144
29. Schwartsman V. Circular external fixation in high tibial osteotomy. Instr Course Lect 1995;44:469–474
30. Healy WL, Anglen JO, Wasilewski SA, Krackow KA. Distal femoral varus osteotomy. J Bone Joint Surg Am 1988;70A:102–109
31. Edgerton BC, Mariani EM, Morrey BF. Distal femoral varus osteotomy for painful genu valgum. A 5–11 year follow-up study. Clin Orthop 1993;288:263–269
32. Aglietti P, Menchetti PP. Distal femoral varus osteotomy in the valgus osteoarthritic knee. Am J Knee Surg 2000;13:89–95
33. Koval KJ, Hoehl JJ, Kummer FJ, Simon JA. Distal femoral fixation: a biomechanical comparison of the standard condylar buttress plate, a locked buttress plate, and the 95-degree blade plate. J Orthop Trauma 1997;11:521–524
34. Mathews J, Cobb AG, Richardson S, Bentley G. Distal femoral osteotomy for lateral compartment osteoarthritis of the knee. Orthopedics 1998;21:437–440
35. Chambat P, Selmi T, Dejour D, Denoyers J. Varus tibial osteotomy. Op Tech Sports Med 2000;8:44–47
36. Shoji H, Insall J. High tibial osteotomy for osteoarthritis of the knee with valgus deformity. J Bone Joint Surg 1973;55A: 963–973
37. Coventry MB. Proximal tibial varus osteotomy for osteoarthritis of the lateral compartment of the knee. J Bone Joint Surg 1987;69A: 32–38
< div class='tao-gold-member'>


